background image

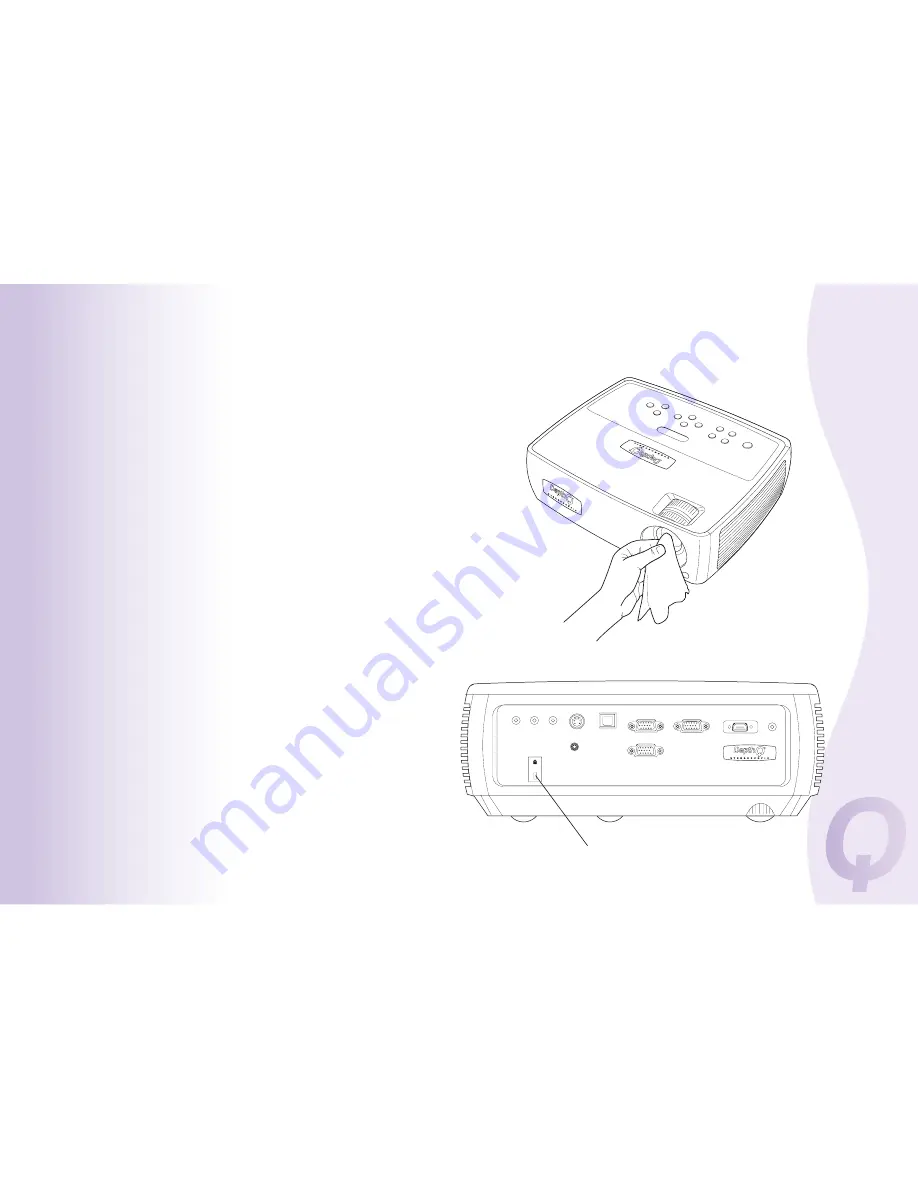
security lock

35

The projector has a security lock for use with a PC Guardian Cable Lock 
System.  Refer to the information that came with the lock for instructions 
on how to use it. 

Using the Security Lock

Lightly wipe the cleaning cloth over the lens in a circular motion.

2

Avoid using an excessive amount of cleaner, and don’t apply the 
cleaner directly to the lens.  Abrasive cleaners, solvents or other 
harsh chemicals might scratch the lens.   

Apply a non-abrasive camera lens cleaner to a soft, dry cloth.

1

Cleaning the Lens

Maintenance

Содержание DepthQ -WXGA

Страница 1: ...A p r o d u c t o f L i g h t s p e e d D e s i g n I n c c o d e v e l o p e d w i t h I n Fo c u s C o r p H I G H D E F I N I T I O N 3 D V I D E O P R O J E C T O R DepthQ WXGA...

Страница 2: ...ceiver Connect the equipment into an outlet on a circuit different from that to which the receiver is connected Consult the dealer or an experienced radio TV technician for help Changes or modificatio...

Страница 3: ...te the projector in a well ventilated area without any obstructions to intake or exhaust vents Do not place the projector on any soft covering that may block the vents Place the projector in a horizon...

Страница 4: ...at www depthq com accessories html as well as at the InFocus store at http store infocus com stores or from your dealer Accessories To read the latest specifications on your projector be sure to visi...

Страница 5: ...ifications and commands are on our website www depthq com support html A 5 volt DC output see below USB to provide mouse control used with an optional remote control only Audio out to provide sound fo...

Страница 6: ...Position the projector the desired distance from the screen The distance from the lens of the projector to the screen the zoom setting and the video format as well as the focus to a small extent deter...

Страница 7: ...le should help you find the connectors to use and obtain the best resolution possible from your input devices such as computers standard VCRs DVD players progressive and interlaced HDTV sources 1080i...

Страница 8: ...r progressive i e HDTV sources See page 8 Composite video connection on page 14 S video connection on page 14 Video 2 or Video 1 Composite video or S video NTSC PAL and SECAM formats Standard 2D Broad...

Страница 9: ...z Refresh VESA connection on page 14 Component video connection on page 14 Computer 1 or Computer 2 Computer 1 or Computer 2 via optional VESA to Component adapter VGA Component video 1080i 720P Compo...

Страница 10: ...he Audio In Computer connector on the projector You may also need an adapter Optional Computer Connections NOTE Always use the power cord that shipped with the projector Connect the black power cord t...

Страница 11: ...or above the screen Use whichever method works best No start up screen Get help on page 16 The Power light on the Status Indicator Panel page 15 blinks green and the fans start to run When the lamp co...

Страница 12: ...rojector is connected Usually a key combination like FN F8 or CRT LCD key turns the external display on and off Locate a function key labeled CRT LCD or a function key with a monitor symbol Press FN a...

Страница 13: ...the image If the image is still wider or narrower on the top or bottom edge of the screen press the top Keystone button to reduce the upper part of the image or press the bottom Keystone button to re...

Страница 14: ...movies are 16 9 What is Aspect Ratio Before connecting your projector you should decide which aspect ratio you want to use The projector s Aspect Ratio setting is accessed through the Resize button on...

Страница 15: ...connector plug an S video cable into the S video connector on your video device and into the Video 1 connector on the projector Use the audio cable as described above Keep in mind that S video delive...

Страница 16: ...es the state of the projector and can help you troubleshoot If your image appears correctly on the screen skip to the next section If it does not troubleshoot the setup Troubleshooting Your Setup To t...

Страница 17: ...external port restart laptop if necessary FN key monitor key or LCD CRT key A only start up screen appears Startup Screen Startup Screen correct image plug power cord into the projector press power bu...

Страница 18: ...ackground appears not the Desktop icons A A computer image projected A A press the Auto Image button on keypad to re sync adjust computer refresh rate in Control Panel Display Settings Advanced Adapte...

Страница 19: ...enu image not centered on screen image clear and not cropped A set your computer s display resolution to 1280x720 the native resolution of the projector Start Settings Control Panel Display Settings t...

Страница 20: ...Basic Picture Aspect ratio menu image does not fit 4 3 or 16 9 screen correct image adjust Sharpness in the Basic Picture menu image not sharp s not fit 4 3 or 16 9 screen sharp square image adjust K...

Страница 21: ...in the Basic Picture menu projected colors don t match source COLOR COLOR correct image A B turn off Rear Project in Setup menu image reversed left to right A correct image A B turn off Ceiling Mount...

Страница 22: ...ync malfunctioning the projected image jumps between only left eye and only right eye every few seconds while viewing through LC shutter glasses correct image COLOR Press the Menu button If the colors...

Страница 23: ...l for one minute lamp won t turn on Temperature light is on Temperature light A A B Embedded video plays correctly turn off the internal LCD display on your laptop FN key monitor key or LCD CRT key Th...

Страница 24: ...ay be purchased from Lightspeed Design Inc or your dealer When sending the projector in for repair we recommend shipping the unit in its original packing material or having a professional packaging co...

Страница 25: ...also has a Source button to switch between sources Press the remote s Menu button to open the projector s menu system Use the arrow buttons to navigate and the Select button to select features and adj...

Страница 26: ...playback has not been paused Adjust the audio source Make sure that you are connected to an audio out connector on the source as opposed to a line in or microphone connector Make sure the correct sour...

Страница 27: ...the menus page 29 Menu opens the on screen menus page 29 Keystone adjusts squareness of the image page 12 Presets cycles through the available preset settings page 30 Auto Image resets the projector...

Страница 28: ...overview details are found in the menu section Presentation Features Once you have optimized the image for a particular source you can save the settings using Presets This allows you to quickly recal...

Страница 29: ...cks first for active video during power up For rear projection turn Rear Project on in the Setup menu For ceiling mounted projection turn on Ceiling Mount in the Setup menu You can customize the proje...

Страница 30: ...light it press Select then use the up and down arrow buttons to adjust the value or select an option or turn the feature on or off Press Select to confirm your changes Use the arrows to navigate to an...

Страница 31: ...o to have the projector choose the ratio Choose Native to see the unmodified input with no resizing by the projector Aspect Ratio Aspect ratio is the ratio of the image width to image height TV screen...

Страница 32: ...Auto then choose RGB for computer sources choose either REC709 or REC601 for component video sources Tracking adjusts the vertical scan of a computer source Sync Threshold progressive signals only If...

Страница 33: ...red on and off Lamp Low Power toggles between on and off Turn it on to lower the light output of the lamp This also lowers the fan speed making the projector quieter Screen Save Time automatically bla...

Страница 34: ...ance slides Menu Transparency allows you to change how much of the projected image behind the menu you can see As the value increases more of the image behind the menu is visible Menu Offset allows yo...

Страница 35: ...g the Select button Verify the new PIN To change the PIN Power up the projector The Enter PIN dialog box appears after the startup screen Enter the PIN Use the navigation buttons on the remote or keyp...

Страница 36: ...ow to use it Using the Security Lock Lightly wipe the cleaning cloth over the lens in a circular motion 2 Avoid using an excessive amount of cleaner and don t apply the cleaner directly to the lens Ab...

Страница 37: ...sliding the door forward and c lifting the door off 3 Wait 60 minutes to allow the projector to cool thoroughly 2 Turn off the projector and unplug the power cord 1 NOTE You can order new lamps from...

Страница 38: ...t remove the 3rd screw on the other side of the module If there is not a perforated hole above the 3rd screw use a flat blade screwdriver to lift the shield enough to gain access to the screw and care...

Страница 39: ...n is turned OFF in the stereo operation is turned OFF in the associated nVidia driver You must navigate to the stereo enable option and set it to ON in order to view realtime associated nVidia driver...

Страница 40: ...device 13 connector panel 4 connectors on projector 6 7 8 9 contacting Lightspeed Design 23 Contrast 30 Custom key 27 32 customer service contact information 23 customizing the projector 28 D DVDs 30...

Страница 41: ...ositioning 5 reset 34 safety considerations 2 security lock 35 setting up 5 shutting down 15 Status Indicator Panel 15 troubleshooting problems 15 23 R rear projection 33 reliability 3 remote control...

Страница 42: ...ite 112 Bellevue WA 98004 USA 206 784 1385 www depthq com D E S I G N 40 V Vertical 31 VESA connection 7 8 9 14 video devices connecting 7 8 9 14 video optimizing 28 Video Standard 32 Volume button 25...

Отзывы: