Liftket LSF 200/1-15 Скачать руководство пользователя страница 14


14


6.2 

Replacement of the wire rope 


6.2.1 

Replacement of the wire rope at the hook tackle 
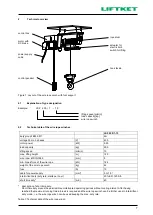


wire rope 
 
suspension plate 


wedge 
 
 
hook mounting 

 
Figure 8: View of the hook tackle (dismantled) 
 
Assembly instructions: 

  Screw off the suspension plate for wire rope. 

  Screw off hook mounting. 

  Punch out the wedge and pull out the wire rope. 

 
The assembly of the new wire rope should be done in the inverted order. 
After assembly the tight fit of the wire rope has to be checked. 


6.2.2 

Replacement of the wire rope at the drum 


The standard length of the wire rope is 81.5 m and the diameter of it 5 mm. The drum therefore is designed for 5 
layers of wire rope. 


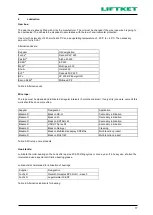
Figure 9: Replacement of the wire rope at the drum 
 
Assembly instructions: 

  Release the wire rope by pressing the down button. 

  Dismantle the shaft cover. 

  Swivel the drum until the rope suspension plate is visible behind its window. 

  Disconnect power. 

  Loosen the two rope suspension plate screws. 

  Pull out the old rope. 

  Fit the new rope through the hole in the drum underneath the rope suspension plate. 

  Tighten the two screws in parallel. 

  Assemble the shaft cover. 

  Reconnect power. 

  Move the rope up properly and tightly. (Use safety gloves!)  

Ensure that the direction of motion is correct!


shaft cover 


window of the 

end plate 


suspension plate 


wire rope drum 


wire rope 

Содержание LSF 200/1-15

Страница 1: ...rating Instructions Wire rope winch Type LSF 200 1 15 Please do not use the electric chain hoist before all operators have carefully read and understood this manual and signed the form on the rear cov...

Страница 2: ...2 LIFTKET Hoffmann GmbH Dresdener Stra e 66 68 04808 Wurzen Germany 49 3425 89 24 0 49 3425 89 24 99 sales liftket de www liftket de Ho 08 2017 englisch Original operating instructions 2017...

Страница 3: ...0 4 3 1 Layout 10 4 3 2 Adjustment of the electric limit switch 11 4 3 3 Hazardous operations 11 5 Directions and prohibitions for use 12 5 1 Directions for use 12 5 2 Prohibitions of use 12 6 Mainten...

Страница 4: ...4...

Страница 5: ...ecessarily cover all situations If you are in any doubt please contact your dealer This manual will tell you how to operate the wire rope winch and how to handle its suspension or its loads safely It...

Страница 6: ...hoisting and travelling motors FEM 9 751 1998 Series lifting equipment Power driven series hoist mechanisms Safety FEM 9 755 1993 Serial hoist units Measures for achieving safe working periods DIN 15...

Страница 7: ...of the wire rope winch kg 42 fuse A 10 cable for power supply mm 5 G 1 5 intermittent duty duty rate starts per hour 40 ED 120 S h short time duty min 40 description of short time duty Short time dut...

Страница 8: ...d Check that the rope winds properly onto the drum on initial use If the rope winds onto one side of the drum only please check if the winch is fitted absolutely horizontally In case of loose rope the...

Страница 9: ...required Caution The wall surface must be horizontal Test Check the correct assembly according to point 3 1 4 Electrical connections After installation check that it has been done in accordance with t...

Страница 10: ...or the mains connection are located in the separate control box A cable 4G1 5 minimum cross section 1 5 mm is necessary for the mains connection After connecting press button for lifting If the load m...

Страница 11: ...he highest hook position is reached in this case the limit switch won t work anymore and this could cause a rope or winch casing to break and the load to be dropped Further operation of the wire rope...

Страница 12: ...visible all the times for the operator and if more than one person is involved in the operation they must be able to communicate with each other at all times If the hoist is not in use the load must...

Страница 13: ...qualified specialist personnel or the manufacturer s after sales service personnel If the hoist is in heavy use two or three shifts high percentage of work with nominal load dusty or high temperature...

Страница 14: ...81 5 m and the diameter of it 5 mm The drum therefore is designed for 5 layers of wire rope Figure 9 Replacement of the wire rope at the drum Assembly instructions Release the wire rope by pressing t...

Страница 15: ...C disk brake The brake is supplied by a rectifier circuit which is located in the control box It operates according to the fail safe principle If there is a power failure the brake acts automatically...

Страница 16: ...r by use of the hexagon screws 3x M5 5 Tighten the screws with equivalent torque of 5 5 Nm Assembly of the hub onto the shaft Assembly of the DC disk brake on the gear cover Tightening by a torque wre...

Страница 17: ...lar intervals 3 months minimum if very dirty concrete cement this work should be done more often Supplier Designation Application Elaskon Elaskon SK H Secondary lubrication Elaskon Elaskon 30 Secondar...

Страница 18: ...components have reached the end of the S W P the wire rope winch or its components have to be overhauled or to be taken finally out of operation The parts have to be disposed in accordance to the law...

Страница 19: ...19...

Страница 20: ...rther information for other fields of operation are not considered herewith If changes to the normal operations are discovered such as unusual noise vibrations higher input current or frequently blowi...

Отзывы: