background image

6

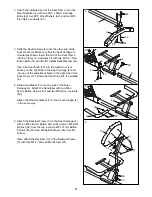
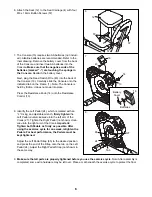
6. Attach the Seat (12) to the Seat Carriage (4) with four

M6 x 16mm Button Screws (57).

8. Identify the Left Pedal (24), which is marked with an

“L.” Using an adjustable wrench, firmly tighten the
Left Pedal 

counterclockwise into the left arm of the

Crank (27). Tighten the Right Pedal (not shown) 

clock-

wise into the right arm of the Crank. Important:
Tighten both Pedals as firmly as possible. After
using the exercise cycle for one week, retighten the
Pedals. For best performance, the Pedals must be
kept tightened.

Adjust the Left Pedal Strap (65) to the desired position
and press the end of the Strap onto the tab on the Left
Pedal (24). Adjust the Right Pedal Strap (not shown) in
the same way.

27

24

Tab

65

8

7. The Console (16) requires two AA batteries (not includ-

ed). Alkaline batteries are recommended. Refer to the
inset drawing. Remove the battery cover from the back
of the Console, and insert two AA batteries into the
Console. Make sure that the negative ends of the
batteries (marked “–”) are touching the springs in
the Console. 
Reattach the battery cover.

Next, plug the Reed Switch Wire (43) into the back of
the Console (16). Carefully slide the Console onto the
indicated tab on the Frame (1). Note: The Console is
held by friction; it does not snap into place.

Press the Resistance Knob (14) onto the Resistance
Control (13).

1

43

14

13

16

7

6

12

57

57

57

4

9. Make sure that all parts are properly tightened before you use the exercise cycle. Note: After assembly is

completed, some extra hardware may be left over. Place a mat beneath the exercise cycle to protect the floor. 

16

Batteries

Battery

Cover

Содержание 831.288720

Страница 1: ...all precautions and instruc tions in this manual before using this equipment Keep this manual for future reference Serial Number Decal Model No 831 288720 Serial No SEARS ROEBUCK AND CO HOFFMAN ESTAT...

Страница 2: ...Keep children under the age of 12 and pets away from the exercise cycle at all times 7 Wear appropriate clothing when exercising do not wear loose clothing that could become caught on the exercise cy...

Страница 3: ...holidays To help us assist you please note the prod uct model number and serial number before calling The model number is 831 288720 The serial number can be found on a decal attached to the exercise...

Страница 4: ...s may have been pre attached If a part is not in the parts bag check to see if it has been pre attached M10 Zinc Washer 62 2 M10 x 85mm Carriage Bolt 48 2 M10 Black Nylon Locknut 50 2 M10 Zinc Nylon L...

Страница 5: ...onto one side of the Seat Carriage 4 Attach the Handlebar with two M6 x 34mm Button Screws 52 and two M6 Nylon Locknuts 53 Attach the other Handlebar 7 to the Seat Carriage 4 in the same way 4 53 52...

Страница 6: ...b 65 8 7 The Console 16 requires two AA batteries not includ ed Alkaline batteries are recommended Refer to the inset drawing Remove the battery cover from the back of the Console and insert two AA ba...

Страница 7: ...se Important Stop turning the knob when turning becomes difficult or damage may result BATTERY INSTALLATION Before the console can be operated two AA batteries must be installed Refer to step 7 on pag...

Страница 8: ...nds the console will then be ready for use 2 Select one of the five modes Scan mode When the power is turned on the scan mode will auto matically be selected One mode indicator will show that the scan...

Страница 9: ...prolonged periods of time This increases the demand on the heart to pump blood to the muscles and on the lungs to oxygenate the blood For aerobic exercise adjust the intensity of your exercise until...

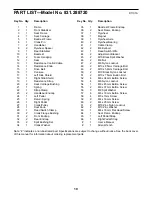
Страница 10: ...2 Flywheel Bearing 41 1 Cable Clamp 42 2 M6 Eyebolt 43 1 Reed Switch Wire 44 2 Adjustment Bracket 45 2 M10 Black Split Washer 46 2 M6 Nut 47 2 M8 Nylon Locknut 48 2 M10 x 85mm Carriage Bolt 49 2 M10...

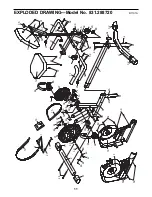
Страница 11: ...48 19 13 25 41 21 16 15 46 44 42 47 8 40 59 43 29 6 26 38 63 22 33 30 14 13 27 12 57 57 11 11 23 23 3 7 7 53 20 20 28 4 58 58 58 55 56 36 49 36 53 52 52 57 57 54 56 64 32 32 9 61 33 30 34 62 62 45 45...

Страница 12: ...sted at the left When requesting help or service or ordering parts please be prepared to provide the following information The MODEL NUMBER of the product 831 288720 The NAME of the product LIFESTYLER...

Отзывы: