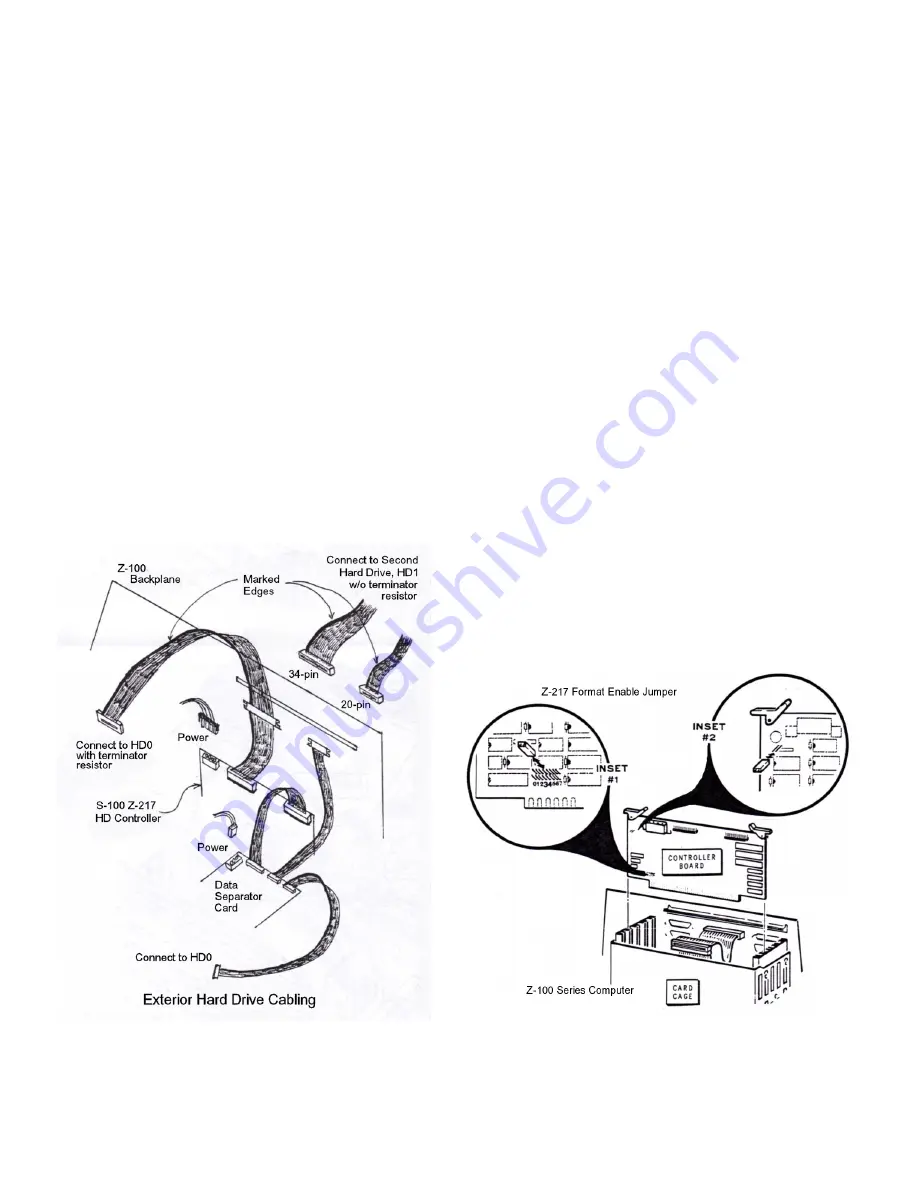
[ ] A 34-conductor cable goes from the Data
Separator Board to the right 34-pin connector on
the Z-217 Controller Board in the card cage. At
both ends, the marked edge of the cable is
positioned toward the power supply connector.
[ ] A 20-conductor cable goes from either 20-
pin connector on the Data Separator Board to the
20-pin edge connector at the rear of the hard
drive. At both ends, the marked edge of the
cable is positioned toward the power supply.
[ ] The last 34-conductor cable goes from the
left 34-pin connector on the Z-217 Controller
Board in the Card Cage to the 34-pin edge
connector at the rear of the hard drive. At both
ends, the marked edge of the cable is positioned
toward the power supply.
[ ] Connect the large 4-pin power supply
connector to the Z-217 Winchester Controller
Board.
[ ] Connect the 3-pin power supply connector
to the Data Separator Board.
[ ] Connect the smaller 4-pin power supply
drive connector to the hard drive. The Mini-
scribe Model 2012 is perfect for the Z-100
because of the extended pigtail drive connector.
Drives from other manufacturers just have a
connector on the rear of the drive. Still
usable, but less convenient.
Figure 12.
Exterior Hard Drive Cabling
Figure 12 shows the suggested cabling for adding
a second, external hard drive. Note the position
of the backplane connectors allows the addition
of the drive without disturbing the internal
drive's position as last on the cable. This
interior drive therefore keeps the terminal
resistor whether the external drive is connected
or not! Do not use a terminal resistor in the
external hard drive.
[ ] Reassemble the computer using the assembly
instructions in the Users' Manual. Do not yet
install the cover, as some low level programming
of the hard drive is required and discussed
next.
SOFTWARE PROGRAMMING:
As mentioned earlier, before you can use your
newly installed hard drive, the drive must be
low-level formatted using the PREP utility, then
partitioned using the PART utility, and then
each partition formatted using FORMAT.
The PREP and PART utilities were available on a
disk entitled 'Winchester Utilities Disk',
distributed separately from the earlier MS-DOS
versions. Instructions are available on disk
from the Z-100 LifeLine Library.
The actual procedures to run PREP are beyond the
scope of this article. However, before running
PREP, a Format Enable Jumper must be reposi-
tioned on the Z-217 Winchester Controller Board.
Note
: The Format Enable Jumper provides protec-
tion against the complete, unintentional erasure
of your hard drive, so once you have completed
PREP, make sure you reposition the jumper to its
harmless storage position.
Figure 13.
Format Enable Jumper
11


