Life Gear 93385 Скачать руководство пользователя страница 18


17

MAINTENANCE 

 
Cleaning 

The elliptical trainer can be cleaned with a soft cloth and mild detergent.    Do not use 
abrasives or solvents on plastic parts.    Please wipe your perspiration off the elliptical trainer 
after each use.    Be careful not get excessive moisture on the computer display panel as this 
might cause an electrical hazard or electronics to fail. 
Please keep the elliptical trainer, specially, the computer console, out of direct sunlight to 
prevent screen damage.     
Please inspect all assembly bolts and pedals on the machine for proper tightness every 
week.


Storage 

Store the elliptical trainer in a clean and dry environment away from children.     


TROUBLESHOOTING 


PROBLEM SOLUTION 

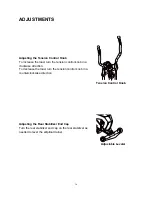
The elliptical trainer wobbles when in use.


Turn the adjustable leveler on the rear 
stabilizer as needed to level the elliptical 
trainer.  

There is no display on the computer 
console. 

1.  Remove the computer console and verify 

the wires that come from the computer 
console are properly connected to the 
wires that come from the front post. 

2.  Check if the batteries are correctly 

positioned and battery springs are in 
proper contact with batteries. 

3.  The batteries in the computer console may 

be dead.    Change to new batteries.


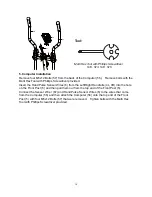
There is no heart rate reading or heart rate 
reading or is erratic / inconsistent. 


1.  Make sure that the wire connections for 

the hand pulse sensors are secure. 

2.  To ensure the pulse readout is more 

precise, please always hold on to the 
handlebar grip sensors with two hands 
instead of just with one hand only when 
you try to test your heart rate figures. 

3.  Gripping the hand pulse sensors too tight. 

Try to maintain moderate pressure while 
holding onto the hand pulse sensors. 

The elliptical trainer makes a squeaking 
noise when in use. 

The bolts may be loose on the elliptical trainer,
please inspect the bolts and tighten the loose 
bolts.  

Содержание 93385

Страница 1: ...385 OWNER S MANUAL IMPORTANT Read all instructions carefully before using this product Retain this owner s manual for future reference The specifications of this product may vary from this photo subject to change without notice 2012 March ...

Страница 2: ... 2 IMPORTANT SAFETY INSTRUCTIONS 3 PARTS LIST 4 HARDWARE PACKING LIST 6 TOOLS 7 OVERVIEW DRAWING 8 ASSEMBLY INSTRUCTIONS 9 OPERATING THE COMPUTER 15 ADJUSTMENTS 16 MAINTENANCE 17 TROUBLESHOOTING 17 WARM UP AND COOL DOWN ROUTINE 18 ...

Страница 3: ...r repairing free of charge any parts which may prove to be defective under normal home use This warranty does not include any damage caused by improper operation misuse or commercial application From the date of purchase the frame is warranted to be free from defects for 1 one year This warranty is offered only to the original owner and is not transferable Proof of purchase is required When orderi...

Страница 4: ... on the pedal and stride over the main frame then step on the other pedal When using please hold the handlebar by hands make the pedals running smoothly by push or pull handlebars then run the equipment regularly by cooperation of hands and feet After exercise please also make one pedal at the lowest position and leave your foot on the higher pedal first and then another 7 Do not use the equipment...

Страница 5: ...izer Ø50x1 5x480 1 038 Front Stabilizer End Cap Ø50 2 012 Bolt M10x57 4 039 Bolt M6x48 2 013 Rear Stabilizer End Cap Ø50x1 5 2 040 Transport Wheel Ø23xØ6x32 2 014 Big Curve Washer Ø10xØ25x2 4 041 Bolt M8x16 6 015 Cap Nut M10 4 042 Big Curve Washer Ø20xØ8x1 5 6 016L Bolt for left U Shape Bracket 1 2 1 043 Bolt M10x18 2 016R Bolt for right U Shape Bracket 1 2 1 044 Spring Washer Ø18xØ10 5x3 2 017L L...

Страница 6: ...Bolt M8x30 1 064 Curve Washer for Tension Control Knob Ø20xØ5 2 1 085 Eyebolt M6x36 2 065 Bolt for Tension Control Knob M5x45 1 086 U Bracket 2 066 Phillips Self Tapping Screw ST4 2x25 6 087 Spring Washer Ø6xØ11 2x2 2 067 Sensor Wire I L 1100 1 088 Nut M6 2 068 Sensor Wire II L 1600 1 089 Bolt M8x10 1 069 Cover Cap Ø40xØ25x10 2 090 Right Decorative Cover Ø50 1 070 Left Cover 538x374x79 1 091 Left ...

Страница 7: ...8 Curve Washer Ø6xØ12x1 4 PCS 49 Cap S16 2 PCS 50 Cap Nut M6 4 PCS 60 Phillips Self Tapping Screw ST4 2x20 4 PCS 62 Screw ST2 9x12 8 PCS 16R Bolt for right U Shape Bracket 1 2 1 PC 17R Right Nylon Nut 1 2 1 PC 18 Wave Washer Ø28xØ17x0 3 1 PC 20 Spring Washer Ø13xØ20x2 1 PC 16L Bolt for left U Shape Bracket 1 2 1 PC 17L Left Nylon Nut 1 2 1 PC 18 Wave Washer Ø28xØ17x0 3 1 PC 20 Spring Washer Ø13xØ2...

Страница 8: ...7 TOOLS Allen Wrench S6 1 PC Allen Wrench S8 1 PC Multi Hex Tool 1 PC Multi Hex Tool with Phillips Screwdriver S10 S13 S14 S15 1 PC ...

Страница 9: ...14 15 16L 18 19 23 25 24 26 31 14 15 17L 20 19 2R 19 29 37 71 16R 19 18 23 25 24 20 17R 27 28 31 26 45 50 48 19 19 81 80 80 82 79 88 86 87 85 32 27 28 50 48 8 83 75 78 73 22 72 73 72 74 7 28 34 35 21 77 84 89 66 66 92 14 15 14 15 48 76 22 41 42 66 32 38 88 86 87 85 93L 93R 93L 93R 94L 33R 94R 66 32 66 91 90 69 69 32 55 55 55 57 52 52 68 9 92 92 92 33L 58 63 58 63 60 60 60 60 62 62 6 53 53 6 ...

Страница 10: ...10 Cap Nuts 15 Tighten cap nuts with the Multi Hex Tool provided Position the Rear Stabilizer 11 behind the Main Frame 1 and align bolt holes Attach the Rear Stabilizer 11 onto the rear curve of the Main Frame 1 with two M10x57 Bolts 12 two Ø10xØ25x2 Big Curve Washers 14 and two M10 Cap Nuts 15 Tighten cap nuts with the Multi Hex Tool provided Hardware Multi Hex Tool Tool 12 11 14 15 14 15 14 14 1...

Страница 11: ...d Remove the Ø20xØ5 2 Curve Washer for Tension Control Knob 64 and M5x45 Bolt for Tension Control Knob 65 from the Tension Control Knob 54 Remove bolt and curve washer with the Multi Hex Tool with Phillips Screwdriver provided Put the cable end of resistance cable of Tension Control Knob 54 into the spring hook of Tension Cable 30 see Figure A Pull the resistance cable of Tension Control Knob 54 u...

Страница 12: ... Attach the Left Handrail Arm 3L onto the left horizontal axle of the Front Post 5 with one M8x18 Bolt 43 one Ø18xØ10 5x3 Spring Washer 44 one Ø10xØ20x1 5 Big Washer 52 and one Ø28x5 Washer 46 that were removed Tighten bolts and washers with the Multi Hex Tool provided Install a S16 Cap 49 onto the M8x18 Bolt 43 Multi Hex Tool Allen Wrench S8 Multi Hex Tool with Phillips Screwdriver S10 S13 S14 S1...

Страница 13: ...ool with Phillips Screwdriver provided Attach the Foot Bar Covers A B 93L 93R onto the Left Foot Bar 2L with two ST4 2x20 Phillips Self Tapping Screws 60 Tighten screws with the Multi Hex Tool with Phillips Screwdriver provided Repeat above step to attach the Right Handrail Arm 3R onto the right horizontal axle of the Front Post 5 and right U Shape Bracket 23 to the right Crank 79 Hardware 16R Bol...

Страница 14: ... Cover B 33L onto the Left Handrail Arm 3L with four ST2 9x12 Screws 62 Tighten screws with the Multi Hex Tool with Phillips Screwdriver provided Attach the Right Handrail Arm Cover A 94R and Right Handrail Arm Cover B 33R onto The Right Handrail Arm 3R with four ST2 9x12 Screws 62 Tighten screws with the Multi Hex Tool with Phillips Screwdriver provided Hardware Multi Hex Tool with Phillips Screw...

Страница 15: ...n the Front Post 5 and then pull them out from the top end of the Front Post 5 Connect the Sensor Wire I 67 and Hand Pulse Sensor Wires 6 to the wires that come from the Computer 56 and then attach the Computer 56 onto the top end of the Front Post 5 with four M5x12 Bolts 57 that were removed Tighten bolts with the Multi Hex Tool with Phillips Screwdriver provided Tool Multi Hex Tool with Phillips...

Страница 16: ...ORIES Displays approximate amount of calories burned during workout This data is a rough guide for comparison of different exercise sessions and should not be used in medical treatment ODOMETER Displays the total accumulative distance traveled The ODOMETER data values can not be clear to zero by pressing and holding the MODE button for 3 seconds If you take out the batteries from the computer the ...

Страница 17: ...trol knob in a clockwise direction To decrease the load turn the tension control knob in a counterclockwise direction Adjusting the Rear Stabilizer End Cap Turn the rear stabilizer end cap on the rear stabilizer as needed to level the elliptical trainer Tension Control Knob Adjustable Leveler ...

Страница 18: ...ner There is no display on the computer console 1 Remove the computer console and verify the wires that come from the computer console are properly connected to the wires that come from the front post 2 Check if the batteries are correctly positioned and battery springs are in proper contact with batteries 3 The batteries in the computer console may be dead Change to new batteries There is no hear...

Страница 19: ... state at the end of each exercise session A proper cool down slowly lowers your heart rate and allows blood to return to the heart HEAD ROLLS Rotate your head to the right for one count you should feel a stretching sensation up the left side of your neck Then rotate your head back for one count stretching your chin to the ceiling and letting your mouth open Rotate your head to the left for one co...

Страница 20: ...Lean against a wall with your left leg in front of the right and your arms forward Keep your right leg straight and the left foot on the floor then bend the left leg and lean forward by moving your hips toward the wall Hold then repeat on the other side for 15 counts TOE TOUCHES Slowly bend forward from your waist letting your back and shoulders relax as you stretch toward your toes Reach as far a...

Отзывы: