background image

1.

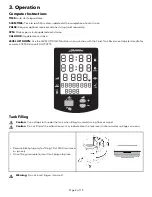
Filling requires a large bucket (not supplied) and the Fluid Rower Siphon (included). Filling will take approximately
4.5 gallons (17 liters) of water.

2.

Remove the tank plug on top of tank and insert the flexible tube into the rear of the tank while keeping the rigid hose
in the bucket.

Note:  Where water quality is known to be poor, Life Fitness recommends the use of distilled water.

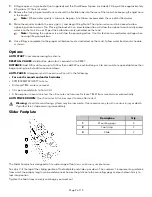
3.

Move the adjuster knob to the plus sign (+), and begin filling. Note: The siphon valve must be closed to allow
siphoning action to occur. Tip: Placing the bucket in an elevated position will allow the siphon to continually pump
water into the tank. Do not fill past the calibration mark indicated on the tank!

Note:  Opening the siphon valve will stop the pumping action. Use this feature to avoid water spillage when
nearing filling completion.

4.

Once filling is complete (to the proper calibration level as indicated on the tank), follow water treatment schedule
as shown.

Options

AUTO START: Commence rowing to activate.

RESET ALL VALUES: Hold button down for 3 seconds first to RESET.

DISTANCE: Add 100m distance, up to 1000m then add 500m, each button push to accumulate required distance then
begin rowing to initiate distance count down.

AUTO-PAUSE: A temporary halt in exercise will result in the following:

• For over 5 seconds and under 5 minutes:

• SPM/500METER/WATT to zero.

• Distance/TIME values are saved.

• CAL per hour defaults to Total CAL.

• A Resumption in exercise in less than 5 minutes will resume Distance TIME/ from saved values automatically.

AUTO POWER DOWN: Over 5 minutes. All values revert to zero after restart.

Warning:  Heart rate monitoring systems may be inaccurate. Over exercise may result in serious injury or death.
If you feel faint, stop exercising immediately.

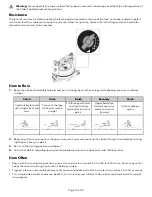
Slider Footplate

Qty.

Description

4

Mounting pegs

1

2

Foot strap

2

2

Slide

3

The Slider Footplate is designed to fit a wide range of foot sizes, and is very simple to use.

To adjust, lift the top of the sliding portion of the footplate and slide up or down. The numbers 1-6 represent a guideline
from which the proper length can be determined. Secure the plate onto the mounting pegs and push down firmly to
lock into position.

Tighten the Footstraps securely and begin your workout.

Page 9 of 15

Содержание ROW CX

Страница 1: ...Row CX Trainer Row CX Owner s Manual 1003502 0001 REV AA...

Страница 2: ......

Страница 3: ...ay Store Operating Hours 9 00 20 00 BRT Monday Friday 10 00 16 00 BRT Saturday ASIA PACIFIC AP Japan Life Fitness Japan Japan Nippon Brunswick Bldg 8F 5 27 7 Sendagaya Shibuya Ku Tokyo Japan 151 0051...

Страница 4: ...2 Troubleshooting 12 Warranty What is Covered 14 Who is Covered 14 How Long is it Covered 14 Who Pays Shipping and Insurance for Service 14 What We Will Do To Correct Covered Defects 14 What is Not Co...

Страница 5: ...frame of your machine If any of the adjustment devices are left projecting they could interfere with the user s movement Do not store in freezing conditions with water in the tank as it can expand and...

Страница 6: ...at regular intervals Ensure that any person s making adjustments or performing maintenance or repair of any kind is qualified to do so DO NOT ATTEMPT TO USE OR REPAIR ANY ACCESSORY APPROVED FOR USE W...

Страница 7: ...7 71 172cm Width Minimum Safe Operating Surface Area 83 85 213cm Length x 20 47 52cm Width x 22 04 56cm Height Dimensions The live area shall be not less than 23 62 60cm greater than the training area...

Страница 8: ...UP DOWN buttons in conjunction with the Fluid Tank Resistance Adjuster Handle for accurate 500M Distance CAL WATTS Tank Filling Caution Use a drop cloth under the tank when filling to avoid staining f...

Страница 9: ...on down for 3 seconds first to RESET DISTANCE Add 100m distance up to 1000m then add 500m each button push to accumulate required distance then begin rowing to initiate distance count down AUTO PAUSE...

Страница 10: ...ll through with arms and legs rocking slightly back on your pelvis Push with the legs while arms remain straight Comfortably forward with straight back and arms 2 Begin to pull your arms back as they...

Страница 11: ...Storage The Life Fitness Row CX Trainer can easily be stored in a vertical upright position For safety choose a suitable location such as a corner of a room It is recommended that something soft such...

Страница 12: ...R Your rower box contents include 4x Water Treatment Tablets which is sufficient for several years of water treatment Treat when water becomes discolored or shows signs of Algae Bacterial growth To pu...

Страница 13: ...em Loose or failed connection Sensor gap too wide see erratic computer display Computer screen illuminates but does not register when rowing Reinstall batteries in correct position and try again If th...

Страница 14: ...lure on your part to use operate and maintain the Product as set out in your Operation Manual All terms of this warranty are void if this product is moved beyond the continental borders of the United...

Страница 15: ...any nature arising out of the use of or inability to use this Product Some states do not allow the exclusion or limitation of implied warranties or of liability for incidental or consequential damages...

Отзывы: