background image


10


MAINTENANCE 

To keep the unit looking clean, we recommend the use of a stainless steel


cleaner for maintenance of all exterior and interior parts.


If not maintained properly, the exterior parts may over a period of time


become covered with dirt, grease and grime in such a way that the surface


grime will eventually become unremovable.


Along with a good interior vacuuming, we suggest a thorough weekly


cleaning using a stainless steel cleaner inside and out.


Use a Tacky Mat ® in front of machine to catch small particulate matter


when stepping down or up.


If the above suggestions are followed, your machine will look newer longer


and provide you with years of trouble free service.


REPLACEMENT KIT


Consists of:


1 set of brushes      


(4)


1 set of belts          


(3)


1 set of wrenches for socket head screws 

(4)


Shoe Brush Machine Rebuilding – quoted upon request and evaluation.


SERVICE & PARTS


Always use factory replacement parts to insure optimum performance


For Factory authorized service and parts please contact our customer


service department at Phone: 860-828-6361 or Toll Free at 800-828-9595,


Fax 860-828-8879.


Use only original replacement parts manufactured by Liberty Industries,


Inc., 133 Commerce Street, East Berlin, CT 06023.   Substitutions may lead


to malfunction, abnormal wear or consequential damage to your new shoe


cleaning machine.


Содержание The Bull Dog 351

Страница 1: ......

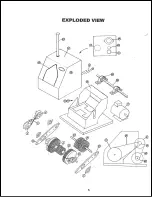
Страница 2: ...VIEW 5 PARTS LIST 6 BELT REPLACEMENT INSTRUCTIONS 7 TOP BRUSH REPLACEMENT INSTRUCTIONS 7 BOTTOM BRUSH REPLACEMENT INSTRUCTIONS 7 SIDE BRUSH REPLACEMENT INSTRUCTIONS 7 ELECTRICAL DIAGRAM 8 INSTRUCTIONS...

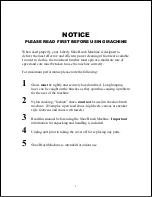
Страница 3: ...owing 1 Shoes must be tightly and securely laced and tied Long hanging laces can be caught on the brushes as they spin thus causing a problem for the user of the machine 2 Nylon stocking fashion shoes...

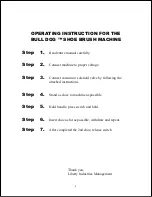
Страница 4: ...per voltage Step 3 Connect vacuum or solenoid valve by following the attached instructions Step 4 Stand as close to machine as possible Step 5 Hold handle press switch and hold Step 6 Insert shoe as f...

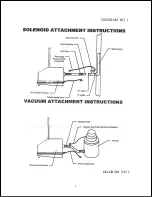
Страница 5: ...5 DIAGRAM NO 1...

Страница 6: ...6...

Страница 7: ...1 14 20 2116 Outlet Electrical 1 15 20 2118 hp Electric Motor 1 16 20 2123 Pillow Block 2 17 20 2129 Sheave Top Driven 1 18 20 2263 Side Brush Hubs for D Shape Shaft 2 19 20 2352 15 amp Breaker 1 20 2...

Страница 8: ...mbly 6 Remove set screws from upper brush and replace 7 Reassemble in reverse order Replacement of Bottom Brush 1 Unplug electrical cord 2 Unscrew cover form base and remove cover 3 Remove round belt...

Страница 9: ...9...

Страница 10: ...e above suggestions are followed your machine will look newer longer and provide you with years of trouble free service REPLACEMENT KIT Consists of 1 set of brushes 4 1 set of belts 3 1 set of wrenche...

Отзывы: