background image

Section 4. Configuring the eddy covariance system

4

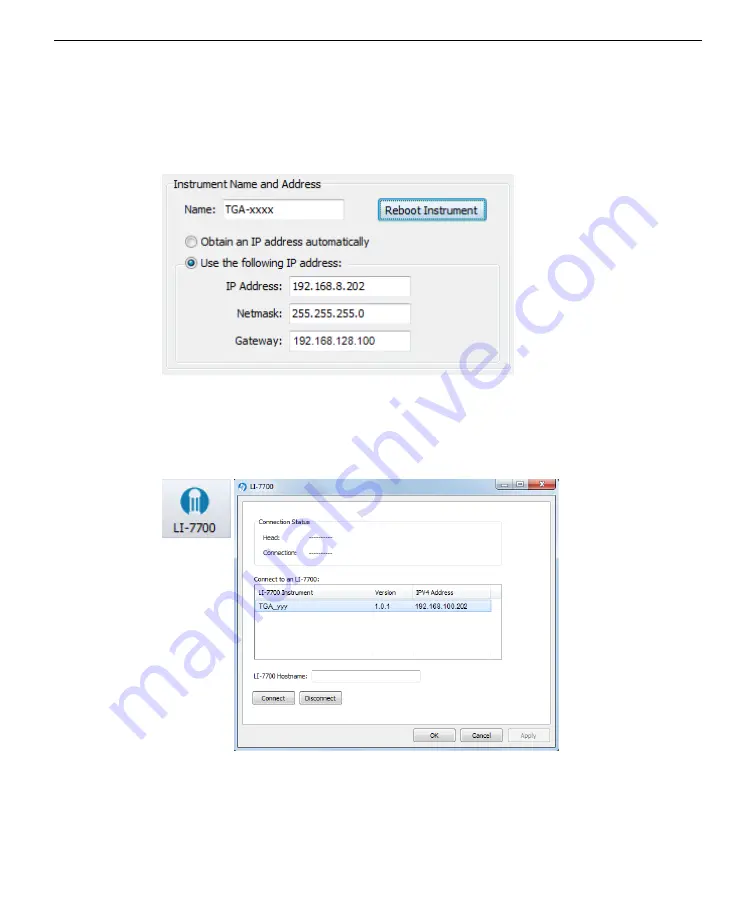
Also under

Manual Controls

, configure the

IP Address

,

Netmask

, and

Gateway

.

l

IP Address:

192.168.128.202, as specified in

Table 6-2

on page 6-2.

l

Subnet Mask:

Typically 255.255.255.0.

l

Gateway:

Set this to the IP address used to connect with the terminal: (192.168.128.100)

Reboot

the LI-7700 after changing the network settings.

5

Integrate LI-7700 data with .ghg files.

Launch the LI-7200x and LI-7500x software, connect to the instrument, and then
click

LI-7700

. Select the LI-7700 and click

Connect

.

4-6

Satellite Communication

Содержание LI-7200x

Страница 1: ...Satellite Communication for Eddy Covariance and Soil Gas Flux Systems Instruction Manual ...

Страница 2: ......

Страница 3: ...3576 U S and Canada envsales licor com Regional Offices LI COR Biosciences GmbH Siemensstraße 25A 61352 Bad Homburg Germany Phone 49 0 6172 17 17 771 envsales gmbh licor com LI COR Biosciences UK Ltd St John s Innovation Centre Cowley Road Cambridge CB4 0WS United Kingdom Phone 44 0 1223 422102 envsales UK licor com LI COR Distributor Network www licor com envdistributors ...

Страница 4: ... trademark of Rogers Communication Inc Edge is a registered trademark of Microsoft Corporation Firefox is a registered tradmark of The Mozilla Foundation Chrome browser is a registered trademark of Google Inc All other trademarks or registered trademarks are property of their respective owners Printing History New editions of this manual will include all updates An update addendum may be used betw...

Страница 5: ...Chassis Ground connection is required The product is marked with this symbol to indicate that a direct current DC power supply is required WARNING Warnings must be followed carefully to avoid bodily injury CAUTION Cautions must be observed to avoid damage to your equipment Manual markings Warning Warnings must be followed carefully to avoid bodily injury Caution Cautions must be observed to avoid ...

Страница 6: ...iv ...

Страница 7: ...onnections and indicators 1 5 Status indicators 1 5 Section 2 Initial setup General steps 2 1 Initial assembly 2 3 Mounting the communication enclosure 2 5 Mounting the antenna 2 6 Securing cables 2 8 Section 3 Configuring the communication system Logging in 3 1 Checking the signal strength 3 2 Pointing the antenna 3 3 With a PC 3 3 Without a PC 3 4 Configuring the Hughes 9502 terminal 3 4 Viewing...

Страница 8: ...iance system 4 11 Section 5 Connecting with an LI 8100A Configuring the LI 8100A 5 1 Modify the LI 8100A configuration 5 3 LI 8100A file transfer 5 4 Copying files from internal storage 5 5 Copying files from the compact flash card 5 5 Section 6 Advanced operations Selecting a data plan 6 1 Recommended IP addresses 6 2 Configure PC network communication 6 2 Section 7 Troubleshooting Section 8 Main...

Страница 9: ... 7900 720 provides access to most sites located in most parts of the world with the exception of the poles and areas that are blocked from geostationary satellites In these instructions the term terminal is used to refer to the Hughes 9502 satellite modem that connects your system to the internet Figure 1 1 The 7900 720 communication system transfers data from a site to computer net works through ...

Страница 10: ...h angled tip To mount the antenna Power cable Part number 392 14582 5 meter power cable with bare leads Enclosure Part number 9979 025 An all weather electronics enclosure to protect the instrumentation from the ele ments PVC strain relief fittings Part number 6579 054 Two PVC junction caps and locknuts part number 259 13741 are included to provide strain relief for the antenna power and communica...

Страница 11: ...10 218 11027 Cables Coaxial Antenna Cable 4 6 m 15 ft 1 380 13839 8 pin Male to RJ45 Ethernet Cable 5 m 16 4 ft 1 392 13977 Standard Ethernet Cable 2 1 m 7 ft 1 616 06116 Table 1 1 Communication system parts shipped from LI COR Some parts are shipped directly from Galaxy 1 Communications Table 1 2 below Description Quantity Satellite Terminal Hughes 9502 1 High Gain Antenna 1 Antenna Cable 10 mete...

Страница 12: ...he top For additional information on the Hughes 9502 see http www hughes com technologies mobilesat systems mobile satellite terminals hughes 9502 bgan m2m for these documents l Hughes 9502 Fixed Satellite Terminal User Guide l Hughes 9502 Quick Setup Guide Product labels The satellite terminal includes a caution label that warns that the unit may become hot 1 4 Satellite Communication ...

Страница 13: ...tatus indicators l Pointing Mode All three LEDs flashing at 1 Hz l Registering Power LED on GPS LED on or flashing Network LED off l Registered Power LED on GPS or Network LED flashing l Connected All three on all three off after 1 minute time out Section 1 Overview of the communication system 1 5 Cable connections and indicators ...

Страница 14: ...Section 1 Overview of the communication system 1 6 Satellite Communication ...

Страница 15: ...depends upon the wireless service provider General steps Note We highly recommend that you fully assemble the system configure your network account and test the system in your office or lab before deploying it in the field 1 Arrange a data plan Prior to using the satellite radio you need to arrange a data plan with a wireless ser vice provider in your area We recommend Inmarsat BGAN M2M from Galax...

Страница 16: ... 8100A Soil Gas Flux System see Connecting with an LI 8100A on page 5 1 5 Connect to the system If everything is configured properly you ll be able to access your eddy covariance sys tem from any computer on the internet and download data connect with web ser vices such as FluxSuite and modify instrument configurations Caution Be careful to avoid data overage charges You can easily transfer many m...

Страница 17: ...of the communication system 1 Assemble the system Install the power cable first because it is difficult to access the connectors after the terminal in installed in the enclosure Mount the terminal in the enclosure as shown Section 2 Initial setup 2 3 Initial assembly ...

Страница 18: ...ount the enclosure antenna and antenna cable The antenna cable is a slender coaxial cable Tighten both cable connections securely Mount the antenna to a tripod or mast so it has adequate reception from the wireless service provider Be sure that the antenna placement does not obstruct the wind or alter any of the variables that are measured at the site see Mounting the antenna on page 2 6 2 4 Satel...

Страница 19: ...rackets should be attached to the mounting plates and then the band clamps can be inserted through the holes in the brackets and tightened around the post as shown in Figure 2 1 below Figure 2 1 Attach mounting plates to the enclosure attach band clamp brackets to mount ing plates and secure to a mast using band clamps Item Qty Part Number Description 1 4 150 12943 M6x1 16 MM Hex Head Bolt 2 4 167...

Страница 20: ... antenna Therefore it is important to pos ition the antenna at a reasonable distance from sensors and data recorders Never put the antenna in an instrument enclosure adjacent to instruments on your instrument platform or pointing toward instruments or cables Maximize the dis tance between instruments and the antenna using the provided 15 m cable to reduce the chance of radio interference 1 Before ...

Страница 21: ...2 Azimuth Elevation Bracket Figure 2 3 Antenna mounting configuration Drive the post at least 45 cm 18 inches into the ground or more in sandy loose or muddy soil Section 2 Initial setup 2 7 Mounting the antenna ...

Страница 22: ...itial setup Securing cables Communication and power cables should be secured so they do not apply strain to connectors and junctions Secure the cables to the strain relief plugs as shown 2 8 Satellite Communication ...

Страница 23: ...e to transfer raw eddy cov ariance data over the satellite connection Logging in Note Sometimes network terminals such as the Hughes 9502 device take a few minutes to establish communications If the device seems unresponsive wait a few minutes and try again If you have trouble connecting refresh the window press F5 or try a different web browser Firefox Google Chrome and Edge all seem to work but ...

Страница 24: ...strength The signal strength is indicated on the home page The terminal will register with the network which will be indicated in the status column at the left of the display See Pointing the antenna on the facing page to optimize the signal strength Caution Be careful to avoid data overage charges You can easily transfer many megabytes of data over the satellite terminal which may incur large dat...

Страница 25: ...etting it get a GPS fix and then checking the pointing information in the software 1 Get the GPS fix Orient the antenna flat facing the sky so that it can see as many GPS satellites as pos sible Once it gets the initial GPS fix GPS LED solid green you can point the antenna toward the Inmarsat satellite 2 Orient the antenna Assemble the system as described in Configuring the communication system on...

Страница 26: ...hones into the headphone jack and listen for tones As the signal strength increases the pitch of the tone will get higher and faster Tighten the antenna at a position that provides the strongest signal 3 Short press the button to exit alignment mode Configuring the Hughes 9502 terminal The steps below describe how to configure the terminal 1 Under Settings IP Address DHCP verify that the setting i...

Страница 27: ...chdog to ON and configure the settings The BGAN M2M terminal includes a mechanism that can be used to periodically verify the network connectivity and take action if a problem is detected Watchdog pings are used to detect connectivity and because they are bits of data just like any other data they require an active connection in order to be transmitted The ping mechanism will also act to keep aliv...

Страница 28: ... minutes All IP traffic gen erated using the Content Watchdog is rated and charged in the same manner as other traffic generated by the terminal Based upon a single 30 byte ping and a 30 byte response data will be used at the following rates Ping Interval Estimated Monthly Usage 15 minutes 400 KB 30 minutes 200 KB 60 minutes 100 KB 120 minutes 50 KB l Ping Required If not set then the system will ...

Страница 29: ...g the IP address When your computer is connected to the device and you are logged in assuming the terminal is connected to the network you can view the IP Address under the Connections Manage Contexts tab Figure 3 2 Hughes 9502 IP Address Keep a record of the IP Address You ll use this to con nect with your instrument Section 3 Configuring the communication system 3 7 Viewing the IP address ...

Страница 30: ...Section 3 Configuring the communication system 3 8 Satellite Communication ...

Страница 31: ... one of the instruments Figure 4 1 LI 7500DS and personal computer connected to a Hughes satellite radio The LI 7500A RS and LI 7200 RS connect similarly How do you retrieve data from all these other sensors if you can only connect to one with the satellite radio Do not despair If you are logging all your data to ghg files and if you are using the SmartFlux System you ll be able to see your proces...

Страница 32: ...command prompt type netsh int ipv6 install and press Enter This section assumes that you have completed all the required steps in Configuring the communication system on page 3 1 and that you have verified that the satellite ter minal can connect with the Internet Note On your PC disable wireless Internet and unplug the Ethernet cable prior to connecting the gateway to the Ethernet port on your PC...

Страница 33: ...sk and Default Gateway l IP Address 192 168 128 201 as specified in Table 6 2 on page 6 2 l Subnet Mask Typically 255 255 255 0 l Default Gateway Set this to the IP address used to connect with the terminal 192 168 128 100 Reboot the instrument after changing the network settings Section 4 Configuring the eddy covariance system 4 3 Configure LI 7500x or LI 7200x eddy covariance system communicatio...

Страница 34: ... this section describe how to log methane data in ghg files for processing in EddyPro software or with the SmartFlux System This section assumes that you have completed all the required steps in Configuring the communication system on page 3 1 and that you have verified that the satellite ter minal can connect with the Internet Note Prior to adding the LI 7700 be sure to complete the steps in Conf...

Страница 35: ...7700 software and connect to the instrument 3 Click the Manual Controls button Configure the Instrument Time and Output Rate as shown Section 4 Configuring the eddy covariance system 4 5 Configure LI 7700 communication ...

Страница 36: ...age 6 2 l Subnet Mask Typically 255 255 255 0 l Gateway Set this to the IP address used to connect with the terminal 192 168 128 100 Reboot the LI 7700 after changing the network settings 5 Integrate LI 7700 data with ghg files Launch the LI 7200x and LI 7500x software connect to the instrument and then click LI 7700 Select the LI 7700 and click Connect 4 6 Satellite Communication ...

Страница 37: ...or to adding the Biomet station be sure to complete the steps in Con figure LI 7500x or LI 7200x eddy covariance system communication on page 4 2 1 Connect the datalogger to your PC You probably have done this already but if not connect the Sutron Datalogger to your PC Ethernet terminal either directly or through an Ethernet switch 2 Launch the XTerm Software that is provided with the Sutron Datal...

Страница 38: ...Section 4 Configuring the eddy covariance system 3 Click Setup Access 4 Click the Setup tab select LAN Settings and click Edit 4 8 Satellite Communication ...

Страница 39: ...128 203 as specified in Table 6 2 on page 6 2 l Subnet Mask Typically it should be 255 255 255 0 l Default Gateway Set this to the IP address used to connect with the terminal 192 168 128 100 7 Click OK Restart the datalogger after changing the network settings Section 4 Configuring the eddy covariance system 4 9 Configure Sutron biomet system communication ...

Страница 40: ...nce system 8 Integrate biomet data with ghg files Launch the LI 7200x and LI 7500x software and connect to the instrument Click Biomet and then click Instrument Select the Biomet System and click Connect and OK 4 10 Satellite Communication ...

Страница 41: ...view the performance of the instrument or alter the configuration On a computer that has internet access launch the gas analyzer PC software Enter the IP address from the Satellite terminal see Viewing the IP address on page 3 7 Important To minimize the data transfer set the update rate to 0 1 Hz Do not leave the connection open for longer than is necessary Otherwise your instru ment may transfer...

Страница 42: ...Section 4 Configuring the eddy covariance system 4 12 Satellite Communication ...

Страница 43: ... in Configuring the communication system on page 3 1 and that you have verified that the satellite ter minal can connect with the Internet Configuring the LI 8100A 1 Configure the PC that is attached to the system so it has a static IP address This is typically accomplished by changing the network settings see Configure PC network communication on page 6 2 2 Connect a PC to the LI 8100A using the ...

Страница 44: ...k Typically it should be 255 255 255 0 l Gateway Set this to the IP address used to connect with the gateway 192 168 128 100 5 Restart the LI 8100A after changing the network configuration Figure 5 1 Soil Gas flux system configured for communication with a satellite terminal In this case communication with the PC is accomplished using the RS 232 connection 5 2 Satellite Communication ...

Страница 45: ...mputer that has Internet access launch the LI 8100A configuration software and click the Connect button 2 Select TCP IP enter the gateway IP Address and click Connect After connecting to the instrument you can check the performance and modify the configuration as you normally would Section 5 Connecting with an LI 8100A 5 3 Modify the LI 8100A configuration ...

Страница 46: ...nternal Storage panel on the upper right displays the LI 8100A data files currently stored on the LI 8100A internal flash memory and the free memory available The Compact Flash Card panel on the lower right shows the files stored and memory available on the compact flash card if it is installed 3 Move files from the LI 8100A Select the file you want to transfer and select Transfer to PC or Copy to...

Страница 47: ...F to move the selected files to the compact flash card Click View File to open the entire file in a new text window You can also drag and drop files to from the internal stor age Files generated by the LI 8100A are denoted with a 81x file extension and contain all of the raw data records and summaries Copying files from the compact flash card Click on Format to format the compact flash card Note t...

Страница 48: ...Section 5 Connecting with an LI 8100A 5 6 Satellite Communication ...

Страница 49: ...alf hour or about 1 5 GB of raw data in 30 days See Table 6 1 below for more details Sensors in System Files to Transfer Data Volume1 Any configuration given below Status Reports 1 GB per month CO2 H2O Eddy Flux System Includes Sonic Anemometer and CO2 H2O gas analyzer Raw Data 2 GB per month CO2 H2O CH4 Eddy Flux System Includes Sonic Anemometer LI 7700 and CO2 H2O gas analyzer Raw Data 2 5 GB pe...

Страница 50: ... the instructions in this manual Sensor Suggested IP Address Personal Computer optional 192 168 128 200 LI 7200x or LI 7500x 192 168 128 201 LI 7700 192 168 128 202 Biomet System 192 168 128 203 LI 8100A 192 168 128 204 Table 6 2 Suggested IP addresses for the PC and instruments in flux systems Configure PC network communication Note This is only necessary when configuring the system You ll do thi...

Страница 51: ...ork window on your computer Windows Start Button Control Panel View Network Status and Tasks Connections Click Change adapter settings 2 Double click the Internet connection to bring up the Local Area Connection Status then click Properties 3 Select Internet Protocol Version 4 TCP IPv4 then click Properties Section 6 Advanced operations 6 3 Configure PC network communication ...

Страница 52: ...omatically and Obtain DNS server address automatically as shown on the left below If you need a static IP address select Use the following IP address and enter the IP address and Subnet mask as shown on the right below Dynamic IP Address Static IP Address Recommended 6 4 Satellite Communication ...

Страница 53: ... munication you will be unable to connect with your system from external networks such as your institutional or home computer network Unable to detect a satellite Poor field of view The satellite radio antenna must have a clear line of site to the satellite Trees mountains or buildings can block the signals Reposition the antenna and refine the orientation to optimize the satellite connection 7 1 ...

Страница 54: ...Section 7 Troubleshooting 7 2 Satellite Communication ...

Страница 55: ...ardware Periodically check the nuts bolts and band clamps that secure the enclosure to the tower and tighten any loose mounts Power and communication cables Check the junctions to ensure that they are tight Check any cable ties that are used to secure the cables to ensure that they have not slipped Also look for damage from rodents and replace any damaged components 8 1 Satellite Communication ...

Страница 56: ...Section 8 Maintenance 8 2 Satellite Communication ...

Страница 57: ...24 VDC Power Consumption Transmit 20W Narrow Beam w o Transmit 3W Idle 1W Off wake on packet 10mW 12 VDC Off wake on packet 30mW 24 VDC Off GPIO control 0W Data Connectivity RJ45 Ethernet USB Antenna Weight 1 85 Kg excluding mount and cable Dimensions 385 mm x 385 mm 33 mm Wind Loading Survival wind loading with mount up to 100 mph Water and Dust Resistance IP 65 compliant Antenna Cable Length 10 ...

Страница 58: ...nal BGAN Satellite and GPS antenna connection GPS module inside 9502 module 3 status LEDs Antenna point audio tone and voltage level indicator through audio jack SIM USIM Slot behind SIM door Enclosure Dimensions A 2 Satellite Communication ...

Страница 59: ...rive FAX 612 553 0708 Minneapolis MN 55441 www turck com LI COR Part Number Cable Cable Connectors Turck Part Number 392 10108 8 pin male to 8 pin male RSS RSS841 1M 392 10107 8 pin female to straight RJ45 RKC RJ45 840 M 392 13977 8 pin male to straight RJ45 RSS RJ45S 841 M 392 13989 8 pin male to 90 RJ45 RSS WRJ45IS 841 M 392 13990 8 pin male to 90 reversed RJ45 RSS WRJ45ES 841 M Table B 1 Turck ...

Страница 60: ...Appendix B Suppliers B 2 Satellite Communication ...

Страница 61: ...ed by act of God or other casualty 4 The purchaser whether it is a DISTRIBUTOR or direct customer of LI COR or a DISTRIBUTOR S cus tomer packs and ships or delivers the instrument to LI COR Inc at LI COR Inc s factory in Lincoln Nebraska U S A within 30 days after LI COR Inc has received written notice of the defect Unless other arrangements have been made in writing transportation to LI COR Inc b...

Страница 62: ...t apply whether included by this contract or by law are limited to the time period of this warranty which is a twelve month period commencing from the date the instrument is shipped to a user who is a customer or eighteen months from the date of shipment to LI COR Inc s authorized distributor whichever is earlier This warranty supersedes all warranties for products purchased prior to June 1 1984 u...

Страница 63: ......

Страница 64: ...nal Offices LI COR Biosciences GmbH Siemensstraße 25A 61352 Bad Homburg Germany Phone 49 0 6172 17 17 771 envsales gmbh licor com LI COR Biosciences UK Ltd St John s Innovation Centre Cowley Road Cambridge CB4 0WS United Kingdom Phone 44 0 1223 422102 envsales UK licor com LI COR Distributor Network www licor com envdistributors 984 13837 02 2022 ...

Отзывы: