background image

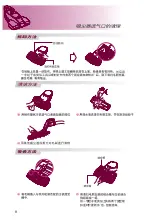
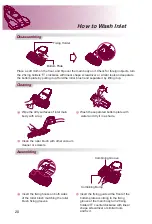
Disassembling

Cleaning

Assembling

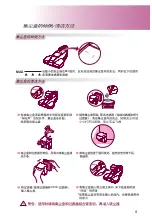
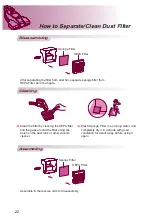
Sponge Filter

HEPA Filter

Sponge Filter

HEPA Filter

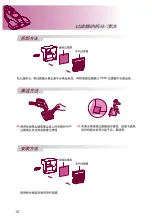
After separating the filter from dust bin, separate sponge filter from

HEPA Filter as in the figure.

Clean the filter by cleaning the HEPA filter 

and the gaps around the filter using the 

brush on the dust tank or other vacuum 

cleaner.

Assemble in the reverse order of disassembly.

Wash Sponge Filter in a running water, and 

completely dry it in a shade with good 

ventilation for about a day before using it 

again.

How to Separate/Clean Dust Filter

22

Содержание VH9001DS

Страница 1: ...VH9001DS 1 13 Page 14 25 ...

Страница 2: ...VH9001DS 380W 2 3 4 2 254 340 170 5 6 8 7 9 10 11 12 13 282 2 4 6 178 吸尘器的部件名称 2 1Kg 吸尘器 1 1Kg 吸尘器存放底座 ...

Страница 3: ...3 有可能导致严重伤害甚至发生死亡事故 有可能导致财产损失或轻微伤害 潮湿的手 会立刻导致严重伤害甚至发生死亡事故 ...

Страница 4: ...4 运行 附件 ...

Страница 5: ...5 部件 部件 吸尘器本体 ...

Страница 6: ...6 1 3 5 6 4 2 左右 三秒钟后 ...

Страница 7: ...7 使用方法 属于小容量且 物体 ...

Страница 8: ...1 3 2 8 1 2 固定锁扣 用一字起子或类似工具将两个固定锁 扣逆时针旋转90 后 然后用 一字起子或类似工具沿 ...

Страница 9: ...9 5 1 3 4 2 6 MAX HEPA 装入 MAX ...

Страница 10: ...10 HEPA ...

Страница 11: ...使用前清理过滤器和集尘盒 使用前清除进气口堵塞物 插好电源插头 按照说明书的操作提示将吸 尘器主机放入底座中 紫外线灯的工作温度是5 到 60 之间 请在这个温度下使 用吸尘器存放底座 电源插头没有插好 吸尘器主机没有按 正确方法放入底座中 紫外线灯未能正常 工作 插好电源插头 按照操作流程操作 确认电源插座的故障或室内 电源是否跳闸 将集尘盒 过滤器和进气口 堵塞物清理干净 然后等待大 概40分钟左右 此产品的电机 过热保护装置会自动解除 之 后可以继续正常使用 再次按动开关或者插好插头 并按动开关后即可 非故障 产品自身特点 本产品具有电机过 热保护装置 可能已 经启动 此装置启动的原因如 下 集尘盒内灰尘过满 过滤器或者进气口 被严重堵塞 产品使用时间过长 使用此产品时不小 心碰到了电源开关或 插头 此产品有以下特点 当手离开吸尘器手 柄三秒钟后 吸尘器 会自动停止工作并处 于待机状...

Страница 12: ...时 间 使 用 吸 尘 器 异味可能会由集 尘盒中的灰尘产生 机体内有异味 机体排出的气 体过热 机体内有噪音 不会影响健康 可放心使用 不会影响吸尘器正常运行或 者造成损坏 可放心使用 及时清理集尘盒并且用清水 洗净晾干后再次使用 机体排出的热气是 由气流在冷却电机时 受热导致的 正常现象 可放心使用 正常现象 可放心使用 将集尘盒按照说明书提示安 装到位 部分噪音可能来自 吸尘器的进气口 这 是由于高功率电机叶 轮的高速旋转引起的 另外可能来自于吸 尘器前端的震动板 这是由于拍打功能而 引起的 集尘盒没有完全组 装到机体上 申告 故障现象 可能的原因 解决方法 ...

Страница 13: ...13 ...

Страница 14: ...6 18 Product specifications 17 The cleaner parts description 20 19 How to Wash Inlet 25 Packing List Product using instructions 23 24 Check before reporting the trouble Attention before using the appliance 21 How to empty clean and assemble the dust tank 22 How to Separate Clean Dust Filter Using the product Disassembling Cleaning Assembling Disassembling Cleaning Assembling You will not be inform...

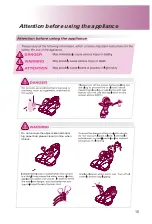
Страница 15: ...Do not vacuum the objects like hair ball or big paper ball please clean it in time when it block 15 Attention before using the appliance ...

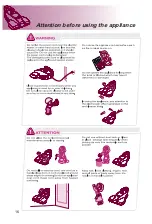
Страница 16: ...inlet 16 Attention before using the appliance ᓔ Do not use the appliance on hard surface such as floor or desk and so on ...

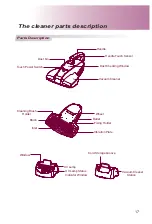
Страница 17: ...cking Window Vacuum Cleaner Dust bin Touch Power Switch Wheel Outlet Fixing Holder Vacuum Cleaner Station Vibration Plate Cleaning Brush Holder Brush Inlet Window UV Lamp UV Lamp Status Indicator Window Cord Storage Groove 17 The cleaner parts description ...

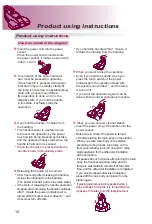
Страница 18: ...be done with the normal operation procedure When you use vacuum cleaner station Insert the power plug of the station into the power socket Make sure to check if the power is turned off before placing the main body on the station When you place main body on the station according to the grooves blue lamp on the front panel window is turned on and UV lamp starts operation for the ultraviolet irradiat...

Страница 19: ... product is not to be held and used but is to place on the cleaning target and to clean the fine dust by pressing the target with the weight of the product so do not use it to inhale big foreign objects Divide the target space to half and use it pushing and pulling back and forth from the end The targets are narrow so place the cleaner on it and use it by pushing and pulling back and forth Use it ...

Страница 20: ... brush and separate it by lifting it up Wipe the dirty surfaces of inlet main body with a rag Clean the roller brush with other vacuum cleaner or scissors Wash the separated bottom plate with water and dry it in a shade Insert the fixing hooks on both sides of the roller brush matching the roller brush fixing grooves Insert the fixing guide at the front of the bottom plate according to the fixing ...

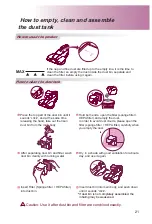
Страница 21: ...st bin and filter wash dust bin cleanly with running water Insert Filter Sponge filter HEPA filter into dust bin Dry in a shade with good ventilation for about a day and use it again Insert dust bin into main body and push down until it sounds click If dust bin is not completely assembled the inhaling may be weakened Hold both ends open the filter sponge filter HEPA filter and empty the dust Cauti...

Страница 22: ...ter as in the figure Clean the filter by cleaning the HEPA filter and the gaps around the filter using the brush on the dust tank or other vacuum cleaner Assemble in the reverse order of disassembly Wash Sponge Filter in a running water and completely dry it in a shade with good ventilation for about a day before using it again How to Separate Clean Dust Filter 22 ...

Страница 23: ...the power on It is the character of this product just use it normally The power cord plug is not plugged in the socket properly Wrong operation procedure of each function Socket no power This product has inlet motor overheat prevention device and it may stop temporarily when the following cases occur If it is used when dust and wastes are full in dust bin and filters If it is used with the inlet b...

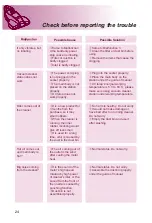
Страница 24: ... station under working temperature Same to Malfunction 3 Clean the filter or dust bin before using Remove the items that cause the clogging It is a new product for 3 months from the purchase so it may smell rubbers When the cleaner is running the inner rubber mounting would give off less smell It is used for a long time odor is caused by the dust in the dust bin No harm to healthy Do not worry It ...

Страница 25: ...Packing list Vacuum Cleaner Owner s Manual Card service Vacuum Cleaner Station 1 1 1 1 25 Packing list ...

Страница 26: ...MFL67600102 http www lg com cn ...

Отзывы: