


5-5
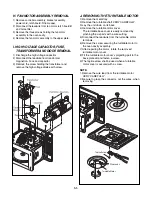
H. FAN MOTOR ASSEMBLY REMOVAL
1) Remove controller assembly, bracket assembly,
power cord, latch board-R from upper.
2) Disconnect the leadwire from fan motor, latch board-R
and noise filter.
3) Remove the three screws holding the fan motor
assembly to the oven cavity.
4) Remove the fan motor assembly to the upper plate.
I. HIGH VOLTAGE CAPACITOR, FUSE,
TRANSFORMER AND DIODE REMOVAL
1) Discharge the high voltage capacitor.
2) Disconnect the leadwire from transformer,
magnetron, Fuse and capacitor.
3) Remove the screw holding the transformer and
remove the high voltage diode earth screw.
J. REMOVING THE TURNTABLE MOTOR
1) Remove the metal tray.
2) Remove the turntable shaft VERY CAREFULLY.
3) Lay the unit down on its back.
4) Remove the turntable motor cover.
The turntable base cover is easily removed by
pinching the six parts with a wire cutting.
5) Disconnect the leadwire from the turntable motor
terminals.
6) Remove the screw securing the turntable motor to
the oven cavity assembly.
7) After repairing the motor, rotate the removed
turntable motor cover.
8) Fit the turntable motor cover’s projecting part to the
base plate slit and fasten a screw.
9) The taptite screw shall be used when a turntable
motor cover is secured with a screw.
NOTE:
1. Remove the wire lead from the turntable motor
VERY CAREFULLY.
2. Be sure to grasp the connector, not the wires, when
removing
Wire Leads
Turntable Motor
Taptite Screw
Содержание SolarDOM MP-9485S
Страница 9: ...SCHEMATIC DIAGRAM 4 3 ...
Страница 34: ... 6 5 466001 43501L 43500L 44510A 466003 466001 43500R 43501R WSZ085 WSZ085 LATCH BOARD PARTS EV ...
Страница 37: ... 41 ...


