background image

14

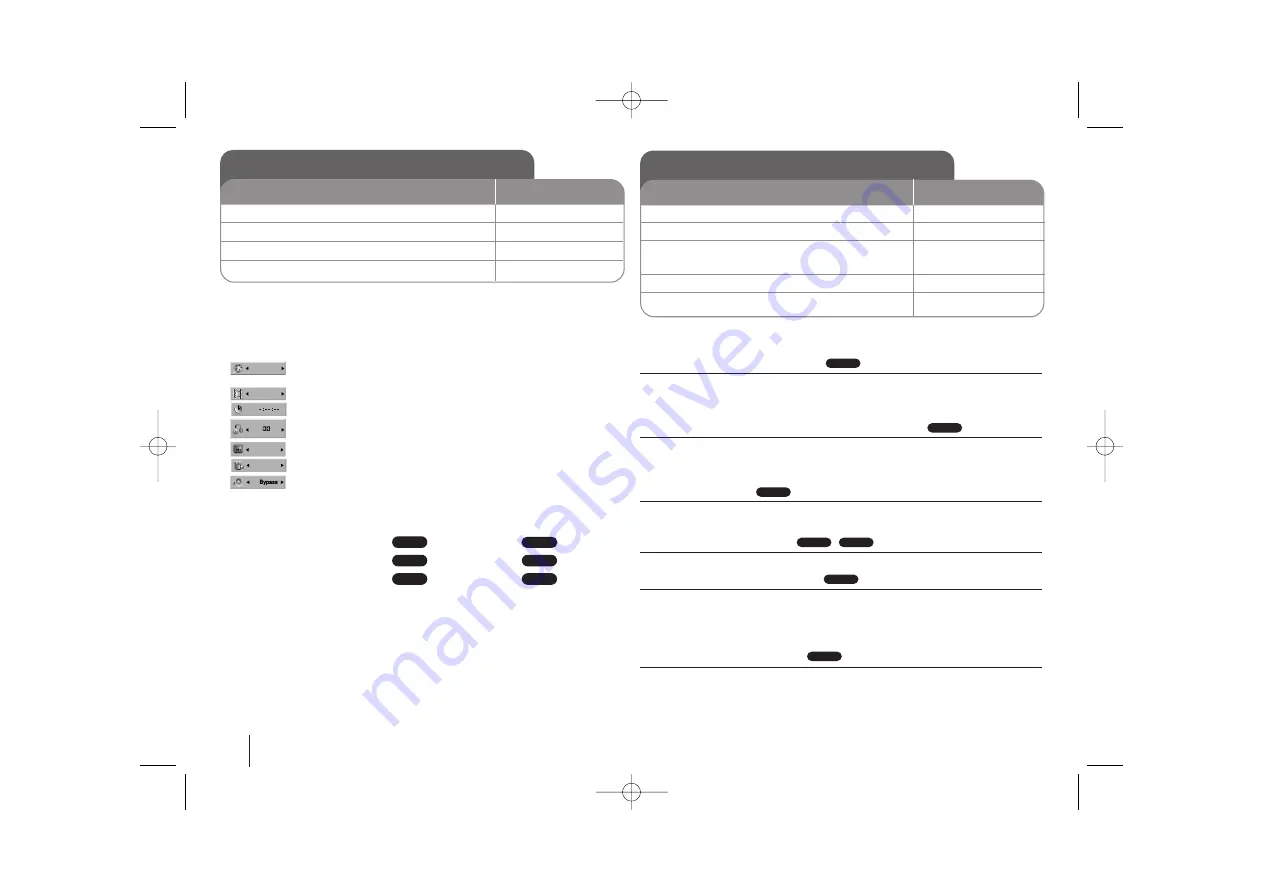
Displaying Disc Information - more you can do

You can select an item by pressing 

U

U  u

u

and change or select the setting by

pressing 

I

I  i

i

.

Current title (or track/ file) 
number/ total number of titles (or tracks/ files)
Current chapter number/ total number of chapters

Elapsed playing time
Selected audio language or channel

Selected subtitle

Selected angle/ total number of angles

Selected sound mode

Symbol Used in this Manual

All discs and file listed below 

MP3 files 

DVD and finalized DVD±R/RW 

WMA files 

DivX files 

Audio CDs 

Playing a Disc or file - more you can do

Playing a DVD that has a menu  

Most DVDs now have menus which load first before the film begins to play. You
can navigate these menus using 

U

U  u

u  I

I  i

i

to highlight an option. 

Press 

ENTER

to select.

Skipping to the next/ previous chapter/ track/ file  

Press 

SKIP

(

>

) to move to the next chapter/ track/ file.

Press 

SKIP

(

.

) to return to the beginning of the current chapter/ track/ file.

Press 

SKIP

(

.

) twice briefly to step back to the previous chapter/ track/ file.

Pauseing playback  

Press 

PAUSE/STEP

(

X

) to pause playback. Press 

ENTER

to continue 

playback.

Frame-by-Frame playback  

Press PAUSE/STEP (

X

) repeatedly to play title Frame-by-Frame.

Playing repeatedly or randomly 

Press

MODE

repeatedly, and the current title, chapter or track will be played

back repeatedly or randomly. To return to normal playback, press 

MODE

repeatedly. 
- Random play mode : only music files.

Fast forward or fast reverse  

Press 

SCAN

(

m

or 

M

) to play fast forward or fast reverse during playback.

You can change the playback speed by pressing 

SCAN

(

m

or 

M

repeatedly. Press 

ENTER

to continue play at normal speed.

ALL

ALL

DivX

DVD

ALL

ALL

DVD

ACD

DivX

WMA

DVD

MP3

ALL

Displaying Disc Information

1 Press DISPLAY :

DISPLAY

2 Select an item : 

U

U  u

u

3 Adjust the Display menu settings : 

I

I  i

i

4 To return the exit :

DISPLAY

ON REMOTE

Playing a Disc or file

ON REMOTE

1 Insert a disc on unit :

Z

Z  

OPEN/CLOSE

2 Select a DVD/CD :

FUNCTION

3 Adjust the menu settings :

U

U  u

u  I

I  i

i

or Select a file from the menu :

U

U  u

u

4 Start the Disc playing :

ENTER

5 To stop the Disc playing :

x

x

STOP

1/6

4/26

D

1  ENG

   3/2.1CH

1  KOR

1/3

HW964_event  12/6/08  11:01 AM  Page 14

Содержание SH94PA-C

Страница 1: ... from CD to your USB device Go to page 17 Portable In Listening to music from your portable device MP3 Notebook etc Go to page 17 5 1ch ez Set up Listening sound from TV DVD and Digital Device with vivid 5 1ch mode Go to page 15 HDMI In Simple connection with Set Top Box through HDMI Go to page 7 Made for iPod Enjoying music from iPod with simple connection Go to page 18 iPod is a trademark of App...

Страница 2: ...to the grounding system of the building as close to the point of the cable entry as practical FCC WARNING This equipment may generate or use radio frequency energy Changes or modifications to this equipment may cause harmful interference unless the modifications are expressly approved in the instruction manual The user could lose the authority to operate this equipment if an unauthorized change or...

Страница 3: ...ion of the product and to protect it from over heating The openings should never be blocked by placing the product on a bed sofa rug or other similar surface This product should not be placed in a built in installation such as a bookcase or rack unless proper ventilation is provided or the manufacturer s instructions have been adhered to 8 Do not install near any heat sources such as radiators hea...

Страница 4: ...to music from your portable player or external device 21 Other operations 21 Language Codes 22 Area Codes 22 Troubleshooting 23 Types of Playable Discs 24 Specifications 25 Welcome to your new DVD Receiver Precautions in using the touch buttons Use the touch buttons with clean and dry hands In a humid environment wipe out any moisture on the touch buttons before using Do not press the touch button...

Страница 5: ...res to the speakers Connect the other end of each wire to the correct speaker according to the colour coding To connect the cable to the speakers press each plastic finger pad to open the connection terminals on the base of each speaker Insert the wire and release the finger pad CENTER SUB WOOFER FRONT R FRONT L Green Orange Red White Above screen directly in front of you This can be placed in any...

Страница 6: ...ceiver is turned off LED color Operation Setting an ID of Wireless 1 Turn on the main unit and Wireless Receiver POWER Switch 2 Press and hold STOP x on the front of unit and MUTE on the remote control REMATE appears in display window 3 Turn off the Wireless Receiver POWER Switch 4 Turn on the Wireless Receiver A new ID is set POWER Switch When the unit is manufactured the ID is already set If an ...

Страница 7: ...audio jack on the unit SCART connection A Connect the TO TV jack on the unit and your TV using the SCART cable AM FM connection AM Connect the AM loop aerial to the DVD receiver FM Connect the FM aerial The reception will be its best when the two loose ends of the aerial are in a straight and horizontal line Video Out connection A Connect the VIDEO OUTPUT MONITOR jack on the unit to the correspond...

Страница 8: ... the resolution settings may result in the picture disappearing or an abnormal picture appearing In this case press RESOLUTION repeatedly unit the picture re appears Changing the resolution when the unit is connected with HDMI connector may result in malfunctions To solve the problem turn off the unit and then turn it on again When you connect a HDMI or DVI compatible device make sure of the follo...

Страница 9: ...microphone when DivX files playback 10 PORT Portable IN port You can enjoy music from portable device on your unit 11 USB port You can play video image and sound files by connecting the USB device 9 1 2 3 4 5 6 7 8 11 10 9 HDMI In connection Connect the HDMI INPUT jack on the unit to the HDMI output jack on your Set Top box or Digital Device etc using an HDMI cable Set the external source to HDMI ...

Страница 10: ...kward or forward TVt tHT SPK 5 1Ch Ez Set Up Press TVtHT SPK to select the AUX OPT directly MODE To select a play mode Random repeat MUTE To mute the sound VOL Volume Adjusts speaker volume NIGHT The night mode is to improve listenalbe at lower volumes SPECIAL EQ EQUALIZER effect You can choose sound impressions SUBTITLE During playback press SUBTITLE repeatedly to select a desired subtitle langua...

Страница 11: ... 1 Turn the power on The language list appears POWER 2 Select the language U U u u I I i i 3 Press ENTER 4 To confirm press I I i i and ENTER During the first use of this unit the initial language setup menu appears on your TV screen You must complete initial language selection before using the unit English will be selected as the initial language ON REMOTE Initial Setting the Area Code Optional 1...

Страница 12: ...r the picture to arrive this is called HD AV Sync Use U U u u on the remote control to scroll up and down through the delay amount which you can set at anything between 0 and 300m sec Semi Karaoke When a chapter title track is fully finished this function shows the score in the screen with a fanfare sound Available discs for the Semi Karaoke function DVD discs DVD Karaoke Discs On When you finishe...

Страница 13: ...registration code of the unit You can burn the download karaoke files into disc to use in internet karaoke mode SSR Real Time Score This function will be shown the Score to real time by checking interval and beat during sing a song in the karaoke mode only Select the On Score bar shows 31 level while checking the interval and beat Select the Off Score bar are not display on the screen This functio...

Страница 14: ...to the previous chapter track file Pauseing playback Press PAUSE STEP X to pause playback Press ENTER to continue playback Frame by Frame playback Press PAUSE STEP X repeatedly to play title Frame by Frame Playing repeatedly or randomly Press MODE repeatedly and the current title chapter or track will be played back repeatedly or randomly To return to normal playback press MODE repeatedly Random p...

Страница 15: ...ing with DivX MP3 WMA and JPEG files together you can select menu of files which you would like to play by pressing MENU If This file has non supperted type pops up select and appropriate file by pressing MENU Viewing the DVD MENU Press MENU to display the disc menu if available Changing the character set to display DivX subtitle correctly If the subtitle does not display properly during playback ...

Страница 16: ...ar in display window To cancel it press VOCAL FADE again This function is available to use only when a microphone is connected The quality of the VOCAL FADER may be different depending on the recording conditions of music files It is not available on the MONO mode Viewing photo files more you can do Viewing photo files as a slide show Use U U u u I I i i to highlight icon then press ENTER to start...

Страница 17: ...ear in the display RT Radio Text A text message contains special information from the broadcast station This text may scroll across the display CT Time controlled by the channel This shows the time and date as broadcast by the station Listening to the radio 1 Turn the power on POWER 2 Select either FM or AM FUNCTION 3 Select a radio station TUN 4 To save a radio station A preset number will show i...

Страница 18: ...r of files is 1000 or more External HDD Card readers Locked devices or hard type usb devices are not supported USB port of the unit cannot be connected to PC The unit can not be used as a storage device For multi card readers if connected you can select a desired slot If any of available slots is not displayed even after the reader is connected press RETURN to display the slot selection display Us...

Страница 19: ...ll be stored AUDIO CD Only Do not remove the USB device during USB recording If not an incomplete file may be made and not deleted on PC Recording through microphones is not available If USB recording does not work the message like NO USB ERROR USB FULL or NO REC is displayed on the display window For the discs recorded in the format of DTS disc USB recording is not supported Multi card reader dev...

Страница 20: ...OUT Compatible iPod When the unit is connected with dock connector may result in malfunctions Compatibility with your iPod may vary depending on the type of your iPod Depending on your iPod s software version it may not be possible to control your iPod from the unit We recommend installing the latest software version When you use iPod look out for the following Interference may happen depending on...

Страница 21: ...m Select Optional You must select the appropriate system mode for your TV system If NO DISC appears in the display window press and hold PAUSE STEP X X for more than five seconds to be able to select a system PAL NTSC Listening to music from your portable player or external device 1 Connect the portable player to the PORT IN PORTABLE IN connector of the unit Or Connect the external device to the A...

Страница 22: ... Samoan 8377 Sanskrit 8365 Scots Gaelic 7168 Serbian 8382 Serbo Croatian 8372 Shona 8378 Sindhi 8368 Singhalese 8373 Slovak 8375 Slovenian 8376 Spanish 6983 Sudanese 8385 Swahili 8387 Swedish 8386 Tagalog 8476 Language Code Tajik 8471 Tamil 8465 Telugu 8469 Thai 8472 Tonga 8479 Turkish 8482 Turkmen 8475 Twi 8487 Ukrainian 8575 Urdu 8582 Uzbek 8590 Vietnamese 8673 Volapük 8679 Welsh 6789 Wolof 8779...

Страница 23: ...DVD receiver There is an obstacle in the path between the remote control and the unit The batteries in the remote control are flat Plug the power cord into the wall outlet securely Select the appropriate video input mode on the TV so the picture from the DVD Receiver appears on the TV screen Connect the video cables securely to both the TV and DVD Receiver Select the correct input mode of the audi...

Страница 24: ... IS RECOMMENDED THAT THE USER SWITCH THE CONNECTION TO THE STANDARD DEFINITION OUTPUT IF THERE ARE QUESTIONS REGARDING OUR TV SET COMPATIBILITY WITH THIS MODEL 525p AND 625p UNIT PLEASE CONTACT OUR CUSTOMER SERVICE CENTER You have to set the disc format option to Mastered in order to make the discs compatible with the LG players when formatting rewritable discs When setting the option to Live File...

Страница 25: ...aker 1Way1Speaker Impedance 4 Ω 4 Ω 3 Ω Rated Input Power 155 W 155W 225 W Max Input Power 310 W 310 W 450 W NetDimensions WxHxD 290x1150x114mm 350x105x93mm 216x405x360mm Net Weight 3 86 kg 1 5 kg 7 1 kg Specifications Specifications Speakers HT904PA Front Rear Speaker speaker Type 2 Way 3 Speaker 1 Way 1 Speaker Impedance 4 Ω 4 Ω Rated Input Power 155 W 155 W Max Input Power 310 W 310 W NetDimens...

Страница 26: ...HW964_event 12 6 08 11 01 AM Page 26 ...

Страница 27: ...tion 1 Occupied Bandwidth 2MHz 5 Modulation Type FHSS 3 4 Channel Number 20 Frequency Range 2400 2483 5MHz 7 RF Operating Temperature 0 55 6 Antenna Type Integrated PCB Antenna Internal antenna 50mW 2 Transmitting Power No ITEM DESCRIPTIONS ...

Страница 28: ...Y LED BLUE RED COLOR DUAL LED 2 Key CH ID NONE 3 JACKS Audio To Speaker 4 Occupied Bandwidth 2MHz 5 Transmitting Power 50mW Integrated PCB Antenna Internal antenna 0 55 Frequency Range Channel Number 2400 2483 5MHz 20 Modulation Type FHSS 6 7 10 RF Operating Temperature 9 Antenna Output Type 8 ...

Отзывы: