background image

1. Application Object

These instructions are applied to all of the color TV, MC-049B.

2. Notes

(1) Because this is not a hot chassis, it is not necessary to use

an isolation transformer. However, the use of isolation
transformer will help protect test instrument.

(2) Adjustment must be done in the correct order.But the

adjustment can be changed by consideration of mass
production.

(3) The adjustment must be performed in the circumstance of

25±5°C of temperature and 65±10% of relative humidity if
there is no specific designation.

(4) The input AC voltage of the receiver must keep rating

voltage in adjusting.

(5) The receiver must be operated for about 15 minutes prior

to the adjustment. 

3. Focus adjustment

3.1. Preliminary steps

Tune the TV set to receive a digital pattern.
(SVC mode:Automatically mode change the STANDARD
MODE)

3.2. Adjustment Method

1) Single Focus CPT

Adjust the upper Focus volume of FBT for the best focus of
horizontal line A,vertical line B.

4. Purity & Convergence adjustment

4.1. Color purity adjustment

(1) It makes CPT enough to demagnetization. 
(2) Receive the signal of red raster.
(3) Loosen fixed screw of DY and closely to CPT funnel part.
(4) Check the center of screen that PURITY MAGNET of CPT

by crossing adjustment. At this time, 4 & 6 pole magnet is
located to magnet of nothing.

(5) Move the DY to make equal red on whole screen and it

does not to make the DY by fixed screw after check a
simple color of Red/Green/Blue and white raster whether or
not it is a pollution of color.
(At this time, take care raster of screen and DY must fixing
in the condition which maintains a horizontality.) 

(6) Check the receiver by move direction. When adjustment is

not working, adjust with the assisted MAGNET.

4.2. Convergence adjustment

These adjustments can the best condition of focus after
finished purity adjustment.

(1) Receive the signal of CROSS HATCH that BACK RASTER

is black.

(2) Adjust brightness and luminosity till dot appear 9 ~12.
(3) Open angle of the two tab of 4 pole MAGNET by isogonic

angle and accord with vertical line of red and blue color in
the middle of screen.

- 8 -

ADJUSTMENT INSTRUCTIONS

A

B

<Fig 1. PAL Digital Pattern(EU05CH)>

Assembling DY to

CPT

CPT Assembling

As preparatory operations before
assembling CPT, wind cotton Tape for
protecting to CPT NECK and DY, CPT
connection parts. At this moment, end
of tape should be over-lapped and
wound in direct route to the NECK.

Let the screen Standard condition.
Operate Heat-Run at least 15
minutes. 

Torque is to be 9-11 kg f.cm when
fixing DY.

Fix the Magnet to the position as
shown picture below. Be careful not to
make CPT neck shadow while
adjusting DY.

HEAT RUN

Degaussing

STC Adjustment

PURITY Adjustment

DY Fixing

SCREEN Voltage adj.

W/B Fixing

FOCUS not yet ADJ.

STC not yet ADJ.

DYC not yet ADJ.

Convergence Magnet

15 ~ 20mm

¢‚

¢‚

6Pole  4

2

Содержание RT-21FB80TQ

Страница 1: ...V SERVICE MANUAL CAUTION BEFORE SERVICING THE CHASSIS READ THE SAFETY PRECAUTIONS IN THIS MANUAL CHASSIS MC 049B MODEL RT 21FB80VQ VT website http biz LGservice com e mail http www LGEservice com techsup html ...

Страница 2: ...ety Precautions 3 Control Descriptions 4 Specifications 7 Adjustment Instructions 8 T rouble Shooting 12 Printed circuit board 16 Block Diagram 19 Exploded View 20 Exploded View Parts List 21 Replacement Parts List 22 SVC Sheet ...

Страница 3: ...perform an AC leakage current check on the exposed metallic parts of the cabinet such as antennas terminals etc to be sure the set is safe to operate without damage of electrical shock Leakage Current Cold Check Antenna Cold Check With the instrument AC plug removed from AC source connect an electrical jumper across the two AC plug prongs Place the AC switch in the on position connect one lead of ...

Страница 4: ...K accepts your selection or displays the current mode 6 Q VIEW returns to the previously viewed programme 7 TELETEXT BUTTONS option These buttons are used for teletext For further details see the Teletext section 8 PSM Picture Status Memory recalls your preferred picture setting 9 FAVOURITE selects a favorite programme 10 TURBO PICTURE SOUND BUTTON option selects Turbo picture and sound 11 MUTE sw...

Страница 5: ... and sub picture INPUT selects the input mode for the sub picture SIZE adjusts the sub picture size STILL freezes motion of the sub picture POSITION relocates the sub picture in clockwise direction 9 4 PIP switches on or off the 9 or 4 sub pictures No function COLOURED BUTTONS These buttons are used for teletext only TELETEXT models or programme edit Without TELETEXT PIP POWER MUTE 1 2 3 4 5 6 7 8...

Страница 6: ... EYE option adjusts picture according to the sur rounding conditions 9 TV AV option selects TV or AV mode clears the menu from the screen switches the set on from standby 10 Function option selects volume EYE option picture items or brief auto programme while the menus not display 11 D D E E option adjusts the function or selects a pro gramme switches the set on from standby 12 TURBO SOUND PICTURE...

Страница 7: ...rd input Voltage 110 240V 50 60Hz 4 Measurement must be performed after heat run more than 20min 5 Adjusting Standard for this chassis is followed a special standard No 1 2 3 4 5 6 7 8 Item Receiving System Receiving Channel Input Voltage Market Screen Size Tuning System Operating Environment Storage Environment Remark For EU For Non EU For EU For Non EU NTSC M Multi model Non EU EU FLAT CONVENTIO...

Страница 8: ...ve the DY to make equal red on whole screen and it does not to make the DY by fixed screw after check a simple color of Red Green Blue and white raster whether or not it is a pollution of color At this time take care raster of screen and DY must fixing in the condition which maintains a horizontality 6 Check the receiver by move direction When adjustment is not working adjust with the assisted MAG...

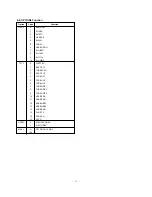
Страница 9: ...U05CH 2 Deflection setting data adjustment is operate by SVC communicator 3 Enter the deflection adjustment mode by selection SERVICE1 on SERVICE MENU after pressing LINE SVC MODE IN START KEY 4 Use the CH D E key to select adjustment item 5 Use the VOL F G key to increase decrease data Note 1 When adjusting a deflection adjust N50Hz of PAL signal first and adjust a deflection at Normal 60Hz NTSC ...

Страница 10: ...S VA VL SC HS 512 511 512 511 512 511 512 511 32 2047 150 12 140 6 100 140 12 140 6 123 Variable range N50Hz PAL FLAT 21 N60Hz NTSC FLAT 21 INCH SYS SOUND CH AU Option Code 0 1 2 3 4 5 6 7 0 1 2 3 0 1 2 3 0 1 Function 21A 21B 21C 29F 25F 28WF 32WF 28N 34F 29N 25N BG I DK BG I DK L BG I DK M BG L RF STEREO AV STEREO MONO MONO DUAL Using Not using Table 4 Initial deflection setting data AV2 DVD SCAR...

Страница 11: ...14 15 16 17 0 1 0 100 Function ENG ONLY EU 5EA EU ETC GREECE EU ALL FARSI ARAB URDU E HINDI E I M V E THAI E CHINA WEST EU EAST EU1 TURKEY EU EAST EU2 CYRILLIC1 CYRILLIC2 CYRILLIC3 TURK GRE1 TURK GRE2 TURK GRE3 ARAB FRA ARAB ENG ARAB HEB1 ARAB HEB2 FARS ENG FARS FA FARS ALL AUTO WITHOUT HDEV WITH HDEV SETTING VOL MAX ...

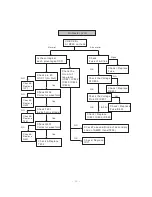
Страница 12: ...k The voltage At pin of IC821 IC822 Q807 Check Replace C821 IC822 Q807 Check The Voltage At pin 2 19 20 21 24 of IIC11 Check Replace TU 101 Check Replace F806 D828 D805 OK OK OK OK OK OK NO NO NO NO NO NO No Raster Sound OK 1 2 Check the Heater voltage of CPT 6 6 4Vrm s Check HV Screen Voltage of CPT Check the Heater pulse of FBT T402 Check R G B out of CPT Board Check FBT T402 Check 185V line of ...

Страница 13: ...Check T401 each pin voltage Check Replace T402 Check the Voltage Of C803 Check the Voltage Pin 4 OF IC801 Check Replace IC801 IC802 IC826 Check Fuse and Diode of secondary Load of SMPS trans T803 Check Replace IC11 Check Replace IC11 Check Replace Q402 Check Replace T401 Check Replace Q401 Check Replace Fuse Check Replace DB801 Check Replace Fuse IC801 NO OK OK OK NO Open NO 18 20V Normal Yes Yes ...

Страница 14: ...p Check 1 8V 3 3V 5V DC Voltage Check SMPS Trans Secondary Voltage Check pin18 Reset Voltage Check IC13 Reset IC Check pin57 58 SCL SDA Check IC12 EEPROM SCL SDA Line RelaceIC11 Q501 Q503 Q504 R G B out of IC11 Check Replace CPT Board com ponent Go to No Sound Picture OK OK OK OK OK NO NO NO NO NO NO 3 3V DC OK OK 3 3V DC Check receiving system in MENU execute Auto Program ...

Страница 15: ...age Of pin2 19 20 21 24 of IC11 Check the signal line of SPK L R Check pin 55 m ute of IC11 Check the waveform At pin2 4 of IC601 Check the waveform At pin6 of IC601 Check the waveform At pin8 9 11 12 of IC601 Check thevpltage At pin7 5 of IC601 Check Replace D828 D805 F806 Check the connection of side or Front AV Board P603A Replace IC601 AV OK OK OK OK NO NO OK OK NO NO NO NO Correct the Board N...

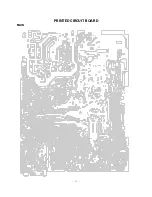
Страница 16: ... 16 PRINTED CIRCUIT BOARD MAIN ...

Страница 17: ... B3 J521 C3 J522 B3 J523 C3 J524 C3 J525 C3 J526 C3 J527 C3 J528 C3 J529 B3 J530 B3 J531 B3 J532 B3 J533 B2 J534 C2 J535 C1 J536 B4 J537 C5 J538 C4 J539 C4 J540 B2 J541 B3 J542 B3 J543 B3 J544 B3 J545 C2 J546 B3 J547 B3 J548 B3 J549 C2 J550 B3 J551 B3 J552 B3 J553 B3 J554 B3 J555 B3 J556 B3 J557 B3 J558 C3 J559 B3 J560 B3 J561 C5 J562 C5 J564 C4 J565 C4 J566 C4 J567 C4 J568 C4 J569 B4 J570 C4 J571...

Страница 18: ...SIDE A V 18 CONTROL PIP ...

Страница 19: ... AMP IC301 TDA4863A 14V 14V VA H OUT 35V H Vc c TU 33V S Vc c 6 5 V 12V B SAW FILTER Z101 PIP_BOARD SDA9489X S1117 18 IC825 S111 7 33 IC853 KIA78S06P IC824 KA78R33 KA78R05C ST 5V ST 3 3V ST 1 8V 3 3 V GAME HIC HIC01 190 V VB H FLB IIC 33V 5V TV MONITOR OUT SCART RGB IN Y Cb Cr IN AV IN H Vc c 5V S Vc c PIP RGB PIP VIDEO IIC VS H FLB 5V ST 5V ON OFF DATA CLOCK RESET VIDEO AUDIO 190V ...

Страница 20: ... 20 EXPLODED VIEW 600 700 330 320 300 510 170 913 112 120 310 530 174 520 400 943 570 ...

Страница 21: ...6KEY 320 320 062E SPRING KNOB 330 5020V00990A BUTTON POWER RT 21FB80 ABS HF 380 1KEY 400 3809V00509B BACK COVER ASSEMBLY RT 21FB80VQ DVD 1PHONE PPL SHAHAB 520 6871VMMT99D PWB PCB ASSEMBLY MAIN MC049B RT 21FB80VT KMLLKS2 6871VMM895Q PWB PCB ASSEMBLY MAI MC 049B RT 21FB80VQ KMLLKS2 530 6871VSMAAPB PWB PCB ASSEMBLY SUB CONT MC049B 21FB80 SHAHAB PPL 570 6871VSML08A PWB PCB ASSEMBLY SUB PIP MC049B 600 ...

Страница 22: ...UF STD 10V M FL TP5 4 7UF STD 50V 20 FL TP 5 22UF STD 16V M FL TP5 0 1UF D 50V 80 20 F Y5V TA52 LOCA NO PART NO DESCRIPTION IC12 IC13 IC301 IC601 IC801 IC802 IC821 IC822 IC822 IC824 IC825 IC826 IC853 IC901 ICP01 ICP02 Q104 Q11 Q301 Q401 Q402 Q501 Q502 Q503 Q504 Q505 Q507 Q508 Q510 Q601 Q802 Q803 Q808 QP01 QP02 D301 D403 D405 D405 D406 D406 D407 D501 0IMMRSG036C 0IFA752700A 0IPMGPH002A 0IPMGSA021C ...

Страница 23: ...4 C526 C527 C528 C529 C530 C531 C532 C533 C534 C535 C536 C537 C538 C540 C541 C542 C543 C545 C546 C547 C548 C550 C551 C602 C603 C604 C605 C606 C607 C608 C609 C610 C611 C612 C613 C614 C615 C616 C617 C618 C619 C620 C625 C626 C627 C632 0CN1040K949 0CN1010K519 0CE107DD618 0CN1040K949 0CN1040K949 0CE107DD618 0CN1040K949 0CN1040K949 0CN1040K949 0CN1040K949 0CN1010K519 0CX3300K409 0CN1040K949 0CE107DD618 ...

Страница 24: ...P01 LP12 LP13 LP14 T401 T803 P1205 P1206 P12B P551B P552B P902 F802 F804 F805 F806 FR401 FR406 FR407 FR408 FR901 J202 J203 0LA0102K139 0LA0101K119 0LA0102K119 0LA0101K119 0LA0102K119 0LA0102K119 0LA0102K119 0LA0102K119 0LA0102K119 0LA0102K119 6140VE0001V 6140VB0001F 0LA0102K119 0LA0102K119 0LA0102K119 0LA0101K119 0LA0102K119 0LA0102K119 0LA0101K119 0LA0101K119 0LA0102K119 0LA0821K119 150 C02F 0LA0...

Страница 25: ...CA NO PART NO DESCRIPTION R35 R37 R38 R403 R404 R405 R409 R410 R412 R42 R421 R422 R501 R502 R503 R505 R506 R507 R508 R509 R510 R511 R512 R513 R514 R515 R516 R517 R518 R519 R520 R521 R522 R523 R524 R526 R527 R532 R534 R535 R536 R539 R540 R542 R543 R545 R555 R557 R558 R562 R563 R601 0RD1000F609 0RD1000F609 0RD1002F609 0RD5600A609 0RD0332A609 0RS8200K607 0RD1501A609 0RS2702K607 0RD7501A609 0RD4701F60...

Страница 26: ...OHM 1 6 W 5 TA52 100 OHM 1 6 W 5 TA52 100 OHM 1 6 W 5 TA52 1 2 W 1 5K 10 PLIKOR HIGH SURGE 1 2 W 1 5K 10 PLIKOR HIGH SURGE 1 2 W 1 5K 10 PLIKOR HIGH SURGE 2 2M OHM 1 2 W 7 0 5 00 TA52 10 OHM 1 6 W 5 TA52 220 OHM 1 6 W 5 00 TA52 LOCA NO PART NO DESCRIPTION RP03 RP04 RP06 RP11 RP12 RP13 RP14 SW1111 SW1112 SW1113 SW1114 SW1115 SW1116 SW801 FB801 FB802 FB803 FB825 T802 X11 XP01 Z101 JK202 PJ1202 PJ120...

Страница 27: ...P NO 3854VA0162A S1 2004 6 12 ...

Страница 28: ...SVC SHEET 3854V A0162A S ...

Страница 29: ...Sep 2004 Printed in Korea P NO 3828VD0199G ...

Отзывы: