background image

Operating

32

Oper

ating

4

Playing the Linked 

Devices

Playing a USB device

yui

This unit can play video, audio and photo files 
contained on a USB device.
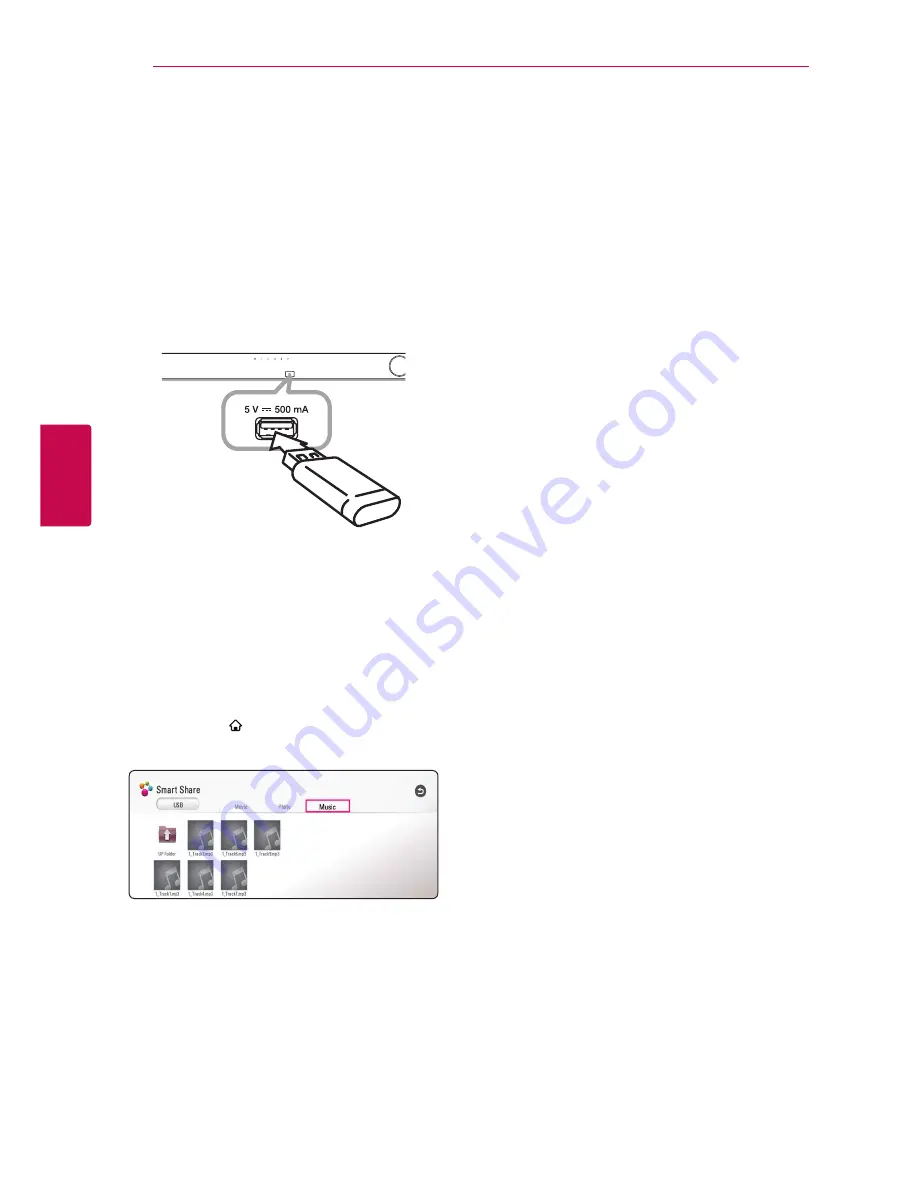
1.  Connect a USB device on the unit.

When you connect the USB device on the HOME 
menu, the unit plays an audio file contained in the 
USB storage device automatically. If the USB storage 
device is containing various types of files, a menu 
for the file type selection will appear.
File loading may takes few minutes depending on 
the number of content stored in the USB storage 
device. Press 

ENTER

 (

b

) while [Cancel] is selected 

to stop loading.
2. Press 

HOME

 ( ).

3.  Select [Smart Share] and press 

ENTER

 (

b

).

4.  Select the desired linked device in the category.
5.  Select [Movie], [Photo] or [Music]. 
6.  Select a file using 

W/S/A/D

, and press 

d

(Play) or 

ENTER

 (

b

) to play the file.

Notes on USB device


y

This unit supports USB flash drive/external HDD 
formatted in FAT32 and NTFS when accessing 
files (music, photo, movie).


y

This unit can support up to 4 partitions of the 
USB device.


y

Do not extract the USB device during operation 
(play, etc.). 


y

A USB device which requires additional program 
installation when you have connected it to a 
computer, is not supported.


y

USB device: USB device that supports USB1.1 
and USB2.0.


y

Video, audio and photo files can be played. For 
details of operations on each file, refer to relevant 
pages.


y

Regular back up is recommended to prevent 
data loss.


y

If you use a USB extension cable, USB HUB or 
USB Multi-reader, the USB device may not be 
recognized.


y

Some USB device may not work with this unit.


y

Digital camera and mobile phone are not 
supported.


y

USB Port of the unit cannot be connected to PC. 
The unit cannot be used as a storage device.

Содержание NB3730A

Страница 1: ...OWNER S MANUAL 300 W SMART SOUND BAR Please read this manual carefully before operating your set and retain it for future reference NB3730A NB3730A S33A1 D NB3732A NB3732A S33A1 D www lg com ...

Страница 2: ......

Страница 3: ... Slots and openings in the cabinet are provided for ventilation and to ensure reliable operation of the product and to protect it from over heating The openings shall be never be blocked by placing the product on a bed sofa rug or other similar surface This product shall not be placed in a built in installation such as a bookcase or rack unless proper ventilation is provided or the manufacturer s ...

Страница 4: ...s including amplifiers that produce heat 9 Do not defeat the safety purpose of the polarized or grounding type plug A polarized plug has two blades with one wider than the other A grounding type plug has two blades and a third grounding prong The wide blade or the third prong are provided for your safety If the provided plug does not fit into your outlet consult an electrician for replacement of t...

Страница 5: ...nected y y Consult the dealer or an experienced radio TV technician for help CAUTION Any changes or modifications not expressly approved by the party responsible for compliance could void the user s authority to operate this equipment FCC RF Radiation Exposure Statement This equipment complies with FCC radiation exposure limits set forth for an uncontrolled environment This equipment should be ins...

Страница 6: ... Playing a USB device 33 Playing a file on a network server 34 Using Home Network Server for PC 34 Installing Nero MediaHome 4 Essentials 34 Sharing files and folders 35 About Nero MediaHome 4 Essentials 35 System requirements 36 General Playback 36 Basic operations for video and audio content 36 Basic operations for photo content 37 Resume playback 38 On Screen Display 38 To control video playbac...

Страница 7: ... to control your TV 55 Network Software Update 55 Network update notification 55 Software update 57 Additional Information 57 File requirement 59 About DLNA 59 Certain system requirements 60 Audio Output Specifications 61 Trademarks and Licenses 64 Specifications 65 Maintenance 65 Handling the unit 65 Important Information relating to Network Services Some of the content in this manual may differ ...

Страница 8: ... special notes and operating features Caution Indicates cautions for preventing possible damages from abuse About the 7 symbol display 7 may appear on your TV display during operation and indicates that the function explained in this owner s manual is not available on that specific media ...

Страница 9: ...with clean and dry hands In a humid environment wipe out any moisture on the touch buttons before using y y Do not press the touch buttons hard to make it work If you apply too much strength it can damage the sensor of the touch buttons y y Touch the button that you want to work in order to operate the function correctly y y Be careful not to have any conductive material such as metallic object on...

Страница 10: ... or previous chapter title file Z Stop Stops playback z Play Starts playback M Pause Pauses playback SPEAKER LEVEL Sets the sound level of desired speaker SOUND EFFECT Selects a sound effect mode VOL Adjusts speaker volume AUDIO Selects an audio language or audio channel MUTE Mute the unit c HOME Displays or exits the Home Menu SUBTITLE Selects a subtitle language INFO MENU m Displays or exits On ...

Страница 11: ...stallation Template with the bottom of TV and attach to the position TV 2 When you mount it on a wall concrete use the wall plugs Not supplied You should drill some holes A guide sheet Wall Mount Bracket Installation Template is supplied to drill Use the sheet to check the point to drill Wall Mount Bracket Installation Template Screws and Wall Plugs are not supplied for mounting the unit We recomm...

Страница 12: ...rts of this unit or be the cause of personal injury y y Do not hang onto the installed unit and avoid any impact to the unit y y Secure the unit firmly to the wall so that it does not fall off If the unit falls off it may result in an injury of a person or damage to the product y y When the unit is installed on a wall please make sure that a child does not pull any of connecting cables as it may c...

Страница 13: ...AUDIO option then press D to move to the second level 4 Use W S to select the Connect wireless speakers option then press ENTER b or D to move to the third level The Wireless Speaker Connection Guide appears 5 Press PAIRING button on the subwoofer If you see the yellow LED indicator light pairing was successful 6 Select Speaker test for wireless speaker connection test by using ENTER b y y If ther...

Страница 14: ...evice s audio sound may be distorted or may not output y y When you use HDMI connection you can change the resolution for the HDMI output Refer to Resolution Setting on page 15 y y Select the type of video output from the HDMI OUT jack using HDMI Color Setting option on the Settings menu see page 27 y y Changing the resolution when the connection has already been established may result in malfunct...

Страница 15: ...MI OUT on the unit with HDMI IN of the TV that supports ARC function using an HDMI cable You can connect only one Sound bar to TV compatible with ARC To active SIMPLINK ARC function set this option to On page 29 Note Resolution Setting The unit provides several output resolutions for HDMI OUT jack You can change the resolution using Settings menu 1 Press HOME 2 Use A D to select the Settings and p...

Страница 16: ...o y y If you select a resolution that your TV does not accept the warning message will appear After resolution change if you cannot see the screen please wait 20 seconds and the resolution will automatically revert back to the previous resolution Note Optical digital audio connection You can enjoy the sound from your TV with a optical digital audio connection TV Optical digital cable Connect the o...

Страница 17: ...Wired network connection Using a wired network provides the best performance because the attached devices connect directly to the network and are not subject to radio frequency interference Please refer to the documentation for your network device for further instructions Connect the unit s LAN port to the corresponding port on your Modem or Router using a commercially available LAN or Ethernet ca...

Страница 18: ...t the NETWORK setting as follow Preparation Before setting the wired network you need to connect the broadband internet to your home network 1 Select Connection Setting option in the Settings menu then press ENTER b 2 Read the preparations for the network settings and then press ENTER b while Start is highlighted Network will automatically be connected to the unit Advanced Setting If you want to s...

Страница 19: ... is highlighted to finish the wired network settings Wireless network connection Another connection option is to use an Access Point or a wireless router The network configuration and connection method may vary depending on the equipment in use and the network environment Wireless Communication DLNA certified servers Access Point or Wireless Router Broadband service Refer to the setup instructions...

Страница 20: ... access point you need to input the security code as necessary If you use other characters than the english alphabet or digits for the SSID name of your access point or wireless router it may be displayed differently Note y y WEP security mode generally have 4 keys available on an access point setting If your access point or wireless router use WEP security enter the security code of the key No 1 ...

Страница 21: ...router or cable modem Then power on and or connect the power cable again y y Depending on the internet service provider ISP the number of devices that can receive internet service may be limited by the applicable terms of service For details contact your ISP y y Our company is not responsible for any malfunction of the unit and or the internet connection feature due to communication errors malfunc...

Страница 22: ...om them y y Turn off all unused network equipment in your local home network Some devices may generate network traffic y y For better reception place the unit from the access point as close as possible y y In some instances placing the access point or wireless router at least 0 45 m 1 5 ft above the floor may improve the reception y y The reception quality over wireless depends on many factors suc...

Страница 23: ...ted If wired network is connected the network connection setting will automatically be finished 4 All available networks are displayed on the screen Use W S to select Wired Network or desired SSID of wireless network and press ENTER b If you have security on your access point you need to input the security code as necessary 5 Use W S A D to select the IP mode between Dynamic and Static Normally se...

Страница 24: ...highlighted to finish the initial setup settings If there is any settings to be changed use W S A D to select 1 and press ENTER b Settings Adjust the setup settings You can change the settings of the unit in the Settings menu 1 Press HOME 2 Use A D to select the Settings and press ENTER b The Settings menu appears 3 Use W S to select the first setup option and press D to move to the second level 4...

Страница 25: ...k name using virtual keyboard This unit will be recognised by the name you are entering on your home network Wi Fi Direct This unit is a Wi Fi Direct certified device Wi Fi Direct is the technology that enables devices to connect each other without connecting to an Access point or a router Set this option to On for activating the Wi Fi Direct mode Refer to page 46 for the device connection Network...

Страница 26: ...earing at the left and right sides 16 9 Full Select when a 16 9 wide TV is connected The 4 3 picture is adjusted horizontally in a linear proportion to fill the entire screen You cannot select 4 3 Letter Box and 4 3 Pan Scan option when the resolution is set to higher than 720p Note Resolution Sets the output resolution of the HDMI video signal Refer to page 15 for details about the resolution set...

Страница 27: ...vice YCbCr Select when connecting to a HDMI display device RGB Select when connecting to a DVI display device Home Menu Guide This function allows you to display or delete the guide bubble on the HOME menu Set this option to On for displaying guide LANGUAGE menu Display Menu Select a language for the Settings menu and on screen display System Setting ...

Страница 28: ...s set to PCM Multi Ch the audio may output as PCM Stereo if the PCM Multi Ch information is not detected from HDMI device with EDID y y This setting is not available on the input signal from an external device Note DRC Dynamic Range Control This function allows you to listen to a movie at a lower volume without losing clarity of sound Auto The dynamic range of the Dolby Digital and Dolby Digital P...

Страница 29: ...ive minutes If you set this option to On the unit automatically turns off within 20 minutes since the Screen Saver is displayed Set this option to Off to leave the screen saver until the unit is operated by the user TV Sound Connecting You can listen to TV sound through this unit s speaker automatically when TV is turned on TV and this unit should be connected with optical cable Press W to move an...

Страница 30: ...ignals is played according to the way it was recorded Bass Blast Reinforce the bass sound effect from front left and right speaker and subwoofer Loudness Improves bass and treble sound User EQ You can adjust the sound by raising or lowering the level of specific frequency 3D SOUND 3D Sound features deliver sound creating a wider spot so you can enjoy more immersive and cinematic surround sound Set...

Страница 31: ...lays LG Apps titles provided to the unit page 49 d My Apps Displays the My Apps screen page 50 e Input Changes input mode f Settings Adjusts the system settings g Search Searches for desired LG Apps and other content h Log In Displays login menu Using the Smart Share You can play video photo and audio content on the unit by connecting a USB device or using home network DLNA 1 Press HOME to display...

Страница 32: ...d press d Play or ENTER b to play the file Notes on USB device y y This unit supports USB flash drive external HDD formatted in FAT32 and NTFS when accessing files music photo movie y y This unit can support up to 4 partitions of the USB device y y Do not extract the USB device during operation play etc y y A USB device which requires additional program installation when you have connected it to a...

Страница 33: ... S A D and press d Play or ENTER b to play the file y y The file requirements are described on page 57 y y Thumbnails of files with unsupported format will be displayed but cannot be played on this unit y y The subtitle file name and video file name have to be the same and located at the same folder y y The playback and operating quality may be affected by your home network condition y y You may e...

Страница 34: ...eck box and click the Next button 10 Click the Exit button to complete the installation MAC OS X 1 Start up your computer and insert the supplied CD ROM disc into your computer s CD ROM drive 2 Browse the CD ROM drive and open the MediaHome_4_Essentials_MAC folder 3 Double click the Nero MediaHome dmg image file The Nero MediaHome window is opened 4 In the Nero MediaHome window drag the Nero Media...

Страница 35: ... examples Follow the explanation referring to the actual operations of your language version Note System requirements Windows PC y y Windows XP Service Pack 2 or higher Windows Vista no Service Pack required Windows 7 no Service Pack required Windows XP Media Center Edition 2005 Service Pack 2 or higher Windows Server 2003 y y Windows Vista 64 bit edition application runs in 32 bit mode y y Window...

Страница 36: ...y to play various speeds of slow motion To skip to the next previous title file During playback press C or V to go to the next title file or to return to the beginning of the current title file Press C twice briefly to step back to the previous title file In the file list menu of a server there may have many types of content in a folder together In this case press C or V to go to the previous or n...

Страница 37: ...epending on a file If MZ Resume Stop appears on the screen briefly press d Play to resume playback from the scene point If you press Z Stop twice Z Complete Stop appears on the screen The unit will clear the stopped point The resume point may be cleared when a button is pressed for example 1 Power Note ...

Страница 38: ...ring video playback e Repeat Repeats a desired section or sequence page 41 f 3D Adjusts the 3D setting page 45 Displaying content information on screen y 1 During playback press INFO MENU m 2 Select an Option using A D and press ENTER b a Title Current title number total number of titles b Time Elapsed playing time total playback time c Audio Selected audio language or channel d Subtitle Selected ...

Страница 39: ...de show page 45 c Option Displays slide show options d Rotate Rotates the photo clockwise d Zoom Displays the Zoom menu Setting the slide show option You can use various options during viewing a photo in full screen 1 While viewing pictures press INFO MENU m 2 Select an Option using A D and press ENTER b a Speed Use A D to select a delaying speed between photos in a slide show b Effect Use A D to ...

Страница 40: ...e connected to the broadband internet for accessing the Gracenote Media Database y y If the music information is not in the Gracenote Media Database message appears on the screen y y Depending on the cases it will takes a few minutes to load music information from the Gracenote Media Database y y Information may be displayed in broken letters if the language you selected is not available on the Gr...

Страница 41: ... portion y This unit can repeat a portion you have selected 1 During playback press REPEAT h to select A B and press ENTER b at the beginning of the portion you wish to repeat 2 Press ENTER b at the end of the portion Your selected portion will be repeated continually 3 To return to normal playback press CLEAR y y You cannot select a portion less than 3 seconds y y This function may not work on so...

Страница 42: ... select the Audio option 4 Use A D to select desired audio language or audio channel Immediately after you have switched sound there may be a temporary discrepancy between the display and actual sound Note Changing the TV Aspect Ratio y You can change the TV aspect ratio setting during playback 1 During playback press INFO MENU m 2 Select an Option using A D and press ENTER b 3 Use W S to select t...

Страница 43: ...ess BACK 1 to exit the On Screen display Setting the User setting option 1 During playback press INFO MENU m 2 Select an Option using A D and press ENTER b 4 Use W S to select the Picture Mode option 5 Use A D to select the User setting option and press ENTER b 6 Use W S A D to adjust the Picture Mode options Select Default option then press ENTER b to reset the all video adjustments 7 Use W S A D...

Страница 44: ... need to select the subtitle file on the Movie menu before playing the movie 1 Use W S A D to select the subtitle file you wish to play in the Movie menu 2 Press ENTER b Press ENTER b again to deselect the subtitle file Selected subtitle file will be displayed when you play the video file y y If you press Z Stop during playback the subtitle selection is cancelled y y This function is not available...

Страница 45: ...ble Device USB USB DLNA server DLNA server 5 Use W S to select a file or a folder you wish to play Select g and press ENTER b to display the upper directory When selecting audio file from a server folder selection is not available Only file selection is available Note 6 Use D to select OK and press ENTER b to complete music selection Setting the 3D option y This function allows you to play 3D cont...

Страница 46: ...irect device select the Refresh List and press ENTER b To select a server from the device list files or folders must be shared by DLNA server from the connected Wi Fi Direct device 6 Select Movie Photo or Music using W S A D and press ENTER b 7 Select a file using W S A D and press ENTER b to play the file y y For the purpose of the better transmission placing the unit from the Wi Fi Direct certif...

Страница 47: ...luetooth devices Pairing your unit and Bluetooth device Before you start the pairing procedure make sure the Bluetooth feature is turned on in to your Bluetooth device Refer to your Bluetooth device s user guide Once a pairing operation is performed it does not need to be performed again 1 Select the Bluetooth function by using the FUNCTION P Appears BT READY in display window 2 Operate the Blueto...

Страница 48: ...d the unit gets out of the operating range of Bluetooth y y The device with Bluetooth wireless technology is disconnected if you turn off the main unit or put the device away from the main unit more than 10 m Note Using the Premium You can use various content services via Internet with the Premium feature 1 Check the network connection and settings page 17 2 Press HOME 3 Select the Premium using A...

Страница 49: ...ing on the region the LG Smart World My Apps service and Search function may not be available y y To install a paid application you need to be a paid member Visit www lgappstv com for more information Note Signing in To use the LG Smart World feature you need to sign in with your account 1 On the LG Smart World or My Apps screen press red R colored button 2 Fill the ID and Password field using the...

Страница 50: ...the region the LG Smart World My Apps service and Search function may not be available y y The Search function does not search content in every online services It works only in certain online services Note Using the My Apps Menu You can move or delete an installed application in the My Apps menu 1 Press HOME 2 Select the My Apps and press ENTER b Move an application 1 Select an application and pre...

Страница 51: ... unit supports only USB Flash Drive and USB External HDD with FAT32 or NTFS format Cannot play video photo or audio files y y The files are not recorded in a format that the unit can play y y The unit does not support the codec of the video file The remote control does not work properly y y The remote control is not pointed at the remote sensor of the unit y y The remote control is too far from th...

Страница 52: ...your media server y y The unit is not connected to the local area network that your media server is connected Cannot connect the unit to the access point or wireless LAN router y y The wireless communication may be interrupted from household devices that are using radio frequencies Move the unit away from them Access point is not displayed on the Access point name list y y The access point or wire...

Страница 53: ...our system that is different from your TV y y Set the resolution which your TV accepts Sound Symptom Cause Solution There is no sound or the sound is distorted y y The unit is in scan slow motion or pause mode y y The sound volume is low y y Check the wireless speaker connection page 13 Customer Support You can update the unit using the latest software to enhance the products operation and or add ...

Страница 54: ... TV You can operate your TV with the supplied remote control If your TV is listed in the table below set the appropriate manufacturer code 1 While holding down 1 TV POWER button and press the manufacturer code for your TV with the numerical buttons see the table below Manufacturer Code number LG 1 Default 2 Zenith 1 3 4 GoldStar 1 2 Samsung 6 7 Sony 8 9 Hitachi 4 2 Release the 1 TV POWER button to...

Страница 55: ...nit using the latest software to enhance the products operation and or add new features You can update the software by connecting the unit directly to the software update server y y Before updating the software in your unit remove USB Device from the unit y y Before updating the software in your unit turn the unit off and then turn it back on y y During the software update procedure do not turn of...

Страница 56: ...ncel will end the update and downloaded file will not be re usable To update software the next time the software update procedure has to be started from the beginning again Do not turn off the power during the software update Caution 9 When update is completed the power will be turned off automatically in a few seconds 10 Turn the power back on The system now operates with the new version The Soft...

Страница 57: ...on Alpha ssa txt MicroDVD sub txt SubViewer 1 0 sub SubViewer 2 0 sub txt TMPlayer txt DVD Subtitle System txt Audio files File Location File Extension Sampling Frequency Bitrate Note USB mp3 wma wav m4a DRM free flac within 32 48 kHz WMA within 16 48 kHz MP3 within 32 192 kbps WMA within 32 320 kbps MP3 Some wav files are not supported on this unit DLNA mp3 wma wav m4a DRM free within 32 48 kHz W...

Страница 58: ...the ID3 Tag embedded MP3 file y y The total playback time of audio file indicated on the screen may not correct for VBR files y y HD video files contained on the USB 1 0 1 1 may not played properly USB 2 0 are recommended to play back HD video files y y This unit supports H 264 MPEG 4 AVC profile Main High at Level 4 1 A file with higher level may not be supported y y This unit does not support fi...

Страница 59: ...he DLNA certification logo makes it easy to find products that comply with the DLNA Interoperability Guidelines This unit complies with DLNA Interoperability Guidelines v1 5 When a PC running DLNA server software or other DLNA compatible device is connected to this player some setting changes of software or other devices may be required Please refer to the operating instructions for the software o...

Страница 60: ...tstream if Digital Output option is set to Bit Stream Except LPCM Codec the output always include interactive and secondary audio 2 This unit automatically selects the HDMI audio according to the decoding capability of the connected HDMI device even though Digital Output option is set to Bit Stream 3 If the Digital Output option is set to DTS re encode the audio output is limited to 48 kHz and 5 1...

Страница 61: ... Rovi Corporation or its subsidiaries and are used under license DLNA the DLNA Logo and DLNA CERTIFIED are trademarks service marks or certification marks of the Digital Living Network Alliance The Wi Fi CERTIFIED Logo is a certification mark of the Wi Fi Alliance The Wi Fi Protected Setup Mark is a trademark of the Wi Fi Alliance Bluetooth wireless technology is a system which allows radio contac...

Страница 62: ...www cinavia com To request additional information about Cinavia by mail send a postcard with your mailing address to Cinavia Consumer Information Center P O Box 86851 San Diego CA 92138 USA This product incorporates proprietary technology under license from Verance Corporation and is protected by U S Patent 7 369 677 and other U S and worldwide patents issued and pending as well as copyright and t...

Страница 63: ... Data the Gracenote Software and the Gracenote Servers including all ownership rights Under no circumstances will Gracenote become liable for any payment to you for any information that you provide You agree that Gracenote Inc may enforce its rights under this Agreement against you directly in its own name The Gracenote service uses a unique identifier to track queries for statistical purposes The...

Страница 64: ... jack x 1 Amplifier Total 300 W Front 80 W x 2 4 Ω THD 10 Subwoofer 140 W 3 Ω THD 10 Wireless subwoofer Power requirements AC 120 V 60 Hz Power consumption 40 W Type 1 Way 1 speaker Impedance 3 Ω Rated input power 140 W Max input power 280 W External dimensions WxHxD 170 mm x 360 mm x 316 mm 6 7 inches x 14 2 inches x 12 4 inches Net Weight 5 54 kg 12 2 lbs System Signal system Standard NTSC color...

Страница 65: ...ownloads files text images photographs graphics videos webcasts publications tools resources software code programs applets widgets applications products and other content Content and all services and offerings Services provided or made available by or through any third party each a Service Provider is the sole responsibility of the Service Provider from whom it originated The availability of and ...

Страница 66: ......

Отзывы: