background image

25

Item

Cook time

Special Instructions

(at HIGH)

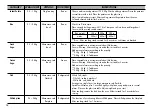
To heat or reheat successfully in the microwave, it is important to follow several guidelines. Measure the amount of

food in order to determine the time needed to reheat. Arrange the food in a circular pattern for best results. Room

temperature food will heat faster than refrigerated food. Canned foods should be taken out of the can and placed in a

microwavable container. The food will be heated more evenly if covered with a microwavable lid or vented plastic

wrap. Remove cover carefully to prevent steam burns. Use the following chart as a guide for reheating cooked food.

Heating or Reheating

Guide


Sliced meat

3 slices 

(0.5cm thick)

Chicken pieces

1 breast

1 leg and thigh

Fish fillet

(170-230g) 

Lasagne

1 serving(300g) 

Casserole

1 cup

4 cups

Casserole

cream or cheese

1 cup

4 cups

Sloppy Joe or

Barbecued beef

1 sandwich

(

1/2

cup meat filling)

without bun

1~2 minutes 

2~3 minutes

3~3

1/2 

minutes

1~2 minutes

4~6 minutes

1

1/2

~3 minutes

4

1/2

~7minutes

1~2

1/2

minutes

3

1/2

~6 minutes

1~2

1/2

minutes

Place sliced meat on microwavable plate.

Cover with plastic wrap and vent.

• Note: Gravy or sauce helps to keep meat juicy.

Place chicken pieces on microwavable plate.

Cover with plastic wrap and vent.

Place fish on microwavable plate.

Cover with plastic wrap and vent.

Place lasagne on microwavable plate.

Cover with plastic wrap and vent.

COOK covered in microwavable casserole dish.

Stir once halfway through cooking.

COOK covered in microwavable casserole dish.

Stir once halfway through cooking.

Reheat filling and bun separately.

COOK covered in microwavable casserole dish.

Stir once. Heat bun as directed in chart below.

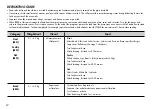
Item

Cook time

Special Instructions

(at HIGH)

Mashed potatoes

1 cup

4 cups

Baked beans

1 cup 

Ravioli or pasta in sauce

1 cup

4 cups

Rice

1 cup

4 cups

Sandwich roll or bun

1 roll 

Vegetables

1 cup

4 cups

Soup

1 serving (8 oz.)

2

1/2

~3

1/2

minutes

6~9 minutes

1

1/2

~3 minutes

2

1/2

~4 minutes

7

1/2

~11minutes

1~1

1/2

minutes

3

1/2

~5 minutes

15~30 seconds

1

1/2

~2

1/2 

minutes

3

1/2

~5

1/2 

minutes

1

1/2

~2 minutes

COOK covered in microwavable casserole dish.

Stir once halfway through cooking.

COOK covered in microwavable casserole dish.

Stir once halfway through cooking.

COOK covered in microwavable casserole dish.

Stir once halfway through cooking.

COOK covered in microwavable casserole dish.

Stir once halfway through cooking.

Wrap in paper towel and place on glass tray.

COOK covered in microwavable casserole dish.

Stir once halfway through cooking.

COOK covered in microwavable casserole dish.

Stir once halfway through cooking.

Содержание MH7949CW

Страница 1: ...MH7949CW P No MFL40257811 www lg com OWNER S MANUAL MICROWAVE OVEN PLEASE READ THIS OWNER S MANUAL THOROUGHLY BEFORE OPERATING ...

Страница 2: ......

Страница 3: ... microwave energy Precautions When heating liquids e g soups sauces and beverages in your microwave oven overheating the liquid beyond boiling point can occur without evidence of bubbling This could result in a sudden boil over of the hot liquid To prevent this possibility the following steps should be taken 1 Avoid using straight sided containers with narrow necks 2 Do not overheat 3 Stir the liq...

Страница 4: ...ng Installing ______________________________ 4 5 Setting the Clock ___________________________________ 6 Child Lock ________________________________________ 7 Micro Power Cooking _______________________________ 8 Micro Power Level __________________________________ 9 Two Stage Cooking _________________________________ 10 Quick Start ________________________________________ 11 Grill Cooking _______...

Страница 5: ...g the outlet can damage the oven Unpacking Installing Unpack your oven and place it on a flat level surface By following the basic steps on these two pages you will be able to quickly check that your oven is operating correctly Please pay particular attention to the guidance on where to install your oven When unpacking your oven make sure you remove all accessories and packing Check to make sure t...

Страница 6: ...ED Fill a microwave safe container with 300 ml 1 2 pint of water Place on the GLASS TRAY and close the oven door If you have any doubts about what type of container to use please refer to page 30 Press the START Q START button once to set 30 seconds of cooking time You will hear a BEEP when you press the button Your oven will start after you have finished the press Plug your oven into a standard h...

Страница 7: ...ows any strange looking symbols unplug your oven from the electrical socket and plug it back in and reset the clock During clock setting the colon will flash After setting the colon will stop flashing Make sure that you have correctly installed your oven as described earlier in this book Press STOP CLEAR Press CLOCK once If you want to use different option Press CLOCK once more If you want to chan...

Страница 8: ...ater If any button is pressed L will appear on the display To cancel CHILD LOCK press and hold STOP CLEAR until L disappears You will hear BEEP when it s released Your oven has a safety feature that prevents accidental running of the oven Once the child lock is set you will be unable to use any functions and no cooking can take place However your child can still open the oven door Press STOP CLEAR...

Страница 9: ...ress 10 SEC three times Press START Q START Your oven has five microwave Power settings High power is automatically selected but repeated presses of the key will select a different power level In the following example I will show you how to cook some food on 800W 80 power for 5 minutes and 30 seconds POWER HIGH MEDIUM HIGH MEDIUM DEFROST MEDIUM LOW LOW Press MICRO 100 80 60 40 20 time times times ...

Страница 10: ...l Water Brown minced beef Cook poultry pieces fish vegetables Cook tender cuts of meat MEDIUM HIGH All reheating Roast meat and poultry Cook mushrooms and shellfish Cook foods containing cheese and eggs MEDIUM Bake cakes and scones Prepare eggs Cook custard Prepare rice soup DEFROST All thawing MEDIUM LOW Melt butter and chocolate Cook less tender cuts of meat LOW Soften butter cheese Soften ice c...

Страница 11: ...N five times Press During two stage cooking the oven door can be opened and food checked Close the oven door and press START Q START and the cooking stage will continue At the end of stage1 BEEP sounds and stage 2 commences Should you wish to clear the programme press STOP CLEAR twice In the following example I will show you how to cook some food in two stages The first stage will cook your food f...

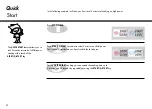
Страница 12: ...g QUICK START cooking you can extend the cooking time up to The QUICK START feature allows you to set 30 seconds intervals of HIGH power cooking with a touch of the START Q START key In the following example I will show you how to set 2 minutes of cooking on high power START Q START 9 59 minutes and seconds by repeatedly pressing the START Q START key ...

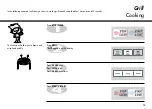
Страница 13: ... the display Press 10 MIN once Press 1 MIN twice Press 10 SEC three times This feature will allow you to brown and crisp food quickly In the following example I will show you how to use the grill to cook some food for 12 minutes and 30 seconds Press START Q START ...

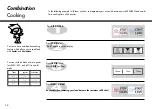
Страница 14: ... the following example I will show you how to programme your oven with micro power 400W 40 and combi for a cooking time of 25 minutes Press STOP CLEAR Press 10 MIN twice Press 1 MIN five times Press COMBI twice Co 2 appears on the display Press Be careful when removing your food because the container will be hot START Q START Times Appears Once Co 1 2 0 Twice Co 2 4 0 Thrice Co 3 6 0 Power level ...

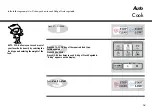
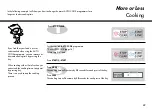
Страница 15: ...cook 0 6kg of Fresh Vegetable 0 6kg appears on the display AUTO COOK allows you to cook most of your favorite food easily by selecting the food type and entering the weight of the Press STOP CLEAR Auto Cook In the following example I will show you how to cook 0 6kg of fresh vegetable Press START Q START food ...

Страница 16: ... absorbed Place vegetables in a microwave safe bowl Add water Cover with wrap After cooking stir and allow to stand for 2 minutes Add amount of water according to the quantity 0 2kg 0 4kg 2 Tablespoon 0 5kg 0 8kg 4 Tablespoon Place vegetables in a microwave safe bowl Add water Cover with wrap After cooking stir and allow to stand for 2 minutes Add amount of water according to the quantity 0 2kg 0 ...

Страница 17: ...ould recommend that the food is checked before cooking commences Pay particular attention to large joints of meat and chicken some foods should not be completely thawed before cooking For example fish cooks so quickly that it is sometimes better to begin cooking while still slightly frozen The BREAD programme is suitable for defrosting small items such as rolls or a small loaf These will require a...

Страница 18: ...ry with flat pieces of aluminum foil This will prevent thin areas becoming warm during defrosting Ensure the foil does not touch the oven walls Separate items like minced meat chops sausages and bacon as soon as possible When BEEP at this point remove the food from the microwave oven remove any defrosted mince to a plate cover and set aside Turn the food over and return to the microwave oven Press...

Страница 19: ... easily by selecting the food type and entering the weight of the food In the following example I will show you how to cook 0 6kg of Roast Beef Press STOP CLEAR Press Press ROAST BEEF MORE once to select 0 6kg of Roast Beef 0 6 kg appears on the display PressSTART Q START ...

Страница 20: ...cooking time turn food over and press start to continue After cooking stand covered with foil for 10 minutes before serving Wash and dry skin Brush the chicken with the melted margarine or butter Place the breast side down on the low rack on the glass tray Put a shallow glass dish for flowing down juice under the rack The oven will beep during the cooking turn food over and press start to continue...

Страница 21: ...e a standing time to allow the center to thaw In the following example will show you how to defrost 0 5kg of frozen minced meat During defrosting your oven will BEEP at which point open the oven door turn food over and separate to ensure even thawing Remove any portions that have thawed or shield them to help slow down thawing After checking close the oven door and press to resume defrosting Your ...

Страница 22: ... defrost quickly for minced meat Remove the meat completely from its wrapping Place the mince onto a microwave safe plate When beeps at this point remove the mince from the microwave oven turn the mince over and return to the microwave oven Press start to continue At the end of the program remove the mince from the microwave oven cover with foil and allow to stand 5 15 minutes or until completely ...

Страница 23: ...seconds for each press of the key In the following example I will show you how to change the preset AUTO COOK programmes for a longer or shorter cooking time If you find that your food is over or undercooked when using the AUTO COOK programme you can increase or decrease cooking time by pressing the key When cooking without Auto function you can extend the cooking time at any point by pressing key...

Страница 24: ...unctions When used as an independent timer the oven is not running The Timer is simply counting down in seconds In the following example I will show you how to set the timer for 15 minutes Press The time will begin counting down in the display window with no cooking or heating in the oven BEEP will sound and the word End will show in the display window at the end of the countdown period START Q ST...

Страница 25: ...put for 5 minutes micowave oven will start to keep warm function automatically 2 When the AUTO COOK is over press Times Appears Working Stop Once Ho L 3 s ec 27 s ec Twice Ho H 5 s ec 25 s ec Press the key to start keep warm function if you want to warm you food The food without AUTO function can be warmed by pressing the key Keep warm function has only one time level 90 minutes But the function w...

Страница 26: ... on microwavable plate Cover with plastic wrap and vent Place fish on microwavable plate Cover with plastic wrap and vent Place lasagne on microwavable plate Cover with plastic wrap and vent COOK covered in microwavable casserole dish Stir once halfway through cooking COOK covered in microwavable casserole dish Stir once halfway through cooking Reheat filling and bun separately COOK covered in mic...

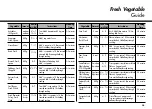
Страница 27: ...s 2 3 minutes 2 3 minutes 2 3 minutes 4 8 11 2 21 2 4 7 6 9 4 9 6 12 51 2 71 2 91 2 14 41 2 71 2 41 2 71 2 6 9 2 ears 230g 450g 4 cups 2 medium 4 medium 2 potatoes 4 potatoes 450g 450g 450g Vegetable Amount Cook time Instructions Standing at HIGH Time Artichokes 230g each Asparagus Fresh Spears Green Beans Beats Fresh Broccoli Fresh Spears Cabbage Fresh Chopped Carrots Fresh Sliced Cauliflower Fre...

Страница 28: ...rned halfway Approx cooking time Item Weight Hints in minutes Beefburgers 50g x 2 15 18 Baste with oil or melted 100g x 2 21 25 butter Thin items should be placed on the grill Beefsteaks rack Thick items can be 2 5cm 1 thick placed on to a drip Rare 230g x 2 20 22 tray Turn food over Medium 230g x 2 24 26 after half the cooking Well 230g x 2 28 30 time Lamb chops 2 5cm 1 thick 230g x 2 27 34 Appro...

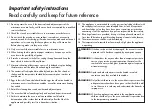
Страница 29: ...ensure cooking times are correctly set as over cooking may result in FIRE and subsequent DAMAGE to the OVEN Important safety instructions Read carefully and keep for future reference 1 Do not attempt to tamper with or make any adjustments or repairs to the door control panel safety interlock switches or any other part of the oven It is hazardous for anyone to carry out any service or repair operat...

Страница 30: ...ult in delayed eruptive boiling therefore care must be taken when handing the container 28 The contents of feeding bottles and baby food jars shall be stirred or shaken and the temperature checked before consumption in order to avoid burns 29 Eggs in their shell and whole hard boiled eggs should not be heated in microwave ovens since they may explode even after microwave heating has ended 30 Detai...

Страница 31: ...such as tumblers or wine glasses as these might shatter as the food warms Plastic storage containers These can be used to hold foods that are to be quickly reheated However they should not be used to hold foods that will need considerable time in the oven as hot foods will eventually warp or melt plastic containers Paper Paper plates and containers are convenient and safe to use in your microwave ...

Страница 32: ...The upper portion of tall food particularly roasts will cook more quickly than the lower portion Therefore it is wise to turn tall food during cooking sometimes several times Food characteristics Microwave cooking Moisture content of food Since the heat generated from microwaves tends to evaporate moisture relatively dry food such as roasts and some vegetables should either be sprinkled with water...

Страница 33: ...e oven Usually the foods are covered during standing time to retain heat unless they are supposed to be dry in texture some cakes and biscuits for example Standing allows foods to finish cooking and also helps flavor blend and develop To Clean Your Oven 1 Keep the inside of the oven clean Your microwave oven has a stainless steel interior Unlike painted steel interiors found in most other microwav...

Страница 34: ...s on the density of the food Q Is it possible to pop corn in a microwave oven A Yes if using one of the two methods described below 1 Popcorn popping utensils designed specifically for microwave cooking 2 Prepackaged commercial microwave popcorn that contains specific times and power outputs needed for an acceptable final product FOLLOW EXACT DIRECTIONS GIVEN BY EACH MANUFACTURER FOR THEIR POPCORN...

Страница 35: ...may not correspond with the coloured markings identifying the terminals in your plug proceed as follows The wire which is colored BLUE must be connected to the terminal which is marked with the letter N or Colored BLACK The wire which is colored BROWN must be connected to the terminal which is marked with the letter L or colored RED The wire which is colored GREEN YELLOW or GREEN must be connected...

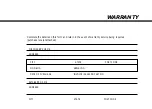
Страница 36: ...being accepted by the owner for travelling expenses incurred in connection with warranty service at the user s home 6 The warranty not applying except to the serving within Australia or New Zealand of products purchased in Australia or New Zealand 7 The authorised serviced agent will provide service during nomal business hours Monday to Friday If any legislation whether Federal or State to applies...

Страница 37: ...form and retain in the event of warranty service being required purchase receipt attached PURCHASER S NAME ADDRESS CITY STATE POST CODE CITY STATE POST CODE RETAILER S NAME ADDRESS MODE NO SERIAL NO DATE OF PURCHASE INVOICE SALES DOCKET NO ...

Страница 38: ...LGEAP Printed in China ...

Отзывы: