background image

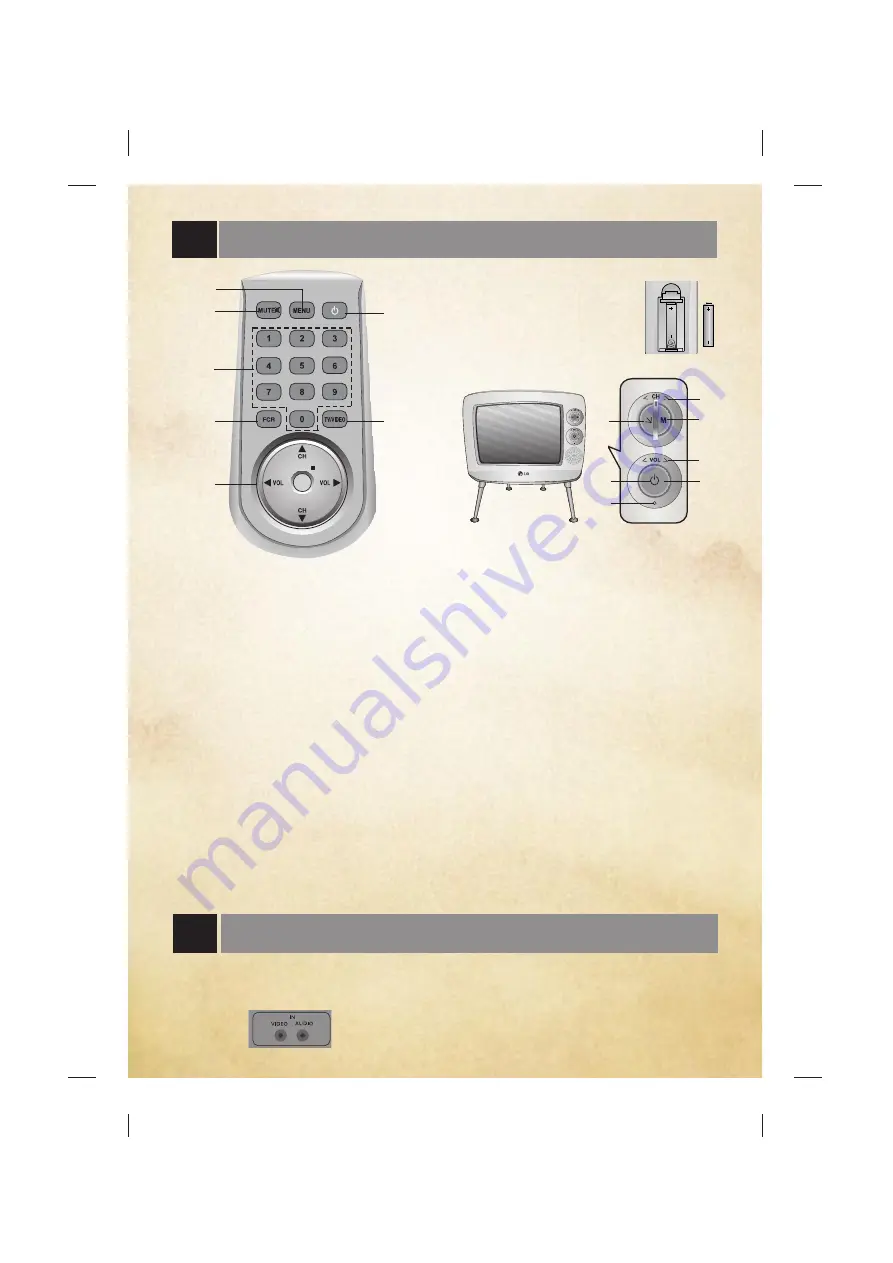
Description of controls

3

1. POWER BUTTON

Refer to "Turning on/off the TV".

2. MENU BUTTON

To display on screen menus.

3. MUTE BUTTON

To mute the sound. Again to restore the muted
sound.

4.  NUMBER BUTTONS (some models)

To select the desired channel directly.

5. FCR (Favorite Channel Review) BUTTON

To select the favorite channel.
Refer to "Favorite channel memory".

6. CHANNEL UP/DOWN (

D

/

E

) BUTTONS

• To select the desired channel.
• To select the desired menu item when menu

is displayed on the screen.

VOLUME UP/DOWN (

F

/

G

) BUTTONS

• To increase or decrease volume level.
• To enter or adjust the selected menu when

menu is displayed on the screen.

ENTER BUTTON (

A

)

• To exit from the displayed menu. 
• To memorize the adjusted menu.
• To recall the current TV mode (by remote

control only).

7. TV/VIDEO BUTTON

To select TV, VIDEO or COMPONENT mode.

Fitting Batteries in the Remote Control Unit
• Open the battery compartment

cover on the back side and insert  
the batteries with correct polarity.

• Apply 1.5V batteries of AAA

type. Don’t mix the used  
batteries with new batteries.

Front panel

1. POWER BUTTON (ON/OFF)

Refer to "Turning on/off the TV".

2. REMOTE CONTROL SENSOR

Note : Only use the supplied remote

control handset.  (When you use others,

they’ll be not able to function.)

3. POWER/STANDBY INDICATOR

illuminates brightly when the set is in 

standby mode.
dims when the set is switched on.

4. TV/VIDEO BUTTON and ENTER BUTTON

• To select TV, VIDEO or COMPONENT mode.
• To exit from the displayed menu. 
• To memorize the adjusted menu.

5. MENU BUTTON

select a menu.

6. < VOL > (VOLUME UP/DOWN)

• To increase or decrease volume level.
• To enter or adjust the selected menu when

menu is displayed on the screen.

7.   < CH >  (CHANNEL UP/DOWN)

• To select the desired channel.
• To select the desired menu item when menu

is displayed on the screen.

Note:Do not apply force to the VOL and CH

button.It can be only adjusted to 10 degree 

to the right or left.So you can adjust the 

program and volume by swivelling it again 

and again.

ENTER

3

4

5

6

2

1

7

3

2

5

6

1

4

7

You can connect additional equipment, such as
VCRs, camcorders etc. to your set.Here shown
may be somewhat different from your set.These
are an example drawing of typical jack layout.

IN JACKS (some models) :Connect external 
equipment outputs (VCR, LASER DISC, 
CAMCORDER) to these  inputs. Press the 
TV/VIDEO button to select 

VIDEO

or 

VIDEO 1

.

Note:This TV is programmed to remember which 
mode it was last set to, even if you turn the TV off. 

Connection of external equipment (some models)

Содержание MC059D

Страница 1: ...read this manual carefully before operating your set Retain it for future reference Record model number and serial number of the set See the label attached on the back cover and quote this information to your dealer when you require service Color Television OWNER SMANUAL ...

Страница 2: ...vision receiver on an unstable cart stand or table The television receiver may fall causing serious injury to a child or an adult and serious damage to the appliance Use only with a cart or stand recommended by the manufacturer or sold with the television receiver Wall or shelf mounting should follow the manu facturer s instructions and should use a mounting kit approved by the manufacturer Slots ...

Страница 3: ...Note Only use the supplied remote control handset When you use others they ll be not able to function 3 POWER STANDBY INDICATOR illuminates brightly when the set is in standby mode dims when the set is switched on 4 TV VIDEO BUTTON and ENTER BUTTON To select TV VIDEO or COMPONENT mode To exit from the displayed menu To memorize the adjusted menu 5 MENU BUTTON select a menu 6 VOL VOLUME UP DOWN To ...

Страница 4: ...g of an item in the sub or pull down menu withF G or D E You can move to the higher level menu with ENTER or F button and to move to the lower level menu press the G button TV programme CH CH Move Next Exit Auto prog Manual Favorite CH CH Move Next Exit Clock Off_timer On _timer Auto _off CH CH Move Next Exit APC Contrast Brightness Color Sharpness Tint Basic TV operation Before operating your TV ...

Страница 5: ...he On Timer This is the function to automatically turn the TV on at a preset time and channel Notes If you don t press any button within 2 hours after turning on the TV set by ON TIMER function the set will be automatically switched back to standby mode TV must be in standby mode for the On timer to work Auto Off If there is no input signal the TV is switched to standby mode automatically in 10 mi...

Страница 6: ...ions broadcast two different caption signals on the same channel By selecting MODE 1 or MODE 2 you can choose which signal you view MODE 1 is usually the signal with the captions while MODE 2 might show demonstration or programming information Your TV might not receive caption signals normally in the following situations 1 Poor reception conditions are encountered A IGNITION Picture may flutter dr...

Страница 7: ...ple images Remote control does not work Cannot tune desired channel CHECK THESE THINGS Is power cord plugged in Is television turned on Check batteries in remote control Try another channel station trouble Check antenna connectings Check for local interference Adjust the antenna Adjust the picture control Program channel using AUTO PROGRAM ...

Страница 8: ...s at the bottom of the rear cabinet and secure them as shown in the figure 4 Lift up the legs of the TV set as shown in the figure Note To avoid any damage caused by the TV set falling over by accident please affix the supplied suspension loop to a proper position on the wall behind the TV set and secure the loop with screws not supplied as shown in the figure Then use the supplied rope to connect...

Отзывы: