


AV
Toggles through video
AV > Component > RGB PC > HDMI/DVI
.
If nothing is inputted for several seconds the screen will automatically move to
the selected menu.
AV
Boutons vidéo
AV > Component > RGB PC > HDMI/DVI
.
Si vous ne saisissez rien pendant plusieurs secondes, l’écran passe automa-
tiquement au menu sélectionné.
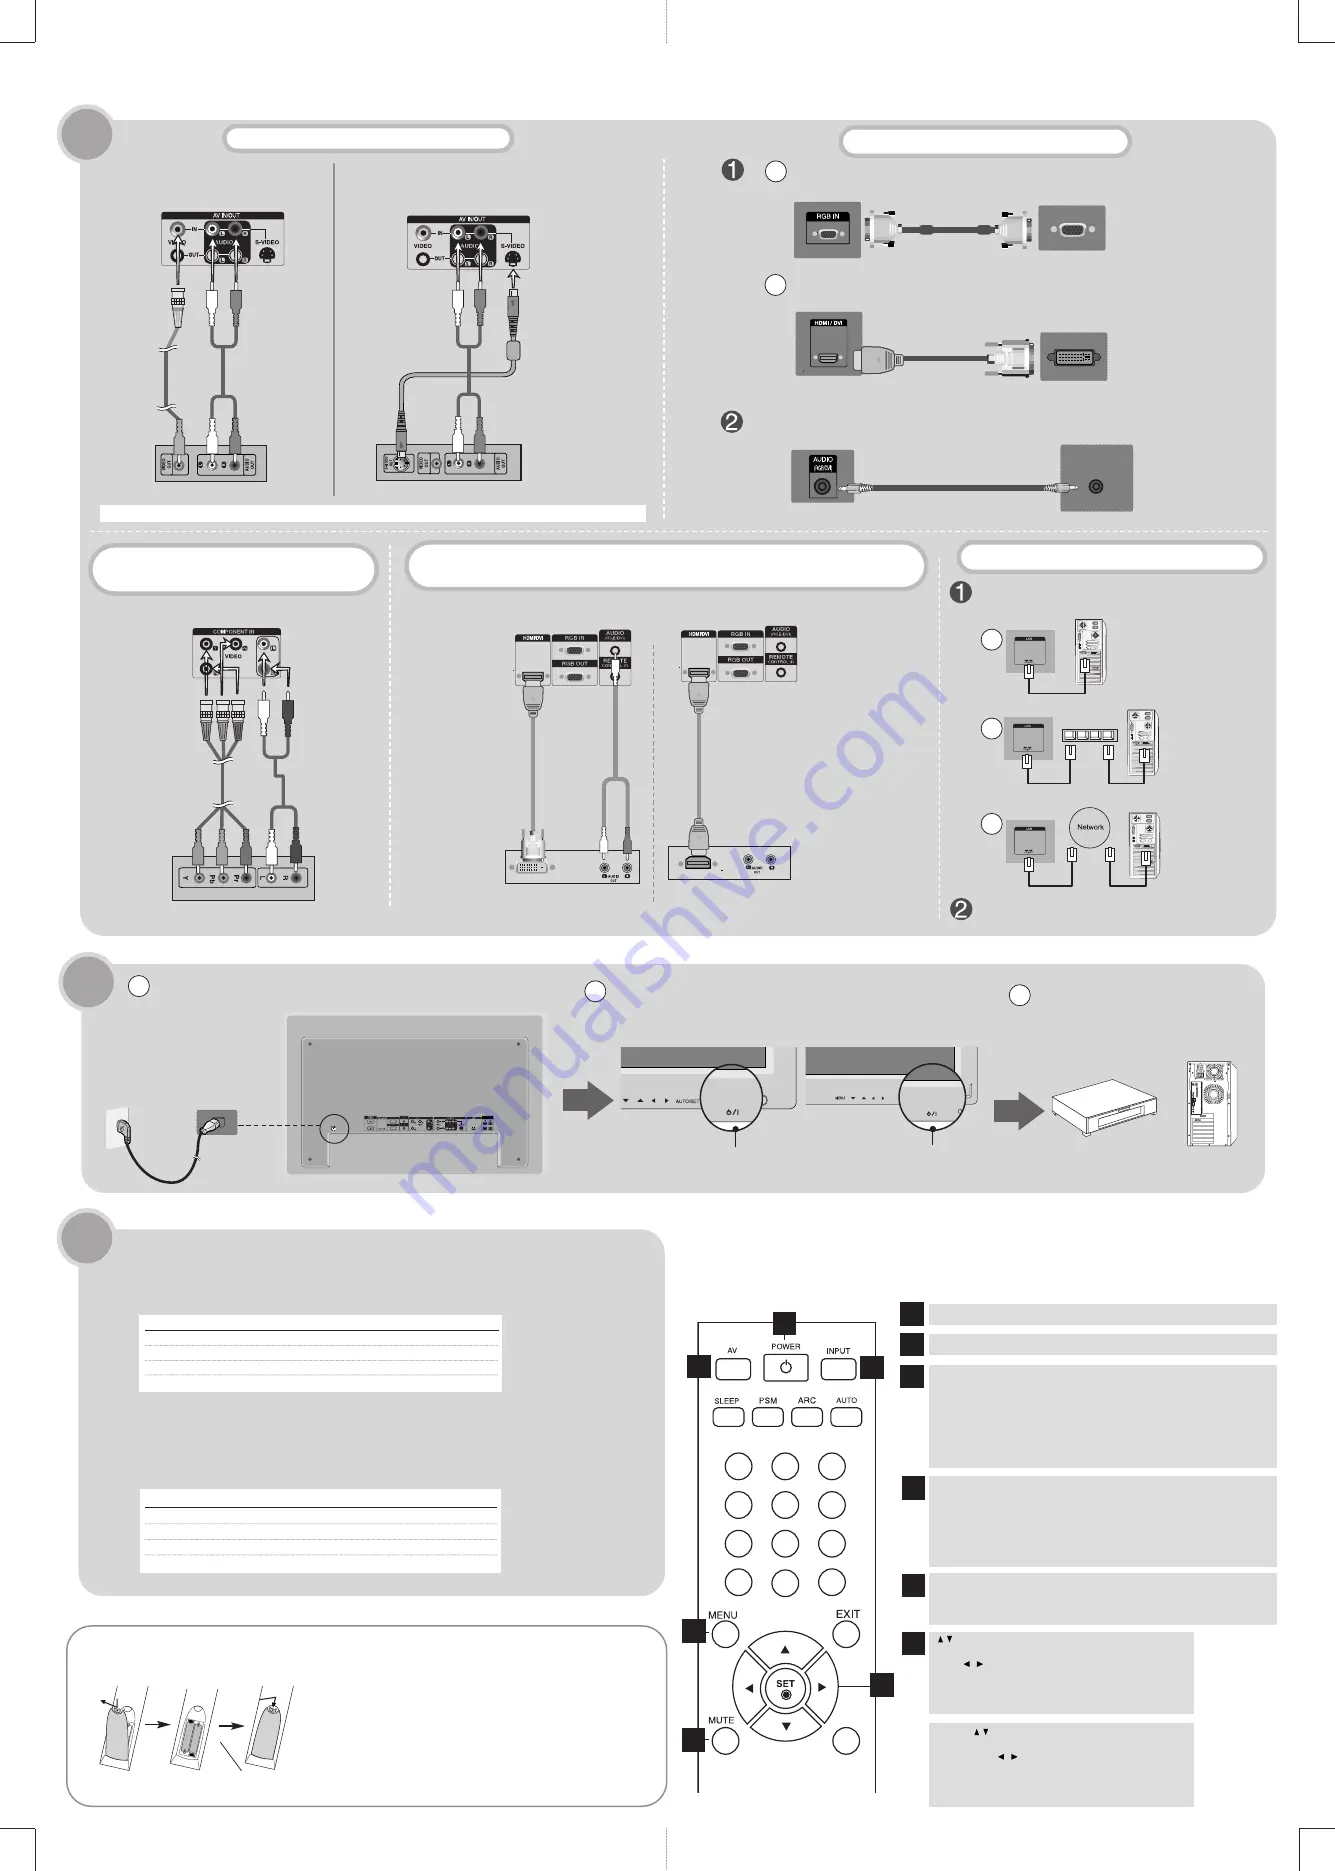
Connect the power cord.
Raccordez le cordon d’alimentation.
1
2
3
Turn on product by pressing the power button on the product.
Mettez l’appareil sous tension à l'aide de la touche de mise sous tension.
Turn on the PC or video equipment.
Mettez votre ordinateur ou votre
équipement vidéo sous tension.
2.
3.
Press the INPUT button on the remote control to select the input signal.
[M3703C] Or, press the INPUT button at the front side of the product to select the input signal.
[M4224C] Or, press the SOURCE button at the back side of the product to select the input signal.
If you press the button once, the following Input Signal Window will appear. Select the signal type you want
using the
D
D
,
E
E
button.
Name of the Remote Control Buttons
l
des touches de la
télécommande
AV
Component
RGB PC
HDMI/DVI
On screen message
Cable configuration
S-Video Cable, BNC Cable, Audio Cable
BNC Cable, Audio Cable
D-Sub Analog Signal Cable
HDMI to DVI Signal Cable, HDMI Signal Cable
Step 1
Step 2
1
2
3
4
5
6
7
8
0
9
*
1. Take out the battery cap.
2. Insert the batteries with correct polarity (+/-).
3. Close the battery cap.
• Dispose of used batteries in the recycle bin to prevent environmental pollution.
1. Ouvrez le capot du compartiment à piles.
2. Introduisez les piles en respectant les polarités (+/-).
3. Refermez le compartiment à piles.
• Veillez à ne pas jeter les piles usagées mais à utiliser les moyens de recyclage
afin de protéger l'environnement.
Inserting batteries into remote control.
l
Insertion des piles dans la télécommande.
1
2
3
4
5
6
1
2
3
4
5
6
MENU (Menü)
Use this button to enter the On Screen Display menu.
Utilisez cette touche pour accéder au menu OSD (affichage à l’écran).
POWER | MISE SOUS/HORS TENSION
MUTE | MUTE (COUPURE DU SON)
INPUT
If you press the button once, the following Input Signal Window will appear.
Select the signal type you want using the
D
D
,
E
E
button.
INPUT
Si vous appuyez une fois sur le bouton, la fenêtre de signal d'entrée suivante
apparaît. Sélectionnez le type de signal souhaité à l'aide du bouton
D
D
,
E
E
.
NOTE
In case the BNC cable is
connected simultaneously as
S-Video cable is conected,
S-Video cable is first.
Remarque
Si le câble BNC et le câble
S-VIDEO sont raccordés
simultanément, le câble S-
VIDEO a la priorité.
Appuyez sur le bouton INPUT sur la télécommande pour sélectionner le signal d'entrée.
[M3703C] Ou, appuyez sur le bouton INPUT sur la face avant du produit.
[M4224C] Ou, appuyez sur le bouton SOURCE sur la face avant du produit.
Si vous appuyez une fois sur le bouton, la fenêtre de signal d'entrée suivante apparaît. Sélectionnez le type
de signal souhaité à l'aide du bouton
D
D
,
E
E
.
AV
Component
RGB PC
HDMI/DVI
Message à l’écran
Configuration du signal d’entrée
Câble S-Video, Câble BNC, Câble audio
Câble BNC, Câble audio
Câble su signal D-Sub
Câble HDMI-DVI, Câble HDMI
Buttons
Bring up and down direction adjustment.
VOL ( ) Buttons
Able to adjust sound.
SET Button
Use when functional adjustment is completed.
,
,
Touches
Touches de direction Haut/Bas
Touches VOL ( )
Permettent de régler le volume.
Touche SET
Utilisez cette touche lorsque les réglages sont terminés.
,
,
,
AAA Type
1.
Connecting your Product
l
Raccordement de l’appareil
Connect with the S-Video cable.
Raccordement avec le câble S-Video.
B.
Connect with the BNC cable.
Raccordement avec le câble BNC.
Audio cable
(Not included)
Câble audio
(non fourni)
Audio cable
(Not included)
Câble audio
(non fourni)
A.
BNC Cable
(Not included)
Câble BNC
(non fourni)
Audio cable
(Not included)
Câble audio
(non fourni)
B
A
PC
PC
PC
Connect the Audio cable.
Raccordez le câble audio.
Connect with the D-Sub cable.
Raccordement avec le câble D-Sub.
Connect with the HDMI to DVI cable.
(not included).
Raccordement avec le câble HDMI-DVI.
(non fourni)
D-Sub cable
Câble de signal D-Sub
HDMI to DVI signal Cable
(Not included)
Câble HDMI-DVI
(non fourni)
AUDIO
Connecting HDTV/DVD
l
Raccordement du
HDTV/DVD (480p/576p/1080i/480i/576i)
[HDTV Receiver] [Récepteur TVHD]
****Blue
*****Green
****B
*****G
Connecting DVD/SET-TOP BOX with a HDMI/DVI/D-Sub cable
l
Raccordement du DVD ou du décodeur avec un câble HDMI/DVI/D-Sub (480p/576p/720p/1080i)
RCA to PC cable
(Not included)
Câble audio
RCA-PC
(non fourni)
[Set-top Box/DVD]
Boîtier décodeurmagnétoscope / DVD
HDMI cable
(Not included)
Câble HDMI
(non fourni)
HDMI to DVI signal Cable
(Not included)
Câble HDMI-DVI
(non fourni)
Connecting VCR/DVD
l
Raccordement du VCR/DVD
S-Video Cable
(Not included)
Câble S-Video
(non fourni)
Connecting PC
l
Raccordement de l’ordinateu
*Yellow
**White
***Red
**W
*Y
***R
**White
***Red
**W
***R
***Red
***R
**W
***R
**White
***Red
**W
***R
*Y
[VCR/DVD]
[VCR/DVD]
First of all, see if the PC or video and the equipment are turned off before connecting cables.
Avant de raccorder les câbles, vous devez vérifier que votre ordinateur et tous les équipements sont hors tension.
*Yellow(*Y)
l
Jaune **White(**W)
l
Blanc
***Red(***R)
l
Rouge ****Blue(****B)
l
Bleu
*****Green(*****G)
l
Vert
[Product]
[Face arrière du produit]
[Product]
[Face arrière du produit]
[Product]
[Face arrière du produit]
[Product]
[Face arrière du produit]
[Product]
[Face arrière du produit]
[Product]
[Face arrière du produit]
[Set-top Box/DVD]
Boîtier décodeurmagnétoscope / DVD
A.
[Product]
[Face arrière du produit]
BNC Cable
(Not included)
Câble BNC
(non fourni)
Connecting LAN cable
l
Pour utiliser le LAN
Connect the LAN cable as shown in the below figure .
Relier le câble LAN selon les indications de la figure ci-dessous.
Using a router(Switch)
Utilisation d’un routeur
(commutateur)
Connect PC to Monitor directly.
Connectez directement le PC au
moniteur.
Using the Internet.
Utilisation d’Internet.
[PC]
[PC]
A
B
C
Network l Réseau
Switch l Commutateur
Connect the LAN cable and install the eZ-Net Manager program on the CD-ROM.
Connectez le câble LAN et installez le programme de gestion eZ-Net sur le CD-ROM.
[Product]
[Product]
[PC]
[Product]
Power button
Bouton Marche/Arrêt
AUTO/SET
SOURCE
SET
Power button
Bouton Marche/Arrêt
[M4224C]
[M3703C]


