background image

4

4 3

3

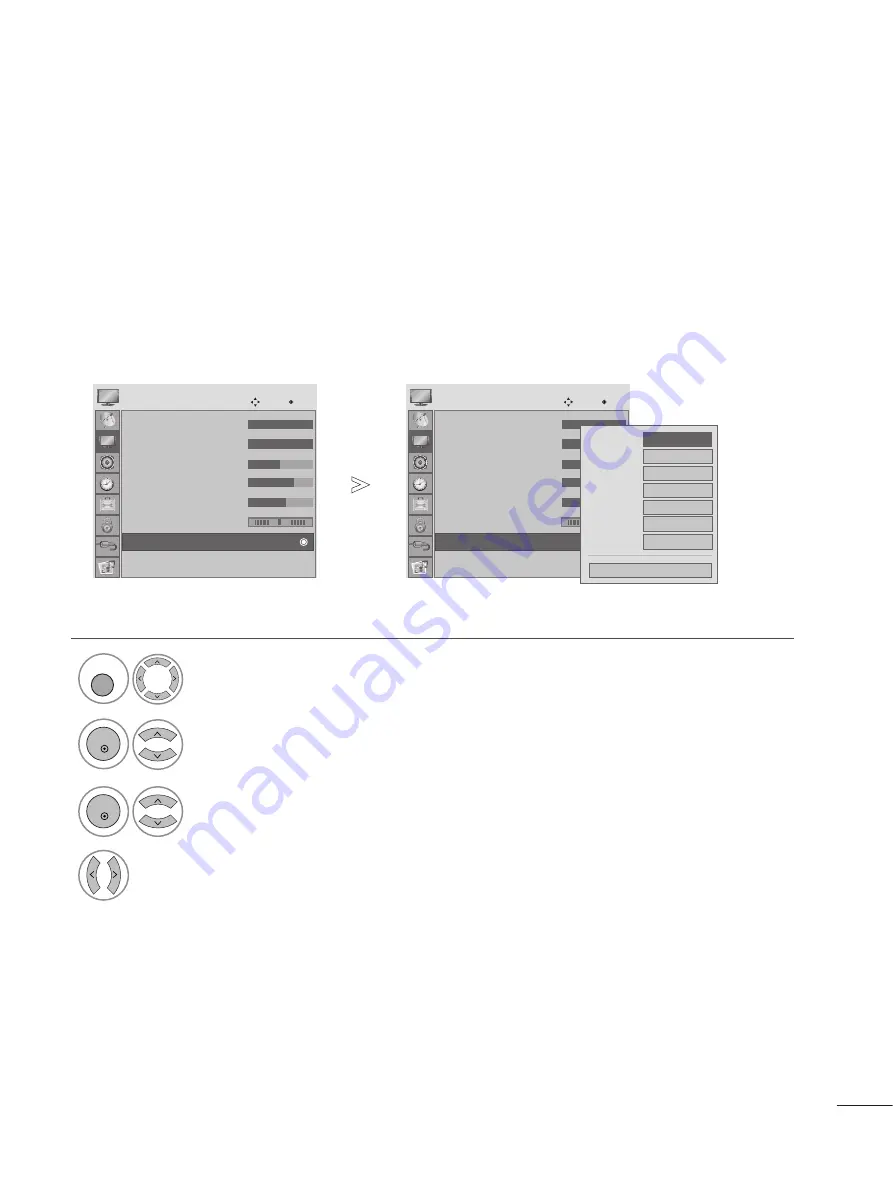
PICTURE CONTROL

Choose one of three automatic colour adjustments. Set to warm to enhance warm colours such as red, or set to
cool to see less intense colours with more blue.

Auto Colour Tone Control (Warm/Medium/Cool)

Select P

PIIC

CT

TU

UR

RE

E.

2

Select A

Ad

dvvaan

ncceed

d   C

Co

on

nttrro

oll.

3

Select C

Co

ollo

ou

urr   T

Teem

mp

peerraattu

urree.

4

Select either C

C o

o o

o ll, M

Meed

diiu

um

m or W

W aa rr m

m.

1

MENU

OK 

OK 

• Press the MENU or EXIT button to close the menu window.

• Press the RETURN button to move to the previous menu screen.

• Backlight 100

• Contrast

100

• Brightness 50

• Sharpness 70

• Colour

60

• Tint

0

• Advanced Control

• Picture Reset

PICTURE

Move

OK

• Advanced Control

R

G

D

• Backlight 100

• Contrast

100

• Brightness 50

• Sharpness

70

• Colour

60

• Tint

0

• Advanced Control

• Picture Reset

PICTURE

Move

OK

• Advanced Control

R

G

D

Colour Temperature

F  

Medium  

G

Dynamic Contrast

High

Dynamic Colour

High

Noise Reduction

Medium

Gamma

Medium

Film Mode

Off

Black Level

Auto

Close

Содержание M2362D

Страница 1: ...www lg com OWNER S MANUAL MONITOR TV MONITOR TV MODELS Please read this manual carefully before operating your set and retain it for future reference ENGLISH M2362D ...

Страница 2: ...ENU Button OK Button VOLUME Buttons PROGRAMME Buttons Power Button Headphone Jack IR receiver Remote controller receiver L Li ig gh ht t S Se en ns so or r This is lens for light sensor select outside luminance when setting AUTO BRIGHT ON P Po ow we er r I In nd di ic ca at to or r illuminates blue when the set is switched on Note You can adjust Power indicator in the OPTION menu ...

Страница 3: ...I IN N D DV VI I D D I In np pu ut t Connect the output from a PC R RS S 2 23 32 2C C I IN N C CO ON NT TR RO OL L S SE ER RV VI IC CE E P PO OR RT T Connect to the RS 232C port on a PC C Co om mp po on ne en nt t I In np pu ut t Connect a component video audio device to these jacks A Au ud diio o V Viid de eo o I In np pu ut t Connect audio video output from an external device to these jacks A An...

Страница 4: ...ushioned surface that will protect product and screen from damage Insert the S St ta an nd d B Ba as se e into the product Turn the S St ta an nd d B Ba as se e L Lo oc ck k through 90 to fix the stand base to the stand body S St ta an nd d B Ba as se e L Lo oc ck k L Lo oc ck ke ed d 4 5 O P E N O P E N O P E N O P E N S St ta an nd d B Ba as se e ...

Страница 5: ...Detach the monitor to the S St ta an nd d B Ba as se e by turning the screw to the left Turn the S St ta an nd d B Ba as se e L Lo oc ck k through 90 to separate the Stand Base from the Stand Body Pushing L La at tc ch h inside Take the stand base from stand body O P E N O P E N O P E N O P E N O P E N O P E N L La at tc ch h S St ta an nd d B Ba as se e ...

Страница 6: ...ION DETACHING STAND BODY 1 Remove the screw 2 point 2 Pull the stand body The image shown may be somewhat different from your set Remove the Stand Body in the same way as the following when using it as a Wall Hook ...

Страница 7: ... the wall 10 cm 10 cm 10 cm 10 cm WALL MOUNT HORIZONTAL INSTALLATION For proper ventilation allow a clearance of 10 cm on each side and from the wall Detailed installation instructions are available from your dealer see the optional Tilt Wall Mounting Bracket Installation and Setup Guide 10 cm 10 cm 10 cm 10 cm 10 cm ...

Страница 8: ...ch Wall mounting interface optional parts to the back of the set When you install the set using the wall mounting interface optional parts attach it carefully so it will not drop Be sure to use screws and a wall mount that meet VESA standards Using screws longer than those recommended might damage the product Using screws that do not meet VESA standards might either damage the product or result in...

Страница 9: ...sington company Kensington sells security systems for expensive electronic equipment such as notebook PCs and LCD projectors NOTE The Kensington Security System is an optional accessory NOTES a If the product feels cold to the touch there may be a small flicker when it is turned on This is normal there is nothing wrong with product b Some minute dot defects may be visible on the screen appearing a...

Страница 10: ...l equipment Multi family Dwellings Apartments Connect to wall antenna socket Single family Dwellings Houses Connect to wall jack for outdoor antenna Outdoor Antenna VHF UHF Wall Antenna Socket RF Coaxial Wire 75 ohm ANTENNA CONNECTION Antenna UHF Signal Amplifier VHF In poor signal areas to get better picture quality install a signal amplifier to the antenna as shown above If signal needs to be sp...

Страница 11: ...ets of the set Press the I IN NP PU UT T button to select C Co om mp po on ne en nt t 2 3 1 HD RECEIVER SETUP To prevent the equipment damage never plug in any power cords until you have finished connecting all equipment The image shown may be somewhat different from your set When connecting with a component cable Signal 480i 576i 480p 576p 720p 1080i 1080p Component Yes Yes Yes Yes HDMI No Yes Ye...

Страница 12: ...e audio output of the digital set top box to the A AU UD DI IO O I IN N R RG GB B D DV VI I jack on the set Turn on the digital set top box Refer to the owner s manual for the digital set top box 2 3 1 When connecting with a HDMI to DVI cable NOTE G HDMI Input does not support PC mode If it is connected PC the screen may not be displayed properly or HDMI IN 1 1 HDMI IN 2 HDMI IN 2 DVI OUTPUT AUDIO...

Страница 13: ... B Y Cb Pb PR R Y Cr Pr Connect the video output sockets Y PB PR of the DVD to the C CO OM MP PO ON NE EN NT T I IN N V VI ID DE EO O sockets Y PB PR of the set Connect the audio cable from the DVD to C CO OM MP PO ON NE EN NT T I IN N A AU UD DI IO O sockets of the set Press the I IN NP PU UT T button to select C Co om mp po on ne en nt t Press the P PL LA AY Y button on the DVD The DVD playback ...

Страница 14: ...output of the DVD to the H HD DM MI I I IN N jack on the set 1 G Set can receive the video and audio signal simultaneously by using a HDMI cable G If the DVD player does not support Auto HDMI you need to set the DVD output resolution appropriately NOTE or HDMI IN 1 1 HDMI IN 2 ...

Страница 15: ...screen OUTPUT SWITCH ANT IN R S VIDEO VIDEO ANT OUT L AV 1 AV 2 ANTENNA CABLE IN Wall Jack Antenna 1 2 When connecting with an antenna Connect the RF out socket of the VCR to the aerial socket of the set Connect the aerial cable to the RF aerial in socket of the VCR Store the VCR channel on a desired programme number using the Manual programme tuning section Select the programme number where the V...

Страница 16: ... you use the U US SB B function G p p 8 80 0 2 1 USB SETUP AV 1 AV 2 USB IN Connect one end of an optical cable to the TV Digital Audio Optical Output port Connect the other end of the optical cable to the digi tal audio Optical input on the audio equipment Set the T TV V S Sp pe ea ak ke er r o op pt ti io on n O Of ff f in the AUDIO menu Gp p 6 63 3 Refer to the external audio equipment instruct...

Страница 17: ... the audio cable from the PC to the A AU UD DI IO O I IN N R RG GB B D DV VI I sockets of the set Press the INPUT button to select R RG GB B Switch on the PC and the PC screen appears on the set The set can be operated as a PC monitor 2 3 1 RGB OUTPUT AUDIO AUDIO IN RGB DVI RGB IN PC 1 2 NOTE G You must use shielded signal interface cables D sub 15 pin cable DVI cable with ferrite cores to maintai...

Страница 18: ...esolutions some scaled or processed pictures may appear on the screen The set has been preadjusted to the mode 1920x1080 60 Hz G Some dot defects may appear on the screen like Red Green or Blue spots However this will have no impact or effect on the monitor performance G Do not press the LCD screen with your finger for a long time as this may produce some temporary distortion effects on the screen...

Страница 19: ...1 18 8 EXTERNAL EQUIPMENT SETUP Tie cables together with a cable tie as shown in the illustration BACK COVER FOR WIRE ARRANGEMENT Cable tie R R ...

Страница 20: ...50p Horizontal Frequency kHz Vertical Frequency Hz 1920x1080 60i 1920x1080 50i 1920x1080 24p 1920x1080 30p 1920x1080 50p Resolution 640x480 800x600 720x400 1024x768 Horizontal Frequency kHz Vertical Frequency Hz 31 468 70 31 469 60 37 500 75 37 879 60 46 875 75 48 363 60 60 123 75 67 500 75 63 981 60 79 976 75 64 674 60 65 290 60 75 000 60 66 587 60 1280x1024 1 152x864 1680x1050 1920x1080 1600x120...

Страница 21: ...a menu Displays the programme table Refer to the p 35 Returns to the previously viewed programme MENU EXIT INFO i GUIDE THUMBSTICK Up Down Left Right OK Selects a menu Refer to the p 25 Clears all on screen displays Shows the present screen information Shows programme schedule Refer to the p 36 to 38 Allows you to navigate the on screen menus and adjust the system settings to your preference Accep...

Страница 22: ...Controls USB menu Photo List and Music List Refer to the p 80 TELETEXT BUTTONS These buttons are used for teletext For further details see the Teletext section Refer to the p 88 to 89 1 1 2 2 3 3 Q MENU MARK Select the desired quick menu source Refer to the p 24 Check and un check programmes in the recorded set menu OK MENU EXIT GUIDE 1 2 3 4 5 6 7 8 9 0 Q VIEW LIST TV PC INPUT POWER VOL PR I II M...

Страница 23: ... completing the initial setting the Initial Setting menu can be displayed again b Press the RETURN button to change the current OSD to the previous OSD c H Ho om me e U Us se e mode is the optimal setting for home environments and is the TV s default mode d S St to or re e D De em mo o mode is the optimal setting for store environments If a user modifies image quality data S St to or re e D De em ...

Страница 24: ...V INFO i TV RADIO Q MENU T OPT MARK SUBTITLE LIGHTING PROGRAMME SELECTION Press the P PR R or or NUMBER buttons to select a pro gramme number 1 VOLUME ADJUSTMENT Press the VOL or button to adjust the volume If you want to switch the sound off press the MUTE button You can cancel this function by pressing the MUTE VOL or or I II button 1 ...

Страница 25: ...he images being watched Selects your desired Sound Mode A Au ud di io o Selects the sound output S Sl le ee ep p T Ti im me er r Sets the sleep timer U US SB B E Ej je ec ct t Selects USB Eject in order to eject USB device QUICK MENU Display each menu Select your desired Source Your TV s OSD On Screen Display may differ slightly from that shown in this manual Q Menu Quick Menu is a menu of feature...

Страница 26: ...ate On Diagnostics SETUP Move OK Clock Off Time Off On Time Off Sleep Timer Off Auto Off On TIME Move OK Subtitle Off Input Label Key Lock Off Set ID Off Power Indicator DDC CI On Mode Setting Home Use Factory Reset OPTION Move OK Lock System Off Set Password Block Programme Parental Guidance Off Input Block LOCK Move OK Antenna AV Component RGB HDMI 1 HDMI 2 DVI INPUT Move OK Photo List Music Lis...

Страница 27: ...hen press the OK button Otherwise select NO Select S SE ET TU UP P 2 Select A Au ut to o T Tu un ni in ng g 3 Select Y Ye es s 4 Run Auto tuning 1MENU OK OK OK Press the MENU or EXIT button to close the menu window Press the RETURN button to move to the previous menu screen Auto tuning Manual tuning Programme Edit Software Update On Diagnostics SETUP Move OK A Au ut to o t tu un ni in ng g Auto tu...

Страница 28: ...Select the desired channel number MENU OK OK Press the MENU or EXIT button to close the menu window Press the RETURN button to move to the previous menu screen Auto tuning Manual tuning Programme Edit Software Update On Diagnostics SETUP Move OK M Ma an nu ua al l t tu un ni in ng g Auto tuning Manual tuning Programme Edit Software Update On Diagnostics SETUP Move OK M Ma an nu ua al l t tu un ni ...

Страница 29: ...lect V V U UH HF F or C Ca ab bl le e 7 Start searching 8 Select S St to or re e or 6 Select the desired channel number or 1 1 2 3 4 5 6 7 8 0 9 MENU OK OK OK 1 2 3 4 5 6 7 8 0 9 Press the MENU or EXIT button to close the menu window Press the RETURN button to move to the previous menu screen Auto tuning Manual tuning Programme Edit Software Update On Diagnostics SETUP Move OK M Ma an nu ua al l t...

Страница 30: ...Select Manual Tuning 3 Select TV 4 Select Name 5 Select the position and make your choice of the second character and so on You can use the alphabet A A to Z Z the number 0 0 to 9 9 and space 6 Select Close 7 Select Store 1MENU OK OK OK OK OK Press the MENU or EXIT button to close the menu window Press the RETURN button to move to the previous menu screen ...

Страница 31: ...mm me e E Ed di it t 3 Enter the Programme Edit 4 Select a programme to be stored or skipped 1MENU OK OK Press the MENU or EXIT button to close the menu window Press the RETURN button to move to the previous menu screen Auto tuning Manual tuning Programme Edit Software Update On Diagnostics SETUP Move OK P Pr ro og gr ra am mm me e E Ed di it t ABC TV Sydney 1 Favourite List Favourite Pr Change Pa...

Страница 32: ... is skipped it means that you will be unable to select it using the PR button during normal TV viewing If you wish to select a skipped programme directly enter the programme number with the NUMBER buttons or select it in the programme edit or EPG A Selecting favourite programme Select your favourite pro gramme number 1 It will automatically include the selected programme into your favourite progra...

Страница 33: ...a programme number Select a programme number to be skipped 2 BLUE BLUE Turn the skipped programme number to blue 3 BLUE BLUE Release the skipped programme The selected programme is deleted all the fol lowing programmes are shifted up one A Moving a programme Select a programme number to be moved Turn the moved programme number to YELLOW 3 YELL YELLO OW W Release the moved programme When a programm...

Страница 34: ...be disconnected After Software Update you can confirm the updated software version in Diagnostics menu It may take an hour to download the software so make sure that the power stays on during the download Occasionally a transmission of updated digital software infor mation will result in the following menu on the TV screen When the Software Update menu is Off the message to change it to On appears...

Страница 35: ...IGITAL MODE ONLY Select S SE ET TU UP P 2 Select D Di ia ag gn no os st ti ic cs s 4 Display the Channel information 3 Display Manufacturer Model Type and Software Version 1 Engineering Diagnostics Manufacturer LG Electronics Inc Model Type M2362D PT Software Version V1 10 0 Popup CH 34 CH 36 CH 38 CH 54 CH 60 Prev RETURN Exit MENU CH 30 E D MENU OK OK OK Press the MENU or EXIT button to close the...

Страница 36: ...ome blue programmes These have been set up to be skipped by auto programming or in the programme edit mode Some programmes with the channel number shown in the programme LIST indicate there is no station name assigned 1 Turns the pages 2 Returns to normal TV viewing A Paging through a programme list 1 Display the Favourite Programme table A Displaying the favourite programme table LIST PR FAV OK L...

Страница 37: ...mation is broadcasted by broadcasting companies The EPG displays the programme description for the next seven days Switch on or off EPG 1 Programme Guide 1 ABC TV Sydney 06 Mar 2006 15 09 ALL 06 Mar 14 00 15 00 1 ABC TV SY I Dream Li 7 7 Digital No Information 9 NineDigital No Information Fra Boohbah Telet No Information Out There Bob the builder 10 ABC2 11 ABC TV 12 ABCHDTV Radio Pr Change E D TV...

Страница 38: ...h off Date setting mode GREEN GREEN Change to the selected programme Change to the selected date Select NOW or NEXT Programme Select a date Select the Broadcast Programme Switch off Date setting mode Enter Timer Record Remind setting mode YELL YELLO OW W OK Select TV or RADIO Programme The detailed information on or off Page Up Down Switch off EPG or GUIDE INFO i EXIT Switch off EPG or GUIDE EXIT ...

Страница 39: ...W W Add new Manual Timer setting mode If you ve created a schedule list a scheduled program is displayed at the scheduled time ven when you are watching a different program at the time YELL YELLO OW W Save Timer Remind Select Service Date or Start time Enter Schedule list editing mode GREEN GREEN Delete the selected item RED RED Change to Guide mode BLUE BLUE Switch off EPG or GUIDE EXIT The detai...

Страница 40: ... selection will allow you to adjust the picture horizontally in linear proportion to fill the entire screen useful for viewing 4 3 formatted DVDs 4 4 3 3 The following selection will allow you to view a picture with an original 4 3 aspect ratio grey bars will appear on both the left and right of the screen You can also adjust A As sp pe ec ct t R Ra at ti io o in the P PI IC CT TU UR RE E menu For...

Страница 41: ...m ma a Z Zo oo om m Choose Cinema Zoom when you wish the pic ture to be altered both horizontally extended and vertically cropped The picture adopting a compromise between alteration and screen coverage J Ju us st t S Sc ca an n The following Selection allows you to view the picture in the best quality without loss of original picture in high resolution image Note If there is interference in origi...

Страница 42: ...ICTURE Move OK E Auto Bright Off Off On O Of ff f When ON is selected this function adjusts the screen brightness automatically depending on the surrounding environment to provide optimal viewing conditions When OFF is selected this function is turned off AUTO BRIGHT Select P PI IC CT TU UR RE E 2 Select A Au ut to o B Br ri ig gh ht t 3 Select O On n or O Of ff f 1MENU OK OK Press the MENU or EXI...

Страница 43: ...button to move to the previous menu screen Aspect Ratio 16 9 Auto Bright Off Picture Mode Vivid Backlight 100 Contrast 100 Brightness 50 Sharpness 70 Colour 60 PICTURE Move OK E Picture Mode Vivid Aspect Ratio 16 9 Auto Bright Off Picture Mode Standard Backlight 100 Contrast 100 Brightness 50 Sharpness 8 Colour 50 PICTURE Move OK E Picture Mode Standard Aspect Ratio 16 9 Auto Bright Off Picture Mo...

Страница 44: ...ol l M Me ed di iu um m or W Wa ar rm m 1MENU OK OK Press the MENU or EXIT button to close the menu window Press the RETURN button to move to the previous menu screen Backlight 100 Contrast 100 Brightness 50 Sharpness 70 Colour 60 Tint 0 Advanced Control Picture Reset PICTURE Move OK Advanced Control R G D Backlight 100 Contrast 100 Brightness 50 Sharpness 70 Colour 60 Tint 0 Advanced Control Pict...

Страница 45: ... 9 93 30 00 0K K 1MENU OK OK Press the MENU or EXIT button to close the menu window Press the RETURN button to move to the previous menu screen Backlight 100 Contrast 100 Brightness 50 Sharpness 8 Colour 50 Tint 0 Advanced Control Picture Reset PICTURE Move OK R G D Advanced Control Backlight 100 Contrast 100 Brightness 50 Sharpness 8 Colour 50 Tint 0 Advanced Control Picture Reset PICTURE Move OK...

Страница 46: ...o move to the previous menu screen PICTURE CONTROL RGB DVI Mode Other mode Aspect Ratio 16 9 Auto Bright Off Picture Mode Vivid Backlight 100 Contrast 100 Brightness 50 Sharpness 70 Colour 60 PICTURE Move OK E Picture Mode Vivid User Aspect Ratio 16 9 Auto Bright Off Picture Mode Standard Backlight 100 Contrast 100 Brightness 50 Sharpness 8 Colour 50 PICTURE Move OK E Picture Mode Standard User As...

Страница 47: ...lect A Ad dv va an nc ce ed d C Co on nt tr ro ol l 3 Select D Dy yn na am mi ic c C Co on nt tr ra as st t D Dy yn na am mi ic c C Co ol lo ou ur r N No oi is se e R Re ed du uc ct ti io on n or G Ga am mm ma a 4 Select your desired Source 1MENU OK OK Press the MENU or EXIT button to close the menu window Press the RETURN button to move to the previous menu screen Backlight 100 Contrast 100 Brigh...

Страница 48: ...s darker H Hi ig gh h The reflection of the screen gets brighter NOTE G If input is not AV NTSC M HDMI or component this function set to auto G In case of auto user can t adjust it directly G Auto Realizing the black level of the screen and set it to High or Low automatically PICTURE CONTROL Backlight 100 Contrast 100 Brightness 50 Sharpness 70 Colour 60 Tint 0 Advanced Control Picture Reset PICTU...

Страница 49: ...OK Press the MENU or EXIT button to close the menu window Press the RETURN button to move to the previous menu screen Backlight 100 Contrast 100 Brightness 50 Sharpness 70 Colour 60 Tint 0 Advanced Control Picture Reset PICTURE Move OK R G D Advanced Control Backlight 100 Contrast 100 Brightness 50 Sharpness 70 Colour 60 Tint 0 Advanced Control Picture Reset PICTURE Move OK R G D Advanced Control ...

Страница 50: ...s this may not be effec tive for general videos Expert Picture Control 2 3 4 1MENU OK OK OK 5 6 OK Press the MENU or EXIT button to close the menu window Press the RETURN button to move to the previous menu screen Aspect Ratio 16 9 Auto Bright Off Picture Mode Expert 1 Backlight 20 Contrast 80 Brightness 50 H Sharpness50 V Sharpness50 PICTURE Move OK E Picture Mode Expert 1 Contrast 80 Brightness ...

Страница 51: ... video clips recorded in film look more natural This feature operates only in TV AV and Component 480i 576i 1080i mode C Co ol lo ou ur r S St ta an nd da ar rd d S SD D H HD D W Wh hi it te e B Ba al la an nc ce e M Me ed di iu um m W Wa ar rm m C Co oo ol l C Co ol lo ou ur r M Ma an na ag ge em me en nt t S Sy ys st te em m G Ga am mm ma a L Lo ow w M Me ed di iu um m H Hi ig gh h You can adjus...

Страница 52: ... OK OK Press the MENU or EXIT button to close the menu window Press the RETURN button to move to the previous menu screen Backlight 100 Contrast 100 Brightness 50 Sharpness 70 Colour 60 Tint 0 Advanced Control Picture Reset PICTURE Move OK R G D Picture Reset Backlight 100 Contrast 100 Brightness 50 Sharpness 70 Colour 60 Tint 0 Advanced Control Picture Reset PICTURE Move OK R G D Picture Reset Re...

Страница 53: ...K OK Press the MENU or EXIT button to close the menu window Press the RETURN button to move to the previous menu screen 1024 x 768 1280 x 768 1360 x 768 1366 x 768 Auto Config SCREEN Move Resolution G Position Size Phase Reset Prev RETURN 1400 x 1050 1680 x 1050 Auto Config SCREEN Move Resolution G Position Size Phase Reset Prev RETURN 1280 x 960 1400 x 900 1600 x 900 Auto Config SCREEN Move Resol...

Страница 54: ... nf fi ig gu ur re e This function is for automatic adjustment of the screen position clock and phase The displayed image will be unstable for a few seconds while the auto configuration is in progress Auto Configure RGB PC mode only If the position of the image is still not correct try Auto adjustment again If picture needs to be adjusted again after Auto adjustment in RGB PC you can adjust the P ...

Страница 55: ...U UR RE E 2 Select S SC CR RE EE EN N 3 Select P Po os si it ti io on n S Si iz ze e or P Ph ha as se e 4 Make appropriate adjustments Auto Config SCREEN Move Resolution Position G Size Phase Reset G F D E MENU OK OK Press the MENU or EXIT button to close the menu window Press the RETURN button to move to the previous menu screen Prev RETURN Contrast 100 Brightness 50 Sharpness 8 Colour 50 Tint 0 ...

Страница 56: ... EE EN N 3 Select R Re es se et t 5 Run Reset To Set Auto Config SCREEN Move Prev RETURN Resolution Position Size Phase Reset G MENU OK OK OK 4 Select Y Ye es s OK Press the MENU or EXIT button to close the menu window Press the RETURN button to move to the previous menu screen Contrast 100 Brightness 50 Sharpness 8 Colour 50 Tint 0 Advanced Control Picture Reset Screen PICTURE Move OK Screen R G ...

Страница 57: ...each programme AUTO VOLUME LEVELER Select A AU UD DI IO O 2 Select A Au ut to o V Vo ol lu um me e 3 Select O On n or O Of ff f 1MENU OK OK Press the MENU or EXIT button to close the menu window Press the RETURN button to move to the previous menu screen Auto Volume Off Clear Voice II Off Level 3 Balance 0 Sound Mode Standard Treble 50 Bass 50 AUDIO Move OK L R E Auto Volume Off Auto Volume Off Cl...

Страница 58: ...ow Press the RETURN button to move to the previous menu screen Auto Volume Off Clear Voice II Off Level 3 Balance 0 Sound Mode Standard Treble 50 Bass 50 AUDIO Move OK L R E Clear Voice II Off Auto Volume Off Clear Voice II Off Level 3 Balance 0 Sound Mode Standard Treble 50 Bass 50 AUDIO Move OK L R E Clear Voice II Off Off On Off S Se el le ec ct t l le ev ve el ls s f fr ro om m 6 6 t to o 6 6 ...

Страница 59: ...U or EXIT button to close the menu window Press the RETURN button to move to the previous menu screen Auto Volume Off Clear Voice II Off Level 3 Balance 0 Sound Mode Standard Treble 50 Bass 50 AUDIO Move OK L R E B Ba alla an nc ce e 0 0 L R Auto Volume Off Clear Voice II Off Level 3 Balance 0 Sound Mode Standard Treble 50 Bass 50 AUDIO Move OK L R E B Ba alla an nc ce e 0 0 L R Close Balance 0 L ...

Страница 60: ...po or rt t Optimizes sound for watching sports vents G Ga am me e Optimizes sound for playing games Select A AU UD DI IO O 2 Select S So ou un nd d M Mo od de e 3 Select S St ta an nd da ar rd d M Mu us si ic c C Ci in ne em ma a S Sp po or rt t or G Ga am me e 1MENU OK OK Press the MENU or EXIT button to close the menu window Press the RETURN button to move to the previous menu screen Auto Volume...

Страница 61: ...lect a T Tr re eb bl le e B Ba as ss s MENU OK OK OK 5 OK Auto Volume Off Clear Voice II Off Level 3 Balance 0 Sound Mode Standard Treble 50 Bass 50 AUDIO Move OK L R E S So ou un nd d M Mo od de e S St ta an nd da ar rd d U Us se er r Auto Volume Off Clear Voice II Off Level 3 Balance 0 Sound Mode Standard Treble 50 Bass 50 AUDIO Move OK L R E S So ou un nd d M Mo od de e S St ta an nd da ar rd d...

Страница 62: ...ress the MENU or EXIT button to close the menu window Press the RETURN button to move to the previous menu screen Balance 0 Sound Mode Standard Treble 50 Bass 50 Reset Digital Audio Out PCM TV Speaker On AUDIO Move OK R Re es se et t L R Balance 0 Sound Mode Standard Treble 50 Bass 50 Reset Digital Audio Out PCM TV Speaker On AUDIO Move OK R Re es se et t L R Resetting sound mode configuration ii ...

Страница 63: ...ound support for any high definition broadcast format Select Auto and mut TV speakers to enable this at digital output Select A AU UD DI IO O Select D Di ig gi it ta al l A Au ud di io o O Ou ut t 3 Select A Au ut to o or P PC CM M 1 2 MENU OK OK Press the MENU or EXIT button to close the menu window Press the RETURN button to move to the previous menu screen Manufactured under license from Dolby ...

Страница 64: ... O Select T TV V S Sp pe ea ak ke er r 3 Select O On n or O Of ff f 1 2 MENU OK OK Balance 0 Sound Mode Standard Treble 50 Bass 50 Reset Digital Audio Out PCM TV Speaker On AUDIO Move OK T TV V S Sp pe ea ak ke er r O On n L R Balance 0 Sound Mode Standard Treble 50 Bass 50 Reset Digital Audio Out PCM TV Speaker On AUDIO Move OK T TV V S Sp pe ea ak ke er r O On n L R Off On On Press the MENU or E...

Страница 65: ...and right loud speakers R R R R Audio signal from audio R input is sent to left and right loud speakers SOUND CONTROL I II A M Mo on no o s so ou un nd d s se el le ec ct ti io on n If the stereo signal is weak in stereo reception you can switch to mono In mono reception the clarity of sound is improved B Br ro oa ad dc ca as st t Mono Stereo O On n S Sc cr re ee en n D Di is sp pl la ay y MONO MO...

Страница 66: ...by a digital signal Once Clock is set in DTV mode you cannot change time CLOCK SETUP Select T TI IM ME E 2 Select C Cl lo oc ck k 1 3 Select either the year month date time or Time Zone option 4 Set the year month date time and Time Zone options MENU OK OK Press the MENU or EXIT button to close the menu window Press the RETURN button to move to the previous menu screen Clock Off Time Off On Time O...

Страница 67: ... D Da ai il ly y M Mo on n to F Fr ri i M Mo on n to S Sa at t S Sa at t to S Su un n or S Su un n To cancel On Off Time function select Off For On Time function only 1 Select M Mo od de e 2 Select D DT TV V R RA AD DI IO O T TV V A AV V C Co om mp po on ne en nt t R RG GB B H HD DM MI I 1 to 2 or D DV VI I 3 Set the programme 4 Adjust volume level at switch on MENU OK OK OK Press the MENU or EXIT...

Страница 68: ...to o O Of ff f 1 3 Select O Of ff f or O On n MENU OK OK Press the MENU or EXIT button to close the menu window Press the RETURN button to move to the previous menu screen Clock Off Time Off On Time Off Sleep Timer Off Auto Off On TIME Move OK A Au ut to o O Of ff f O On n Clock Off Time Off On Time Off Sleep Timer Off Auto Off On TIME Move OK A Au ut to o O Of ff f O On n Off On On ...

Страница 69: ...IMER SETTING When you switch the set off the preset sleep time is cancelled You can also adjust Sleep Timer in the Q Menu When entering DPM Sleep mode the value of sleep time setting will be canceled Select T TI IM ME E 2 Select S Sl le ee ep p T Ti im me er r 1 3 4 Confirm it MENU OK OK OK Select O Of ff f 1 10 0 2 20 0 3 30 0 6 60 0 9 90 0 1 12 20 0 1 18 80 0 or 2 24 40 0 M Mi in n ...

Страница 70: ...e Use Factory Reset OPTION Move OK Subtitle Off Subtitle Off Input Label Key Lock Off Set ID Off Power Indicator DDC CI On Mode Setting Home Use Factory Reset OPTION Move OK Subtitle Off Select O OP PT TI IO ON N Select S Su ub bt ti it tl le e Select O On n or O Of ff f Save 2 3 4 1MENU OK OK OK Press the MENU or EXIT button to close the menu window Press the RETURN button to move to the previous...

Страница 71: ...the menu window Press the RETURN button to move to the previous menu screen Subtitle Off Input Label Key Lock Off Set ID Off Power Indicator DDC CI On Mode Setting Home Use Factory Reset OPTION Move OK I In np pu ut t L La ab be ell Subtitle Off Input Label Key Lock Off Set ID Off Power Indicator DDC CI On Mode Setting Home Use Factory Reset OPTION Move OK I In np pu ut t L La ab be ell RGB HDMI 1...

Страница 72: ...he TV or POWER INPUT PR D E or NUMBER buttons on the remot control then the set will be turned on With the Key Lock On the display Key Lock On appears on the screen if any button on the front panel is pr ssed while viewing the TV Except for r I button MENU OK OK Press the MENU or EXIT button to close the menu window Press the RETURN button to move to the previous menu screen Subtitle Off Input Lab...

Страница 73: ...e er r i in nd di ic ca at to or r O Of ff f LED always Off POWER INDICATOR 1 Select O OP PT TI IO ON N 2 Select P Po ow we er r I In nd di ic ca at to or r MENU OK Subtitle Off Input Label Key Lock Off Set ID Off Power Indicator DDC CI On Mode Setting Home Use Factory Reset OPTION Move OK Power Indicator Subtitle Off Input Label Key Lock Off Set ID Off Power Indicator DDC CI On Mode Setting Home ...

Страница 74: ... connecting communication between PC and set when DDC CI is ON and set cannot be adjusted with PC because communication between PC and set is disconnected when DDC CI is OFF DDC CI Only RGB DVI mode 1 Select O OP PT TI IO ON N 2 Select D DD DC C C CI I MENU OK Subtitle Off Input Label Key Lock Off Set ID Off Power Indicator DDC CI On Mode Setting Home Use Factory Reset OPTION Move OK DDC CI On Sub...

Страница 75: ...ng at stores 1 Select O OP PT TI IO ON N 2 Select M Mo od de e S Se et tt ti in ng g Select S St to or re e D De em mo o or H Ho om me e U Us se e 3 MENU OK OK Selecting the environment Choose the setting mode you want Store Demo Home Use Select HomeUse tousethisTVathome TousethisTVatstore select StoreDemo Mode Setting Subtitle Off Input Label Key Lock Off Set ID Off Power Indicator DDC CI On Mode...

Страница 76: ...et t 3 MENU OK OK Press the MENU or EXIT button to close the menu window Press the RETURN button to move to the previous menu screen Subtitle Off Input Label Key Lock Off Set ID Off Power Indicator DDC CI On Mode Setting Home Use Factory Reset OPTION Move OK Factory Reset Subtitle Off Input Label Key Lock Off Set ID Off Power Indicator DDC CI On Mode Setting Home Use Factory Reset OPTION Move OK F...

Страница 77: ...1 If you forget your password press 7 7 7 7 on the remote control handset If selecting On Block Programme Parental Guidance and Input Block operates MENU OK OK OK OK 1 2 3 4 5 6 7 8 0 9 Press the MENU or EXIT button to close the menu window Press the RETURN button to move to the previous menu screen Lock System Off Set Password Block Programme Parental Guidance Off Input Block LOCK Move OK L Lo oc...

Страница 78: ...OK Press the MENU or EXIT button to close the menu window Press the RETURN button to move to the previous menu screen GREEN GREEN Lock System Off Set Password Block Programme Parental Guidance Off Input Block LOCK Move OK B Bllo oc ck k P Pr ro og gr ra am mm me e ABC TV Sydney 1 Pr Change Page Change D F G E P DTV RADIO TV 1 ABC TV Sydney 2 7 Digital 9 Nine Digital 10 ABC2 1 1 ABC TV 12 ABC HDTV ...

Страница 79: ...ter a password to watch a rated programme PARENTAL CONTROL IN DIGITAL MODE ONLY Select L LO OC CK K 2 Select P Pa ar re en nt ta al l G Gu ui id da an nc ce e 3 Make appropriate adjustments 4 Save 1MENU OK OK OK Press the MENU or EXIT button to close the menu window Press the RETURN button to move to the previous menu screen Lock System Off Set Password Block Programme Parental Guidance Off Input ...

Страница 80: ...U or EXIT button to close the menu window Press the RETURN button to move to the previous menu screen Lock System Off Set Password Block Programme Parental Guidance Off Input Block LOCK Move OK I In np pu ut t B Bllo oc ck k Lock System Off Set Password Block Programme Parental Guidance Off Input Block LOCK Move OK I In np pu ut t B Bllo oc ck k AV Component RGB HDMI1 HDMI2 DVI F Off G Off Off Off...

Страница 81: ...l power supply If not the device may not be recognized G Some storage device requires external power please insert USB device to the monitor after connect external power If not it cause the product to malfunction or fail to be played G Please connect a USB storage device with cable is offered by USB maker If connected with cable is not offered by USB maker or an excessively long cable the device m...

Страница 82: ...e er ra at te e l li ik ke e M MA AR RK K k ke ey y 1 3 4 5 2 PHOTO JPEG supporting file Baseline 15360 x 8640 Progressive format 1024 x 768 You can play JPEG files only Only baseline scan is supported among JPEG SOF0 SOF1 only Non supported files are displayed in the form of bitmap USB Device Page 2 3 No Marked Photo List Up Folder Free Space 150MB Navigation Option Page Change Mark Exit 1366x768...

Страница 83: ...Al ll l Mark all photos on the screen G U Un nm ma ar rk k A Al ll l Deselect all marked photos G D De el le et te e Delete the selected photo item G C Cl lo os se e Close the pop up menu Select the target folder or drive Select the desired photos 2 Show the PopUp menu 3 1 Use the P P button to navigation in the photo page Use the M MA AR RK K button to mark or unmark a photo When one or more phot...

Страница 84: ...tio of a photo may change the size of the photo displayed on the screen in full size Press the R RE ET TU UR RN N button to move to the previ ous menu screen 1 17 Slideshow BGM Delete Option Hide USB Device Page 2 3 No Marked Photo List Up Folder Free Space 150MB 1366x768 125KB KR101 KR102 JMJ001 JMJ002 JMJ003 JMJ004 KR103 KR104 KR105 JMJ005 JMJ006 JMJ007 JMJ008 Up Folder Drive1 Drive1 Select the ...

Страница 85: ...values for S Sl li id de e S Sp pe ee ed d and M Mu us si ic c F Fo ol ld de er r Use button and O OK K button to set values Then go to and press O OK K to save the settings You cannot change M Mu us si ic c F Fo ol ld de er r while BGM is playing G H Hi id de e Hide the menu on the full sized screen To see the menu again on the full sized screen press O OK K button to display OK Select the S Sl l...

Страница 86: ...B Device Page 2 3 No Marked Music List Up Folder Free Space 150MB Navigation Option Page Change Mark Exit 1 340 120KB Up Folder 2 3 4 5 1 Moves to upper level folder Current page Total pages Total number of marked music title Usable USB memory Corresponding buttons on the remote control M MA AR RK K a an nd d F FA AV V h ha av ve e s sa am me e f fu un nc ct ti io on n i in n U US SB B m mo od de ...

Страница 87: ...ist G M Ma ar rk k A Al ll l Mark all music titles in the folder G U Un nm ma ar rk k A Al ll l Deselect all marked music titles G D De el le et te e Delete the selected music titles G C Cl lo os se e Close the pop up menu Use the P P button to navigation in the music page Use M MA AR RK K button to mark or unmark a music When one or more music files are marked the marked music title will be playe...

Страница 88: ...ss O OK K A buttons screen saver is stopped G The P PL LA AY Y G P Pa au us se e I II I A GG FF buttons on the remote control are also available in this mode G You can use the GG button to select the next music and the FF button to select the previous music Using the remote control When playing repeatedly press the R RE EW W FF button to speed up FF FFF FFFF FFFFF FFFFFF repeatedly press the F FF ...

Страница 89: ...itch to teletext The initial page or last page appears on the screen Two page numbers TV station name date and time are displayed on the screen headline The first page number indicates your selection while the second shows the current page displayed Press the T TE EX XT T or E EX XI IT T button to switch off teletext The previous mode reappears SWITCH ON OFF IN DIGITAL MODE ONLY A Page selection E...

Страница 90: ... mode press this button to select a sub page number The sub page number is displayed at the bottom of the screen To hold or change the sub page press the RED GREEN or NUMBER buttons A H Ho ol ld d Stops the automatic page change which will occur if a teletext page consists of 2 or more sub pages The num ber of sub pages and the sub page displayed is usually shown on the screen below the time When ...

Страница 91: ...led properly A Activate any function to restore the brightness of the picture A Check for local interference such as an electrical appliance or power tool A Station or cable product experiencing problems tune to another station A Station signal is weak reorient antenna to receive weaker station A Check for sources of possible interference A Check antenna Change the direction of the antenna TROUBLE...

Страница 92: ... i im ma ag ge e i is s d di is sp pl la ay ye ed d A Adjust brightness and contrast again A If the product is in power saving mode move the mouse or press any key A The signal from the PC Video card is out of the vertical or horizontal frequency range of the product Adjust the frequency range by referring to the Specifications in this user s guide A The signal cable between PC and product is not ...

Страница 93: ...D Is the screen position wrong Horizontal noise appears or the characters look blurred Do thin lines appear on the background screen S Sc cr re ee en n c co ol lo or r i is s a ab bn no or rm ma al l A Set screen color resolution to more than 24 bits true color Select control Panel Display Settings Color Table menu in Windows A Check the connection status of the signal cable A Several pixels red g...

Страница 94: ... ric softener or dishwashing detergent Wring the cloth until it s almost dry and then use it to wipe the screen Make sure the excess water is off the screen and then let it air dry before you turn on your set Cleaning the Cabinet A To remove dirt or dust wipe the cabinet with a soft dry lint free cloth A Please be sure not to use a wet cloth Extended Absence G If you expect to leave your set dorma...

Страница 95: ...on Recommended Resolution Horizontal Frequency Vertical Frequency Synchronization Type Video Signal 1920 X 1080 60 Hz 1920 X 1080 60 Hz 30 kHz to 83 kHz 56 Hz to 75 Hz Separate Sync Digital Input Connector TV D Sub Analog PC Audio In component DVI D HDMI 2 CVBS Rated Voltage Power Consumption Tilt Tilt Range 5 to 15 Dimensions Width x Height x Depth Weight 551 8 mm x 419 5 mm x 221 6 mm 21 72 inch...

Страница 96: ...C4 C5 C6 C7 D0 D1 D2 D3 D4 D5 D6 D7 D0 D1 D2 D3 D4 D5 D6 D7 Lead code Low custom code High custom code Data code Data code Repeat code Tf 4 5 ms 9 ms 2 25 ms 9 ms 0 55 ms 0 56 ms 1 12 ms 0 56 ms 2 24 ms Tf Tf Tf 108ms 455KHz Bit 0 Bit 1 1 How to Connect A Connect your wired remote control to the Remote Control port on the set 2 Remote Control IR Codes A Output waveform Single pulse modulated with ...

Страница 97: ...R C BUTTON 14 Number Key 4 R C BUTTON 15 Number Key 5 R C BUTTON 16 Number Key 6 R C BUTTON 17 Number Key 7 R C BUTTON 18 Number Key 8 R C BUTTON 19 Number Key 9 R C BUTTON 1A Q VIEW R C BUTTON 1E FAV R C BUTTON 20 TEXT R C BUTTON 21 T OPT R C BUTTON 28 RETURN R C BUTTON 39 SUBTITLE R C BUTTON 43 MENU R C BUTTON 44 OK R C BUTTON 45 Q MENU R C BUTTON 50 TV PC R C BUTTON F0 TV RADIO R C BUTTON 0A I ...

Страница 98: ...h the product Type of Connector D Sub 9 Pin Male No Pin Name 1 No connection 2 RXD Receive data 3 TXD Transmit data 4 DTR DTE side ready 5 GND 6 DSR DCE side ready 7 RTS Ready to send 8 CTS Clear to send 9 No Connection RS 232C IN CONTROL SERVICE 1 5 6 9 RS 232C Configurations 7 Wire Configurations Standard RS 232C cable PC TV RXD 2 3 TXD TXD 3 2 RXD GND 5 5 GND DTR 4 6 DSR DSR 6 4 DTR RTS 7 8 CTS...

Страница 99: ...range of SET ID is 1 to 99 1MENU OK OK Press the MENU or EXIT button to close the menu window Press the RETURN button to move to the previous menu screen Subtitle Off Input Label Key Lock Off Set ID Off Power Indicator DDC CI On Mode Setting Home Use Factory Reset OPTION Move OK Set ID Off Subtitle Off Input Label Key Lock Off Set ID Off Power Indicator DDC CI On Mode Setting Home Use Factory Rese...

Страница 100: ... Second command to control the TV Set ID You can adjust the set ID to choose desired monitor ID number in option menu Adjustment range is 1 to 99 When selecting Set ID 0 every connected set is controlled Set ID is indicated as decimal 1 to 99 on menu and as Hexa decimal 0x0 to 0x63 on transmission receiving protocol DATA To transmit command data Transmit FF data to read status of command Cr Carria...

Страница 101: ...een 1 6 9 04 Zoom 06 Original 07 1 4 9 09 Just Scan 10 to 1F Cinema Zom 1 to 1 6 k c Set ID Data Cr Ack c Set ID OK NG Data x 0 05 5 V Vo ol lu um me e C Co on nt tr ro ol l C Co om mm ma an nd d k k f f G To adjust volume You can also adjust volume with the VOLUME buttons on remote control Transmission Data Min 00 to Max 64 Refer to Real data mapping See page 102 k f Set ID Data Cr Ack f Set ID O...

Страница 102: ...nd d k k k k Data Min 00 to Max 64 Refer to Real data mapping See page 102 k k Set ID Data Cr Ack k Set ID OK NG Data x 1 15 5 B Ba al la an nc ce e C Co om mm ma an nd d k k t t G To adjust balance You can also adjust balance in the AUDIO menu Transmission Data Min 00 to Max 64 Refer to Real data mapping See page 102 k t Set ID Data Cr Ack t Set ID OK NG Data x 1 13 3 T Tr re eb bl le e C Co om m...

Страница 103: ...Tu un ne e C Co om mm ma an nd d C Co om mm ma an nd d m m a a G Select channel to following physical number Transmission Data 00 High channel data Data 01 Low channel data ex No 47 00 2F 2FH No 394 01 88 188H DTV No 0 Don t care Data 02 0x00 ATV 0x10 DTV 0x20 Radio Channel data range Analogue Min 00 to Max 63 0 to 99 Digital Min 00 to Max 3E7 0 to 999 m a Set ID Data0 Data1 Data2 Cr Ack a Set ID ...

Страница 104: ...s before using the product Keep the Owner s Manual CD in an accessible place for future reference The model and serial number of the SET is located on the back and one side of the SET Record it below should you ever need service MODEL SERIAL ...

Отзывы: