


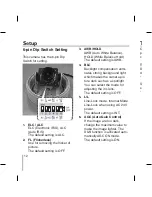


99
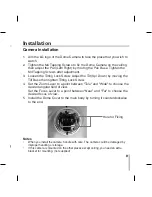
Front View
Side View
Pan Base
6-pin Dip Switch
Tilt Base
Zoom Lever
Tilting Lock Screw
Focus Lever
Lens
Tilting Lock Screw
Dome Cover Separatory Spring
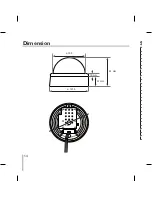
Construction
Installation
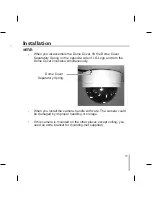
Camera Installation
1. Aim the LG logo of the Dome Camera to face the place that you wish to
watch.
. Tighten the M4 Tapping Screws to fix the Dome Camera on the ceiling,
then adjust the Pan(Left/Right) by moving the Pan Base. Tighten the
M4 Tapping Screws after adjustment.
3. Loosen the Tilting Lock Screw. Adjust the Tilt(Up/Down) by moving the
Tilt Base then tighten Tilting Lock Screw.
4.
Set the Zoom Lever to a point between "Tele" and "Wide" to choose the
desired angular field of view.
Set the Focus Lever to a point between "Near" and "Far" to choose the
desired focus of view.
5. Install the Dome Cover to the main body by turning it counterclockwise
to the end.
Notes
• When you install the camera, handle with care. The camera could be damaged by
improper handling or storage.
• If this camera is mounted on the other places except ceiling, you need an extra
bracket for mounting. (not supplied)
Hole for Fixing
Содержание LV300N-B
Страница 16: ...P NO MFL40426626 ...


