background image

13

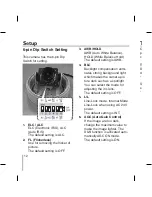
6-pin Dip Switch Setting

This camera has the 6-pin Dip 

Switch for setting.

1.  ELC / ALC  

ELC (Electronic IRIS), ALC 

(Auto IRIS)  

The default setting is ALC.

2.  FL (Flickerless) 

Use for removing the flicker of 

picture.

The default setting is OFF.

3.  AWB/HOLD 

AWB (Auto White Balance), 

HOLD (White Balance Hold). 

The default setting is AWB.

4.  BLC  

Backlight compensation elimi-

nates strong background light 

which makes the camera pic-

ture dark such as a spotlight. 

You can select the mode for 

adjusting the iris lens.  

The default setting is OFF.

5.  L/L  

Line-Lock mode, Internal Mode. 

Line-Lock when using AC 4 V 

power. 

The default setting is INT.

6.  AGC (Auto Gain Control) 

If the image are too dark, 

change the maximum value to 

make the image lighter. The 

D&N function is activated auto-

matically AGC ON mode. 

The default setting is ON.

Setup

Troubleshooting

Check the following guide for the  

possible cause of a problem before 

contacting service.

The picture is poor

Does the Dome Cover have lots of 

dust on the surface?

-  Use a dry cloth to clean the  

camera when it is dirty.

Smear may be caused to the 

screen of night than daytime.

-  Adjust the Focus by moving the 

Focus Lens.

Contrast of the screen is not 

clear.

Check the condition of the monitor. 

A light source such as a spot light 

causes burn-in on the display 

screen. Adjust position or angle 

of the camera to eliminate strong 

background light.

Background screen appears 

white extremely.

You can set the background  

compensation to OFF.

Содержание LV300N-B

Страница 1: ...Before installing operating or adjusting this product please read this instruction booklet carefully and completely ColorVideo Camera Instruction Manual Models LV300N B LV300P B ...

Страница 2: ...fied service person and should conform to all local codes CAUTION To avoid electrical shock do not open the cabinet Refer servicing to qualified personnel only Disposal of your old appliance 1 When this crossed out wheeled bin symbol is attached to a prod uct it means the product is cov ered by the European Directive 2002 96 EC 2 All electrical and electronic prod ucts should be disposed of sepa r...

Страница 3: ... is operated in a com mercial environment This equipment generates uses and can radiate radio frequency energy and if not installed and used in accordance with the instruction manual may cause harmful interference to radio communications Operation of this equipment in a residential area is likely to cause harmful interference in which case the user will be required to correct the interference at h...

Страница 4: ...re cleaning Do not use liquid cleaners 7 Do not block any ventilation open ings Install in accordance with the manufacturer s instructions Slots and openings in the cabinet are provided for ventilation to ensure reliable operation of the product and to protect it from over heating The openings should never be blocked by placing the product on a bed sofa rug or other similar surface This product sh...

Страница 5: ...gs convenience receptacles and the point where they exit from the apparatus 11 Only use attachments acces sories specified by the manufac turer 12 Use only the cart stand tripod bracket or table specified by the manufacturer or sold with appa ratus When a cart is used use caution when moving the cart apparatus combination to avoid injury from tip over 13 Unplug this apparatus during lightning stor...

Страница 6: ...the camera in such conditions as shown below Use in a room or area filled with cigarette smoke dust or gas Avoid the camera with direct sunlight Do not aim the camera at bright objects Never face it with direct sunlight or other extremely bright objects Otherwise blooming or smear may be caused Handle the camera with care Do not abuse the camera Avoid striking shaking etc The camera could be dam a...

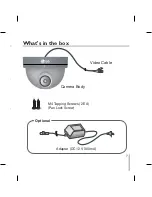
Страница 7: ...ox direct objects or other wise sed h care d striking be dam orage era to oor use from ed to mediately onnel age the ger of Video Cable Camera Body M4 Tapping Screws 2 EA Pan Lock Screw Adapter DC 12 V 300 mA Optional ...

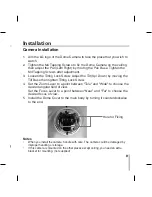
Страница 8: ...ch Tilt Base Zoom Lever Tilting Lock Screw Focus Lever Lens Tilting Lock Screw Dome Cover Separatory Spring Construction Insta Camer 1 Aim watc 2 Tigh then M4 T 3 Loos Tilt B 4 Set t desir Set t desir 5 Insta to th Notes When impro If this brack ...

Страница 9: ...g the Tilt Base then tighten Tilting Lock Screw 4 Set the Zoom Lever to a point between Tele and Wide to choose the desired angular field of view Set the Focus Lever to a point between Near and Far to choose the desired focus of view 5 Install the Dome Cover to the main body by turning it counterclockwise to the end Notes When you install the camera handle with care The camera could be damaged by ...

Страница 10: ...on Camera Connection Connect the Power Adapter 12 V 300 mA optional to the Power Input Jack of the camera as shown below Insta NOTES W S D W b I n Power Input Jack Adapter Jack Power Adapter Not supplied Monitor BNC ...

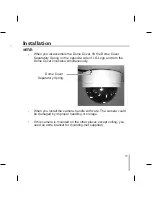
Страница 11: ... side of LG Logo and turn the Dome Cover clockwise simultaneously When you install the camera handle with care The camera could be damaged by improper handling or storage If this camera is mounted on the other places except ceiling you need an extra bracket for mounting not supplied Dome Cover Separatory Spring ...

Страница 12: ...i nates strong background light which makes the camera pic ture dark such as a spotlight You can select the mode for adjusting the iris lens The default setting is OFF 5 L L Line Lock mode Internal Mode Line Lock when using AC 24 V power The default setting is INT 6 AGC Auto Gain Control If the image are too dark change the maximum value to make the image lighter The D N function is activated auto...

Страница 13: ...urface Use a dry cloth to clean the camera when it is dirty Smear may be caused to the screen of night than daytime Adjust the Focus by moving the Focus Lens Contrast of the screen is not clear Check the condition of the monitor A light source such as a spot light causes burn in on the display screen Adjust position or angle of the camera to eliminate strong background light Background screen appe...

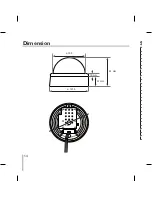
Страница 14: ...14 Dimension 91 mm ø 121 5 ø 100 ø 90 10 mm 31 mm Spec Si Total Pic Sig Sca Sy Scan R Stand Sensit Video G Sh W Po Powe Ope St N D ...

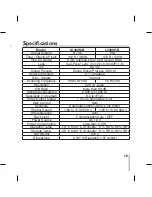
Страница 15: ... Hz VD Resolution 520 TV Lines S N Ratio More than 48 dB Standard Illuminance 2 000 lx 3 200 K Sensitivity 1 3 output 0 5 lx F1 2 Video Output Signal 1 Vp p Composite 75 Ω Gain Control Auto Exposure Automatic control with DC Iris motor Shutter Speed 1 60 to 1 100 000 s 1 50 to 1 100 000 s White Balance Auto Back Light Compensation Auto OFF Power Source DC 12 V Power Consumption Less than 2 3 W Ope...

Страница 16: ...P NO MFL40426626 ...
Отзывы: