background image

6

6

If the product is not leveled after the 

installation, you can rotate the display 

up to 5 degrees. 

±

5

°

±

5

°

7

5

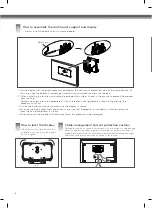
How to assemble the wall mount support and display 

- Always install the display with 2 or more people. 

How to level the Display

Cable arrangement and set protection cushion 

-  Arrange the cables as shown in the picture. Use some type of cable banding 

device to hold all the cables together. Attach the set protection cushion to 

mitigate the impact between the wall and the set when adjusting the angle. 

Attach the set protection cushion as shown in the picture.  

Safety pin

112

16

1.  Set the display with the guide spacer assembled on the wall mount bracket on the wall in arrow direction. At 

this time, align the bottom assembly part and lift the set up lightly to align the top part.

2.  When adjusting the location, assemble the provide safety clip as shown in the picture to prevent the product 

from moving.  

Tighten the safety clip screw completely. If the safety clip is not tightened as shown in the picture, the 

product can fall off.


Pull on the bottom of the set to make sure the display is secure.


When connecting cables and accessories, make sure that theproduct is installed at a sufficient distance 

from the wall to avoidstress on them.


When you push the product with excessive force, the product can be damaged.

Содержание LSW140B

Страница 1: ...OWNER S MANUAL Wall Mounting Bracket LSW140B P NO MFL63640554 1312 REV00 Please read this manual carefully before operating your set and retain it for future reference www lg com Brazil www lge com ...

Страница 2: ...the product where the weight cannot be supported If the strength of the location where the wall mount is installed is not strong enough it can fall off and cause an injury Use a trained and experienced installer to move or replace the wall mount if needed Installation requires special techniques and moving or installing the product on your own can cause serious safety issues When installing the wa...

Страница 3: ...er flows into the product or if moisture and heat are applied to the product it can cause a fire an electric shock or problem to the product Unplug the power cord from the power outlet before installing the product If you install the product with the power cord plugged it can cause an electric shock or a fire Do not install the product near any object that may cause vibration Do not install the pr...

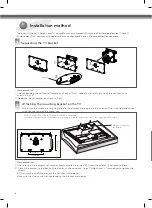
Страница 4: ...y tightened to the bracket and display If the screws will not fully tightened they might be too long or the wrong size Work procedure 1 Check to see if the display has screws already installed into the VESA mounting holes If so remove those 2 Attach the bracket to the back of the display as shown above Use a Phillips head screwdriver to tighten the screws At this time be careful to prevent the set...

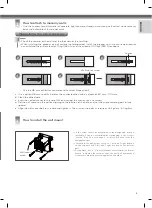
Страница 5: ...he hole and set the angle adjusting part to face upward e Align the wall mount bolt to the hole and tighten it Then fasten the bolts at torque of 45 kgf cm 60 kgf cm Wall mount screw c Anchor Use the anchors for wall material of concrete light concrete strong natural stone soft natural stone masonry brick and hallow block that do not crack 4 How to install the wall mount Wall mount screw If the sc...

Страница 6: ...the picture Safety pin 1 Set the display with the guide spacer assembled on the wall mount bracket on the wall in arrow direction At this time align the bottom assembly part and lift the set up lightly to align the top part 2 When adjusting the location assemble the provide safety clip as shown in the picture to prevent the product from moving Tighten the safety clip screw completely If the safety...

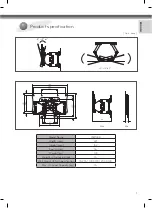
Страница 7: ...Unit mm Max Min 112 15 15 2 15 15 2 112 16 112 16 Model Name LSW140B Width mm 221 Height mm 152 Depth mm 16 Weight kg 0 9 Weight with packing kg 1 5 Wall Mount VESA Specification 75 X 75 100 X 100 200 X 100 Max UL Load Capacity kg 15 ...

Страница 8: ... of the product is located on the back or one side of the product Record it below should you ever need service MODEL SERIAL Supported Displays Please contract the retailers or refer to the TV owner s manual for applicable models ...

Отзывы: