36
Single Zone High Efficiency
, Standard, Extended Pipe and Mega W
all Mount Installation Manual
Due to our policy of continuous product innovation, some specifications may change without notification.
©LG Electronics U.S.A., Inc., Englewood Cliffs, NJ. All rights reserved. “LG” is a registered trademark of LG Corp.
RefRigeRant PiPing ConneCtions
Perform the leak test by pressurizing nitrogen gas to 550 psi on both the liquid and gas pipes. Test with the piping service valves closed. If
the pressure does not drop for twenty-four (24) hours, the system passes the test. If the pressure drops, there is a nitrogen leak in the sys-
tem. Find the leak, repair, and then test again.
Leak Test/Soap Method Check
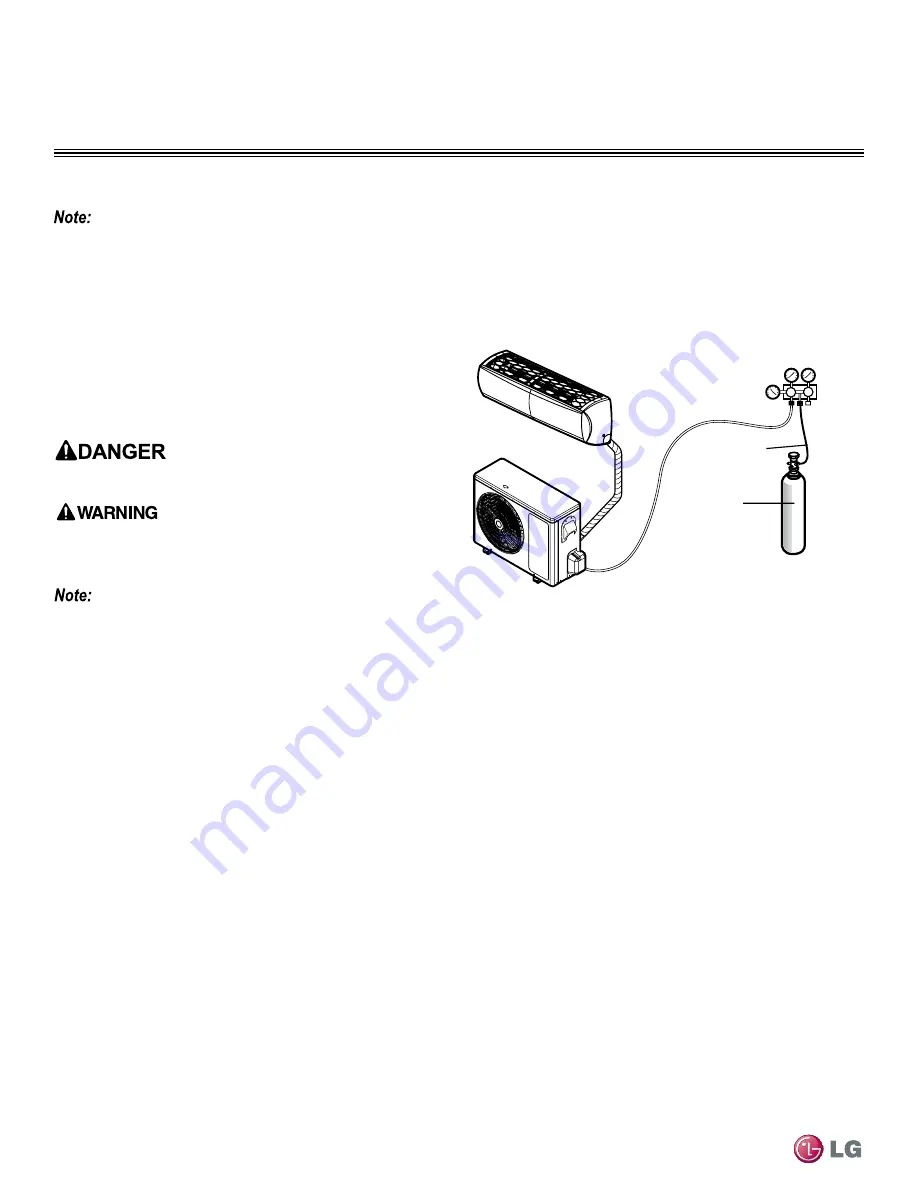
Figure 52:
Leak Test Diagram.
Leak test
Leak Test Ambient Temperature Correction
If the ambient temperature changed between the time when
pressure was applied and when the pressure drop was checked,
adjust results by factoring in approximately 1.45 psi for each 2°F of
temperature difference.
Correction formula = (Ambient temperature when pressure was ap
-
plied - Ambient temperature when pressure drop was checked) x 0.01.
Example:
When pressure (550 psig) was applied, the ambient temperature
was 80.6 °F; 24 hours later when pressure drop (540 psi) was
checked, ambient temperature was 68°F.
Thus, 80.6 - 68 x 0.01 = 0.126. In this case, the pressure drop of
0.126 was due to temperature difference, therefore, there is no leak
in the refrigerant piping system.
Pressure Gauge Hookup
1.
Connect the manifold valve (which includes the pressure gaug
-
es), along with dry nitrogen gas cylinder to the service valves
using charge hose (Figure 52).
2.
Pressurize the system to maximum 150 P.S.I.G. with dry nitrogen
gas and close the cylinder valve when the gauge reading reaches
150 P.S.I.G.
Lo
Hi
Outdoor Unit
Manifold Valve
Charge Hose
Nitrogen Gas
Tank (Upright
Position)
Pressure
Gauge
Indoor Unit
Piping Bundle
Leak Test Using Nitrogen Tank
• To avoid nitrogen entering the refrigerant system in a liquid state,
the top of the cylinder must be higher than its bottom when you
pressurize the system.
• Be sure cylinder is used in a vertical standing position.
Soap Water Method - Leak Testing
1.
Remove the caps from the 2-way and 3-way valves. See Figure 50.
2. To open the 2-way valve, turn the valve stem counter-clockwise
approximately 90°, wait for about 2 to 3 seconds, and close it.
3. While running the nitrogen gas tank hookup, apply a soap water
or a liquid neutral detergent on the indoor unit connection or
outdoor unit connections by using a soft brush.
4. While running the pressure gauge system, observe the connec-
tions for any leaks.
•
If you see bubbles appearing at any of the connection points/joints
(at either inside and outside units), it is an indication of a leak.
5. Make a note of where the leaks are coming from along the liquid
and gas piping.
6. Disengage the nitrogen pressure by loosening the charge hose
connector at the nitrogen cylinder (Figure 52 above).
7. Once system pressure is reduced back to normal range, discon-
nect hose from the cylinder.
8. At this point you will need to make all repairs to connections and
piping where bubbles were observed.
9. Once all repairs are made, repeat soap testing using nitrogen
cylinder and check for any further leaks.
10.
Once system is leak free, proceed to Evacuation steps.
Use of combustible gases including oxygen, may result in fire or explo
-
sion.
Using nitrogen runs the risk of fire and explosion. Inert gas (nitrogen)
should be used when checking plumbing leaks, cleaning or repairs of
pipes, etc.


