background image

16

O P E R AT I N G   I N S T R U C T I O N S

A

B

C

D

E

F

G

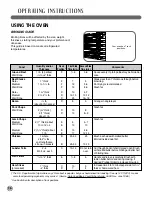
Your oven has 7 rack

positions.

USING THE OVEN

BROILING GUIDE

Broiling times will be affected by the size, weight,
thickness, starting temperature and your preference of
doneness. 
This guide is based on meats at refrigerated
temperatures.

Food

Quantity and/or

Thickness

Rack

Position

First Side

Time (min.)

Second Side

Time (min.)

Comments

Ground Beef

Well Done

Beef Steaks

Rare

Medium
Well Done

Rare

Medium
Well Done

Bacon

Pork Chops

Well Done

Lamb Chops

Medium
Well Done

Medium
Well Done

Chicken

Lobster Tails

Fish Fillets

Ham Slices

(precooked)

Space evenly. Up to 8 patties may be broiled at
once.
Steaks less than 1” thick cook through before
browning.
Pan frying is recommended.
Slash fat.

Arrange in single layer.

Slash fat.

Slash fat.

Brush each side with melted butter.
Broil skin-side-down first.

Cut through back of shell. Spread open. Brush
with melted butter before broiling and after half
of broiling time.
Handle and turn very carefully. Brush with
lemon butter before and during cooking, if
desired. Preheat broiler to increase browning.
Increase time 5 to 10 minutes per side for 1

1

/

2

thick or home-cured ham.

1 lb. (4 patties)

1

/

2

to 

3

/

4

” thick

1” thick

1 to 1

1

/

2

lb.

1

1

/

2

” thick

2 to 2

1

/

2

lb.

1

/

2

lb.

(about 8 thin slices)

2 (

1

/

2

” thick.)

2 (1” thick) 
about 1 lb.

2 (1” thick) about

10 to 12 oz.

2 (1

1

/

2

” thick) about 

1 lb

1 whole

2 to 2

1

/

2

lbs.,

split lengthwise

4 bone-in breasts

2–4

6 to 8 oz. each

1

/

4

to 

1

/

2

” thick

1” thick

1

/

2

” thick

F

F
F
F

D
D
D
D

D
D

E
E

E
E
B

B
C

E

C
D

7~8

7

12
13

10

12-15

25

8

10
13

6

10

10
17

35-40

25-30

13–16

7~8

10

7

5-6

5

5-6
8-9

6-7

10-12

16–18

3

8

8~9

4–7

10

4-6

12-14

25

10-15

Do not turn

over.

6

5
4

† The U.S. Department of Agriculture says “Rare beef is popular, but you should know that cooking it to only 140˚F(60˚C). means

some food poisoning organisms may survive.” (Source: Safe Food Book, Your Kitchen Guide, USDA Rev. June 1985.) 

* See illustration for description of rack positions.

Содержание LRG3091S

Страница 1: ...ISH ENGLISH P No MFL33029605 www lg com ENGLISH ESPAÑOL USER S GUIDE GAS RANGE Please read this manual carefully before operating your range and retain it for future reference LRG3091ST LRG3091SB LRG3091SW ...

Страница 2: ...eads 26 Burner Grates 26 Cooktop Surface 27 Stainless Steel Surfaces 27 Oven Air Vents 27 Control Panel 27 Front Manifold Panel and Knobs 28 Oven Door 29 Oven Bottom 30 Oven Racks 30 Oven Light Replacement 31 Removing and Replacing the Storage Drawer 4 TROUBLESHOOTING 32 35 Before Calling for Service 5 WARRANTY 36 LG Gas Range Limited Warranty 36 Product Registration Information THANK YOU Congratu...

Страница 3: ... agency or the gas supplier WARNING If the information in this manual is not followed exactly a fire or explosion may result causing property damage personal injury or death DO NOT store or use gasoline or other flammable vapors and liquids in the vicinity of this or any other appliance Indicates a hazardous situation which if not avoided could result in serious injury or death This guide contains...

Страница 4: ...ance with the National Electrical Code Do not use an extension cord with this range To prevent fire hazard or electrical shock DO NOT use an adapter plug an extension cord or remove the grounding prong from the electrical power cord Failure to follow this warning can cause serious injury fire or death To prevent poor air circulation place the range out of kitchen traffic path and out of drafty loc...

Страница 5: ...al or foam type fire extinguisher Flame in the upper oven or lower oven drawer can be smothered completely by closing the oven door or drawer and turning the control to off or by using a multi purpose dry chemical or foam type fire extinguisher DO NOT use the oven or the drawer for storage Let the burner grates and other surfaces cool before touching them NEVER block the vents air holes of the ran...

Страница 6: ...that is placed over the burner grate to support the wok This ring acts as a heat trap which may damage the burner grate and burner head Also it may cause the burner to work improperly This may cause a carbon monoxide level above that allowed by current standards resulting in a health hazard Foods for frying should be as dry as possible Frost or moisture on foods can cause hot fat to bubble up and ...

Страница 7: ...n before self clean is started Also remove any items placed in the bottom drawer before starting a self clean cycle Clean only parts listed in this manual DO NOT clean the door gasket The door gasket is necessary for a good seal Care should be taken not to rub damage or move the gasket If the self cleaning mode malfunctions turn the range off and disconnect the power supply Let it serviced by a qu...

Страница 8: ... using cooking or roasting bags in the oven follow the manufacturer s directions Use only glass cookware that is recommended for use in gas ovens Always remove the broiler pan from the range after you finish broiling Grease left in the pan can catch fire if oven is used without removing the grease from the broiler pan When broiling if meat is too close to the flame the fat may ignite To prevent ex...

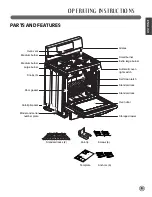
Страница 9: ... Large burner Knobs 5 Door gasket Anti tip bracket Model and serial number plate Storage drawer Oven door Oven vent Grates Small burner Extra large burner Automatic oven light switch Self clean latch Standard rack Standard rack Template Anchors 6 Screws 6 Anti tip Standard racks 2 ...

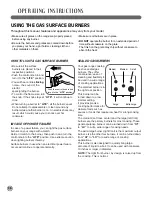
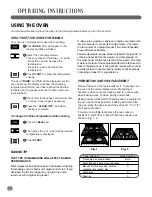
Страница 10: ...rners on your range with a match Hold a lit match to the burner then push in and turn the control knob to the LITE position Use extreme caution when lighting burners this way Surface burners in use when an electrical power failure occurs will continue to operate normally SEALED GAS BURNERS Your gas range cooktop has five sealed gas burners They offer convenience ease of cleaning and flexibility to...

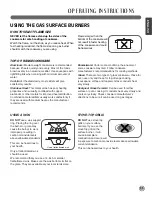
Страница 11: ...Enamelware Under some conditions the enamel of some cookware may melt Follow cookware manufacturer s recommendations for cooking methods Glass There are two types of glass cookware those for oven use only and those for top ofrange cooking saucepans coffee and teapots Glass conducts heat very slowly Heatproof Glass Ceramic Can be used for either surface or oven cooking It conducts heat very slowly ...

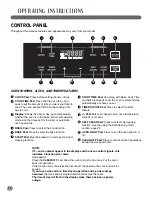
Страница 12: ...tart and stop automatically at a time you set TIMER ON OFF Pad Press to select the timer feature Pad Enters or changes time oven temperature Sets HI or LO broil SELF CLEAN Pad Press to select self cleaning function See the using the Self Cleaning Oven section page 22 OVEN LIGHT Pad Press to turn the oven light on or off CLEAR OFF Pad Press to cancel all oven operations except the clock and timer N...

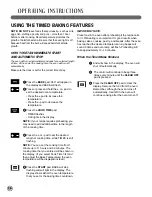
Страница 13: ... need to restart the oven or broil function OVEN LIGHT The oven light automatically turns ON when the door is opened The oven light may also be manually turned ON or OFF by pressing the OVEN LIGHT pad NOTE The oven light can not be turned on during a self clean cycle The oven light can not be turned on until the oven temperature has cooled below 500 F 260 C after a self clean cycle is complete A B...

Страница 14: ... temperature long beeps will sound 5 times and oven lamp will flash Check food for doneness at minimum time on recipe Cook longer if necessary Press the CLEAR OFF pad when cooking is complete To change the Bake Temperature while cooking Press the Bake pad Then press the or pad until the desired temperature is displayed Press START Type of Food Rack Position Frozen pies on cookie sheet Angel food c...

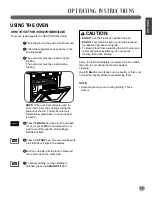
Страница 15: ...s the BROIL pad once for Hi and twice for Lo or press BROIL and press the or pad to scroll through the broil settings BROIL will flash Press the START pad The oven will begin to broil BROIL will light in the display Broil on one side until the food is browned turn and cook on the other side To cancel broiling or when broiling is finished press the CLEAR OFF pad NOTE If the oven door remains open f...

Страница 16: ...ead open Brush with melted butter before broiling and after half of broiling time Handle and turn very carefully Brush with lemon butter before and during cooking if desired Preheat broiler to increase browning Increase time 5 to 10 minutes per side for 11 2 thick or home cured ham 1 lb 4 patties 1 2 to 3 4 thick 1 thick 1 to 11 2 lb 11 2 thick 2 to 21 2 lb 1 2 lb about 8 thin slices 2 1 2 thick 2...

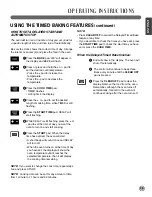
Страница 17: ...n the kitchen that will beep when the set time has run out It does not start or stop cooking or control oven operations The TIMER ON OFF feature can be used during any of the other oven control functions NOTE 1 If you press TIMER ON OFF once it allows you to set the time in minutes and seconds For example if you press 50 it means 50 seconds 2 If you press TIMER ON OFF twice it allows you to set th...

Страница 18: ...times every minute until the CLEAR OFF pad is pressed Press the CLEAR OFF pad to clear the display Remove the food from the oven Remember although the oven turns off automatically food left in the oven will continue cooking after the oven turns off HOW TO SET AN IMMEDIATE START AND AUTOMATIC STOP Press the BAKE pad 350 will appear in the display and BAKE will flash Press or press and hold the or p...

Страница 19: ... cooking Press the START pad When the delay time has expired the oven will start A short beep will sound once and DELAY will turn off When the oven turns on at the time of day you have set the display will show the oven temperature until it reaches the selected temperature then it will display the cooking time remaining NOTE If you want to change the cook time repeat steps 5 6 and press START NOTE...

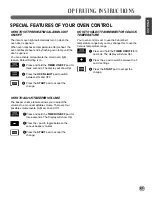
Страница 20: ...ourself DO NOT use thermometers such as those found in grocery stores to check the temperature setting of your oven These thermometers may vary 20 40 degrees NOTE This adjustment will not affect the broiling or the self cleaning temperatures The adjustment will be retained in memory after a power failure The oven temperature can be increased or decreased as much as 35 F or 19 C To increase the ove...

Страница 21: ...ge HOW TO ADJUST BEEPER VOLUME The beeper volume feature allows you to adjust the volumes to a more acceptable volume There are four possible volume levels Hi Med Lo and Off Press and hold the TIMER ON OFF pad for three seconds The Display will show Opt Press the pad to toggle between the various beeper volumes Press the START pad to accept the change HOW TO SELECT FAHRENHEIT OR CELSIUS TEMPERATUR...

Страница 22: ... SELF CLEANING OVEN BEFORE A CLEAN CYCLE When running a self clean cycle it is recommended that a kitchen window be opened or the use of ventilation fan or hood be used Remove the oven racks broiler pan broiler grid all cookware and any aluminum foil from the oven they cannot withstand the high cleaning temperatures IMPORTANT The health of some birds is extremely sensitive to the fumes given off d...

Страница 23: ...with a damp cloth after the oven cools If white spots remain remove them with a soap filled scouring pad and rinse thoroughly with a vinegar and water mixture These deposits are usually a salt residue that cannot be removed by the clean cycle If the oven is not clean after one clean cycle repeat the cycle You cannot set the oven for cooking until the oven is cool enough for the door to unlock Whil...

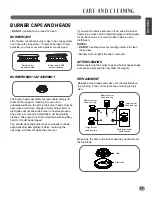
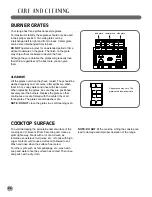
Страница 24: ...s exposed when the burner head is removed When turning a burner to LITE all the burners spark Do not attempt to disassemble or clean around any burner while another burner is on An electric shock may result Turn all controls OFF before removing the burner parts The burner grates caps and burner heads can be lifted off making them easy to clean The electrodes are not removable Burner Grate Burner C...

Страница 25: ...mes Clogged or dirty burner ports or electrodes will not allow the burner to operate properly Any spill on or around an electrode must be carefully cleaned Take care to not hit an electrode with anything hard or it could be damaged You should clean the burner caps and heads routinely especially after bad spillovers which could clog the openings Lift them off when they are cool If you want to remov...

Страница 26: ... such as tomatoes sauerkraut fruit juices etc or foods with high sugar content could cause a dull spot if allowed to set Wash and rinse when the surface has cooled For other spills such as fat spatterings etc wash with soap and water once the surface has cooled Then rinse and polish with a dry cloth NOTE DO NOT lift the cooktop Lifting the cooktop can lead to damage and improper operation of the r...

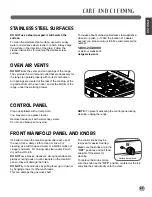
Страница 27: ...ming drawer CONTROL PANEL Clean up splatters with a damp cloth You may also use a glass cleaner Remove heavier soil with warm soapy water Do not use abrasives of any kind NOTE To prevent activating the control panel during cleaning unplug the range FRONT MANIFOLD PANEL AND KNOBS It s better to clean the manifold panel after each use of the oven Use a damp cloth to clean or rinse For cleaning use m...

Страница 28: ...able but it is heavy You may need help removing and replacing the door TO CLEAN THE INSIDE OF THE DOOR DO NOT allow excess water to run into any holes or slots in the door Because the area inside the gasket in front of the cavity is cleaned during the self clean cycle you do not need to clean this by hand The area outside the gasket can be cleaned with a soap filled plastic scouring pad TO CLEAN T...

Страница 29: ...igh acid content Hot fruit fillings or other foods with a lot of acid tomatoes sauerkraut sauces with vinegar or lemon juice may cause pitting and damage to the porcelain enamel surface and should be wiped up right away DO NOT use aluminum foil on the bottom of the range It can damage the oven cavity and block the air flow of the burner causing poor heat distribution To clean up spillovers use soa...

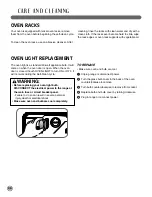
Страница 30: ...he oven door is closed thouch OVEN LIGHT to turn ON or OFF It will not work during the Self Clean cycle OVEN LIGHT REPLACEMENT WARNING Before replacing your oven light bulb DISCONNECT the electrical power to the range at the main fuse or circuit breaker panel Failure to do so can result in severe personal injury death or electrical shock Make sure oven and bulb are cool completely TO REPLACE Make ...

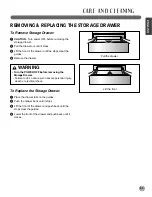
Страница 31: ... the Storage Drawer Place the drawer rails on the guides Push the drawer back until it stops Lift the front of the drawer and push back until the stops clear the guides Lower the front of the drawer and push back until it closes REMOVING REPLACING THE STORAGE DRAWER Lift the front Pull the drawer Turn the POWER OFF before removing the Storage Drawer Failure to do so can result in severe personal i...

Страница 32: ...ect cookware or cookware of improper size being used Oven thermostat needs adjustment Clock not set correctly Aluminum foil used improperly in the oven Make sure the electrical plug is inserted into a live properly grounded outlet Remove the burners and clean them Check the electrode area for burned on food or grease See the CARE AND CLEANING section Make sure the burner parts are installed correc...

Страница 33: ...temperature is too high to set a self clean operation Improper oven controls setting This is the sound of the metal heating and cooling during both the cooking and cleaning functions Too much soil Make sure you press the BROIL HI LO pad See the USING THE OVEN section See the BROILING GUIDE Use the broiling pan and grid that came with your range Make sure it is cool Use the broiling pan and grid th...

Страница 34: ...rmal for the first few times the oven is used Allow the oven to cool below locking temperature This can take up to 1 hr after the cycle is complete See the Using the USING THE SELF CLEANING OVEN section Clean up heavy spillovers before beginning the self clean cycle Heavily soiled ovens may need to self clean again or for a longer period of time Close the oven door Touch the CLEAR OFF pad Allow th...

Страница 35: ...he drawer The drawer is out of alignment Drawer is over loaded or the load is unbalanced Liquid in drawer Uncovered foods Temperature setting too high Fully extend the drawer and push it all the way in See the CARE AND CLEANING section Reduce weight Redistribute drawer contents Remove liquid Cover food with lid or aluminum foil Reduce temperature setting ...

Страница 36: ...oper installation acts of God or use of products not approved by LG Corporation 5 Repairs to parts or systems resulting from unauthorized modifications made to the appliance 6 Replacement parts or repair labour costs for units operated outside the united states 7 Any labour costs during the limited warranty period This warranty is extended to the original purchaser for products purchased for home ...

Страница 37: ...www lg com Register your product Online LG Customer Information Center 1 800 243 0000 1 888 865 3026 USA Consumer User USA Commercial User Printed in Mexico ...

Отзывы: