background image

2

TABLE DES MATIÈRES

TABLE DES MATIÈRES

3       

CONSIGNESDE SÉCURITÉ 

IMPORTANTES

12 

 APERÇU

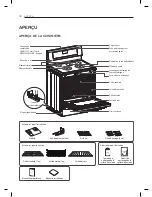
1 2    Aperçu de la cuisinière
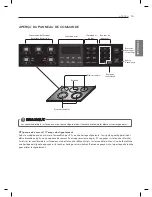
1 3    Aperçu du panneau de commande

 14 

 CARACTÉRISTIQUES

1 4    Réglages
1 4    Horloge
1 5    Minuterie en marche/arrêt
1 5    Préchauffage rapide
1 5    Convection à conversion automatique
1 6    Thermostat
1 6    Langue
1 6    Voyant d’alarme de préchauffage
1 6    Volume du bip
1 6    Fahrenheit ou Celsius
1 7     Heure de début
1 8    Temps de cuisson
1 8    Voyant de four
1 8    Verrouillage du four

 19 

  UTILISATION DE LA SURFACE DE 

CUISSON

1 9    Zones de cuisson
1 9    Utilisation des éléments de la surface de 

cuisson

2 1    Utilisation d’une bonne batterie de cuisine

 22 

  UTILISATION DU FOUR

22    Retrait et remplacement des grilles du four
23    Cuisson au four

23    Cuisson par convection
24    Rôtissage par convection
25     Grillage
25    Grillage rapide
25    Guide de cuisson au grilloir recommandée
28    Repas d’enfants
29     Réchaud
29     Fermentation
29     Favoris
30    Mode shabbat

30  

TIROIR-RÉCHAUD

30    Utiliser le tiroir-réchaud

 32 

  ENTRETIEN ET NETTOYAGE

32     Net toyer la surface de cuisson en vitre/

céramique

33     Auto-nettoyage
36    Nettoyage de l’extérieur
36    Changement de la lumière du four
37     Retrait et remplacement de la porte du four 

et du tiroir-réchaud

 39 

 FAQ

40  

DÉPANNAGE

 44 

 GARANTIE

Содержание LRE6325SB

Страница 1: ...S MANUAL ELECTRIC RANGE LRE6327ST LRE6325ST LRE6325SB LRE6325SW Please read this owner s manual thoroughly before operating and keep it handy for reference at all times www lg com ENGLISH FRANÇAIS MFL55646608 ...

Страница 2: ... using the cooktop 1 8 Cooking areas 1 8 Using the cooktop elements 20 Using the proper cookware 21 using the oven 21 Removing and replacing the oven racks 22 Bake 22 Convection bake 23 Convection roast 24 Broil 24 Speed broil 24 Recommended broiling guide 27 Kids meal 28 Warm 28 Proof 28 Favorites 29 Sabbath mode 29 warming drawer 29 Operating the warming drawer 31 care and cleaning 31 Cleaning t...

Страница 3: ... symbol This symbol alerts you to potential hazards that can result in property damage and or serious bodily harm or death All safety messages will follow the safety alert symbol and either the word WARNING or CAUTION These words mean y y It is possible for a child or adult to tip the range and be killed y y Verify that the anti tip device has been properly installed and engaged to the floor or wa...

Страница 4: ... oven doors and windows of oven doors also get hot and may cause burns if not cooled y y Use care when opening the oven door Let hot air or steam escape from the oven before removing or replacing food in the oven y y Do Not heat unopened food containers Pressure in the containers may cause them burst which may result in injury y y Be certain that all packing materials are removed from the applianc...

Страница 5: ...throw baking soda on the fire or use a fire extinguisher y y Only use dry pot holders Moist or damp pot holders on hot surfaces may result in burns from steam Do not let the pot holder touch hot heating elements Do not use a towel or other bulky cloth to remove food y y Donotstoreitemsinorontherange Flammablematerialsshouldnotbestored in or near the range y y Wear proper apparel Loose fitting or h...

Страница 6: ... fat frying Filling the pan with too much fat can cause spillovers when food is added SAFETY DURING USE y y Do not touch the oven racks while they are hot y y If the rack must be moved while the oven is hot do not let the potholder con tact the hot heating element in oven y y Always use pot holders or oven mitts when removing food from the oven or the center warming element Cookware will be hot y ...

Страница 7: ... surface units unattended at high heat settings Boil overs cause smoking and greasy spillovers that may ignite y y Glazed cooking utensils Only certain types of glass glass ceramic ceramic earth enware or other glazed utensils are suitable for a range top service without breaking due to the sudden change in temperature y y Utensil handles should be turned inward and not extend over adjacent surfac...

Страница 8: ...ge Children climbing on the range or on the oven door to reach items could be seriously injured y y Let hot utensils cool in a safe place out of reach of small children y y Children should not be allowed to play with controls or other parts of the ap pliance GLASS CERAMIC COOKING SURFACES Stand to the side of the range when opening the oven door The hot air and steam that escape can cause burns to...

Страница 9: ...o burner will also improve efficiency Boil overs cause smoking and greasy spillovers that may catch on fire y y Always turn the surface units off before removing cookware y y DO NOT use plastic wrap to cover food Plastic may melt onto the surface and be very difficult to remove y y DO NOT touch surface units until it has cooled down y y The surface elements may still be hot and burns may occur if ...

Страница 10: ...n remove the broiler pan and any utensils of foods from the oven y y It is normal for the cooktop of the range to become hot during a self clean cycle Therefore touching the cooktop during a clean cycle should be avoided y y Important Instruction In the event the self clean error code F is displayed and three long beeps sound the oven is malfunctioning in the self clean mode Switch off the electri...

Страница 11: ...LRE6327ST Glass Touch LRE6325ST SW SB Keypad Oven vent Single element Warming zone element Dual element Rating label Appliance outlet Circle breaker Offset rack 1ea Drawer rack Cooktop Cleaning pad Template Standard rack 2ea Cooktop Cleaner Accessories for installation Accessories for cooking Accessories for maintenance Owner s manual Installation manual Anti tip 1ea Screws 6ea Anchors 6ea ...

Страница 12: ...ashing clock This means that the product has just been plugged in or that it has experienced a power interruption To clear the PF message press the On Off key on the cooktop controls and the Clear Off key on the oven controls If your oven displays a flashing clock then press the Clock key and reset the time or press any key to stop flashing Cooktop Element Control Features Oven Controls Number But...

Страница 13: ...the clock 12 or 24 hour Your control is set to use a 12 hour clock If you would pre fer to have a 24 hour time clock follow the steps below 1 Press and hold the CLOCK button for three seconds 2 Press the 1 button for 12 hour or the 2 button for 24 hour 3 Press the START button to accept Minimum Maximum default settings All of the features listed have a minimum and a maximum time or temperature set...

Страница 14: ...sec onds until TIMER ON OFF is pressed To Cancel the Timer 1 Press the TIMER ON OFF button once The display will return to the time of day If the remaining time is not shown in the display re call the remaining time by pressing the TIMER ON OFF button note rapid preheat The Rapid Preheat feature can preheat your oven up to 20 faster than the normal preheat function Setting Rapid Preheat 1 Press th...

Страница 15: ...be turned on if the Self Clean function is active note Thermostat You may find that your new oven cooks differently than the one it replaced Use your new oven for a few weeks to become more familiar with it before changing the temperature settings If after familiarizing yourself with the new oven and you still think that it is too hot or too cold you can adjust the thermostat yourself Setting the ...

Страница 16: ...e the oven buttons to set the temperature Press 3 0 and 0 3 Press the START TIME button 4 Set the start time Press 4 3 and 0 for 4 30 5 Press the START button A short beep will sound and the oven will begin baking To cancel the DELAYED TIMED COOK function press the CLEAR OFF button at any time To change the cooking time repeat steps 3 4 and press the START button If your oven clock is set as a 12 ...

Страница 17: ...rs and 59 minutes 5 Press the START button The display will show the cooking time countdown To set the WARM function to engage at the end of the timed cook cycle repeat steps 1 4 and then press the WARM button WARM will appear in the display Refer to the WARM section on the previ ous page note The oven will continue to cook for the set amount of time and then turn off automatically When the cookin...

Страница 18: ...r tem perature setting caution Using the cooktop elements To turn on a SINGLE element left and right rear elements 1 Press the ON OFF button that controls the element that you would like to use refer to the below cook top element control image 2 Press the button once to adjust the element tem perature to Hi or the button once to adjust the element temperature to Lo 3 Use the buttons to adjust the ...

Страница 19: ...s to quickly scroll through the temperature settings note To turn on the Warming Zone center element 1 Press the warming zone ON OFF button The warm ing zone indicator light will flash 2 Press the button once to adjust the temperature to Hi or the button once to adjust the temperature to Lo Power level sequence is from Lo 2 3 4 Hi or from Hi 4 3 2 Lo 3 Use the buttons to adjust the temperature set...

Страница 20: ... damaged Using the proper cookware Using the proper cookware can prevent many problems such as food taking longer to cook or achieving inconsis tent results Proper pans will reduce cooking times and cook food more evenly Stainless steel is recommended Check pans for flat bottoms by using a straight edge or ruler 1 Place a ruler across the bottom of the pan 2 Hold it up to the light 3 No light shou...

Страница 21: ...ng the oven on to prevent burns DO NOT cover the racks with aluminum foil or any other material or place anything on the bottom of the oven Doing so will result in poor baking and may damage the oven bottom Only arrange oven racks when the oven is cool caution Removing the racks 1 While wearing oven mitts grasp the oven rack 2 Pull the rack straight out until it stops 3 Lift up the front of the ra...

Страница 22: ...ods CONVECTION BAKE The convection system uses a fan to circulate the heat evenly within the oven Improved heat distribution allows for even cooking and excellent results while cooking with single or multiple racks Setting the CONVECTION BAKE function example 375 F 1 Press the CONV BAKE button The display will flash 350 F 2 Set the oven temperature using the number buttons Press 3 7 and 5 3 Press ...

Страница 23: ... and muffins will have better results when using multiple racks CONVECTION ROAST The CONVECTION ROAST feature is designed to give op timum roasting performance CONVECTION ROAST com bines cooking with the convection fan to roast meats and poultry The heated air circulates around the food from all sides sealing in juices and flavors Foods are crispy brown on the outside while staying moist on the in...

Страница 24: ...king food If using Speed Broil no preheat is necessary 5 When cooking is complete or to cancel at any time press the CLEAR OFF button Smoking Due to the intense heat associated with broiling it is nor mal to experience smoke during the cooking process This smoke is a natural byproduct of searing and should not cause you to worry If you are experiencing more smoke than you are comfortable with use ...

Страница 25: ...00 1 1 2 Medium Rare Hi G 6 00 5 00 Medium Hi G 7 00 6 00 Medium Well Hi G 8 00 10 00 Well Done Hi G 8 00 12 00 Ribeye Delmonico 3 4 1 Medium Rare Hi G 5 00 3 00 Medium Hi G 5 00 4 00 Medium Well Hi G 6 00 4 00 Well Done Hi G 6 00 5 00 1 1 2 Medium Rare Hi G 6 00 5 00 Medium Hi G 7 00 6 00 Medium Well Hi G 8 00 10 00 Well Done Hi G 8 00 12 00 Bone In Steaks 3 4 1 Medium Rare Hi G 5 00 4 00 Medium ...

Страница 26: ...rtion skin off 3 4 1 Broiler Hi G 6 00 5 00 1 1 2 Broiler Hi G 7 00 6 00 Shrimp skin on 10 lbs Broiler Hi G 4 00 3 00 10 20 lbs Broiler Hi G 3 00 3 00 21 30 lbs Broiler Hi G 3 00 2 00 Shrimp skin off 10 lbs Broiler Hi G 4 00 2 00 10 20 lbs Broiler Hi G 3 00 2 00 21 30 lbs Broiler Hi G 3 00 1 00 Lobster tail 1 3 Broiler Hi G 6 00 Pork Pork Chop 1 Broiler Hi G 6 00 5 00 Pork Tenderloin 12 16 oz 1 5 ...

Страница 27: ...o use a light coating of non stick pan spray Vegetables y y Toss your vegetables lightly in oil before cooking to improve browning KIDS MEAL This function is specially designed to cook popular kids foods such as regular crust pizza rising crust pizza fresh pizza chicken nuggets french fries and hamburger patties When using this function there is no need to preheat the oven prior to cooking Setting...

Страница 28: ...EAR OFF button when proofing is fin ished To avoid lowering the oven temperature and lengthening proofing time do not open the oven door unnecessarily Check bread products early to avoid overproofing Do not use the proofing mode for warming food or keeping food hot The proofing oven temperature is not hot enough to keep foods at safe tempera tures Use the WARM feature to keep food warm Proofing wi...

Страница 29: ... any time Changing the temperature while in SABBATH mode 1 Press the BAKE button No tones will sound and the display will not change 2 Set the temperature using the number buttons 3 Press the START button There is a 15 second delay before the oven will rec ognize the temperature change note WARMING DRAWER Warming drawer rack in position Operating the Warming Drawer The warming drawer keeps hot coo...

Страница 30: ... y y Do not put food or foil directly on the surface or base of the warming drawer This may result in dam age to your drawer and may spoil your food y y Do not place plastic wrap in the warming drawer or use it to cover food being heated in the warming drawer Plastic may melt onto the drawer or surround ing areas and is very difficult to remove Use only alu minum foil or cookware that is capable o...

Страница 31: ...and use a dry cloth or paper towel to remove all cleaning residue DO NOT heat the cooktop until it has been cleaned thoroughly note Burned on Residue 1 While the cooktop is still hot remove any burnt on deposits or spilled food from the glass ceramic cook ing surface with a suitable metal razor scraper simi lar to scraping paint off of a windowpane it will not damage the decorated cooking surface ...

Страница 32: ...cleaning Wipe any heavy spillovers on the bottom of the oven Make sure that the oven light bulb cover is in place and the oven light is off The oven light cannot be turned on during a self clean cycle The oven light cannot be turned on until the oven temperature has cooled below 500 F 260 C after a self clean cycle is complete IMPORTANT If any sugar or food containing sugar preserves ketchup tomat...

Страница 33: ...ss the SELF CLEAN button The oven defaults to the recommended four hour self clean for a moder ately soiled oven Press twice for a five hour self clean or three times for a three hour self clean 3 Press START 4 Once the Self Clean is set the oven door will lock automatically and the lock icon will display You will not be able to open the oven door until the oven is cooled The lock will release aut...

Страница 34: ...l the oven is cooled The lock will re lease automatically Once the door has been locked the LOCKED indi cator light will stop flashing and remain on Allow about 15 seconds for the oven door lock to activate If the clock is set for a 12 hour display default the Delayed Self Clean can never be set to start more than 12 hours in advance note After the Self Clean cycle y y The oven door will remain lo...

Страница 35: ...n the outside of the oven door Doing so can cause damage caution Do not hand clean oven door gasket Remove any debris from door Broiler Pan and Grid y y Do not store a soiled broiler pan or grid anywhere in the range y y Do not clean the broiler pan or grid in a self cleaning mode y y Remove the grid from the pan Carefully pour out the grease from the pan into a proper container y y Wash and rinse...

Страница 36: ...ng drawer The door is very heavy Be careful when removing and lifting the door DO NOT lift the door by the handle DO NOT hit the glass with pots pans or any other object Scratching hitting jarring or stressing the glass may weaken its structure causing an increased risk of breakage at a later time caution Removing the oven door 1 Fully open the door Pull the hinge locks down toward the door frame ...

Страница 37: ...emove screws Lever Push down with finger Pull up with finger Lever 3 Locate the glide lever on each side of the drawer Push down on the left glide lever and pull up on the right glide lever Remove screws Lever Push down with finger Pull up with finger Lever 4 Pull the warming drawer away from the range Replacing the Warming Drawer 1 Pull the bearing glides to the front of the chassis glide 2 Align...

Страница 38: ... It is not recommend to place aluminum foil inside the oven cavity Using foil on the racks will restrict air flow which could result in poor cooking results Can I leave my racks in the oven when running a Self Clean cycle No Although it will not damage the racks it will discolor them and may make them hard to slide in and out during use Remove all items from the oven before starting a Self Clean c...

Страница 39: ... F 9 No heating F 3 Key Short Error F 10 Door Lock Fail Surface units will not maintain a rolling boil or cooking is not fast enough y y Improper cookware is being used Use pans that are flat and match the diameter of the surface unit selected y y In some areas the power voltage may be low Cover pan with a lid until desired heat is obtained Surface units do not work properly y y A fuse in your hom...

Страница 40: ...ler pan is upside down and the grease is not draining Always place the grid on the broiler pan with ribs up and slots down to allow grease to drip into the pan y y Grease has built up on oven surfaces Regular cleaning is necessary when broiling fre quently y y Old grease or food spatters cause excessive smoking Clean the interior of the oven Food does not bake or roast properly y y Oven controls i...

Страница 41: ...oven temperature is too high to set a self clean operation Allow the range to cool and reset the controls y y Oven controls improperly set Refer to the Care and Cleaning section y y A self clean cycle cannot be started if the lockout feature is activated Crackling or popping sound y y This is the sound of the metal heating and cooling during both the cooking and Self Clean functions This is normal...

Страница 42: ...o slide y y The shiny silver colored racks were cleaned in a self clean cycle Apply a small amount of vegetable oil to a paper towel and wipe the edges of the oven racks with the paper towel Oven door remains locked after the self clean cycle y y Oven interior is still hot Allow about one hour for the oven to cool after the completion of a self clean cycle The door can be opened when the LOCK indi...

Страница 43: ...ir or replacement of fuses or correc tion of wiring or correction of unauthorized repairs installation 2 Failure of the product to perform during power failures and interruptions or inadequate electrical service 3 Damage caused by leaky or broken water pipes frozen water pipes restricted drain lines inadequate or interrupted water supply or inadequate supply of air 4 Damage resulting from operatin...

Страница 44: ...memo ...

Страница 45: ...INIÈRE ÉLECTRIQUE LRE6327ST LRE6325ST LRE6325SB LRE6325SW Veuillez lire attentivement ce manuel du propriétaire avant d utiliser la machine et conservez le aux fins de référence en tout temps www lg com FRANÇAIS P No MFL55646608 ...

Страница 46: ... Zones de cuisson 1 9 Utilisation des éléments de la surface de cuisson 2 1 Utilisation d une bonne batterie de cuisine 22 UTILISATION DU FOUR 22 Retrait et remplacement des grilles du four 23 Cuisson au four 23 Cuisson par convection 24 Rôtissage par convection 25 Grillage 25 Grillage rapide 25 Guide de cuisson au grilloir recommandée 28 Repas d enfants 29 Réchaud 29 Fermentation 29 Favoris 30 Mo...

Страница 47: ...iels pouvant provoquer des dommages matériels et ou des blessures corporelles graves ou la mort Tous les messages de sécurité suivront le sym bole d alerte de sécurité et la mention AVERTISSEMENT ou MISE EN GARDE Voici le message que ces mots véhiculent AVERTISSEMENT y y Il est possible pour un enfant ou un adulte de faire basculer la cuisinière et d être tué y y Assurez vous que le dispositif ant...

Страница 48: ...ents ou toute autre matière inflammable toucher les éléments chauffants ou les surfaces intérieures du four jusqu à ce qu ils aient eu suffisamment le temps de refroidir D autres surfaces telles que les ouver tures de ventilation du four et les surfaces à proximité de ces ouvertures les portes du four et les fenêtres des portes du four deviennent chaudes aussi et pourraient causer des brûlures si ...

Страница 49: ...oyage de réparation ou pour toute autre raison veillez à ce que les supports anti basculement soient correctement réinstallés avant de replacer la cuisinière contre le mur y y N UTILISEZ JAMAIS votre appareil électroménager pour chauffer la pièce y y Gardez les enfants et les animaux loin du four y y N UTILISEZ pas de l eau sur les feux de graisse Si un feu se produit dans le four laissez la porte...

Страница 50: ...rriture ou une batterie de cuisine sur la partie inférieure de la cavité du four Ceci pourrait causer des dommages permanents à la finition du fond du four y y Ne placez jamais du plastique du papier des aliments en conserve ou des matériaux combustibles dans le four y y Lors de la cuisson d aliments dans le four inférieur utilisez toujours une plaque à pâtisserie ou une poêle à 4 côtés surélevés ...

Страница 51: ...n extincteur d incendie y y En cas de feu dans le four NE METTEZ PAS de l eau ou de la farine sur le feu La farine peut être explosive et l eau peut propager le feu de graisse et causer des blessures personnelles y y N UTILISEZ PAS le gril lèchefrite sans la grille NE couvrez PAS la grille de papier d aluminium y y N utilisez pas du plastique pour couvrir la nourriture Utilisez une feuille métalli...

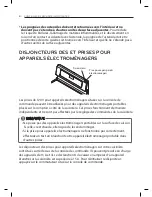
Страница 52: ... le comptoir à côté de la cuisinière Ces prises fonctionnent de manière indépendante et ne sont pas affectées par le réglage des commandes de la cuisinière Prise pour aperspareils électroménagers Disjoncteurs Les disjoncteurs des prises pour appareils électroménagers sur votre cuisinière sont situés sur le dessus de la console de commande Ils peuvent prendre en charge des appareils de 15 A et ils ...

Страница 53: ...es auxquels les enfants s intéressent dans les ar moires situées au dessus de la cuisinière Les enfants qui grimpent sur la cui sinière ou sur la porte du four pour y parvenir pourraient se blesser gravement y y Laissez les ustensiles chauds se refroidir dans un endroit sûr hors de la portée des jeunes enfants y y On ne devrait jamais permettre aux enfants de jouer avec les commandes ou autres par...

Страница 54: ...S l élément de surface sans surveillance à des ré glages de feu vif Relation appropriée entre l ustensile et le brûleur permettra également d améliorer l efficacité Les vapeurs d ébullition causent de la fumée et des déversements graisseux qui peuvent s enflammer y y Éteignez toujours les éléments de surface avant d enlever la batterie de cui sine y y N utilisez PAS des pellicules en plastique pou...

Страница 55: ...es dans une pièce bien aérée y y Lorsque vous utilisez le cycle d auto nettoyage nettoyez uniquement les parties citées dans ce manuel Avant de démarrer le cycle d auto nettoyage enlevez le gril lèchefrite et tout ustensile de nourriture du four y y Il est normal que la surface de cuisson de la cuisinière devienne chaude durant le cycle d auto nettoyage Par conséquent il faudrait éviter de toucher...

Страница 56: ...pad Évent du four Élément simple Élément de la zone chauffante Élément double Plaque signalétique Disjoncteurs Prise pour aperspareils electromenagers Grille décalée 1ea Grille de tiroir Tampon de nettoyage de la surface de cuisson Modèle Grille standard 2ea Produit de nettoyage de la surface de cuisson Accessoires pour l installation Accessoires pour la cuisson Accessoires pour l entretien Manuel...

Страница 57: ...cuisson et la touche Effacer Arrêt sur les contrôles du four Si votre four affiche une horloge qui clignote appuyez sur la touche horloge et réinitialisez l heure ou appuyez sur n importe quelle touche pour arrêter le clignotement Commande de l élément de surface de cuisson Fonctionnalités Commandes du four Boutons de nombres Bouton de démarrage verrouillage Bouton d annulation Réchaud Éléments si...

Страница 58: ...e saisie deux brefs signaux so nores se fera entendre si la saisie de la température ou de l heure est en dessous du réglage minimum ou au dessus du réglage maximum de la fonctionnalité en question FONCTION NALITÉ TEMP HEURE MIN TEMP HEURE MAX Défaut HORLOGE 12 h 1h00 Min 12h59 Min 24 h 0h00 Min 23h59 Min MINUTERIE 12 h 0h01 Min 11h59 Min 24 h 0h01 Min 11h59 Min TEMPS DE CUISSON 12 h 0h01 Min 11h5...

Страница 59: ...annuler la minuterie 1 Appuyez sur le bouton TIMER ON OFF MINUTERIE EN MARCHE ARRÊT une seule fois L affichage retournera à l heure du jour PRÉCHAUFFAGE RAPIDE La fonctionnalité de préchauffage rapide peut préchauffer votre four jusqu à 20 fois plus vite que la fonction de préchauffage normale Régler la fonction de préchauffage rapide 1 Appuyez sur le bouton de fonction de cuisson ex le bouton BAK...

Страница 60: ...tre nouveau four cuit les aliments différemment que le four que vous venez de remplacer Utilisez votre nouveau four pendant quelques semaines pour vous y familiariser avant de changer les réglages de température Si après vous être familiarisé avec votre nouveau four vous trouvez qu il est quand même trop chaud ou trop froid vous pouvez régler le thermostat vous même Régler le thermostat 1 Appuyez ...

Страница 61: ...r pour régler la température Appuyez sur 3 0 et 0 3 Appuyez sur le bouton START TIME HEURE DE DÉMARRAGE 4 Réglez l heure de démarrage Appuyez sur 4 3 et 0 pour avoir 4h30 5 Appuyez sur le bouton START DÉMARRER Un bref bip sonnera et le four commencera la cuisson REMARQUE Pour annuler la fonction CUISSON MINUTÉE DIFFÉRÉE appuyez sur le bouton CLEAR OFF ANNULER à n importe quel moment Pour changer l...

Страница 62: ...START DÉMARRER Le décompte du temps de cuisson s affichera Le four continuera la cuisson pendant la période de temps réglée puis s arrêtera automatiquement Lorsque le temps de cuisson est écoulé Le mot END FIN et l heure du jour s afficheront Le signal sonore d indication de fin de cuisson son nera toutes les 60 secondes jusqu à ce que vous appuyiez sur le bouton CLEAR OFF ANNULER Lorsque la fonct...

Страница 63: ...e de contrôle d élément de la surface de cuisson cidessous 2 Appuyez sur le bouton une fois pour régler la température de l élément sur Hi Élevé ou le bouton pour régler la température de l élément à Lo Bas 3 Utilisez les boutons pour régler les paramètres de température de l élément Les paramètres de température de l élément sont réglables en tout temps 4 Pour éteindre l élément après avoir fini ...

Страница 64: ...ature sur Hi Élevé ou le bouton pour régler la température sur Lo Bas La séquence du niveau de puissance est de Lo 2 3 4 Hi ou de Hi 4 3 2 Lo 3 Utilisez les boutons pour régler les paramètres de température Les paramètres de température sont réglables en tout temps 4 Pour éteindre la zone chauffante appuyez sur le bou ton ON OFF MARCHE ARRÊT une fois Commandes de l élément simple Commande de la zo...

Страница 65: ...cuisson peut être endom magée UTILISATION DE LA BONNE BATTERIE DE CUISINE L utilisation de la bonne batterie de cuisine peut prévenir plus ieurs problèmes tels que les aliments qui prennent plus long temps à cuire ou des résultats de cuisson irréguliers Des poêles appropriées réduiront le temps de cuisson et permettront aux aliments de cuire de façon plus uniforme L acier inoxydable est recommandé...

Страница 66: ...2 Tirez la grille directement vers l extérieur jusqu à ce qu elle s arrête 3 Soulevez le côté avant de la grille 4 Tirez la grille pour la sortir Grille standard Position B Grille standard Position D Cuisson à une grille multiple Grille standard Cuisson à une grille REMARQUE Lorsque vous utilisez un thermomètre de four dans la cavité du four la température peut différer de la température que vous ...

Страница 67: ...era lorsque la porte est ouverte mais la chaleur continuera Dans certains cas le ventilateur pourrait s arrêter durant un cycle de cuisson par convection COMMANDES DU FOUR CUISSON AU FOUR La fonction BAKE CUISSON AU FOUR est utilisée pour préparer de la nourriture telle que des pâtisseries pains casseroles Le four peut être programmé pour cuire à n importe quelle température située entre 170 F 77 ...

Страница 68: ...ion pour rôtir les viandes et les volailles L air réchauffé circule autour de la nourriture de tous les côtés conservant les jus et saveurs Les aliments sont brunis et croustillants de l extérieur tout en restant juteux à l intérieur Le rôtissage par convection est particulièrement bon pour les coupes de viande tendre non couvertes Réglage de la fonction Convection Roast Rôtissage par convection e...

Страница 69: ... pas des poêles à sauter les aliments ou des plaques à pâtisserie régulières pour des raisons de sécurité 2 N utilisez JAMAIS un gril lèche frite qui n est pas bien nettoyé et qui n est pas à la température de la pièce au début de la cuisson 3 Faites TOUJOURS fonctionner votre système de ventila tion de la surface de cuisson ou la hotte à évacuation durant le grillage 4 Gardez l intérieur de votre...

Страница 70: ... Hi Élevé G 6 00 5 00 À point Hi Élevé G 7 00 6 00 Cuit Hi Élevé G 8 00 10 00 Bien cuit Hi Élevé G 8 00 12 00 Faux filet bifteck de faux filet 3 4 po 1 po Saignant Hi Élevé G 5 00 3 00 À point Hi Élevé G 5 00 4 00 Cuit Hi Élevé G 6 00 4 00 Bien cuit Hi Élevé G 6 00 5 00 1 1 2 po Saignant Hi Élevé G 6 00 5 00 À point Hi Élevé G 7 00 6 00 Cuit Hi Élevé G 8 00 10 00 Bien cuit Hi Élevé G 8 00 12 00 St...

Страница 71: ...illoir Hi Élevé G 6 00 5 00 1 1 2 po Grilloir Hi Élevé G 7 00 6 00 Crevettes avec la peau 10 lb Grilloir Hi Élevé G 4 00 3 00 10 20 lb Grilloir Hi Élevé G 3 00 3 00 21 30 lb Grilloir Hi Élevé G 3 00 2 00 Crevettes sans la peau 10 lb Grilloir Hi Élevé G 4 00 2 00 10 20 lb Grilloir Hi Élevé G 3 00 2 00 21 30 lb Grilloir Hi Élevé G 3 00 1 00 Queue de homard 1 3 po Grilloir Hi Élevé G 6 00 Porc Côtele...

Страница 72: ...gumes d une légère couche d huile avant de les cuire pour améliorer leur brunissement REPAS D ENFANT Cette fonction est spécialement conçue pour cuisiner des repas d enfants populaires tels que la pâte de pizza régulière la pizza à pâte levée la pizza fraîche les croquettes de poulet les frites et les galettes de steak haché Lorsque vous utilisez cet te fonction aucun besoin de préchauffer le four...

Страница 73: ...ler Pour régler la fonction WARM RÉCHAUD après la cuisson minutée 1 Réglez la fonction de cuisson 2 Entrez la température du four à l aide des boutons de nombres 3 Appuyez sur le bouton COOK TIME TEMPS DE CUISSON et entrez le temps de cuisson à l aide des boutons de nombres 4 Appuyez sur le bouton WARM PROOF RÉCHAUD FERMENTATION 5 Appuyez sur le bouton START DÉMARRER 6 Une fois que la cuisson est ...

Страница 74: ...BBAT Le mode SHABBAT peut être utilisé uniquement pendant la cuisson mode BAKE ou CUISSON AU FOUR MODE SHABBAT Le mode Shabbat est généralement utilisé pendant le Shabbat et les fêtes juives Lorsque le mode Shabbat est activé le four ne s allume pas jusqu à ce que le mode Shabbat soit désactivé En mode Shabbat tous les bou tons de fonction à l exception du bouton CLEAR OFF Annuler sont inactifs Sb...

Страница 75: ...rriture ou du papier d aluminium directement sur la surface ou la base du tiroir réchaud Ceci pourrait endommager votre tiroir et gâter votre nourriture y y Ne placez pas des pellicules en plastique dans le tiroirréchaud et ne l utilisez pas pour couvrir de la nourriture qui est en train d être réchauffée dedans Le plastique peut fondre dans le tiroir ou dans les zones avoisinantes et il sera très...

Страница 76: ...à l aide d un grattoir à lame métallique approprié similaire à un grattoir pour enlever la peinture d un carreau de vitre il n endommagera pas la surface de cuisson décorée Tenez le grattoir à un angle d environ 30 de la surface de cuisson 2 Une fois que la surface de cuisson a refroidi appliquez quelques gouttes environ la taille d une pièce de dix cents de produit de nettoyage approuvé sur chaqu...

Страница 77: ... le nettoyage de ces marques utilisez un produit de nettoyage pour surface de cuisson en céramique et appliquez le avec un chiffon de nettoyage pour surfaces de cuisson en céramique 2 Si les chaudrons munis d un mince revêtement d aluminium ou de cuivre peuvent être utilisés pour chauffer les aliments à sec le revêtement peut lais ser une décoloration noire sur la surface de cuisson Cette décolora...

Страница 78: ...nombres pour entrer l heure du jour à laquelle vous aimeriez que l Auto Nettoyage commence 5 Appuyez sur le bouton START DÉMARRER MISE EN GARDE NE forcez PAS la porte du four à rester ouverte lorsque l icône de verrou est affichée La porte du four restera verrouillée jusqu à ce que la température ait refroidi Forcer la porte à rester ouverte endommagera la porte Réglage de la fonction Auto Nettoya...

Страница 79: ...dit Si le four n est pas propre après un cycle d auto net toyage répétez le cycle y y Si les grilles du four ont été laissées dans le four et ne glissent pas facilement après un cycle de nettoyage essuyez les grilles ainsi que les supports des grilles avec une petite quantité d huile végétale afin qu ils glissent plus facilement y y Des lignes fines pourraient apparaître dans la por celaine car ce...

Страница 80: ...OYAGE DE L EXTÉRIEUR Moulure peinte et décorative Pour un nettoyage général utilisez un chiffon avec de l eau savonneuse chaude Pour des saletés plus difficiles et une accumulation de graisse appliquez un détergent liquide directement sur la saleté Laissez le détergent pendant 30 à 60 minutes Rincez avec un chiffon humide et séchez N utilisez pas des produits à nettoyer abrasifs Surfaces en acier ...

Страница 81: ... de la porte en position déverrouillée Un outil tel qu un tournevis plat peut être nécessaire Fente Verrou de charnière Bras d articulation Cadre de la porte 2 Tenez fermement les deux côtés de la porte vers le haut Fermez la porte en position de retrait environ cinq degrés à mi chemin entre la position d arrêt du gril et complètement fermée Environ 5 3 Soulevez la porte et tirez la vers l extérie...

Страница 82: ...fant pour le sortir de la cuisinière AVERTISSEMENT Déconnectez le courant électrique de la cuisinière à partir du fusible principal ou du panneau des disjoncteurs Le non respect de cette consigne peut occasionner des blessures corporelles graves la mort ou un choc électrique Replacer le tiroir réchaud 1 Tirez les patins de roulement en avant des patins du châssis 2 Alignez le patin sur chaque côté...

Страница 83: ...ium sur les grilles limitera la circulation d air ce qui pourrait entraîner de mauvais résultats de cuisson Puis je laisser mes grilles dans le four pendant que le cycle d auto nettoyage fonctionne Non Bien que cela n endommage pas les grilles celles ci pourraient se décolorer et devenir difficiles à glisser à l intérieur et extérieur du four Enlevez tous les éléments qui se trouvent dans le four ...

Страница 84: ... de porte défaillant Les éléments de surface ne maintiennent pas une ébullition consécutive ou la cuisson n est pas assez rapide y y Batterie de cuisine inappropriée utilisée Utilisez des casseroles plates et qui concor dent avec le diamètre de l élément de surface sélectionné y y Dans certaines zones le courant électrique voltage pourrait être faible Couvrez la casserole avec un couvercle jusqu à...

Страница 85: ...e de s égoutter dans le plateau y y De la graisse s est accumulée sur les surfaces du four Un nettoyage régulier est néces saire lorsque vous grillez fréquemment y y Les graisses accumulées jusqu à présent ou les projections de nourriture causent une fumée excessive Nettoyez l intérieur du four La nourriture ne cuit pas ou ne rôtit pas comme il faut Nettoyez l intérieur du four La nourriture ne br...

Страница 86: ...ace de cuisson en céramique verre Utilisez une batterie de cuisine avec des fonds propres et secs Le four ne s auto nettoie pas y y La température du four est trop élevée pour pouvoir démarrer le cycle d auto nettoyage Laissez au four le temps de refroidir et réinitialisez les commandes y y Les commandes du four sont mal réglées Consultez la section Utilisation de l auto nettoyage du four y y Le c...

Страница 87: ... y y Les grilles argentées brillantes on été nettoyées dans un cycle d auto nettoyage Appliquez une petite quantité d huile végétale sur un papier essuie tout et essuyez les bords des grilles du four avec le papier essuie tout La porte du four se déver rouillera après le cycle d auto nettoyage y y L intérieur du four est encore chaud Attendez environ une heure suivant la fin du cycle d autonettoya...

Страница 88: ...on d un service électrique inadéquat 3 Des dommages occasionnés par la fuite ou le bris de conduites d eau le gel de conduites d eau des tuyaux de drainage restreints une alimentation en eau inadéquate ou interrompue ou une alimentation en air inadéquate 4 Des dommages attribuables à l utilisation du produit dans une atmosphère corrosive ou contraire aux instructions spéciées dans le manuel d util...

Страница 89: ...NOTES ...

Страница 90: ...NOTES ...

Страница 91: ...NOTES ...

Страница 92: ...Printed in Mexico www lg com Register your product Online LG Customer Information Center 1 800 243 0000 1 888 865 3026 1 888 542 2623 USA Consumer User USA Commercial User CANADA ...

Отзывы: