background image

3-11

COMPONENT ACCESS

REMOVING THE OVEN TEMPERA

REMOVING THE OVEN TEMPERA

TURE SENSORS

TURE SENSORS

1. Turn off the electrical supply going to the range.

2. Open the oven door and remove the racks from

the oven.

3. Pull the range away from the wall so that you can

access the rear panel.

4. Remove the 16 screws from the rear panel and

remove the panel (see step 3 on page 3-2).

5. To remove an oven temperature sensor,

disconnect the connector from the main harness
and remove the two mounting screws in oven
cavity.

Main oven Sensor
connector

Main oven Sensor
connector

Main oven Sensor
connector

Main oven Sensor
connector

Main oven Sensor
connector

Main oven Sensor
connector

Main oven Sensor
connector

Main oven Sensor
connector

Main oven Sensor
connector

Main oven Sensor
connector

Main oven Sensor
connector

Main oven Sensor
connector

Main oven Sensor
connector

Main oven Sensor
connector

Main oven Sensor
connector

Main oven Sensor
connector

Main oven Sensor
connector

Main oven Sensor
connector

Main oven Sensor
connector

Main oven Sensor
connector

Main oven Sensor
connector

Main oven Sensor
connector

Main oven Sensor
connector

Main oven Sensor
connector

Main oven Sensor
connector

Main oven Sensor
connector

Main oven Sensor
connector

Main oven Sensor
connector

Main oven Sensor
connector

Main oven Sensor
connector

Screws 

Main oven Sensor

WARNING

• DISCONNET power supply cord

from the outlet before servicing.

• Replace all panels and parts before

operating.

• RECONNECT all grounding devices.

- Failure to do so can result in severe personal

injury, death or electrical shock.

!

CAUTION

• Be careful when you work on the

electric range handling the sheet
metal part.

- Sharp edge may be present and you can cut

yourself.

!

Содержание LRE30453SB

Страница 1: ...ERVICE MANUAL MODEL LRE30453SW LRE30453SB LRE30453ST CAUTION BEFORE SERVICING THE UNIT READ THE SAFETY PRECAUTIONS IN THIS MANUAL Website http biz lgservice com P NO MFL37118303 February 2008 Printed in Korea 삼 흥 정 판 Internal Use Only ...

Страница 2: ...our dealer If the power cord is defective it must be replaced by a qualified service agent with a UL listed range cord Electrical leads and cables should not be allowed to touch the oven Rating plate is located on the left side of warming drawer The power supply of the appliance should be turned off when it is being repaired FORWARD LG Electronices assumes no responsibility for any repairs made on...

Страница 3: ...ion Roast Cook Warm Oven lockout Changing hour mode on clock 12HR 24HR Proof Self Clean Warming drawer COMPONENT ACCESS 3 1 3 17 Component Locations 3 1 Removing the Back Control cover and Key membrane Assembly 3 2 Removeing the Control Power Supply and Power Control Board PCB 3 3 Removing the Surface Element and the Ceramic Glass Cooktop 3 4 Removing the Door Latch and the Door Switch 3 5 Removin...

Страница 4: ...OF CONTROL 5 1 5 4 Main PCB 5 2 Cook top display PCB 5 3 Oven relay PCB 5 3 FAILURE MODE FLOW CHART 6 1 6 11 No display No power 6 1 6 4 Oven does not heat 6 5 6 7 Cook top does not heat 6 8 6 9 Oven lamp does not operate 6 10 No key input 6 11 FAILURE CODES 7 0 F CODE FLOW CHART 7 1 7 10 F 1 error 7 1 F 2 error 7 2 7 4 F 3 F 4 error 7 5 7 6 F 9 error 7 9 7 10 TROUBLE SHOOTING 8 1 8 3 SCHEMATIC DI...

Страница 5: ...s Failure to do so can result in severe personal injury death or electrical shock DO NOT touch heating elements or interior surfaces of oven Heating element may be hot even though they are dark in color Interior surfaces of an oven become hot enough to cause burns During and after use do not touch or let clothing or other flammable materials contact heating elements or interior surfaces of oven un...

Страница 6: ...on WARNING DO NOT touch heating elements or interior surfaces of oven Heating element may be hot even though they are dark in color Interior surfaces of an oven become hot enough to cause burns During and after use do not touch or let clothing or other flammable materials contact heating elements or interior surfaces of oven until they have had sufficient time to cool Other surfaces of the applian...

Страница 7: ... goes on or three long beeps sound oven is malfunctioning in the self clean mode Turn off or disconnect appliance from power supply and have serviced by a qualified technician VENTILATING HOODS Clean Ventilating Hoods Frequently Grease should not be allowed to accumulate on hood or filter When flaming foods under the hood turn the fan on OVEN Use Care When Opening Door Let hot air or steam escape ...

Страница 8: ...ial Number label and Tech Sheet locations are shown below Model Serial Number Location MODEL SERIAL NUMBER LABEL MODEL SERIAL NUMBER LABEL AND TECH SHEET LOCA AND TECH SHEET LOCATIONS TIONS Tech Sheet Location On Low Rear Cover ...

Страница 9: ...vorites Door lockout Broiler pan Type Element Warming rack Oven Interior W x H x D Exterior Width Exterior Height Exterior Depth Net weight Lbs Kg Rating 30 Freestanding WH BK STS Keypad Keypad LED Yes Yes Yes 1 Clock 12hr 24hr 2 Temperature unit F C 3 Beeper Volume High Low Mute 4 Smart oven light On Off 5 Convection auto conversion on off 6 Thermostat Adjustment 7 Sabbath mode Ceramic glass 5 6 ...

Страница 10: ...is not required when using broil All foods should be turned at least once except fish which does not need to be turned Convection Bake Roast Mode Upper element lower element Rear element some model and fan operate during convection bake Convection bake should be used for cooking casseroles and roasting meats Oven should be preheated for best results when using convection bake Pans do not need to b...

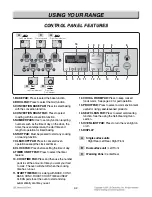
Страница 11: ...re 10 COOK TIME PAD Press and then use the number pads to set the amount of time you want your food to cook The oven will shut off when the cooking time has run out 11 START TIME PAD Use along with BAKE CONV BAKE CONV ROAST COOK TIME and SELF CLEAN pads to set the oven to start and stop automatically at a time you set 12 COOK WARM PAD Press to keep cooked foods warm See page 2 4 for pad operation ...

Страница 12: ...surface unit 3 TO TURN ON OFF THE OVEN LIGHT The oven light automatically turns ON when the door is opened The oven light may also be manually turned ON or OFF by pressing the OVEN LIGHT pad Note The oven light cannot be turned on if self clean feature is active 4 TIMER ON OFF To cancel timer at any time touch TIMER ON OFF pad Note 1 If you press TIMER ON OFF pad once this allows you to select sec...

Страница 13: ...Press START pad To decrease the oven temperature 1 Press and hold BAKE pad for 3 seconds 2 Press the desired temperature 3 Press the BAKE pad once 4 Press START pad 11 BAKE TIMED BAKE DELAYED TIMED BAKE 12 BROIL 2 4 USING YOUR RANGE CONV BAKE Desired Temp START CONV ROAST Desired Temp START START SELF CLEAN Once 3 hour Twice 2 hour 3 times 4 hour START COOK WARM Press and hold the START pad for 3 ...

Страница 14: ...mponents and their locations are shown below COMPONENT LOCA COMPONENT LOCATIONS TIONS Broil Heater Oven Sensor Door Switch Surface Elements Door Locking Motor Micro Switch Main PCB Cook Top Display PCB Bake Heater Hinge Hanger Oven Light LVT Door Latch Assembly Convection Motor Oven Relay PCB Thermal Fuse ...

Страница 15: ...e assembly and separate PCB assembly REMOVING THE BACK CONTROL COVER REMOVING THE BACK CONTROL COVER AND KEY MEMBRANE ASSEMBL AND KEY MEMBRANE ASSEMBLY Y Control Cover Back Cover PCB Assembly KEY MEMBRANE Assembly WARNING DISCONNET power supply cord from the outlet before servicing Replace all panels and parts before operating RECONNECT all grounding devices Failure to do so can result in severe p...

Страница 16: ...roper pcb in default mode and check main pcb NOTE Refer to the page 5 1 5 3 for composition of control board 5 To remove the control power supply a Disconnect 2 connectors b Remove the two screws Oven Relay PCB Main PCB 2 Screws WARNING DISCONNET power supply cord from the outlet before servicing Replace all panels and parts before operating RECONNECT all grounding devices Failure to do so can res...

Страница 17: ... b Remove the element bracket screw shown above for the element you are servicing d Carefully lift the bottom of the bracket just far enough to remove the element REASSEMBLY NOTE When you reinstall the element make sure that the wires are inserted into the correct tap then reinstall the bracket screw to secure it to the cooktop 3 4 COMPONENT ACCESS REMOVING THE SURF REMOVING THE SURFACE ELEMENTS A...

Страница 18: ... cooktop see page 3 4 for the procedure b Remove the door switch from the range To do this squeeze tabs and use a ratchet extension or a small socket and tap it out of the hole with a hammer c Disconnect the wires from the terminals 2 Screws Unhook Actuating Rod Wires Door Switch WARNING DISCONNET power supply cord from the outlet before servicing Replace all panels and parts before operating RECO...

Страница 19: ...nt forward so that you can access the terminals and disconnect the wires 2 Rear bracket Screws 2 Upper bracket Screws 2 Terminals WARNING DISCONNET power supply cord from the outlet before servicing Replace all panels and parts before operating RECONNECT all grounding devices Failure to do so can result in severe personal injury death or electrical shock CAUTION Be careful when you work on the ele...

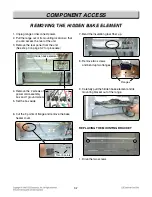
Страница 20: ...e element Hidden bake element Hidden bake element Hidden bake element Hidden bake element Hidden bake element Hidden bake element Hidden bake element Hidden bake element Hidden bake element Hidden bake element Hidden bake element Hidden bake element Hidden bake element Hidden bake element Hidden bake element Hidden bake element Hidden bake element Hidden bake element Hidden bake element Hidden bak...

Страница 21: ...ven 7 To remove Fan motor assembly disconnect wire connection and remove the three bracket screws 8 Pull the fan motor assembly forward REMOVING THE CONVECTION ELEMENT REMOVING THE CONVECTION ELEMENT F FAN BLADE AND F AN BLADE AND FAN MOT AN MOTOR OR Fan cover Nut Fan cover Screws 4ea Mounting Screws 3ea Cavity Inner Outer Fan blade Support Washer Fan motor Nut Nut Nut Nut Nut Nut Nut Nut Nut Nut ...

Страница 22: ...ips Socket Clips Socket Clips Socket Clips Socket Clips Socket Clips Socket Clips Socket Clips Socket Clips Socket Clips Socket Clips Socket Clips Socket Clips Socket Clips Socket Clips Socket Clips Socket Clips Socket Clips Socket Clips Socket Clips Socket Clips Socket Clips Socket Clips Socket Clips Socket Clips Socket Clips Socket Clips Socket Clips Socket Clips Socket Clips Viewed From Rear Pa...

Страница 23: ...control board chip operates the motor 2 The cam moves the door hook connected to latch rod from unlocked position to locked position from locked Position to unlocked position 3 The cam activates the micro switch that causes the motor to stop 4 The locked status remains until the range temperature drops to approximately 500F after end of the self clean or lock out feature is reactivated The motor o...

Страница 24: ...in oven Sensor connector Main oven Sensor connector Main oven Sensor connector Main oven Sensor connector Main oven Sensor connector Main oven Sensor connector Main oven Sensor connector Main oven Sensor connector Main oven Sensor connector Main oven Sensor connector Main oven Sensor connector Main oven Sensor connector Main oven Sensor connector Main oven Sensor connector Main oven Sensor connect...

Страница 25: ...range 4 Push the drawer into the range until levers click approximately 2 Pull the drawer open again to seat bearing glides into position If you do not hear the levers click or the bearing glides do not feel seated remove the drawer and repeat steps 2 4 This will minimize possible damage to the bearing glides Remove screw Lever Push down with finger Lever Push up with finger WARNING DISCONNET powe...

Страница 26: ...Push the hinge locks up against the front frame of the oven cavity to the locked position Step 5 Close the oven door To remove the door Step 1 Fully open the door Step 2 Pull the hinge locks down toward Fig 1 the door frame to the unlocked position Step 3 Firmly grasp both sides of the door at the top Step 4 Close door to the door removal position which is approximately 5 degrees refer to the Fig ...

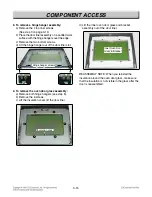
Страница 27: ...rews 4 top liner screws 4 top liner screws 4 top liner screws 4 top liner screws 4 top liner screws 4 top liner screws 4 top liner screws 4 top liner screws 4 top liner screws 4 top liner screws 4 top liner screws 4 top liner screws 4 top liner screws 4 top liner screws 4 top liner screws 4 top liner screws 4 top liner screws 4 top liner screws 4 top liner screws 4 top liner screws 4 top liner scr...

Страница 28: ...acket lnner Oven Door Glass Bracket lnner Oven Door Glass Bracket lnner Oven Door Glass Bracket lnner Oven Door Glass Bracket lnner Oven Door Glass Bracket lnner Oven Door Glass Bracket lnner Oven Door Glass Bracket lnner Oven Door Glass Bracket lnner Oven Door Glass Bracket lnner Oven Door Glass Bracket lnner Oven Door Glass Bracket lnner Oven Door Glass Bracket lnner Oven Door Glass Bracket lnne...

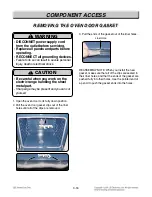
Страница 29: ... gasket Door gasket Door gasket Door gasket Door gasket Door gasket Door gasket Door gasket Door gasket Door gasket Door gasket Door gasket Door gasket Door gasket Door gasket Gasket clip Gasket clip Gasket clip Gasket clip Gasket clip Gasket clip Gasket clip Gasket clip Gasket clip Gasket clip Gasket clip Gasket clip Gasket clip Gasket clip Gasket clip Gasket clip Gasket clip Gasket clip Gasket c...

Страница 30: ... screws from the rear panel and remove the panel see step 3 4 on page 3 2 5 Raise the cooktop see page 3 4 for the procedure NOTE Position the side of the cooktop so that it does not rest on the side panel that you are removing 6 Remove the two screws from the top rear of the side panel WARNING DISCONNET power supply cord from the outlet before servicing Replace all panels and parts before operati...

Страница 31: ...connectors far enough 3 Resistance checks must be made with power cord unplugged from outlet and with wiring harness or connectors disconnected NOTE Below Ω value were tested at room temperature 77F 25 C Before testing any of components perform the following checks WARNING Disconnect power supply cord from the outlet before servicing Replace all panels and parts before operating Reconnect all grou...

Страница 32: ...le meter scale R x 1000 1 Refer to page 3 3 for the servicing procedure 2 Measure the resistance Multiple meter scale R x 1000 Normal Approximately 27 Ω 10 If not replace Components Test procedures Results NO COM Normal Approximately 2 6 kΩ 10 If not replace Abnormal Infinite open below 5Ω shorted Door latch open Door latch Locked Continuity Infinite NOTE After checking for the continuity of switc...

Страница 33: ...itive to temperature Do test after cooling down sufficiently 1 Refer to page 3 6 for the servicing procedure 2 Measure the resistance after cooling down Multiple meter scale R x1 Normal Approximately 14 Ω 10 If not replace 1 Refer to page 3 7 for the servicing procedure 2 Measure the resistance after cooling down Multiple meter scale R x1 Normal Approximately 17 Ω 10 If not replace 4 3 NOTE Ω Valu...

Страница 34: ...1 Measure the resistance after cooling down Multiple meter scale R x1 4 4 Oven lamp Components Test procedures Results Normal Below 5 Ω If not replace ...

Страница 35: ...test leads to limiter terminals 1A and 2A The meter should indicate continuity 0Ω 6 Touch the ohmmeter test leads to limiter terminals 1B and 2B With the temperature below 150 F the meter should indicate an open circuit infinite With the temperature above 150 F the meter should indicate continuity 0Ω Components Test procedures Results Normal Approximately 46 Ω If not replace Normal continuity belo...

Страница 36: ...erminals 1A and 2A the meter should indicate continuity 0 Ω 6 Touch the ohmmeter test leads to limiter terminals 1B and 2B With the temperature below 150 F the meter should indicate an open circuit infinite With the temperature above 150 F the meter should indicate continuity 0 Ω Components Test procedures Results Normal Approximately 565 Ω If not replace Normal continuity below 0 5 Ω If not repla...

Страница 37: ...meter should indicate continuity 0 Ω 6 Touch the ohmmeter test leads to limiter terminals 1B and 2B With the temperature below 150 F the meter should indicate an open circuit infinite With the temperature above 150 F the meter should indicate continuity 0 Ω 4 7 Dual surface element Left Front LF Components Test procedures Results Normal Approximately 32 Ω Normal Approximately 55 Ω Normal continuit...

Страница 38: ...N OF CONTROL Front Front Back Back Controller assembly Main PCB P N 6871W1N002E Front Back Cook top display PCB P N 6871W1N010F Front Back Oven relay PCB P N 6871W1N012B Front Back PCB case assembly Key pad assembly ...

Страница 39: ...ntrol Detecting oven temperature warming drawer temperature Buzzer sound control Key entry Door open close Door lock unlock detection Error mode detection and pop up Supervising hot cook top element Single Radiant Surface Elements Right Rear Left Rear Left Front on off power level relay switching Dual Radiant Surface Elements Right Front INNER OUTER on off power level relay switching Single Radian...

Страница 40: ...surface elements Right Front inner outer power level indication Dual radiant surface element size indication Right Front inner outer Single radiant surface elements warming zone Center Rear power level indication P N 6871W1N010F Oven relay PCB Oven relay PCB Main function Oven heater on off relay switching DLB Broil Bake P N 6871W1N012B COMPOSITION OF CONTROL ...

Страница 41: ...t Yes No Yes Some beep sound Cook top display blank Check AC input voltage of Main PCB Main PCB CN3 pin 1 and 3 Replace the cook top display PCB 010F 4 5V 5 5V END Replace the main PCB 002E END 1 CN14 Pin 10 and 12 The voltage should be 4 5V 5 5V Main PCB 002B No Yes No Check the thermal fuse See the page 3 1 Go to page 6 3 ...

Страница 42: ...splay Enter key input Yes No Yes Some beep sound Oven display blank Check AC input voltage of Main PCB Main PCB CN3 pin 1 and 3 Replace the main PCB 002E END 1 No display No power No Check the thermal fuse See the page 3 1 Go to page 6 3 ...

Страница 43: ...mal Replace the defective harness 1 Check the power transformer Refer to the below measure LVT coil resistance Normal approximately Fig1 Primary S2 S1 P Secondary Fig 1 Side Lead Color DCR Ω P S1 S2 black white yellow yellow red red 25 28 1 0 1 3 1 8 2 1 Replace the Main PCB 002E Normal END Replace the power transformer END No Yes ...

Страница 44: ...over 5 minutes on preheating where door is closed except proof and cook warm During cook No Heating Main Oven Disconnect power Check for loose connections at bake broil convection heater terminal and harness Check the bake heater measure the resistance after cooling down Normal approximately 17Ω Normal END Continued on the next page No Yes Reconnect If defective harness replace or fix ...

Страница 45: ...HART Oven does not heat Check the broil heater measure the resistance after cooling down Normal approximately 14Ω Normal END No Yes Replace the bake heater Normal END No Yes Replace the broil heater Continued on the next page ...

Страница 46: ...heck the oven sensor measure the resistance after cooling down Normal approximately 1 09kΩ Normal END Reconnect No Yes Replace the oven relay PCB 012B Normal Replace the main PCB 002E Replace the oven sensor END END For further check of main PCB Refer to the appendix A No Yes Normal Yes ...

Страница 47: ...top does not heat No heating All or a part of cook top heaters Disconnect power Check for loose connection at board 002E PCB to cook top heaters Normal END No Yes Reconnect If defective harness replace or fix Continued on the next page ...

Страница 48: ...ot heat Remove the main PCB 002E harness and pull the main PCB 002E forward from the PCB case Inspect the main PCB 002E Wide pattern Live part blown out Normal END No No Yes Repair and fix END Replace the main PCB 002E Repairable by yourself Yes ...

Страница 49: ...or fix END Replace the oven lamp END No No Yes Normal Normal END No Yes Yes END Reconnect Oven lamp does not operate Disconnect power Check for loose connection of oven lamp terminal and harness Check for loose connector main PCB CN1 Check the oven lamp measure the resistance Normal below 5Ω Abnormal infinite Abnormal Infinite ...

Страница 50: ...put Key does not input Reconnect the main PCB connector CN10 and CN11 more than two times Normal Yes Some keys or All keys Normal END END All END Yes No No Some Replace the main PCB 002E Replace the main PCB END Replace the keypad assembly ...

Страница 51: ...ins Ω value should read OPEN if there is any problem Replace oven sensor E If you couldn t find any problem Replace Control PCB Key held down too long or shorted key Door Locking system don t operate Main oven Sensor opened Main oven Sensor shorted F1 F2 F3 F4 DISPLAY SHOWS CAUSE CORRECTIVE ACTION A Perform step 1 through 2 above B Open the back panel and check continuity of the sensor heater bake...

Страница 52: ...rt for 60 seconds Key short error F 1 Plugged out the power remove keypad tail and check F 1 error recur or not after plugging in the power Remove the main PCB 002E harness and pull the PCB 002E forward from the PCB case Replace keypad or keypad assembly Disconnect power recur Yes Front Back Normal Repairable by yourself END Yes Yes No No No END Replace the main PCB 002E Repair and fix END ...

Страница 53: ...itch does not operate properly after rotating twice then supervising circuit detects a Door Lock failure and the F 2 error code appears Reconnect Normal END No Yes Door lock failed Disconnect power Check for loose connection on the micro switch and the door locking motor Check the oven door lock switch micro switch measure the resistance Normally open type NO COM Door latch open Door latch Locked ...

Страница 54: ...connect Check the door locking motor measure the resistance normal approximately 2 6kΩ abnormal infinite or below 5 Ω Remove the main PCB 002E harness and pull the PCB 002E forward from the PCB case Check for loose connector Front main PCB CN4 Front CN4 CN4 CN4 CN4 CN4 CN4 CN4 CN4 CN4 CN4 CN4 CN4 CN4 CN4 CN4 CN4 CN4 CN4 CN4 CN4 CN4 CN4 CN4 CN4 CN4 CN4 CN4 CN4 CN4 CN4 ...

Страница 55: ...ct connector pin solder of CN4 Back main PCB CN4 Back If pin solder is cracked repair and re use CN4 CN4 CN4 CN4 CN4 CN4 CN4 CN4 CN4 CN4 CN4 CN4 CN4 CN4 CN4 CN4 CN4 CN4 CN4 CN4 CN4 CN4 CN4 CN4 CN4 CN4 CN4 CN4 CN4 CN4 Cracked Replace END Repair and fix END No Yes ...

Страница 56: ...s short for over 1 min after cook starts During cook During cook Main oven sensing failed Disconnect power Main oven sensing error F 3 F 4 error Check for loose oven sensor connector Check the main oven sensor measure the resistance after cooling down Normal approximately 1 09kΩ Normal END Reconnect No Yes Normal Replace the main oven sensor END No Yes Continued on the next page ...

Страница 57: ...or not Remove the main PCB 002E harness and pull the PCB 002E forward from the PCB case Yes Check for loose connector Front main PCB CN6 Normal No Yes END Reconnect and replace the bad harness Inspect connector pin solder of CN6 Back main PCB CN6 Back If pin solder is cracked repair and re use Cracked Replace END Repair and fix END No Yes CN6 CN6 CN6 CN6 CN6 CN6 CN6 CN6 CN6 CN6 CN6 CN6 CN6 CN6 CN6...

Страница 58: ...ing During cook Not self clean mode Oven is too hot F 9 Disconnect power Remove the oven relay PCB 012B harness and pull the oven relay PCB 012B forward from case Oven too hot error F 9 error Check for a welded bake relay measure the resistance Normal No END Replace the oven relay PCB Welded Normal Continuity Infinite Continued on the next page ...

Страница 59: ...OW CHART Oven too hot error F 9 error Normal No END END Replace the oven relay PCB 012B Replace the main relay PCB 002E Yes Yes Check for a welded broil relay measure the resistance Welded Normal Continuity Infinite ...

Страница 60: ... Refer to the page 6 1 6 3 Verify power is present at unit Verify that the circuit breaker is not tripped Replace household fuse capacity Check circuit breaker Repair or replace wiring see wiring diagrams Test and or replace element Test and or replace PCB Refer to the page 6 4 6 6 Verify all connections are clean and tight replace broken wires Test and or replace cook top PCB Refer to the page 6 ...

Страница 61: ... down period after self clean cycle not complete Improper use of oven e g being used to heat the home Worn or broken broil stop roller Replace power control board PCB Replace power control board PCB Verify power is present at unit Verify that the circuit breaker is not tripped Replace household fuse but do not fuse capacity Refer to Owner s manual instructions Verity all connections are clean and ...

Страница 62: ...y controlled Oven sensor needs to be adjusted Adjust hinges or replace hinges Adjust or replace hinges Adjust hinges outward Do not cover racks with foil Install tempered glass toward the heat Do not use harsh abrasives or scouring pads See Owner s manual intructions Apply a small amount of vegetable oil to a paper towel and wipe the edges of the oven racks with the paper towel Do not spray with p...

Страница 63: ...elements off RADIANT COOK TOP Wattage RR 1200W LR 1200W RF 2700W LF Left Front 1200W inner 2500W Dual CR 100W WIRE COLORS SYMBOL COLOR WH WHITE BK BLACK RD RED YL YELLOW PK PINK BL BLUE BN BROWN GN GREEN GY GRAY WARNING POWER MUST BE DISCONNECTED BEFORE SERVICING THE APPLIANCE SCHEMATIC DIAGRAM ...

Страница 64: ...it 1 Check the line voltage household fuse or circuit breaker 2 Check for loose wiring or mis wiring within electric range NOTE The following individual circuits are for use in diagnosis and are shown in the ON position BAKE COOK WARM PROOF BROIL OVEN LIGHT For Model LRE30453SW LRE30453SB LRE30453ST ...

Страница 65: ...For Model LRE30453SW LRE30453SB LRE30453ST 9 3 SELF CLEANING CLOCK DISPLAY ON ...

Страница 66: ...9 4 CR Warming Zone CONV BAKE CONV ROAST For Model LRE30453SW LRE30453SB LRE30453ST RR Cook top Element ...

Страница 67: ...9 5 For Model LRE30453SW LRE30453SB LRE30453ST LR Cook top Element RF Cook top Element LF Cook top Element ...

Страница 68: ... 10 1 EXPLODED VIEW EV INTRODUCTION I DOOR PARTS DRAWER PARTS COOKTOP PARTS CONTROLLER PARTS CAVITY PARTS ...

Страница 69: ... 10 3 EV DOOR PARTS I 1410 1410 W238 W149 W108 W108 1402 1038 W238 1401 1403 1023 W101 W222 W149 W149 W149 W149 1704 1704 1009 1000 1028 1018 1703 1015 1024 1024 1020 W225 W109 W109 W243 ...

Страница 70: ... 10 5 CONTROLLER PARTS 2015 W215 2403 2402 W108 W108 W108 W108 2385 2048 2018 W105 2006 W105 2009 2033 2037 3006 3006 2036 2038 2034 2044 EV ...

Страница 71: ... 10 6 COOKTOP PARTS 9000 3022 3057 3401 3401 W172 3014 3016 3302 3402 3402 3301 W144 W144 W144 W144 3058 W105 W105 3303 3303 3056 3058 EV ...

Страница 72: ...RTS W107 W105 8517 8504 8515 8512 8502 8503 8508 8502 8507 8501 8514 8513 8513 W144 W172 W172 8388 W105 W228 5505 5505 8506 W144 W144 W144 W144 W144 W144 W144 W144 W144 W144 W149 W144 W144 W144 W144 8511 W229 9381 EV ...

Страница 73: ...1 W146 W146 W236 5063 5409 5509 5037 5517 5514 5506 3006 5510 5070 5503 5502 5501 5021 5511 3013 3063 3501 5019 W230 W230 W230 W172 5516 5516 4002 5512 5515 5014 5512 W172 W172 W172 5505 5513 5401 5407 3202 W233 W235 5404 5504 5510 W232 W234 5016 W130 EV ...

Страница 74: ......

Отзывы: