background image

-24-

7. MICROWAVE LEAKAGE TEST 

CAUTION

• Be sure to check microwave leakage prior to

servicing the oven if the oven is operating prior to

servicing.

• Service personnel should inform the

manufacturer, importer, or assembler of any 

certified oven unit found to have a microwave 

emission level in excess of 5 mW/cm2 and should 

repair any unit found to have excessive emission 

levels at no cost to the owner and should ascertain the 

cause of the excessive leakage. The service 

personnel should instruct the owner not to use the unit 

until the oven has been brought into compliance.

• If the oven operates with the door open, service

personnel should;

-  Tell the user not to operate the oven

-   Contact the manufacturer and CDRH (Center for 

Devices and Radiological Health)immediately.

NOTE: Address to CDRH

Office of Compliance (HFZ-312) 

Center for Devices and Radiological Health 

1390 Piccard Drive Rockville, Maryland 20850

• Service personnel should check all surface and

vent openings for microwave emission testing.

• Check for microwave energy leakage after every

servicing. The power density of the microwave

radiation leakage emitted by the microwave oven

should not exceed 1mW/cm2.sq. Always start

measuring of an unknown field to assure safety for

operating personnel from radiation leakage.

NOTE: The standard is 5mW/cm2.sq. while in the

customerʼs home.1mW/cm2.sq.stated here is

manufacturerʼs own voluntary standard for units in

customerʼs home.

EQUIPMENT-

• TESTER ((VOLTS-DC, AC, Ohmmeter)

• Microwave survey meter

  - Holaday   HI-1500 

HI-1501

  - Narda      8100 

8200

• 600 cc non conductive material beaker (glass or

plastic), inside diameter:approx.8.5 cm (3

1

/

2

 in.)

• Glass thermometer: 100 °C or 212 °F (1 deg scale)

MEASURING MICROWAVE ENERGY

LEAKAGE

•  Pour 275±15cc of 20±5°C(68±9°F) water in a 

beaker which is graduated to 600 cc, and place the 

beaker in the oven.

• Set the energy leakage monitor to 2,450 MHz and

use it following the manufacturer's recommended

test procedure to assure correct result.

•  When measuring the leakage, always use the 

2-inch (5cm) spacer supplied with the probe.

• Operate the oven at its maximum output.

• Measure the microwave radiation using an

electromagnetic radiation monitor by holding the

probe perpendicular to the surface being 

measured.

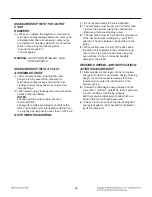
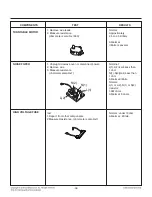
Move probe along shaded area.

Probe scanning speed

Less than 2.5 cm/sec. ( 1 in/sec)

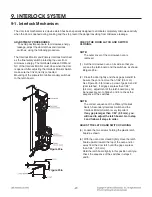
Move probe along shaded area.

Probe scanning speed

Less than 2.5 cm/sec. ( 1 in/sec)

Содержание LMV1762SB

Страница 1: ...VE OVEN SERVICE MANUAL MODEL LMV1762SB LMV1762SW LMV1762ST LMV1763ST CAUTION BEFORE SERVICING THE UNIT READ THE SAFETY PRECAUTIONS IN THIS MANUAL P NO MFL06272540 March 2016 Printed in Korea Internal Use Only ...

Страница 2: ... proper alignment integrity and connections d Any defective or misadjusted components in the interlock monitor door seal and microwave generation and transmission systems shall be repaired replaced or adjusted by procedures described in this manual before the oven is released to the owner e A microwave leakage check to verify compliance with the federal performance standard should be performed on ...

Страница 3: ...7 4 1 Control Panel Features 7 4 2 Explanation of Control Panel 8 5 Wiring Diagram Key Matrix 9 5 1 Wiring Diagram 9 5 2 Key Matrix 10 6 Troubleshooting 11 6 1 General Information for Service 11 6 2 Safety Caution 12 6 3 Basic Check Summary 13 6 4 Troubleshooting 14 7 Microwave Leakage Test 24 8 Power Output Measurement 26 9 Interlock System 27 9 1 Interlock Mechanism 27 9 2 Interlock Continuity T...

Страница 4: ...gnetron 2M214 161GP Cook Top Lamp 125 V 30 W or 40 W Cavity Lamp 125 V 30 W or 40 W Timer Digital up to 99 min 99 sec in each cooking stage Tray Tempered Safety Glass Overall Dimensions 2915 16 W x 167 16 H x 1615 16 D Oven Cavity Size 219 16 W x 141 8 H x 8 7 8 D Effective Capacity of Oven Cavity 1 7cu ft Accessories Ownerʼs Manual Cooking Guide Installation Manual Exhaust Adapter Exhaust Damper ...

Страница 5: ...ng operation BEFORE TOUCHING any parts of the oven always remove the power plug from the outlet Remove your watches whenever working close to or replacing the magnetron DO NOT touch any parts of the control panel circuit A resulting static electric discharge may damage the P C B NEVER operate the oven with no load NEVER injure the door seal and front plate of the oven cavity NEVER put iron tools o...

Страница 6: ...dio etc to prevent interference GROUNDING INSTRUCTIONS For personal safety this appliance must be fully grounded at all times In the event of an electrical short circuit grounding reduces the risk of electric shock The plug must be plugged into an outlet that is properly installed and grounded CAUTION This unit is equipped with a 3 prong plug for your safety If the wall outlet is a grounded 3 hole...

Страница 7: ... 7 4 OPERATION 4 1 Control Panel 12 14 15 17 23 20 16 21 22 19 13 2 3 1 6 7 9 11 8 10 4 5 18 ...

Страница 8: ...press it 11 Light On Off Touch this pad to turn the cooktop countertop light on or off 12 Pizza Touch this pad to reheat one or several slices of pizza without entering a cook time or power 13 Auto Reheat Touch this pad to reheat microwavable foods without entering a cook time or power 14 Time Defrost Touch this pad to set a defrost time 15 Auto Defrost Touch this pad followed by number pads to th...

Страница 9: ...YL BK BK BK RY8 C T Lamp RY9 Vent Slow RY3 Vent High RY4 Vent Low FUSE SR5 SMPS 1 3 4 5 6 7 8 9 SECONDARY SWITCH 1 2 BOTTOM BR BL RD YL DIODE BL H V FUSE H V CAPACITOR H V TRANSFORMER MONITOR SWITCH WH RY2 POWER RY1 Oven Lamp RV U MGT GN 9 BK BL WH PK BR GY ...

Страница 10: ... 10 5 2 Key Matrix KEY MATRIX KEY MATRIX ...

Страница 11: ...ay window will show the time counting down by seconds D After about 5 minutes make sure the primary interlock switch the secondary interlock switch and the interlock monitor switch operate properly by opening and closing the door several times Press the START button each time the door is closed E Continue operating the unit Two short beeps and one long beep will sound when the time is up The unit ...

Страница 12: ...rmly b The hinge is broken c The door seal is damaged d The door is bent or warped or there is any other visible damage on the unit that may cause microwave energy leakage NOTE Always keep the seal clean e Make sure that there are no defective parts in the interlock mechanism f Make sure that there are no detective parts in the microwave generating and transmission assembly especially waveguide 4 ...

Страница 13: ... open Switch Symptom 1 Door is closed No key Not started Operating O L V M T T M Check Open Short when the door is closed Switch Symptom 2 Door is open Not turned on O L Check Open Short when the door is open Switch BR PK YL BK BK BK RY8 C T Lamp RY9 Vent Slow RY3 Vent High RY4 Vent Low FUSE SR5 SMPS 1 3 4 5 6 7 8 9 SECONDARY SWITCH 1 2 BOTTOM BR BL RD YL DIODE BL H V FUSE H V CAPACITOR H V TRANSF...

Страница 14: ... 14 6 4 Troubleshooting No Display or Dead ...

Страница 15: ...the continuity test between the power cord and the connector Code L to Pin1 Code N to Pin3 No Yes Check PCB Go to No 6 of this flow chart Go to No 6 of this flow chart Is there any beeping sound in the continuity test between the ends of the fuse Yes No Replace the Fuse L L L L L L L L L L L L L L L L L L L L L L N N N N N N N N N N N N N N N N N N N N N N 5 Is there any beeping sound in the conti...

Страница 16: ... 16 Keypad Failure ...

Страница 17: ... Door should be closed Power ON Yes No Adjust latch board Refer to section 9 1 9 2 Check PWB Go to No 4 of this flow chart 3 When the door is opened is the voltage of the door sensing part over 4 V CN3 Pin1 and Pin2 Yes No Replace the PCB EBR75341201 Reconnect or repair the connector Replace the PCB EBR75341201 4 Is the connector connected to the PCB disconnected or disassembled No Yes Replace the...

Страница 18: ... RD RV U GN DIODE BL FUSE SR5 SMPS H V FUSE H V CAPACITOR H V TRANSFORMER MONITOR SWITCH WH PTC RD BK BK BK RY2 POWER RY5 MGT SECONDARY SWITCH RY4 Vent Low RY3 Vent High RY9 Vent Slow RY7 C T Lamp RY7 T T Motor RY1 Oven Lamp YL YL PK ...

Страница 19: ...and TAB2 No Yes PCB no problem Alternate explanation refer to the Note 3 While the product is operating under EZ ON start is the voltage of both ends of the D37 over 8 V No Yes Replace the Relay 2 4 Replace the PCB EBR75341201 Note If something is caught in the door or in the sealing area the microwave oven cannot operate safely The latch switches and monitor switch will prevent operation ...

Страница 20: ...efer to section 9 1 9 2 7 Is the resistance of the high voltage Transformer out of range Test Point 1 Primary winding 0 2 0 5 Ohm 2 Secondary 50 120 Ohm 3 Filament winding 0 Ohm No Yes Replace the High Voltage Transformer 6 Is the connector connected to High Voltage Transformer assembly disconnected or disassembled No Yes Reconnect or repair the connector ...

Страница 21: ...igh voltage diode assembly disconnected or disassembled No Yes Reconnect or repair the connector Forward Forward Forward Forward Forward Forward Forward Forward Forward Forward Forward Forward Forward Forward Forward Forward Forward Forward Forward Forward Forward Forward 12 Is the connector connected to the magnetron assembly disconnected or disassembled Yes Forward Forward Forward Forward Forwar...

Страница 22: ... the Primary latch board refer to section 9 1 9 2 Replace the turntable motor Power ON 3 Push the EZ ON button operate Is the voltage of both ends of the D37 over 8 V Yes No Replace the PCB EBR75341201 4 Is there any beeping sound in the continuity test between the ends of two Pin of RY1 Yes No Replace the PCB EBR75341201 5 PCB No Problem ...

Страница 23: ...e any beeping sound in the continuity test between the ends of the latch board Secondary switch Door should be closed Yes No Adjust latch board refer to section 9 1 9 2 Power ON 4 When the door is opened Is the voltage of the door sensing part over 4 V Pin 11 to Pin 12 Yes No Replace the PCB EBR75341201 4 Is there any beeping sound in the continuity test between the ends of the two pins of RY1 No ...

Страница 24: ... radiation leakage emitted by the microwave oven should not exceed 1mW cm2 sq Always start measuring of an unknown field to assure safety for operating personnel from radiation leakage NOTE The standard is 5mW cm2 sq while in the customerʼs home 1mW cm2 sq stated here is manufacturerʼs own voluntary standard for units in customerʼs home EQUIPMENT TESTER VOLTS DC AC Ohmmeter Microwave survey meter ...

Страница 25: ...eter full scale deflection 2 The test probe must be removed no faster than 1 inch sec 2 5cm sec along the shaded area otherwise a false reading may result 3 The test probe must be held with the grip portion of the handle A false reading may result if the operator ʼs hand is between the handle and the probe 4 When testing near a corner of the door keep the probe perpendicular to the surface making ...

Страница 26: ...10 1 K is measured where t is the time in seconds and T is the temperature rise The initial and final water temperatures are selected so that the maximum difference between the final water temperature and the ambient temperature is 5 K 6 The microwave power output P in watts is calculated from the following formula 4 187 Mw T2 T1 0 55Mc T2 T0 t is measured while the microwave generator is operatin...

Страница 27: ...removed 1 Set the microwave oven on its side so that you can see the latch board and the switches as shown inFigure 23 a 2 Close the door tightly and check gaps A and B to be sure they are no more than 1 64 0 5 mm See Figure 23 b for close up view of gaps A and B door latches If all gaps are less than 1 64 0 5 mm adjustment of the latch board may not be necessary Go to Steps 5 and 6 to check the s...

Страница 28: ...they are zero to the body of the switches in the following sequence Interlock Monitor Switch Primary Interlock Switch Secondary Interlock Switch NOTE The Interlock Monitor Switch is an added safety check on the Primary and Secondary Interlock Switches If the Primary and Secondary Interlock Switches allow the oven to operate with the door open the Monitor Switch will blow the fuse 7 When you achiev...

Страница 29: ...ndicate a closed circuit If the secondary switch operation is abnormal make the necessary adjustment or replace the switch making sure to replace it with the same type of switch C MONITOR SWITCH TEST Disconnect the wire lead from the monitor switch Connect the ohmmeter leads to the common COM and normally closed NC terminals of the switch The meter should indicate a closed circuit in the door open...

Страница 30: ... wire leads 2 Measure resistance ohm meter scale Rx1 Primary winding Secondary winding Filament winding 3 Measure resistance ohm meter scale Rx1000 Primary winding to ground Filament winding to ground 1 Remove wire leads Install the magnetron seal in the correct position Check that the seal is in good condition 2 Measure resistance ohm meter scale Rx1 Filament terminal 3 Measure resistance ohm met...

Страница 31: ...dicate infinite resistance in both directions 1 Measure continuity ohm meter scale Rx1 2 Remove the lead wires and operate oven at power level 1 through power level 10 Relay 2 1 Remove lead wires 2 Measure resistance ohm meter scale Rx1 High speed Blue and Black wire Low speed Blue and White wire Slow speed Blue and Grey wire Normal High speed Approximately 60 to 75 ohm Low speed Approximately 110...

Страница 32: ...2 resistor 1 5M ohms Abnormal 0 ohms Normal under 10ohm Abnormal infinite 1 Remove wire leads 2 Measure resistance ohm meter scale Rx1000 1 Unplug microwave oven or disconnect power 2 Remove wire 3 Measure resistance ohmmeter scale Rx1 test 1 Depart from other components 2 Measure Resistance ohm meter scale Rx1 L 1 L 2 N 2 N 1 Turntable Motor NOISE FILTER HIGH VOLTAGE FUSE L 1 L 2 N 2 N 1 L 1 L 2 ...

Страница 33: ...ouched Less than 400 ohms When not touched More than 1 megaohm FPC CONNECTOR Top NOTES A MICROWAVE ENERGY TEST MUST ALWAYS BE PERFORMED WHEN THE UNIT IS SERVICED FOR ANY REASON MAKE SURE THE WIRE LEADS ARE IN THE CORRECT POSITION WHEN REMOVING THE WIRE LEADS FROM THE PARTS BE SURE TO GRASP THE CONNECTOR NOT THE WIRES KEY MATRIX Time Cook Hold Warm C T Lamp On Off Start 13 Sensor Cook time weight D...

Страница 34: ...ntrol panel assembly to the oven cavity 2 Remove the control panel by pushing it upward 3 Remove the connectors cn1 cn3 cn5 and wire leads RY1 RY2 from the circuit board 4 Remove 5 screws securing the circuit board Relay White Relay 2 CN1 Control Bracket FPC Connector S1 Circuit Board Circuit Board Relay White Relay 2 CN1 Control Bracket FPC Connector S1 Relay Circuit Board Circuit Board Relay Whi...

Страница 35: ...CONNECTOR Follow the steps below as illustrated in Figures 6 and 7 to insert the F P C connector 1 Insert the F P C connector into the terminal socket securely with the fingers 2 Hold the plastic fastener with thumb and forefinger of the other hand and push it slowly into the terminal socket Figure 6 NOTE When reconnecting the F P C connector make sure that the holes on the F P C connector are pro...

Страница 36: ...e the mounting plate by loosening the screws 1 or 2 screws securing it to the outer case 4 Remove two screws on the left central edge and one screw on the right central edge of the base plate Remove the fan bracket from the outer case by removing one screw securing it to the outer case 5 Remove six screws of the rear cavity 6 Remove the outer case Fan Bracket Power Cord Figure 8 ...

Страница 37: ...ard 3 Make any necessary replacements and check for microwave energy leakage according to ADJUSTMENT PROCEDURES on page 7 12 YL BL From HVT BR From HVT RD from T T mot or PK YL BL From HVT BR From HVT RD from T T mot or PK Figure 9 Figure 10 WIRE COLOR SYMBOL COLOR WH WHITE BK BLACK BR BROWN RD RED YL YELLOW PK PINK BL BLUE GY GREY GN GREEN N P Not Provided ...

Страница 38: ... the magnetron be sure to install the magnetron gasket in the correct position and be sure that the gasket is in good condition After replacing the magnetron check for microwave energy leakage with a survey meter Checked microwave energy leakage must be below the limit of 5 mW cm2 All service adjustments should be made for minimum microwave energy leakage readings E REMOVING STIRRER FAN Figures 13...

Страница 39: ...tc 2 Remove the two screws securing it to the door handle CAUTION Be careful not to damage the door seal plate with the screwdriver H ASSEMBLING DOOR 1 When mounting the door assembly to the oven assembly be sure to adjust the door assembly parallel to the chassis Also adjust it so the door has no play between the inner door surface and oven frame assembly If the door assembly is not mounted prope...

Страница 40: ... hand Figure 19 3 Remove the base plate by removing the 8 screwssecuring it to the oven cavity Figure 20 4 Disconnect the lead wire from the turntable motorterminals 5 Remove the 1 screw securing the turntable motorto the oven cavity assembly Figure 21 NOTES Remove the lead wire from the turntable motor VERY CAREFULLY Be sure to grasp the connector not the wires when removing Figure 18 b Figure 19...

Страница 41: ...W INTRODUCTION OVEN CAVITY PARTS INTERIOR PARTS LATCH BOARD PARTS CONTROL PANEL PARTS DOOR PARTS EV Customer Model Product Code SVC Model Customer Model Product Code SVC Model Customer Model Product Code SVC Model ...

Страница 42: ...1000 1002 1004 1006 1007 1005 1381 W262 1009 2381 2004 2008 2006 EV DOOR PARTS CONTROLLER PARTS Customer Model Product Code SVC Model Customer Model Product Code SVC Model ...

Страница 43: ...OVEN CAVITY PARTS 3034 3010 3001 3029 6001 6000 3011 3025 3026 3028 3018 3036 3024 5138 3024 EV ...

Страница 44: ...W102 4000 4002 4003 4001 4004 4002 LATCH BOARD PARTS EV ...

Страница 45: ...INTERIOR PARTS I EV 5008 5063 5035 W101 5116 5034 3009 3008 3012 3002 3037 5014 W101 5009 5016 5116 5030 5000 5022 5018 W101 5002 ...

Страница 46: ...INTERIOR PARTS II EV 5024 3027 5045 3028 5037 5038 5010 5001 W101 5058 5044 3004 5043 5006 5041 ...

Страница 47: ... EV INSTALLATION PARTS 6011 6010 6009 6008 MBM4 VINYL BAG Customer Model Product Code SVC Model ...

Страница 48: ......

Отзывы: