background image

10

ENGLISH

 CAUTION


Remove the stand before installing the TV on a wall mount by 

performing the stand attachment in reverse.

 NOTE


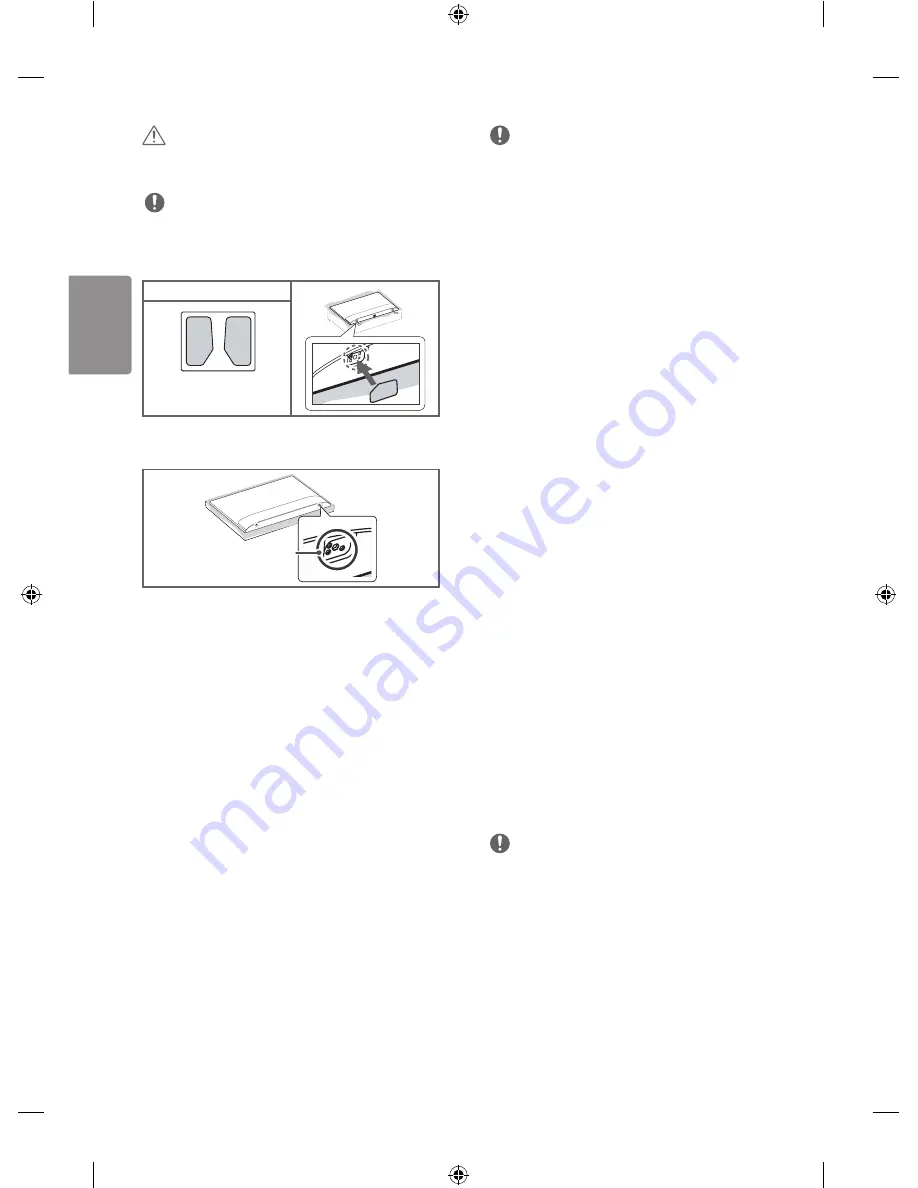
When installing the wall mounting bracket, use the Adhesive 

label. The Adhesive label will protect the opening from 

accumulating dust and dirt. (Only when the item of the following 

form is provided)

Provided Item

Adhesive label


When using the wall mount, it is recommended that you apply a 

piece of tape over the Stand holes to prevent dust and bugs from 

entering the holes. (Depending on model)

stand hole

Connections (notifications)

Connect various external devices to the TV and switch input modes to 

select an external device. For more information of external device’s 

connection, refer to the manual provided with each device.  

Available external devices are: HD receivers, DVD players, VCRs, audio 

systems, USB storage devices, PC, gaming devices, and other external 

devices.

 NOTE


The external device connection may differ from the model.


Connect external devices to the TV regardless of the order of the 

TV port.


If you record a TV program on a DVD recorder or VCR, make sure to 

connect the TV signal input cable to the TV through a DVD recorder 

or VCR. For more information of recording, refer to the manual 

provided with the connected device.


Refer to the external equipment’s manual for operating 

instructions.


If you connect a gaming device to the TV, use the cable supplied 

with the gaming device.


In PC mode, there may be noise associated with the resolution, 

vertical pattern, contrast or brightness. If noise is present, change 

the PC output to another resolution, change the refresh rate to 

another rate or adjust the brightness and contrast on the PICTURE 

menu until the picture is clear.


In PC mode, some resolution settings may not work properly 

depending on the graphics card.


Some USB Hubs may not work. If a USB device connected using 

a USB Hub is not detected, connect it to the USB port on the TV 

directly.

Antenna connection

Connect the TV to a wall antenna socket with an RF cable (75 Ω).


Use a signal splitter to use more than 2 TVs.


If the image quality is poor, install a signal amplifier properly to 

improve the image quality.


If the image quality is poor with an antenna connected, try to 

realign the antenna in the correct direction.


An antenna cable and converter are not supplied.


Supported DTV Audio: MPEG, Dolby Digital, Dolby Digital Plus, 

HE-AAC

Other connections

Connect your TV to external devices. For the best picture and audio 

quality, connect the external device and the TV with the HDMI cable. 

Some separate cable is not provided.

 NOTE


Supported HDMI Audio format : Dolby Digital (32 kHz, 44.1 kHz, 

48 kHz), DTS (44.1 kHz, 48 kHz), PCM (32 kHz, 44.1 kHz, 48 kHz, 96 

kHz,192 kHz) (Depending on model)


Use HDMI IN 3 for PC mode. (Only LH60**)

Содержание LH57 SERIES

Страница 1: ...P No MFL69397001 1603 REV01 LED TV LH57 AAA X 4 M4 X L14 www lg com ...

Страница 2: ......

Страница 3: ...1 2 1 2 1 2 A B 3 4 ...

Страница 4: ...HDMI IN LAN USB IN ANTENNA CABLE IN OPTICAL DIGITAL AUDIO OUT VIDEO Y PB PR L MONO AUDIO R COMPONENT IN AV IN VIDEO Y PB PR L MONO AUDIO R HDMI IN ARC ...

Страница 5: ...OPTICAL DIGITAL AUDIO OUT VIDEO Y PB PR L MONO AUDIO R COMPONENT IN AV IN VIDEO L MONO AUDIO R VIDEO AUDIO VIDEO Y PB PR L MONO AUDIO R ...

Страница 6: ...DC IN 19 V 2 3 1 DC IN 19 V 1 2 32LH57 ...

Страница 7: ...1 2 4 3 ...

Страница 8: ...2 438 71 4 7 4 5 43LH5700 CD 976 633 217 9 583 81 5 8 4 8 1 AC DC適配器 AC DC Adapter 32LH570B CC 製造商 Manufacturer APD 型號 Model DA 48G19 製造商 Manufacturer Lien Chang 型號 Model LCAP45 輸入 Input AC 100 240 V 50 60 Hz 產量 Output 19 V 2 53 A 43LH5700 CD ...

Страница 9: ...OWNER S MANUAL Safety and Reference LED TV LG LED TVs are LCD TVs with LED backlighting www lg com Please read this manual carefully before operating your TV and retain it for future reference ...

Страница 10: ...e electrocuted due to excess moisture Make sure to connect Mains cable to compliant AC mains socket with Grounded earth pin Except for devices which are not grounded on earth Otherwise possibility you may be electrocuted or injured Insert power cable plug completely into wall socket otherwise if not secured completely into socket fire ignition may break out Ensure the power cord does not come into...

Страница 11: ...s such as paper and matches Children must pay particular attention Electrical shock fire or injury can occur If a foreign object is dropped into the product unplug the power cord and contact the service centre Do not spray water on the product or scrub with an inflammable substance thinner or benzene Fire or electric shock accident can occur Do not allow any impact shock or any objects to fall int...

Страница 12: ... former from touching the latter even when the antenna falls This may cause an electric shock Do not install the product on places such as unstable shelves or inclined surfaces Also avoid places where there is vibration or where the product cannot be fully supported Otherwise the product may fall or flip over which may cause injury or damage to the product If you install theTV on a stand you need ...

Страница 13: ...ng The distance between the product and the wall should be more than 10 cm Do not install the product in a place with no ventilation e g on a bookshelf or in a cupboard Do not install the product on a carpet or cushion Make sure the air vent is not blocked by a tablecloth or curtain Otherwise this may result in fire Take care not to touch the ventilation openings when watching the TV for long peri...

Страница 14: ...ratus the apparatus has been exposed to rain or moisture does not operate normally or has been dropped If the product feels cold to the touch there may be a small flicker when it is turned on This is normal there is nothing wrong with product The panel is a high technology display product with resolution of two million to six million pixels You may see tiny black dots and or brightly coloured dots...

Страница 15: ... factory initialization of theTV may take a few minutes Image shown may differ from yourTV YourTV s OSD On Screen Display may differ slightly from that shown in this manual The available menus and options may differ from the input source or product model that you are using New features may be added to thisTV in the future The items supplied with your product may vary depending on the model Product...

Страница 16: ...TV on its side or tilt towards the left or right Do not apply excessive pressure to cause flexing bending of frame chassis as it may damage screen When handling theTV be careful not to damage the protruding buttons CAUTION Avoid touching the screen at all times as this may result in damage to the screen Do not move theTV by holding the cable holders as the cable holders may break and injuries and ...

Страница 17: ...pes are not provided You can obtain additional accessories from your local dealer Mounting on a wall Attach an optional wall mount bracket at the rear of theTV carefully and install the wall mount bracket on a solid wall perpendicular to the floor When you attach theTV to other building materials please contact qualified personnel LG recommends that wall mounting be performed by a qualified profes...

Страница 18: ...xternal equipment s manual for operating instructions If you connect a gaming device to theTV use the cable supplied with the gaming device In PC mode there may be noise associated with the resolution vertical pattern contrast or brightness If noise is present change the PC output to another resolution change the refresh rate to another rate or adjust the brightness and contrast on the PICTURE men...

Страница 19: ...Settings Accesses the quick settings INPUT Changes the input source B Number button Enters numbers Shows programme guide Returns to the previously viewed programme Adjusts the volume level Accesses your favourite programme list Views the information of the current programme and screen MUTE Mutes all sounds Scrolls through the saved programmes Moves to the previous or next screen C D C Shows the pr...

Страница 20: ...gh the saved programmes Moves to the previous or next screen TELETEXT buttons These buttons are used for teletext Depending on model HOME Accesses the Home menu C D C Accesses the quick menu Q Settings Accesses the quick settings Navigation buttons up down left right Scrolls through menus or options Selects menus or options and confirms your input Returns to the previous level Clears on screen dis...

Страница 21: ...ivated in the TIMERS settings If there is no signal while theTV is on theTV will turn off automatically after 15 minutes of inactivity When connecting to the PC HDMI No signal or Invalid Format is displayed Turn theTV off on using the remote control Reconnect the HDMI cable Restart the PC with theTV on Specifications The annual energy consumption indicated on the energy label is measured in accord...

Страница 22: ......

Страница 23: ......

Страница 24: ...Record the model number and serial number of the TV Refer to the label on the back cover and quote this information to your dealer when requiring any service MODEL SERIAL ...

Страница 25: ...OWNER S MANUAL EXTERNAL CONTROL DEVICE SETUP Please read this manual carefully before operating the set and retain it for future reference www lg com ...

Страница 26: ...7E SIMPLINK R C Button 1E FAV Favorite Channel R C Button 8E Forward R C Button 20 Text Teletext R C Button 8F Rewind R C Button 21 T Opt Teletext Option R C Button AA Info R C Button 28 Return BACK R C Button AB Program Guide R C Button 30 AV Audio Video Mode R C Button B0 Play R C Button 39 Caption Subtitle R C Button B1 ꕗ Stop File List R C Button 40 Λ Arrow Key Cursor Up R C Button B5 RECENT R...

Страница 27: ...232C IN CONTROL SERVICE TV TV PC TV PC SERVICE ONLY RS 232C IN CONTROL SERVICE RS 232C IN CONTROL SERVICE 1 3 2 1 3 2 LGTV supports PL2303 chip based Vendor ID 0x0557 Product ID 0x2008 USB to serial converter which is not made nor provided by LG It can be purchased from computer stores that carry accessories for IT support professionals RS 232C With RS232C Cable DE9 D Sub 9pin Type You need to pur...

Страница 28: ...C TV PC SERVICE ONLY RS 232C IN CONTROL SERVICE RS 232C IN CONTROL SERVICE 1 3 2 1 3 2 Customer Computer RS 232C configurations 3 Wire Configurations Not standard 1 6 5 9 PC TV RXD 2 2 TXD TXD 3 1 RXD GND 5 3 GND OR RXD 3 2 TXD TXD 2 1 RXD GND 5 3 GND D Sub 9 Phone RS 232C Serial port Set ID For Set ID number see Real Data Mapping on p 6 1 Press SETTINGS to access the main menus 2 Press the Naviga...

Страница 29: ... to 05 06 Contrast k g 00 to 64 20 Tune Command m a p 9 07 Brightness k h 00 to 64 21 Channel Programme Add Del Skip m b 00 to 01 08 Color Colour k i 00 to 64 22 Key m c Key Codes 09 Tint k j 00 to 64 23 Control Backlight Control Panel Light m g 00 to 64 10 Sharpness k k 00 to 32 24 Input select Main x b p 11 11 OSD Select k l 00 to 01 25 3D Only 3D models x t p 11 12 Remote Control Lock Mode k m ...

Страница 30: ... OK Data x The set transmits ACK acknowledgement based on this format when receiving normal data At this time if the data is data read mode it indicates present status data If the data is data write mode it returns the data of the PC computer Error Acknowledgement Command2 Set ID NG Data x The set transmits ACK acknowledgement based on this format when receiving abnormal data from non viable funct...

Страница 31: ...ull wide mode may work differently based on model and is supported for DTV fully and ATV AV partially 03 Screen Mute Command k d To select screen mute on off Transmission k d Set ID Data Cr Data 00 Screen mute off Picture on Video mute off 01 Screen mute on Picture off 10 Video mute on Ack d Set ID OK NG Data x In case of video mute on only TV will display On Screen Display OSD But in case of Scre...

Страница 32: ...ndby mode DC off by off timer or ka mc command and if key lock is on TV will not turn on by power on key of IR Local Key 13 Treble Command k r To adjust treble You can also adjust in the AUDIO menu Transmission k r Set ID Data Cr Data Min 00 to Max 64 Ack r Set ID OK NG Data x Depending on model 14 Bass Command k s To adjust Bass You can also adjust in the AUDIO menu Transmission k s Set ID Data C...

Страница 33: ...ital 10 Antenna TV DTV 20 Antenna Radio Radio 40 Satellite TV SDTV 50 Satellite Radio S Radio 90 Cable TV CADTV a0 Cable Radio CA Radio Tune Command Examples 1 Tune to the Analog antenna PAL Channel 10 Set ID All 00 Data 00 01 Channel Data is 10 00 0a Data 02 Analog Antenna TV 00 Result ma 00 00 0a 00 2 Tune to the digital antenna DVB T Channel 01 Set ID All 00 Data 00 01 Channel Data is 1 00 01 D...

Страница 34: ...Data 03 Data 04 Data 05 x a Set ID NG Data 00 x For Japan Model To tune channel to following physical major minor number Transmission m a 0 Data00 Data01 Data02 Data03 Data04 Data05 Cr Digital Antenna Satellite Data 00 xx Don t care Data 01 Data 02 Major Channel Number Data 01 High byte Channel Data Data 02 Low byte Channel Data 00 01 27 0F Decimal 1 9999 Data 03 Data 04 Minor Branch Channel Numbe...

Страница 35: ...on model and signal 25 3D Command x t only 3D models Depending on model To change 3D mode for TV Transmission x t Set ID Data 00 Data 01 Data 02 Data 03 Cr Depending on model Data Structure Data 00 00 3D On 01 3D Off 02 3D to 2D 03 2D to 3D Data 01 00 Top and Bottom 01 Side by Side 02 Check Board 03 Frame Sequential 04 Column interleaving 05 Row interleaving Data 02 00 Right to Left 01 Left to Rig...

Страница 36: ...l code Data value range 0 20 converts Viewpoint range 10 10 automatically Depending on model This option works when 3D Mode Genre is manual only 3 When Data 00 is 06 07 00 Off 01 On 4 When Data 00 is 08 00 Revert to 3D video from 3D to 2D converted 2D video 01 Change 3D video to 2D video except 2D to 3D video If conversion condition doesn t meet command is treated as NG 5 When Data 00 is 09 00 Sta...

Отзывы: