background image

REFRIGERATOR INSTALLATION

14

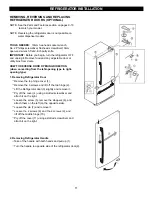
HOW TO REMOVE AND INSTALL THE

PULLOUT DRAWER

IMPORTANT:

To avoid possible injur or product or property

damage, you will need two people to perform the following
instructions.

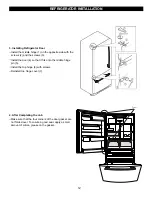
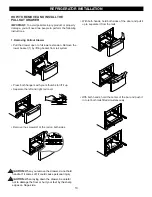
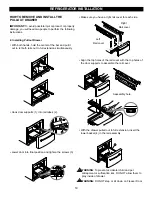
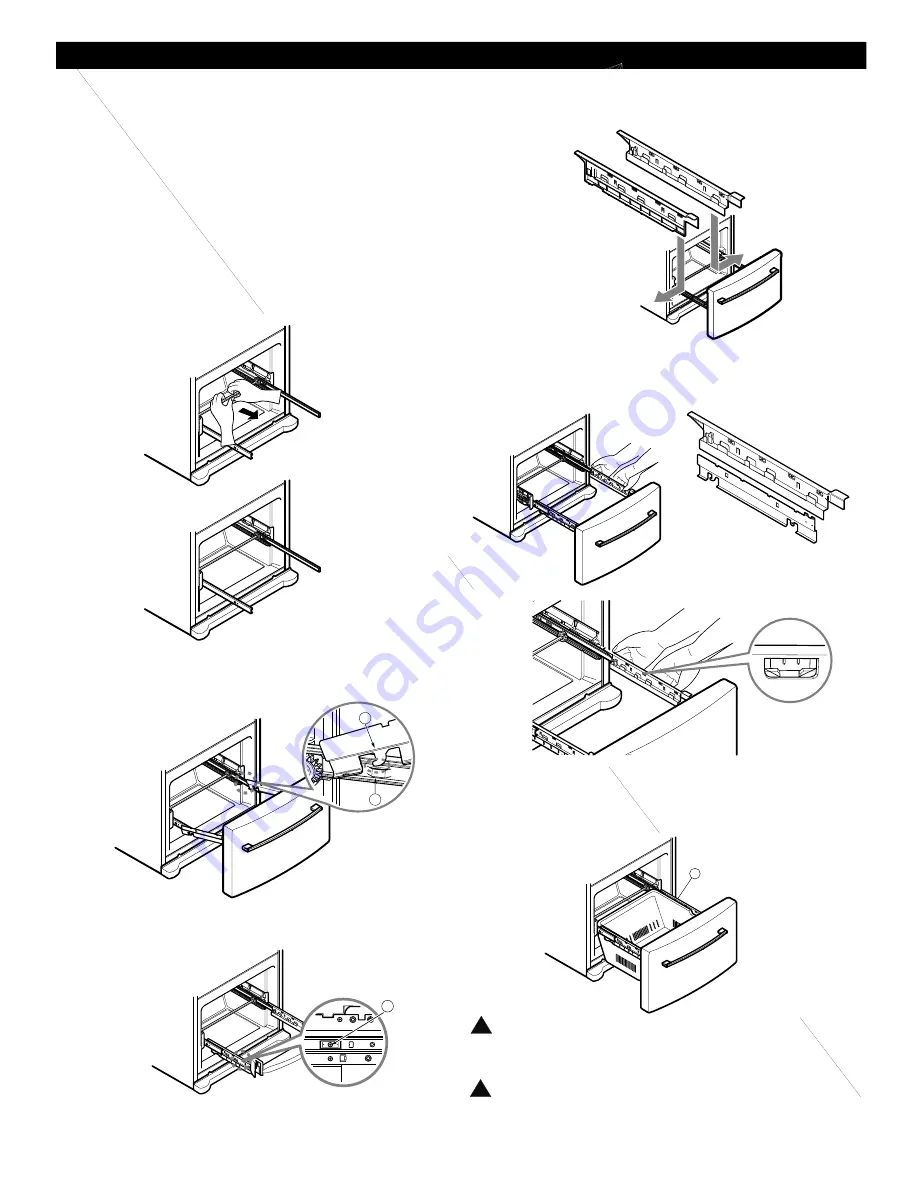
2. Installing Pullout Drawer

With both hands, hold the center of the bar and pull it
out to let both rails out to full extension simultaneously.

Hook door supports (1) into rail tabes (2) . 

Lower door into final position and tighten the screws (3)

Make sure you have a right rail cover for each side. 

Align the top holes of the rail cover with the top holes of
the door supports to assemble the rail cover. 

With the drawer pulled out to full extension, insert the
lower basket (4) in the rail assembly.

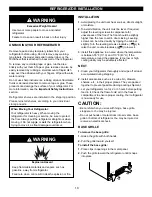
WARNING:

To prevent accidental child and pet

entrapment or suffocation risk. DO NOT allow them to
play inside of drawer.

WARNING:

DO NOT step or sit down on Freezer Door.

1

2

3

Aassembly hole

!

!

Right 

Rail cover

Left 

Rail cover

4

Содержание LDN22735

Страница 1: ...BOTTOM FREEZER REFRIGERATOR User s Guide Please read this guide thoroughly before operating and keep it handy for reference at all times Models P No 3828JL8019H LRBN2051 LDN2273 LBN2251 LBC2251 ...

Страница 2: ...0 Food Storage Guide 21 Storing Frozen Food 21 Refrigerator Shelves 22 Chef Fresh Snack Pan 23 Crisper Humidity Control 23 Optibin Crisper 23 Crisper cover with lattice on inner surface 24 Door Racks 24 Design A Door 24 Dairy Bin 25 Ice Bin 25 DuraBase 25 Tilting Door 26 Wire Durabase 26 DuraBase Divider 25 Frezzer Shelf 26 Care and Cleaning 27 28 General Cleaning Tips 27 Outside 27 Inside Walls 2...

Страница 3: ... warranty lasts so these limitations or exclusions may not apply to you This warranty gives you specific legal rights and you may also have other rights which vary from state to state THE ABOVE WARRANTY DOES NOT APPLY TO 1 Service trips to your home to deliver and pickup install instruct or replace house fuses or correct house wiring or plumbing or correction of unauthorized repairs 2 Damage to th...

Страница 4: ...CTRONICS NO SE HACE RESPONSABLE POR LA PERDIDA EN EL USO DEL PRODUCTO POR INCONVENIENCIA O CUALQUIER OTRO DAÑO DIRECTO O CONSECUENTE QUE PROVENGA DEL USO Y O NO USO DE ESTE PRODUCTO O POR ALGUNA VIOLACION A LAS GARANTIAS IMPLEMENTADAS INCLUYENDO LA GARANTIA DE COMPRA APLICADA A ESTE PRODUCTO Algunos estados no permiten la exclusión o limitación de daños incidentales o consecuenciales o limitacione...

Страница 5: ...ove power to the light circuit Read all instructions before using this appliance Use this appliance only for its intended purpose as described in this use and care guide After your refrigerator is in operation do not touch the cold surfaces in the freezer compartment when hands are damp or wet Skin may adhere to the extremely cold surfaces In refrigerators with automatic icemakers avoid contact wi...

Страница 6: ... extension cord However if you still elect to use an extension cord it is absolutely necessary that it be a UL listed in the United States 3 wire grounding type appliance extension cord having a grounding type plug and outlet and that the electrical rating of the cord be 15 amperes minimum and 120 volts Use of an extension cord will increase the clearance needed for the back of the refrigerator WA...

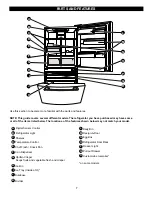
Страница 7: ...tor you have purchased may have some or all of the items listed below The locations of the features shown below may not match your model PARTS AND FEATURES G H I J K M N L O P Q R A B C D E F G H J L N O P K M I Q R Ice Tray Inside of H Optibin Crisper Keeps fruits and vegetable fresh and crisper Chef Fresh Snack Pan Can Dispenser Temperature Control Shelves Refrigerator Light Digital Sensor Contr...

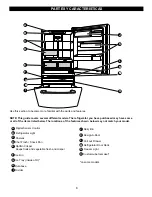
Страница 8: ... features NOTE This guide covers several different models The refrigerator you have purchased may have some or all of the items listed below The locations of the features shown below may not match your model G H I J K M N L O Ice Tray Inside of H Optibin Crisper Keeps fruits and vegetable fresh and crisper Chef Fresh Snack Pan Shelves Refrigerator Light Digital Sensor Control Dairy Bin Design A Do...

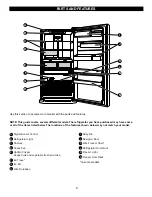
Страница 9: ... locations of the features shown below may not match your model PARTS AND FEATURES Digital Sensor Control Refrigerator Light Shelves Snack Pan Optibin Crisper Keeps fruits and vegetable fresh and crisp Ice Trays Ice Bin Wire Durabase Dairy Bin Design A Door Wire Freezer Shelf Refrigerator Door Rack Freezer Light Freezer Door Rack B C D A F E G H I J L M K N A B C D E F G H I J M N L K 9 on some mo...

Страница 10: ...in door closing Leveling screws can be turned easily by tipping the cabinet slightly Turn the leveling screws clockwise to raise the unit counterclockwise to lower it 3 Install this appliance in an area where the temperature is between 55 F 13 C and 110 F 43 C If the temperature around the appliance is too low or high cooling ability may be adversely affected NEXT 1 Clean your refrigerator thoroug...

Страница 11: ... Lift the Refrigerator door 3 slightly and remove it Pry off the cover 4 using a slotted screwdriver and attach it on the right Loosen the screw 5 remove the stoppers 6 and attach them on the left on the opposite side Loosen the pin 7 and remove it Loosen the 2 screws 8 and the 2 screws 9 and lift off the middle hinge 10 2 Removing Refrigerator Handle Take of the handle with both hands and pull up...

Страница 12: ...e door 4 so that it fits onto the middle hinge pin 5 Install the top hinge 6 with screws Reinstall top hinge cover 7 4 After Completing the Job Make sure that the four corners of the door gasket are not folded over T o ensure a good seal apply a small amount of silicon grease on the gasket REFRIGERATOR INSTALLATION 12 Corner ...

Страница 13: ... or property damage you will need two people to perform the following instructions 1 Removing Pullout Drawer Pull the drawer open to full lower extension Remove the lower basket 1 by lifting basket from rail system Press both hangers with yours thumbs to lift it up Separate the left and right rail cover Remove the screws 2 of the rail on both sides With both hands hold both sides of the door and p...

Страница 14: ...supports 1 into rail tabes 2 Lower door into final position and tighten the screws 3 Make sure you have a right rail cover for each side Align the top holes of the rail cover with the top holes of the door supports to assemble the rail cover With the drawer pulled out to full extension insert the lower basket 4 in the rail assembly WARNING T o prevent accidental child and pet entrapment or suffoca...

Страница 15: ...slightly and remove it Pry off the cover 4 using a slotted screwdriver and attach it on the right Loosen the screw 5 remove the stoppers 6 and attach them on the left on the opposite side Loosen the pin 7 and remove it Lift off the washer 8 Pry off the cover 9 using a slotted screwdriver and attach it on the right 2 Removing Freezer Door Lift the door 10 slightly and remove it Loosen the 2 screws ...

Страница 16: ...the plug buttons 4 on left side Install the handle mounting screw 3 on the right side Hold the handle so the masking tape is at the bottom Align keyhole slots 2 on the top and bottom of the back of the handle with the screws 3 mounted on the front of the door Press the handle against the door front making sure that the screws 3 go into the keyhole slots 2 Grasping the handle with both hands press ...

Страница 17: ...inge pin Install the middle hinge 4 on the opposite side with the screw 5 and the screws 9 6 Installing Refrigerator Door Place the washer 6 on the middle hinge pin 7 Install the door 8 so that it fits onto the middle hinge pin 7 Install the top hinge 10 with screws Reinstall top hinge cover 11 REFRIGERATOR INSTALLATION 1 2 3 4 11 10 8 7 4 3 6 9 5 1 Handle type 2 Handle type 1 NOTE Before start ch...

Страница 18: ...ise to raise that side of the refrigerator or counterclockwise to lower it It may take several turns of the leveling screw to adjust the tilt of the refrigerator NOTE Having someone push against the top of the refrigerator takes some weight off the leveling screws This makes it easier to adjust the screws 3 4 Check using a level 5 Replace the base grille Door Alignment If the space between your do...

Страница 19: ...igerator has two controls that let you regulate the temperature in the freezer and refrigerator compartments Initially set the REFRIGERATOR CONTROL at 37 F 3 C and the FREEZER CONTROL at 0 F 18 C Leave it at this setting for 24 hours one day to stabilize Then adjust the compartment temperature as desired Drawer Best Model Refrigerator control 32 F to 47 F 0 C to 8 C The lower the number setting th...

Страница 20: ... by adjusting the refrigerator first Wait 24 hours after the refrigerator adjustment to check the freezer temperature If it is too warm or too cold then adjust the freezer control as well Use the settings listed in the chart below as a guide Always remember to wait at least 24 hours between adjustments RECOMMENDED CONDITION REASON ADJUSTMENT REFRIGERATOR section Turn too warm REFRIGERATOR Door ope...

Страница 21: ...allow air or moisture in or out If you do you could have food odor and taste transfer throughout the refrigerator and also dry out frozen food Packaging recommendations Rigid plastic containers with tight fitting lids Straight sided canning freezing jars Heavy duty aluminum foil Plastic coated paper Non permeable plastic wraps Specified freezer grade self sealing plastic bags Follow package or con...

Страница 22: ...lf Tilt up the front of the shelf in the direction of 1 and lift it in the direction of 2 Pull the shelf out To replace a shelf Tilt the front of the shelf up and guide the shelf hooks into the slots at a desired height Then lower the front of the shelf so that the hooks drop into the slots NOTE Make sure that shelves are level from one side to the other Failure to do so may result in the shelf fa...

Страница 23: ...he cover to hold or release moisture To remove the glass 1 Lift up the glass after inserting a screwdriver under the criper cover To remove the crisper 1 Slide crisper straight out to the stop 2 Lift the front of the crisper then pull it out to remove 3 Replace the crisper by sliding it back in fully past the drawer stop USING YOUR REFRIGERATOR 23 2 1 and 2 Pull out and out Drawer Best Model While...

Страница 24: ...ay be removed for easier cleaning Snap on Door Racks To remove the racks 1 Remove all items in the door racks 2 Push the rack against the inside wall of the door A and lift up the door rack B To replace the racks 1 Hold either end of the door rack against the inside wall of the door 2 Push down the rack until it locks in place DESIGN A DOOR 1 Bins can be moved to either side of the door 2 To remov...

Страница 25: ...door shelf CAUTION Do not use the egg box as an ice storage bin in the freezer compartment The egg box can easily easily break if it freezes FREEZER SECTION ICE BIN Drawer Type Models 1 T o separate the ice bin pull out the drawer as much as possible 2 Gently lift and pull out the ice bin 3 T o reinstall pull out the drawer as much as possible and set the ice bin in its correct position and then p...

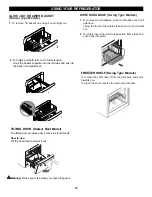
Страница 26: ...th rails out to full extension Hook the basket supports into the rail tabs and push to the back of compartment WIRE DURABASE Swing Type Models 1 To remove wire Durabase pull wire durabase out to full extension Tilt up the front of the wire Durabase and pull it straight out 2 To install insert the wire Durabase into frame rails and push back into place FREEZER SHELF Swing Type Models To remove the ...

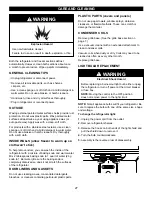
Страница 27: ...t not scratch the surfaces of the refrigerator DOOR LINERS AND GASKETS Do not use cleaning waxes concentrated detergents bleaches or cleaners containing petroleum plastic parts PLASTIC PARTS covers and panels Do not use paper towels window sprays abrasive cleansers or flammable fluids These can scratch or damage the material CONDENSER COILS Remove grille base See the grille base section on page 7 ...

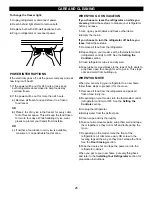
Страница 28: ...ou leave follow these steps 1 Remove all food from the refrigerator 2 Depending on your model set the thermostat control refrigerator control to OFF See the Setting the Controls section 3 Clean refrigerator wipe it and dry well 4 T ape rubber or wood blocks to the tops of both doors to prop them open far enough for air to get in This stops odor and mold from building up WHEN YOU MOVE When you are ...

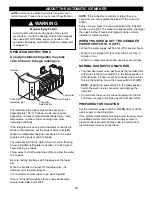
Страница 29: ...the indicator moves up one light The higher the light position the larger the cubes will be Pressing at highest position returns indicator to lowest position WHEN YOU SHOULD SET THE ICEMAKER POWER SWITCH TO O OFF When the water supply will be shut off for several hours When the ice storage bin is removed for more than a minute or two When the refrigerator will not be used for several days NORMAL S...

Страница 30: ...ater filter and between 40 and 120 p s i on models with a water filter Power drill or adjustable wrench Straight and Phillips blade screwdriver Two 1 4 outer diameter compression nuts and 2 ferrules sleeves to connect the copper tubing to the shutoff valve and the refrigerator water valve If your existing copper water line has a flared fitting at the end you will need an adapter available at plumb...

Страница 31: ...o 3 turns of about 10 diameter to allow the refrigerator to move out from the wall after installation 7 CONNECT THE TUBING TO THE VALVE Place the compression nut and ferrule sleeve for copper tubing onto the end of the tubing and connect it to the shutoff valve Make sure the tubing is fully inserted into the valve Tighten the compression nut securely NOTE Commonwealth of Massachusetts Plumbing Cod...

Страница 32: ...ten the tubing into the tubing Clamp attached to the back of the refrigerator First loosen the screw fastening the clamp Next insert the tubing in the groove Finally re fasten the screw 10 TURN THE WATER ON AT THE SHUTOFF VALVE Tighten any connections that leak Reattach the compressor compartment access cover 11 PLUG IN THE REFRIGERATOR Arrange the coil of tubing so that it does not vibrate agains...

Страница 33: ...are new to you you might be concerned about them Most of the new sounds are normal Hard surfaces like the floor walls and cabinets can make the sounds seem louder than they actually are The following describes the kinds of sounds and what may be making them The defrost timer will click when the automatic defrost cycle begins and ends The thermostat control or refrigerator control depending on the ...

Страница 34: ...ow The condenser coils are dirty This prevents air transfer and makes the motor work harder Clean the condenser coils Refer to the Care and Cleaning section 34 FROST OR ICE CRYSTALS ON FROZEN FOOD The door is not closing properly See Doors will not close completely above The door is opened often When the door is opened warm humid air is allowed in the freezer resulting in frost DOORS WILL NOT CLOS...

Страница 35: ...E The sounds may be normal for your refrigerator Refer to the Understanding Sounds You May Hear section THE ICEMAKER IS NOT PRODUCING ICE OR ICE CUBES ARE FREEZING TOO SLOWL Y The freezer temperature is cold enough to produce ice Wait 24 hours after hook up for ice production See the Setting the Controls Section Door left open Check to see if something is holding the door open THE DOORS ARE DIFFIC...

Страница 36: ...r too warm move the dial one number at a time A large amount of food has just been added Adding food warms the refrigerator It can take a few hours to the refrigerator or freezer for the refrigerator to return to normal temperature The food is not packaged correctly Wrap food tightly and wipe off damp containers prior to storing in the refrigerator to avoid moisture accumulation If necessary repac...

Страница 37: ...NOTES 37 ...

Страница 38: ......

Отзывы: