background image

7

      the monitor is off, but the monitor is still electricized. In order to security, you should unplug the power cord 
      while you don't use the monitor. 

3.2 OSD control keys 
  

    RECALL: Reset all values to setting of factory.

      ASPECT: Switch picture scale: 16:9/4:3 
      Auto key: This key is used to complete auto- adjusting function, it make the monitor to be the best visual  
                      display status only in VGA mode.  
      +/-: These two keys will complete the navigate right or left and choose the control of the menu function. The 
            adjustment value can be set directly by +/- key.
      MENU: Confirmation key can show the menu and complete the confirmation function.    
      POWER: This is a slight touch digital control key. It is used to turn the monitor on or off.

3.3 OSD menu

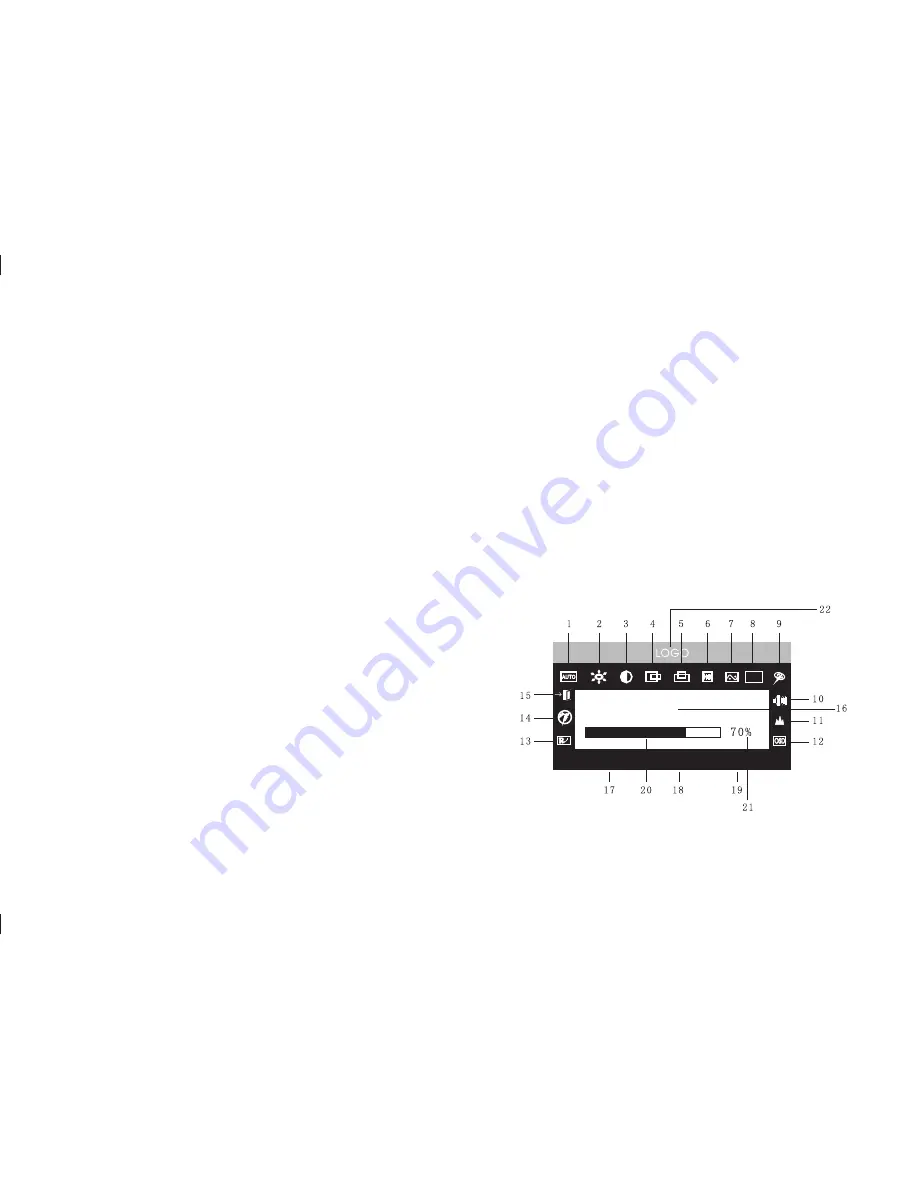
   3.3.1 The meaning of the menu in VGA mode [Fig.7]:  
            1. Auto adjustment      2. Brightness  
            3. Contrast                  4. H-position  
            5. V-postion                 6. Clock 
            7. Phase                      8.  Signal  source   
            9. Color adjustment     10.  Volume                
            11. Sharpness             12. OSD position/transparence
            13. Recall                    14. Language    
            15. Exit                        16. Selected function name 
            17. Resolution             18. H-frequency 


Fig.7 (DVI MODEL)


1024X768  H

64.0KH

Z

  V

60.0H

Z

S

CONTRAST

Содержание LCD17VLED

Страница 1: ...17 3 VGA LED MONITOR LCD17VLED ...

Страница 2: ...ower on 5 2 7 Self test pattern 5 2 8 Adjust the picture 6 3 Operation 6 3 1 Power LED indicator 6 3 2 OSD control keys 7 3 3 OSD menu 7 3 4 Safety mode 11 3 5 Timing guide 11 3 6 Plug Play 12 3 7 Power management 12 3 8 Volume adjust 12 4 Specification 13 5 Simple troubleshooting 15 2 1 Base Installation 2 2 Wall Mounting with VESA Standard 2 3 Signal Cable Connection 2 4 Power Cord Connection 书 ...

Страница 3: ...ashbowl sink laundry tub swimming pool etc 8 The slots are designed for ventilation simultaneously to keep the machinery workable and protect it from overheating For the same reason please do not place the monitor on the bed sofa carpets or other similar surface Don t place the monitor near or over heat source or place in built in installation 9 Keep 5 cm away from the wall or other goods 10 This ...

Страница 4: ...ug this monitor from the outlet and refer servicing to qualified service personnel under the following conditions The power cord is frayed or damaged The monitor has been dropped or the cabinet has been damaged When the monitor displays a distinct change in performance this indicates a need for service 18 The power cord is the main device to disconnect the power 19 Unplug the power cord when you d...

Страница 5: ...he white and black reference voltage Plug play compatible with Windows9X ME NT 2000 XP and VESA DDC1 2B 1 3 Check the list Please make sure that all of the following items are included before operating this monitor 2 Installing the monitor Please consider the following advice before you install your monitor Position Choose a place that reflects less to place your monitor Generally there is a suita...

Страница 6: ...g 1 Fig 2 2 2 Wall Mounting with VESA Standard Fig 3 subassembly 1 Take off the base 2 Fasten the wall mounting board The height can be confirmed by the user 3 Fasten the wall mounting stand at the position of VESA on the rear cover with bolts 4 Spin M4 bolts into the left right nuts on the wall mounting stand 3 4 mm of depth from bolts washer to stand is recommended Fig 1 VGA cable DVI cable opti...

Страница 7: ...port of the monitor 2 5 Power Cord Connection Plug one side of the power cord into the AC adapter and the other side into AC power source outlet then plug the output side of the AC adapter into the power port at the side of monitor 2 6 Power on Switch on the power to both the monitor and your computer After the monitor is power on the LED lights up green or blue If the LED becomes red and flashing...

Страница 8: ... 3 the Operation of the monitor 3 Operation OSD control panel Fig 5 and Fig 6 are model elevation Other models differ in key press position and front panel 3 1 Power LED indicator When the monitor is working the power LED is green or blue If the monitor is in saving power mode the power LED will be red and flashing If you turn off the monitor the power LED will be off When the LED is off Fig 5 Fig...

Страница 9: ...left and choose the control of the menu function The adjustment value can be set directly by key MENU Confirmation key can show the menu and complete the confirmation function POWER This is a slight touch digital control key It is used to turn the monitor on or off 3 3 OSD menu 3 3 1 The meaning of the menu in VGA mode Fig 7 1 Auto adjustment 2 Brightness 3 Contrast 4 H position 5 V postion 6 Cloc...

Страница 10: ... DVI mode Fig 8 1 Brightness 2 Contrast 3 Sharpness 4 Volume 5 OSD menu display time 6 Transparence 7 OSD position 8 Signal source 9 9300k 10 7800k 11 6500k 12 User 13 Recall 14 Language 15 Exit 16 Selected function name 17 Resolution 18 H frequency 19 V frequency 20 Progressive bar of adjustment 21 Percentage of adjustment 22 Customer LOGO Fig 8 ...

Страница 11: ...ward upward or downward Adjust the frequency of pixel Adjust the phase of pixel clock Adjust the sharpness of the picture Adjust the colors of the picture Set 9300K color temperature Set 7800K color temperature Set 6500K color temperature Set user mode Auto color balance Adjust the OSD display time Adjust the parameter of OSD Move the menu toward left or right Move the menu toward upward or downwa...

Страница 12: ...e black color reference voltage to obtain optimal color balance 2 R G B adjustment In USER mode monitor will automatically enter R G B adjustment mode push MENU key the relative options will flash then adjust it by key Then push MENU key again to exit 3 Language There are many languages to select you can choose the language which you wish 4 Position of OSD menu When you select the item you can adj...

Страница 13: ...en After a few seconds the monitor will enter turn off mode You must restart the computer and reset the frequency range 11 Fig 12 OUT OF RANGE WORKING FREQUENCY RANGE HF 31KHz 80KHz VF 56 75Hz Hz Max Res 1600X900 CURRENT MODE HF 94 0KHz VF 84 9Hz 3 5 Timing guide Recommended mode 1600 900 60Hz VGA SVGA XGA WXGA 720 400 640 480 800 600 1024 768 1600 900 70 60 60 60 60 1 2 3 4 5 NO Mode Resolution R...

Страница 14: ...onnector mode and proper resolution frequency 3 7 Power management This monitor complies with EPA energy star requirement and meets VESA DPMS standard The following is the description of the power indicator for the power saving mode Fig 13 3 8 Volume adjust Adjust the volume by OSD menu and software of the PC Fig 13 15W 1W 1W Mode On Stand by suspend Off Power indicator Green or blue Red flashing ...

Страница 15: ...t working mode Max Resolution Color Input resistance Power supply for monitor Input connector Power saving control Comply with EPA energy star standards 4 Specification 17 3 TFT LED Anti glary 381 89mm 214 81mm 0 23868mm 0 23868mm 160 160 2 220cd m 600 1 8ms 1600 900 60Hz 1600 900 262144 75 3 Ω DC 12 4 2A 15 pins D Sub or DVI D Yes Yes 13 书 ...

Страница 16: ...ng Weight Net weight Gross weight 86kpa 104kpa 3 mm 3 495 100 390mm 2 5kg 3 5kg 5 40 10 85 20 55 5 95 437 36 5 339 manual and real operation please do according to real operation Note This specification is subject to change without notices If there are differences between 14 Panel size Comply with European CE Plug Play 17 3 Yes Yes ...

Страница 17: ...key to adjust and contrast brightness Keep 5cm away from other goods for ventilation Don t put anything on the monitor It s normal phenomena Eliminate the bright or dark spot in 20 minutes after turning on the monitor 7 Picture distortion and flicker 8 Short of color Check the PC setting select the proper resolution and adjust refresh frequency Check if the signal cable pins are twisting or broken...

Отзывы: