background image

ENGLISH

SOURCE

SET(SELECT)

When connecting with a DVI-D signal input cable.

• Select DVI-PC: DVI-D digital signal.

When connecting with a D-Sub signal input cable.

• Select RGB-PC: 15-pin D-Sub analog signal.

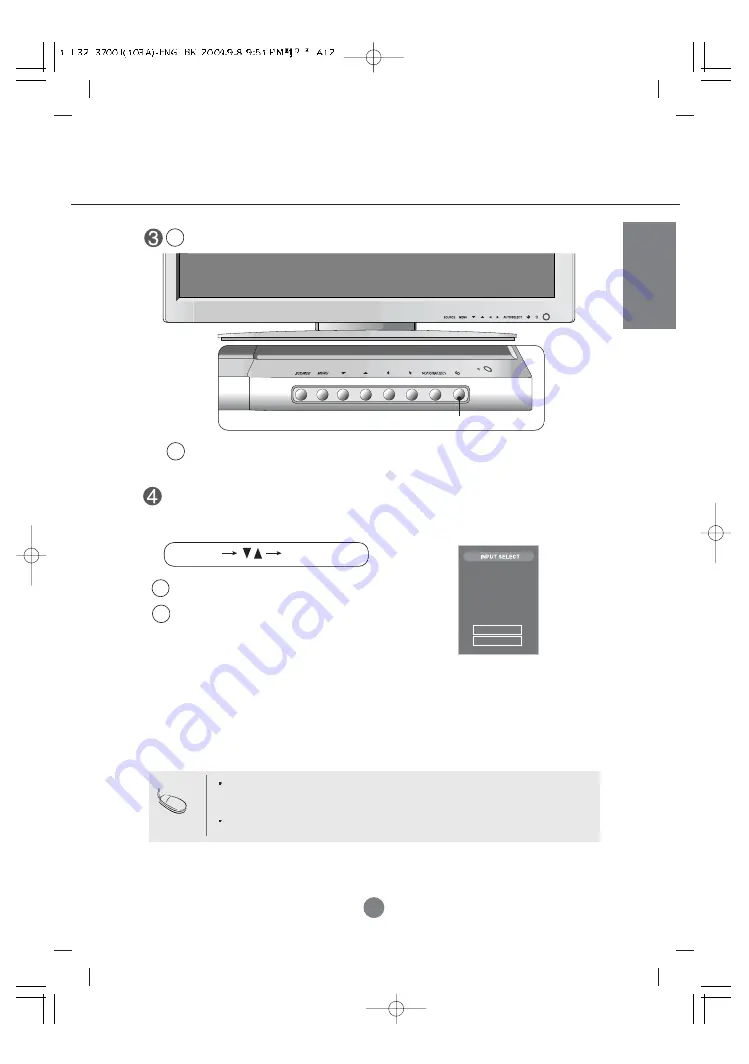
Select an input signal.
Press the SOURCE button on the remote controller to select the input signal. 
Or, press the SOURCE button at the front side of the monitor.

How to connect to two computers.

Connect the signal cables (DVI and D-Sub) to each computer.
Press the SOURCE button in a remote controller to select the computer to use.

Directly connect to a grounded power outlet on the wall or a power bar with a ground
wire.

Note

Turn on power by pressing the power button on the monitor.

Turn on the PC. 

Power button

B

A

B

A

TV

AV

S-Video

Component 1

Component 2

RGB - PC

DVI - PC

Содержание L3700TC

Страница 1: ...Test Report No GETEC E3 04 046 FCC Class B Certification EUT Type 37 LCD TV Monitor FCC ID BEJL3700TC APPENDIX H USER S MANUAL ...

Страница 2: ...erence EN 55024 1998 Electromagnetic Immunity EN 61000 3 2 Power Line Harmonics EN 61000 3 3 Voltage Fluctuations EN 60950 Product Safety LowRadiationCompliance MPRII This monitor meets one of the strictest guidelines available today for low radiation emissions offering the user extra shielding and an antistatic screen coating These guidelines set forth by a government agency in Sweden limit the a...

Страница 3: ... hear a strange sound unplug the power cord and contact the service center If you continue to use without taking proper measures electrical shock or fire can occur If you dropped the monitor or the case is broken turn off the monitor and unplug the power cord If you continue to use without taking proper measures electrical shock or fire can occur Contact the service center Do not drop metallic obj...

Страница 4: ...the monitor Covering dust can cause a fire or insulation deterioration can cause electric leakage electric shock or fire Fix the power cable completely If the power cable is not fixed completely a fire can break out Hold the plug when pulling out the power cable Do not bend the power cord with excessive force or put heavy objects on the power cord The power line can be damaged which may cause elec...

Страница 5: ...by referring to the User s Manual Your vision can be impaired Use authorized detergent only when cleaning the monitor Do not use benzene thinner or alcohol Monitor can be deformed The fluorescent lamp used in this product contains a small amount of mercury Do not dispose of this product with general household waste Disposal of this product must be carried out in accordance to the regulations of yo...

Страница 6: ...own here 15 pin D Sub Signal Cable DVI D Signal Cable Optional Wall mount Rack Please refer to the enclosed Installation Guide when installing the wall mount rack Monitor Driver CD User s Guide Cards 1 Take out the battery cap 2 Insert the battery with correct polarity 3 Close the battery cap You can use a remote controller 7 meter distance and 30 degree left right within the receiving unit scope ...

Страница 7: ...before you install the monitor LINE OUT A terminal used to connect to the speaker including a built in amplifier Amp Make sure that the connecting terminal of the PC sound card is checked before connecting If the Audio Out of PC sound card has only Speaker Out reduce the PC volume If the Audio Out of the PC sound card supports both Speaker Out and Line Out convert to Line Out using the card jumper...

Страница 8: ... signal input cable IBM compatible PC When connecting with the DSub signal input cable Macintosh PC PC Rear side of the monitor MAC Macintosh Adapter not included Use the standard Macintosh adapter since an incompatible adaptor is available in the market Different signaling system IN OUT REMOTE CONTROL Rear side of the monitor When connecting to a wall outlet Connecting the Monitor Connect the pow...

Страница 9: ...he input signal Or press the SOURCE button at the front side of the monitor How to connect to two computers Connect the signal cables DVI and D Sub to each computer Press the SOURCE button in a remote controller to select the computer to use Directly connect to a grounded power outlet on the wall or a power bar with a ground wire Note Turn on power by pressing the power button on the monitor Turn ...

Страница 10: ...play operates normally If the display is in DPM Energy Saving mode this indicator color changes to amber Power Button Power LED Adjust the volume Use this button to directly control brightness and contrast of the PC signal RGB PC DVI PC Use this button to show hide the OSD On Screen Display menu screen MENU Button Use the button to select an icon or adjust the setting in the OSD screen OSD Select ...

Страница 11: ... Icon Function Description OSD Menu When Watching TV Video DVD HDTV STATION PICTURE SOUND TIMER Adjusts the timer function Adjusts the screen video Adjusts the audio function Adjusts screen brightness contrast and color that you prefer Set Selects the channel available only when watching TV Note OSD On Screen Display The OSD function enables you to adjust the screen status conveniently since it pr...

Страница 12: ...he vertical or horizontal frequency range of the monitor Adjust the frequency range by referring to the Specifications in this manual Maximum resolution D Sub 1280 x 1024 75Hz DVI D 1280 x 1024 60Hz The signal cable between PC and monitor is not connected Check the signal cable Press the SOURCE menu in the remote controller to check the input signal Is the monitor power cord connected Does the pow...

Страница 13: ...ote controller to automatically select an optimal screen status that fits into the current mode If adjustment is not satisfactory use the Clock OSD menu D Sub analog signal Press the AUTO button in the remote controller to automatically select an optimal screen status that fits into the current mode If adjustment is not satisfactory use the Phase OSD menu See if the Zoom value is set to 0 If it is...

Страница 14: ...s connected properly Adjust the volume See if the sound is set properly See if the Sound is set to On in the PIP POP PBP menu Select the appropriate treble sound Select the appropriate bass sound Adjust the volume No sound No sound is available when the PIP POP PBP mode is engaged Sound is too dull Sound is too low The audio function does not work See if the PIP POP PBP function is in use If the P...

Страница 15: ...Glare coating Visible diagonal size 106 68 cm 0 681 mm Pixel Pitch L3200T Rated Voltage AC 100 240V 50 60Hz 2 0A Power Consumption Normal operation 160W Power saving preparation state 4W Power saving state 4W Power switch off 2W L3700T Rated Voltage AC 100 240V 50 60Hz 2 4A Power Consumption Normal operation 220W Power saving preparation state 4W Power saving state 4W Power switch off 4W L4200T Ra...

Страница 16: ... inches 3 112 9 cm 44 45 inches x 61 90 cm 24 37 inches x 22 77 cm 8 96 inches 4 112 9 cm 44 45 inches x 57 12 cm 22 49 inches x 12 00 cm 4 72 inches L4200T 1 105 7 cm 41 61 inches x 70 20 cm 27 64 inches x 29 45 cm 11 59 inches 2 105 7 cm 41 61 inches x 65 30 cm 25 71 inches x 11 91 cm 4 69 inches 3 125 9 cm 49 57 inches x 70 20 cm 27 64 inches x 29 45 cm 11 59 inches 4 125 9 cm 49 57 inches x 65...

Страница 17: ... WXGA 1360 X 768 60Hz DVI D WXGA 1360 X 768 60Hz Horizontal Frequency DSUB 30 83 kHz DVI D 30 72 kHz Vertical Frequency 56 85 Hz Synchronization Type Separate Composite SOG Sync On Green Digital 15 pin DSUB type DVI D digital S Video Composite video HDTV DVD Operational Condition Temperature 10 C 35 C Humidity 10 80 Storage Condition Temperature 20 C 60 C Humidity 5 95 The product specifications c...

Страница 18: ... x 768 1280 x 720 1360 x 768 1280 x 1024 1600 x 1200 60 123 68 68 44 772 47 72 63 981 75 VESA VESA VESA VESA VESA VESA 75 85 60 60 60 60 Power LED Mode Monitor Normal Operation Pre power Saving State Power Saving State Power Switch Off Power Cut off Switch Off Green Amber Amber DSUB Mode 1 Mode 16 DVI D Mode 1 Mode 15 Kensington Security Slot optional Connected to a locking cable that can be purch...

Отзывы: