background image

18

On Screen Display(OSD) Selection and Adjustment 
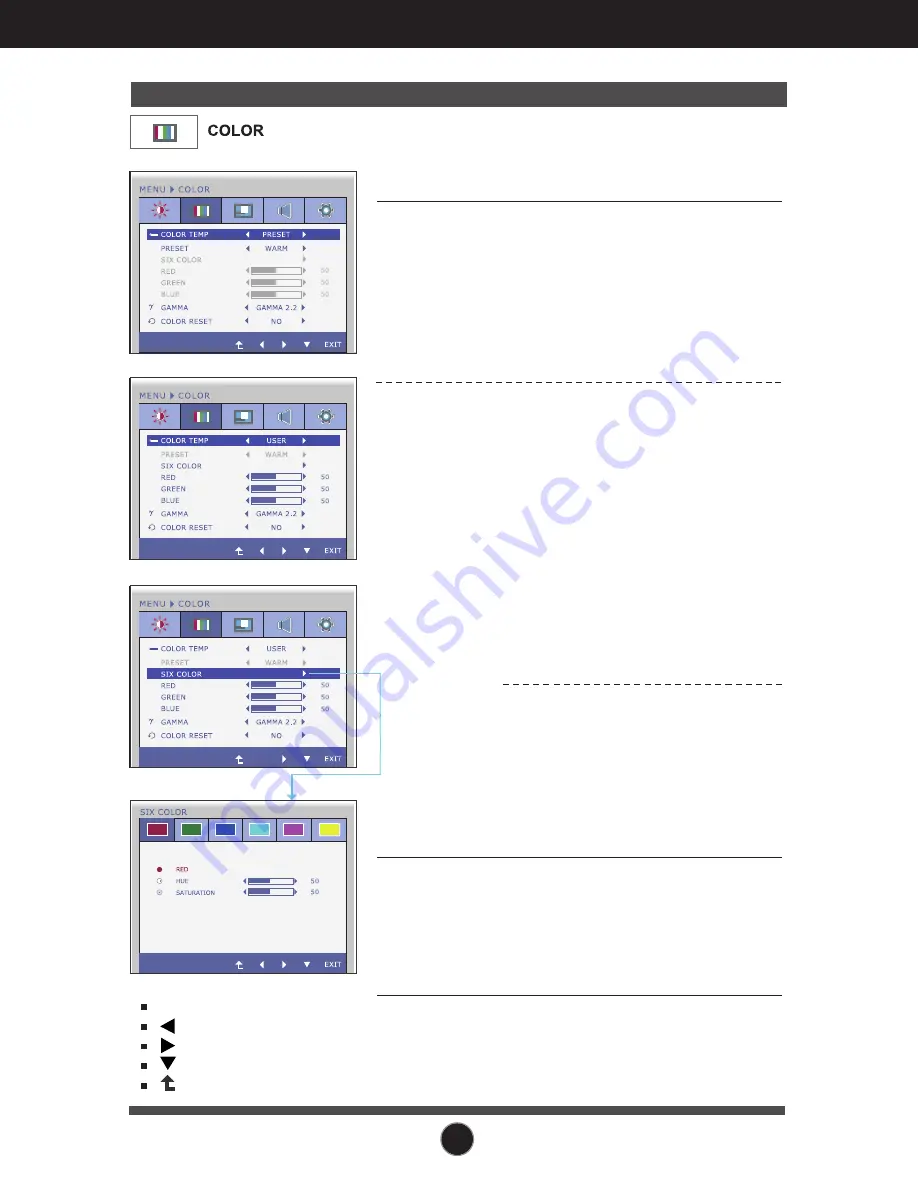
Main menu

Sub menu

Description

COLOR TEMP

PRESET 

Select either PRESET or USER to adjust
the screen color. 

Select the preset color temperature. 
• WARM: Set the screen to warm color    

temperature . 

• MEDIUM: Set the screen to medium  

color temperature.

• COOL: Set the screen to cool color 

temperature.

USER

GAMMA

COLOR
RESET

SIX COLOR
Sets and stores the hue and saturation
for six colors(RED/GREEN/BLUE/CYA
N/MAGENTA/YELLOW) to satisfy the
color requirements of a user. 
HUE
Adjusts the screen hue.
SATURATION
Adjusts the color sharpness on the
screen. Lower values make the color
sharpness weaker and colors lighter
while higher values make the color
sharpness stronger and colors darker.   

RED
Set your own red color levels.

GREEN
Set your own green color levels.

BLUE
Set your own blue color levels.

Set your own gamma value. :
1.8/2.0/2.2/2.4/2.6
On the monitor, high gamma values
display whitish images and low gamma
values display blackish images.

Resets the color settings to the factory
default settings for the current input
device. 

PRESET Mode

USER  Mode

EXIT : Exit

: Decrease
: Increase
: Select another sub-menu

: Restart to select sub-menu

Содержание IPS231B

Страница 1: ...www lg com OWNER S MANUAL LCD MONITOR LCD MONITOR MODEL Please read this manual carefully before operating your set and retain it for future reference ENGLISH IPS231P IPS231B ...

Страница 2: ...ak out due to overheating Do not touch the power plug with wet hands Additionally if the cord pin is wet or covered with dust dry the power plug completely or wipe dust off before plugging in the cord You may be electrocuted due to excess moisture If you don t intend to use the product for a long time unplug the power cable from the product Covering dust can cause a fire or insulation deterioratio...

Страница 3: ... electrical shock or fire can occur Contact the service center Do not drop an object on or apply impact to the product Do not throw any toys or objects at the product It can cause injury to humans problems to the product and damage the display Keep out of reach of children and do not place toys near the product Make sure the product ventilation hole is not blocked Install the product more than 10c...

Страница 4: ... on it Keep proper distance from the product and rest from time to time Your vision may be impaired if you look at the product too closely or fpr too long Set the appropriate resolution by referring to the User s Guide Your vision can be impaired Keep small accessories out of the reach of children Leaving a fixed image on the screen for a long time may cause damage to the screen and cause image bu...

Страница 5: ...mful interference to radio communications However there is no guarantee that interference will not occur in a particular installation If this equipment does cause harmful interference to radio or television reception which can be determined by turning the equipment off and on the user is encouraged to try to correct the interference by one or more of the following measures Reorient or relocate the...

Страница 6: ...r Cord 15 pin D Sub Signal Cable Tosetitup thissignalcablemaybe attachedto thisproductbefore shippingout DVI D Signal Cable Thisfeatureisnotavailableinall countries NOTE This accessories may look different from those shown here User must use shielded signal interface cables D sub 15 pin cable DVI D cable with ferrite cores to maintain standard compliance for the product Audio Cable ...

Страница 7: ...he Stand Body Be sure don t pull out the Stop Pin and make the Stand Base direction as shown WARNING The tape and locking pin may only be removed from those monitors equipped with a standing base when the base is pulled up Otherwise you may be injured by the protruding sections of the stand Product Handling with Care When you lift up or move the product Do Not hold or touch the front part of LCD p...

Страница 8: ...the back of the stand base and turn the screw clockwise to tighten 4 Lift and turn the monitor to face towards the front after the connection is made to the female part of the cable you re attaching 5 When you desire to disintegrate the monitor from the stand base use a coin to turn the screw counterclockwise Positioning your display After installation adjust the angle as shown below 1 Adjust the ...

Страница 9: ...forward tilt angle of the monitor should not exceed 5 degrees WARNING You do not need to replace the Locking pin after it is removed to adjust its height When adjusting the angle of the screen do not put your finger s in between the head of the monitor and the stand body You can hurt your finger s When adjusting the height of the screen do not put your finger s in between the head of the monitor a...

Страница 10: ...andscape Portrait You can rotate the panel 90o clockwise Please be cautious and avoid contact between the monitor head and the Stand Base when rotating the screen to access the Pivot function If the monitor head touches the Stand Base then the Stand Base could crack 3 Be careful with the cables when rotating the screen Using the Pivot function Stand section Head section ...

Страница 11: ...gnal input cable and power cord in order then tighten the screw of the signal cable Connecting with the PC 1 2 Wall outlet type Mac adapter For Apple Macintosh use a separate plug adapter is needed to change the 15 pin high density 3 row D sub VGA connector on the supplied cable to a 15 pin 2 row connector When using a D Sub signal input cable connector for Macintosh Variesaccordingtomodel DVI D T...

Страница 12: ...trol settings so that they cannot be inadvertently changed Press and hold the MENU button for several seconds The message OSD LOCKED should appear You can unlock the OSD controls at any time by pushing the MENU button for several seconds The message OSD UNLOCKED should appear MODE Button For more information refer to page 21 22 ...

Страница 13: ...lay EXIT Button AUTO Button AUTO IMAGE ADJUSTMENT When adjusting your display settings always press the AUTO button before entering the On Screen Display OSD Only Analog Mode This will automatically adjust your display image to the ideal settings for the current screen resolution size display mode The best display mode is IPS231P IPS231B 1920 x 1080 Power Indicator The power indicator stays blue i...

Страница 14: ...he use of the controls The following section is an outline of the available adjustments and selections you can make using the OSD To make adjustments in the On Screen Display follow these steps Press the discretionary Button then the main menu of the OSD appears To access a control use the corresponding Buttons Use the Buttons to adjust the image to the desired level Use the Button to select other...

Страница 15: ...stments COLOR TEMP SIXCOLOR RED GREEN BLUE CYAN MAGENTA YELLOW HUE SATURATION RED GREEN BLUE WARM MEDIUM COOL PRESET USER LANGUAGE POWER INDICATOR WHITE BALANCE SUPER ENERGY SAVING ORIGINAL RATIO FACTORY RESET To customize the screen status for a user s operating environment OTHERS HORIZONTAL VERTICAL CLOCK PHASE GAMMA COLOR RESET DISPLAY To adjust the position of the screen DSUB DSUB DSUB To impr...

Страница 16: ...d to the best to view the videos It is a mode that the screen is adjusted to the standard sRGB It is a mode that the screen is adjusted to the best for the text works It is a mode that the screen is adjusted to the best to view pictures It is a mode that the user can adjust each element It can adjust the color mode of the Main Menu DSUB DVI D Main menu Sub menu Supported input Description ...

Страница 17: ... below are the icons icon names and icon descriptions of the all items shown on the Menu Sub menus NOTE OSD On Screen Display menu languages on the monitor may differ from the manual Menu Name Icons Button Tip Exit Adjust Decrease Increase Select another sub menu Restart to select sub menu Press the MENU Button then the main menu of the OSD appears ...

Страница 18: ...ain menu Sub menu Description EXIT Exit Decrease Increase Select another sub menu Restart to select sub menu BRIGHTNESS CONTRAST SHARPNESS To adjust the brightness of the screen To adjust the contrast of the screen To adjust the clearness of the screen ...

Страница 19: ...equirements of a user HUE Adjusts the screen hue SATURATION Adjusts the color sharpness on the screen Lower values make the color sharpness weaker and colors lighter while higher values make the color sharpness stronger and colors darker RED Set your own red color levels GREEN Set your own green color levels BLUE Set your own blue color levels Set your own gamma value 1 8 2 0 2 2 2 4 2 6 On the mo...

Страница 20: ... also change To adjust the focus of the display This item allows you to remove any horizontal noise and clear or sharpen the image of characters HORIZONTAL VERTICAL To move image left and right To move image up and down EXIT Exit Decrease Increase Select another sub menu Restart to select sub menu To adjust the volume of headphone Speaker EXIT Exit Decrease Increase Mute Restart to select sub menu...

Страница 21: ... on the front side of the monitor to ON or OFF If you set OFF it will go off If you set ON at any time the power indicator will automatically be turned on NOTE If this does not improve the screen image restore the factory default settings If necessary execute the WHITE BALANCE function again This function will be enabled only when the input signal is an analog signal EXIT Exit Decrease Increase Se...

Страница 22: ...ng the OSD system Listed below are the icons icon names and icon descriptions of the all items shown on the Menu Sub menus NOTE OSD On Screen Display menu languages on the monitor may differ from the manual Menu Name Icons Button Tip Exit Move Select another sub menu Press the MODE Button then the main menu of the OSD appears ...

Страница 23: ...djusted to the best to view the videos TEXT PHOTO USER sRGB It is a mode that the screen is adjusted to the best for the text works It is a mode that the screen is adjusted to the best to view pictures It is a mode that the user can adjust each element It can adjust the color mode of the Main Menu It is a mode that the screen is adjusted to the standard sRGB ...

Страница 24: ...y moving the mouse or pressing any key on the keyboard to bring up the screen Try to turn on the PC This message appears when the signal from the PC video card is out of horizontal or vertical frequency range of the display See the Specifications section of this manual and configure your display again This message appears when the signal cable between your PC and your display is not connected Chec...

Страница 25: ...lay image to the ideal setting If the results are unsatisfactory decrease the horizontal bars using the PHASE icon in the on screen display Check Control Panel Display Settings and adjust the display to the recommended resolution or adjust the display image to the ideal setting Set the color setting higher than 24 bits true color IMPORTANT Check Control Panel Display Settings and see if the freque...

Страница 26: ...bits true color at Control Panel Settings Check if the screen is set to interlace mode and if yes change it to the recommend resolution Do you see an Unrecognized monitor Plug Play VESA DDC monitor found message Have you installed the display driver Be sure to install the display driver from the display driver CD or diskette that comes with your display Or you can also download the driver from our...

Страница 27: ...re 20 C to 60 C Humidity 5 to 90 non Condensing Environment al Conditions With Stand Width 54 82 cm 21 58 inch Height 36 67 cm 14 43 inch Min 47 67 cm 18 76 inch Max Depth 22 44 cm 8 83 inch Weight excl packing 4 7 kg 10 51 lb Dimensions Weight Tilt 5 to 15 Swivel 356 Height 110 mm 4 33 inch Range AC 100 240 V 50 60 Hz 1 0 A Power Input Attached Detached O Stand Base Wall outlet type Power cord DD...

Страница 28: ... kHz Vertical Freq Hz Recommend Mode 1 2 3 4 5 6 7 8 9 10 11 12 720 x 400 640 x 480 640 x 480 800 x 600 800 x 600 1024 x 768 1024 x 768 1152 x 864 1280 x 1024 1280 x 1024 1680 x 1050 1920 x 1080 31 468 31 469 37 500 37 879 46 875 48 363 60 123 67 500 63 981 79 976 65 290 67 500 70 60 75 60 75 60 75 75 60 75 60 60 Blue Blue Blinking Off ...

Страница 29: ...ies the specifications of the Wall mount plate or the interchange device 1 After moving the product to face downward make sure to place it on a soft cloth or a cushion to avoid surface damage 2 Separate the head and the stand with the use of a screwdriver ...

Страница 30: ...separately at most computer stores 3 Install the Wall mount plate Screw Mounting Interface Dimension Hole spacing 75 mm x 75 mm NOTE VESA compatible only with respect to screw mounting interface dimensions and mounting screw specifications Please use VESA standard as below 784 8 mm and under 30 9 inch Wall Mount Pad Thickness 2 6 mm Screw 4 0 mm x Pitch 0 7 mm x Length 10 mm 787 4 mm and above 31 ...

Страница 31: ...rial number of the SET is located on the back or one side of the SET Record it below should you ever need service MODEL SERIAL As an ENERGY STAR Partner LGE U S A Inc has determined that this product meets the ENERGY STAR guidelines for energy efficiency ENERGY STAR is a set of power saving guidelines issued by the U S Environmental Protection Agency EPA ...

Отзывы: