background image

47

USB

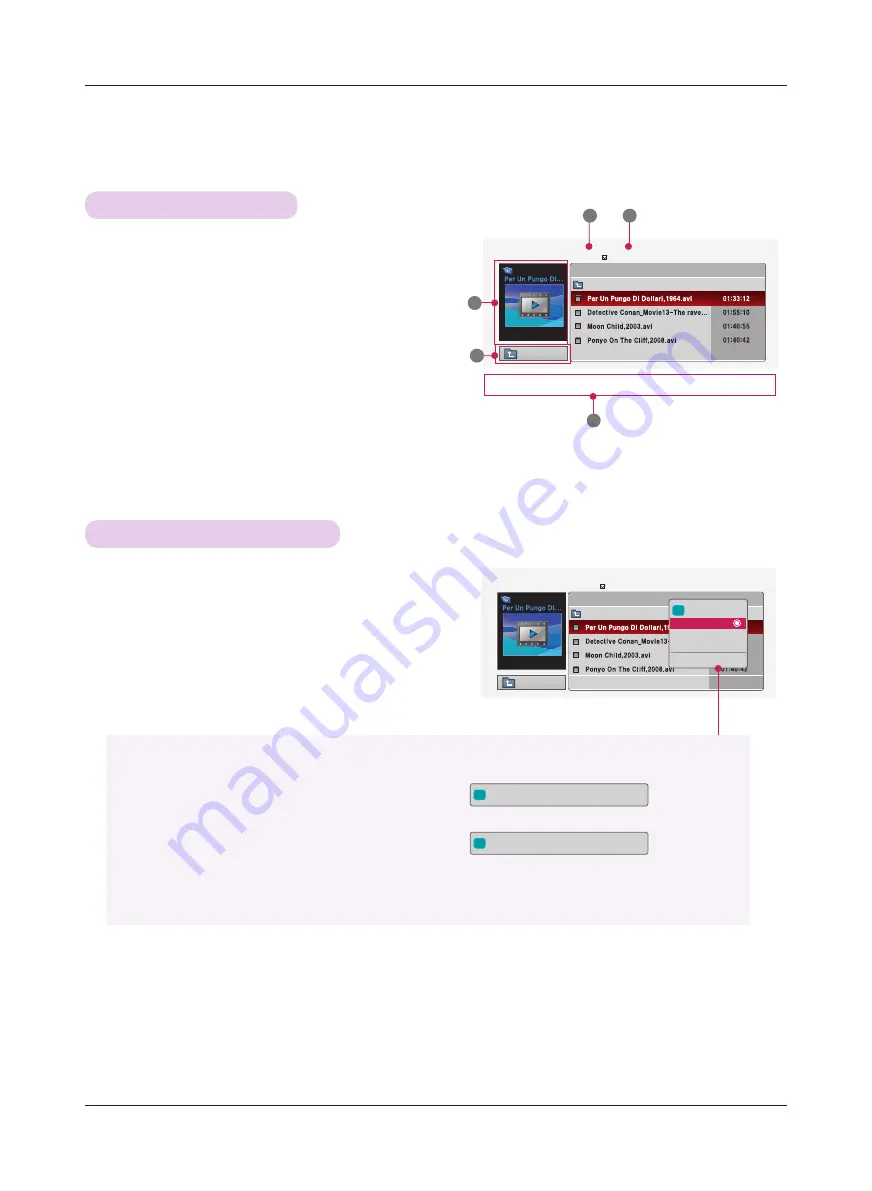
1 .  Moves to upper level folder
2 .  Preview:  Display the title/folder name of the movie in the 

selected folder

3 .  Current page/Total pages
4 .  Total number of marked movies
5 .  Corresponding buttons on the remote control

Up Folder

Page 1/1

No Marked

MUSIC LIST

704 x 396  668 MB

Movie

Up Folder

Up Folder

Page 1/1

No Marked

MUSIC LIST

704 x 396  668 MB

Movie

Up Folder

Movie Selection and Popup Menu

Screen Components

2

3

4

5

1

i

   704 x 396  668 MB

Play 

Mark All
Delete
Close

1 .   Press the 

USB

 button. Then, move to 

MOVIE LIST

 with 

the 

 buttons and press the 

OK 

button.

2 .   Press the 


move to a desired movie file and 

press the 

OK

 button.

3 .   Move to a desired item with the 


buttons and then 

press the 

OK 

button.

•   Play

: Play the selected movie titles. 

- In the case of files not supported, a message regarding non-supported file is displayed.

- The screen is played, but when the audio file is not supported, the following message shows.

•   Mark All

: Mark all movies in the folder.

•   Delete

: Delete the selected movie.

•   Close

: Close the pop-up menu.

i

This file is invalid.

i

Unsupported Audio.

Navigation        

PopUp Menu        

 Page Change        

Mark        

Exit

Navigation        

PopUp Menu        

 Page Change        

Mark        

Exit

Title

Duration

Title

Duration

Содержание HX350

Страница 1: ...OWNER S MANUAL DLP PROJECTOR HX350T Please read this manual carefully before operating your set and retain it for future reference www lg com ...

Страница 2: ...ral the instructions furnished the user shall include the fol lowing or similar statement placed in a prominent location in the text of the manual NOTE This equipment has been tested and found to comply with the limits for a Class B digital device pursuant to part 15 of the FCC Rules These limits are designed to provide reasonable protec tion against harmful interference in a residential installat...

Страница 3: ... Volume Booster 25 TIME Menu Options Clock Setting 26 On Off Time Setting 26 Sleep time Function 27 Auto Off Function 27 OPTION Menu Options Selecting Menu Language 28 Selecting Audio Language 28 Setting Caption 29 Using Blank Function 30 Selecting Blank image 30 Screen Capture Function 31 To adjust the brightness of the screen 31 To make the power of the projector turn on automatically when power...

Страница 4: ...void a fire hazard This may cause a fire hazard or damage the unit Do not place heavy objects on the power cord This may cause a fire or an electric shock hazard Do not place the projector close to sources of steam or oil such as a humidifier This may create a fire hazard or an electric shock hazard Do not place the projector where it might be exposed to exces sive dust This may cause a fire hazar...

Страница 5: ...t touch metal parts during or soon after operation since the vents will remain very hot Power WARNING Power NOTES Do not plug in too many items into one power outlet It may result in overheating of the out let and create a fire hazard Never touch the power plug with a wet hand This may cause an electric shock hazard Prevent dust from collecting on the power plug pins or outlet This may cause a fir...

Страница 6: ...l outlet and contact your dealer or service center This may cause a fire or an electric shock hazard or damage to the unit Use an air spray or soft cloth that is moist with a neutral detergent and water for removing dust or stains on the projection lens Others WARNING Do not attempt to service the projector yourself Contact your dealer or service center This may cause damage to the projector and c...

Страница 7: ...does not always indicate a malfunction Control panel Exhaustion Direction High heat keep the area near the exhaust clear Focus ring Speaker Control Panel CH CH VOL VOL MENU Button Displays or closes menus POWER Button Turns the projector ON OFF Button Adjusts functions of menus OK Button Checks present mode and saves the change of functions Do not touch the lens when using the projector or opening...

Страница 8: ...Do not block the IR port for normal operation of remote control Note that clearance is limited between the USB and HDMI inputs Using devices of a non standard size may block other ports RGB IN AUDIO IN ANTENNA IN Kensington Security System Connector Refer to page 13 DC Power IN HDMI USB ...

Страница 9: ...s Enters letters and numbers Dash Inserts a dash between numbers such as 2 1 and 2 2 FLASHBK Tunes to the last channel viewed VOL Adjusts the volume level AUTO Automatically adjusting of the PC input image RATIO Resizes an image MUTE Mutes all sounds CH Scrolls through the saved channels PAGE Moves to the previous or next screen MENU Accesses the menu INFO Views the information of the current prog...

Страница 10: ...se it may reduce the battery life significantly USB ꕗ ꕖ ꕘ ꕙ ꕚ ꕖ ꕘ ꕙ ꕚ BLANK INFOⓘ STILL Key sꔍ Key sꔌ VOL CH 1 4 7 2 5 8 0 3 6 9 1 4 7 2 5 8 0 3 6 9 FLASHBK FAV MARK RATIO MENU Q MENU ꕉ BACK AUTO OK ꔉ MUTE INPUT USB 화면가림 방송안내 정보표시 화면정지 키스톤ꔍ 키스톤ꔌ 음량 채널 이전채널 선호채널 선택 화면크기 메뉴 간편설정 ꕉ 이전 자동조정 확인 ꔉ 조용히 외부입력 페 이 지 ꕗ Remote Control AAA Batteries Owner s manual CD Owner s manual Power Cord Computer Cable AC...

Страница 11: ... may not work when a lamp equipped with electronic ballast or a three wavelength lamp is installed Replace those lamps with international standard products to use the remote control normally Do not obstruct the slots and openings of the projector This may cause overheating and cause a fire hazard The projector is equipped with ventilation holes intake on the bottom and ventilation holes exhaust on...

Страница 12: ...age will be crooked Although slight angles can be counteracted using the Keystone adjustement Refer to page 22 4 After placing the projector in its desired location connect the video input s Then connect the power cable to the projector and the wall outlet projection distance based on the picture format Projection distance D Projection offset ratio 110 38 6 mm Projection distance D Basic Operation...

Страница 13: ...s with expensive electronic equipment such as notebook PCs or projectors The Kensington Security System is an optional item Kensington Security System You can install this projector using a camera tripod When stabilizing the tripod we recommend using the locking bolt of standard size 4 5 mm or less The maximum size allowed for the locking bolt is 6 5 mm If it is longer than the maximum allowed siz...

Страница 14: ...button on the remote control The light on the control panel will be turned on Press the INPUT button on the remote control to select the input signal you want When you press the POWER button on the remote control or the POWER button on the control panel when you turn on the projector the lights for POWER and MENU buttons on the control panel will be turned on Check if the lens door is open before ...

Страница 15: ...put from laptops when the laptop screen is on How to connect Connect a RF Coaxial wire to the Wall Antenna Socket or Outdoor Antenna For Optimum picture quality adjust the antenna direction if outdoor antenna is used If the antenna needs to be split for two Projector s install a 2 Way Signal Splitter For much more information about antennas visit our Knowledgebase at http lgknowledgebase com Searc...

Страница 16: ...TV settop box with an HDMI cable 2 Set the DTV receiver s resolution to one of the following 480p 720p 1080i 1080p mode Please refer to the owner s manual of the DTV settop box for the connection between the projector and DTV set top box How to connect a Component source 1 Connect the DTV settop box Component cable with RGB to Component cable and than connect it to RGB IN of the projector When con...

Страница 17: ... the OK button 2 Press the buttons to move Auto Turning and press the OK button 3 Press the buttons to move Yes and press the OK button When setting the Auto Tuning or Manual Tuning the number of maxi mum channels you can store is 1000 It is subject to change depending on the broadcasting signal environment Memorizes all the available channels in the order of DTV TV CADTV and CATV Press the BACK b...

Страница 18: ...s the FAV button on the remote control 2 Press the button to select a channel and then press the OK button Press the CH button to turn the pages Press the BACK button to exit the menu screen Favorite Channels are a convenient feature that lets you quickly select channels of your choice without waiting for the pro jector to select all the in between channels To tune to a favorite channel press the ...

Страница 19: ...ess the BACK button to exit the menu screen Adjusting Picture Mode 1 Press the Q MENU button on the remote control 2 Press the buttons to move Picture Mode 3 Press the button to toggle through the preset picture settings Picture Mode Set the projector picture settings to your preference in the Picture Mode menu You can also use this function through the MENU button Press the BACK button to exit th...

Страница 20: ...uces screen noise without compromising video quality Gamma Low Make dark and middle gray level area of the picture brighter Medium Express original picture levels High Make dark and middle gray level area of the picture darker ꔈYou can adjust brightness of dark area and middle gray level area of the picture Black Level Low The reflection of the screen gets darker High The reflection of the screen ...

Страница 21: ... Method 2 Points Pattern Inner Outer Red Green Blue Contrast Red Green Blue Brightness The adjustment range is 50 50 b Method 20 Points IRE Pattern Inner Outer IRE Institute of Radio Engineers is the unit to display the size of the video signal and can be set among 5 10 15 95 100 You can adjust Red Green or Blue according to each setting Red Green Blue The adjustment range is 50 50 Color Managemen...

Страница 22: ...on to exit the menu screen Using Keystone Function Use this function when the screen is not at a right angle to the projector and the image is a trapezoid shape Only use the Keystone function when you can t get the best angle by moving the projector Keystone 0 ꔗ ꔃ ꔉOK CH PJT Mode Front CH Aspect Ratio 16 9 1 Press the Q MENU button on the remote control 2 Press the buttons to move PJT Mode 3 Press...

Страница 23: ...uto Config function for a still image You can also use this function through the MENU button Auto Configure Function This function assures you of getting the best video quality by automatically adjusting the horizontal size and synchronization of the image Auto Tracking function works in RGB PC input only Auto config 1 Press the MENU button Then move to SCREEN with the buttons and press the OK but...

Страница 24: ...ess the button to select a desired item Press the BACK button to exit the menu screen Digital TV 1 Press the Q MENU button on the remote control 2 Press the buttons to move Multi Audio 3 Press the button to select a desired item Press the BACK button to exit the menu screen On analog signals this projector can receive MTS stereo programs and any SAP Secondary Audio Program that accompa nies the st...

Страница 25: ...s the OK button You can adjust this function in the DTV and Cable DTV Press the BACK button to exit the menu screen 1 Press the MENU button Then move to AUDIO with the buttons and press the OK button 2 Press the buttons to move Balance and press the OK button 3 Press the buttons to adjusting audio balance and press the OK button Press the BACK button to exit the menu screen Adjust the treble your ...

Страница 26: ...utton to exit the menu screen The time is set automatically from a digital channel signal The digital channel signal includes information for the current time provided by the broadcasting station Set the clock manually if the current time is set incorrectly by the auto clock function This function operates only if the current time has been set The Of f Time function overrides the On Time function ...

Страница 27: ... Auto Off Function 1 Press the MENU button Then move to TIME with the buttons and press the OK button 2 Press the buttons to move Auto Off and press the OK but ton 3 Move to a desired item with the buttons and then press the OK button Press the BACK button to exit the menu screen This function turns the projector off automatically after the preset time is passed when there is no signal CH Sleep Ti...

Страница 28: ... menu screen 1 Press the MENU button Then move to OPTION with the buttons and press the OK button 2 Press the buttons to move Audio Language and press the OK button 3 Press the buttons to select English Spanish or French and press the OK button Press the BACK button to exit the menu screen Selecting Menu Language Selecting Audio Language ꔂMove ꔉOK OPTION Menu Language English Audio Language Englis...

Страница 29: ...ecome disabled CAPTION The term for the words that scroll across the bottom of the screen usually the audio portion of the pro gram provided for the hearing impaired TEXT The term for the words that appear in a large black frame and almost cover the entire screen usually messages provided by the broadcaster Digital Broadcasting System Captions Choose the language you want the DTV CADTV Captions to...

Страница 30: ...ge English Caption Service1 Blank Image Blue Screen Capture LED Mode Normal Auto Power Off Demo Mode Off Initial Setting Home Use 1 Press the BLANK button on the remote control The screen turns off to a background color You can choose the background color Refer to Selecting Blank image 2 Press any button to cancel the blank function To temporarily turn off the lamp press BLANK on the remote contro...

Страница 31: ...n to exit the menu screen To adjust the brightness of the screen CH LED Mode Normal 1 Press the MENU button Then move to OPTION with the buttons and press the OK button 2 Press the buttons to move Screen Capture and press the OK button It can only be selected when there is an input signal It may take up to 2 minutes to save the screen capture Press the BACK button to exit the menu screen Screen Ca...

Страница 32: ...ed 1 Press the MENU button Then move to OPTION with the buttons and press the OK button 2 Press the buttons to move Demo Mode and press the OK button 3 Press the buttons to move On and press the OK button It can be selected when Initial Setting is set as Store Demo Press the BACK button to exit the menu screen Demo Mode Function ꔂMove ꔉOK OPTION Menu Language English Audio Language English Caption...

Страница 33: ...en move to OPTION with the buttons and press the OK button 2 Press the buttons to move Initial Setting and press the OK button 3 Move to a desired item with the buttons and then press the OK button Set as Home Use when used in homes Press the BACK button to exit the menu screen Initial Setting Function ꔂMove ꔉOK OPTION Menu Language English Audio Language English Caption Service1 Blank Image Blue ...

Страница 34: ... channels ratings and other viewing sources The Parental Control Function V Chip is used to block program viewing based on the ratings sent by the broad casting station The default setting is to allow all programs to be viewed Viewing can be blocked by choosing the type of the program and the categories It is also possible to block all program viewing for a time period To use this function the fol...

Страница 35: ...and press the OK button 4 Press the buttons to move On and press the OK button When you select On the Lock System is enable Press the BACK button to exit the menu screen 1 Press the MENU button Then move to LOCK with the buttons and press the OK button 2 Press the number 0 9 to input the password 3 Press the buttons to move Set Password and press the OK button 4 Press the number 0 9 to choose any ...

Страница 36: ...y blocking out all the movies with the ratings above a specified level Keep in mind that the movie ratings limit only applies to movies shown on projector not TV programs such as soap operas Menu Description G General audience PG Parental guidance suggested PG 13 Parents strongly cautioned R Restricted NC 17 No one 17 and under admitted X Adult only Blocking Off Permits all programs ꔂMove ꔉOK LOCK...

Страница 37: ...sword 3 Press the buttons to move TV Rating General and press the OK button 4 Move to a desired item with the buttons and then press the OK button Press the BACK button to exit the menu screen TV Rating Children For USA TV Rating General For USA Prevents children from watching certain children s TV programs according to the ratings limit set The children rating does not apply to other TV programs ...

Страница 38: ...ars and younger 18ans This programs is only for adults Blocking Off Permits all programs ꔂMove ꔉOK LOCK Lock System On Set Password Block Channel TV Rating English TV Rating French Downloadable Rating Input Block 1 Press the MENU button Then move to LOCK with the buttons and press the OK button 2 Press the number 0 9 to input the password 3 Press the buttons to move TV Rating English and press the...

Страница 39: ...the OK button Press the BACK button to exit the menu screen ꔂMove ꔉOK LOCK Lock System On Set Password Block Channel Movie rating TV Rating Children TV Rating General Downloadable Rating Input Block 1 Press the MENU button Then move to LOCK with the buttons and press the OK button 2 Press the number 0 9 to input the password 3 Press the buttons to move Downloadable Rating and press the OK button 4...

Страница 40: ...utomatically Select Eject in order to eject a USB device Eject USB USB memory stick PHOTO LIST MUSIC LIST MOVIE LIST FILE VIEWER 1 Press the Q MENU button on the remote control 2 Press the buttons to move USB Device 3 Press the OK button on the remote control After Eject USB USB memory cannot be read Remove USB memory and connect again Press the BACK button to exit the menu screen CH USB Device Ej...

Страница 41: ... not offered by USB maker or an excessively long cable the device may not be recognized Some USB storage devices may not be supported or operate smoothly If the name of a folder or file is too long it will not be displayed or recognized File alignment method of USB storage device is similar to Window XP and filename can recognize up to 100 English characters Please backup important files because a...

Страница 42: ...1 Press the USB button Then move to PHOTO LIST with the buttons and press the OK button 2 Press the buttons to move a desired photo file and press the OK button 3 Move to a desired item with the buttons and then press the OK button If the picture file is damaged it may not be displayed properly High resolution pictures may take longer time to display on the entire screen Page 1 1 No Marked PHOTO L...

Страница 43: ... Use button to select the previous or next photo Slideshow Selected photos are displayed during the slide show If no photo is selected all photos in the current folder are displayed during slide show Set the time interval of the slide show in Option BGM Listen to music while viewing photos in full size Set the BGM device and album in Option Rotate Rotate photos Delete Delete photos Option Set valu...

Страница 44: ... a desired item with the buttons and then press the OK button Page 1 1 No Marked MUSIC LIST Up Folder ꔛ 00 00 05 42 Drive 1 Arirang Up Folder Good Bye Arirang 05 30 04 12 i 3945 KB 128 Kbps Play Play with Photo Mark All Delete Close Play Once a song finishes playing the next selected one will be played When there are no selected files to play the next one in the current folder will be played If yo...

Страница 45: ...beta 1 Xvid 1 10 beta 2 H 264 AVC Dolby Digital HEAAC AAC MPEG MP3 LPCM avi MPEG 2 MPEG 4 SP MPEG4 ASP DivX 3 11 DivX 4 DivX 5 DivX 6 Xvid 1 00 Xvid 1 01 Xvid 1 02 Xvid 1 03 Xvid 1 10 beta 1 Xvid 1 10 beta 2 H 264 AVC Dolby Digital HEAAC AAC MPEG MP3 LPCM mkv H 264 AVC MPEG 1 MPEG 2 MPEG 4 SP MPEG4 ASP Dolby Digital HEAAC AAC MPEG MP3 LPCM divx MPEG 2 MPEG 4 SP MPEG4 ASP DivX 3 11 DivX 4 DivX 5 Di...

Страница 46: ...oppage faster playback etc when the audio language is changed Movie files other than the specified types and formats may not work properly Max bitrate of playable movie file is 20Mbps Files encoded with GMC Global Motion Compensation may not be played When you are watching the movie by Movie List function user setup for each image mode does not operate Only the files saved in ASCII CODE is support...

Страница 47: ...Then move to MOVIE LIST with the buttons and press the OK button 2 Press the move to a desired movie file and press the OK button 3 Move to a desired item with the buttons and then press the OK button Play Play the selected movie titles In the case of files not supported a message regarding non supported file is displayed The screen is played but when the audio file is not supported the following ...

Страница 48: ...r 16 9 screen size ꔈPicture Mode Select the Vivid Standard Cinema Sport or Game ꔈ Audio Language Select Language Group of the audio during movie play ꔈ Subtitle Language Select Language Group of the subtitle during movie play Subtitle language option can be differ according to choice of the language for menu Sync When the video is not synchronized with the caption it can be adjusted by the unit of...

Страница 49: ...sed at www divx com vod Deactivation Function 1 Press the MENU button Then move to USB with the buttons and press the OK button 2 Press the buttons to move Deactivation and press the OK button 3 Move to a desired item with the buttons and then press the OK button DRM Digital Rights Management function These are the technology and the service that prevents the illegal use of digital contents to pro...

Страница 50: ...lower during the realigning process If the document volume is big or it has many pages loading may take long time Unsupported fonts may be replaced with other fonts View File 1 Press the USB button Then move to FILE VIEWER with the buttons and press the OK button 2 Press the move to a desired file and press the OK button Menu Go Page Zoom Hide Use Page CH button to move the previous or next page G...

Страница 51: ...oduct to lightly clean the product Please use a recommended air spray or lens cleaning product To clean lens small amount of cleaning agent on a swab or a soft cloth and rub on the lens Please be aware that liquid may flow pass through the lens if the product is sprayed on lens directly Cleaning the Projector Case To clean the projector case first unplug the power cable To remove dirt or dust wipe...

Страница 52: ...G SD B191A 19 5 V 5 64 A Audio Output 1 W 1 W Television System NTSC M ATSC 64 256 QAM Program Coverage VHF 2 13 UHF 14 69 CATV 1 135 DTV 2 69 CADTV 1 135 External Antenna Impedance 75 Ω Height mm 57 5 without foot 61 0 with foot Width mm 160 Length mm 134 5 Weight g 790 USB Device 5 V 0 5 A max Operating Condition Temperature In operation 0 C 40 C presentation mode 0 C 37 C In storage and transit...

Страница 53: ...right 2004 Glenn Randers Pehrson OSSP str String Handling copyright 1999 2005 Ralf S Engelschall rse engelschall com copyright 1999 2005 The OSSP Project http www ossp org random number generator copyright 1990 1993 The Regents of the University of California Standard C functions copyright 1998 Softweyr LLC copyright 1988 1993 The Regents of the University of California tinyxml copyright 2000 2006...

Страница 54: ...ojector is located on the back or one side of the projector Record it below should you ever need service MODEL SERIAL LG Customer Information Center 1 800 243 0000 1 888 865 3026 1 888 542 2623 USA Consumer User USA Commercial User CANADA ...

Отзывы: