Copyright © 2010 LG Electronics Inc. All rights reserved.
Only for training and service purposes
- 7 -
LGE Internal Use Only
6. EDID Data Download
6-1. Used Device
Adjustment remote control
6-2. Adjustment Method
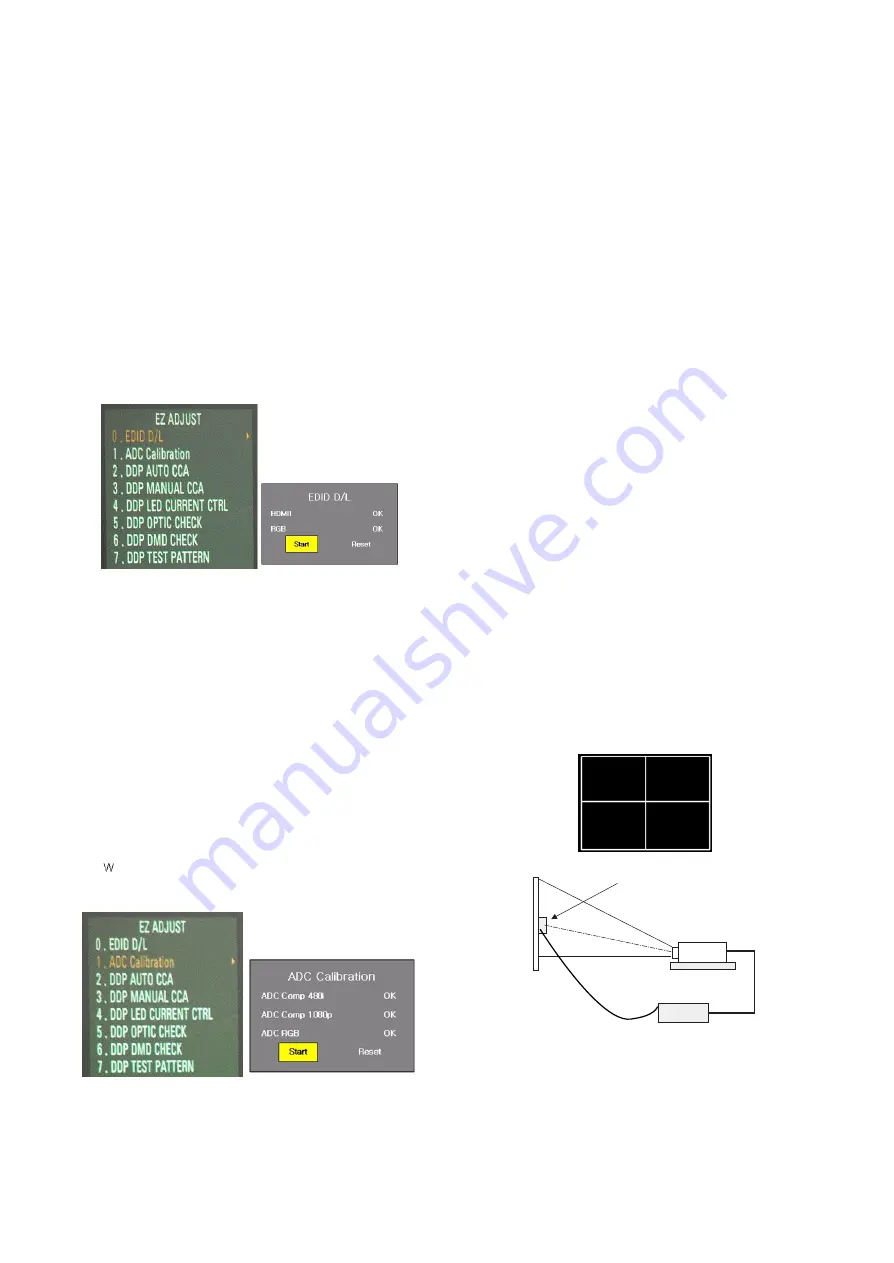
(1) Enter to adjustment mode with selecting “ADJ” on remote
control.
(2) Enter to “0. EDID D/L”. with pressing right direction key to
get in EDID Download adjustment menu (Fig. 6-1)
(3) Select “START”
(4) When adjustment is completed, check RGB “OK”, HDMI1
“0K”. (Fig. 6-2)
When it fails, Reset and check by trying the (3) process
again.
(5) When getting out, press “ADJ” on remote control.
7. ADC Adjustment
7-1. Used Device
Adjustment remote control
Master equipment
7-2. Adjustment Method
- Input before adjusting : Component ,Signal : Set as 480i
(Model : 209, Pattern : 65)
(1) Enter to adjustment mode with selecting “ADJ” on remote
control.
(2) Enter to “1. ADC CALIBRATION” with pressing right
direction key to get in ADC adjustment menu (Fig. 7-1)
(3) Select “START” . (Fig. 7-2)
(4)
hen adjustment is completed, check ADC Comp 480i
“OK”, ADC Comp 1080p “0K”, ADC RGB “0K”. (Fig. 7-2)
If it fails, Reset and check by re-trying (3) process.
8. Check ADC/EDID adjustment
8-1. Used Device
Adjustment remote control 1EA
8-2. EDID Adjustment Method
(1) Enter to adjustment mode with selecting “ADJ” on remote
control. (Input Password ‘0000’)
(2) Enter to “0. EDID D/L” with pressing right direction key
(3) Check if RGB is set as “OK””, and HDMI1 is set as “0K”.
(Fig. 6-2)
(4) When getting out, press “ADJ” on remote control.
8-3. ADC Adjustment Method
(1) Enter to “1. ADC CALIBRATION” with pressing right
direction key to get in ADC control menu.
(2) Check ADC Comp 480i is set as “OK”, and ADC Comp
1080p as “0K”, ADC RGB as “0K”.(Fig. 7-2)
(3) When getting out, press “ADJ” on remote control.
9. White Balance Adjustment
9-1. Used Device
(1) Illuminometer (Model : CL-200) 1EA : Chromaticity
measurement from projection screen center
(2) Remote control 1EA
(3) CL200 and SET connection Interface Board 1EA
(4) CL200 Uart Communication Cable 1EA
9-2. Equipment Composition
HX300 model projects 110% upside, so user needs to be
careful when setting CL-200 in the center of screen.
(When it enters ADJUST -> 7. DDP TEST PATTERN, the
center adjustment pattern is displayed.)
(Fig.6-1) Adjustment Menu when ADJ is selected (Left)
(Fig.6-2) Selection Category on ADJ Adjustment Menu (Right)
(Fig. 7-1) Selection Category on ADJ Menu (Left)
(Fig. 7-2) Selection Category on ADJ Adjustment Menu (Right)
CL-200
SCREEN
Projector
Set fixing device
RS232C
Interface board
(Fig. 9-1) Equipment Composition
Содержание HX300G
Страница 22: ......
Страница 28: ...5 51 USB Ext HDD Memory card USB Memory 1 HX300 Features Using USB 2 0 DivX HD HD HD ...
Страница 37: ...14 51 R G B 2 SET Assembly Diagram Cabling 1 LED cable LED Cable R LED Cable B LED Cable G LED Power CONNECTOR ...
Страница 44: ...21 51 Engine Assembly Composition Engine Assembly Composition 2 SET Assembly Diagram Engine Ass y Shaping ...
Страница 57: ...S W Download Guide ...
Страница 61: ...38 51 4 Click next button HX300 DPP6400 SUB S W Download Tool ...
Страница 62: ...39 51 5 Click next button HX300 DPP6400 SUB S W Download Tool ...
Страница 63: ...40 51 6 Click next button HX300 DPP6400 SUB S W Download Tool ...
Страница 64: ...41 51 6 Click finish button HX300 DPP6400 SUB S W Download Tool ...
Страница 66: ...43 51 3 Separate Back cover as below HX300 DPP6400 SUB S W Download Tool ...
Страница 69: ...46 51 6 Click DLP Composer Lite Tool HX300 DPP6400 SUB S W Download Tool ...
Страница 70: ...47 51 7 Edit Æ Preferences click 8 Establish by USB in Communications item HX300 DPP6400 SUB S W Download Tool ...
Страница 73: ...50 51 Click yes Y Downloading 1 13 HX300 DPP6400 SUB S W Download Tool ...


