background image

Getting Started

8

Ge
tting S

tar

ted

1

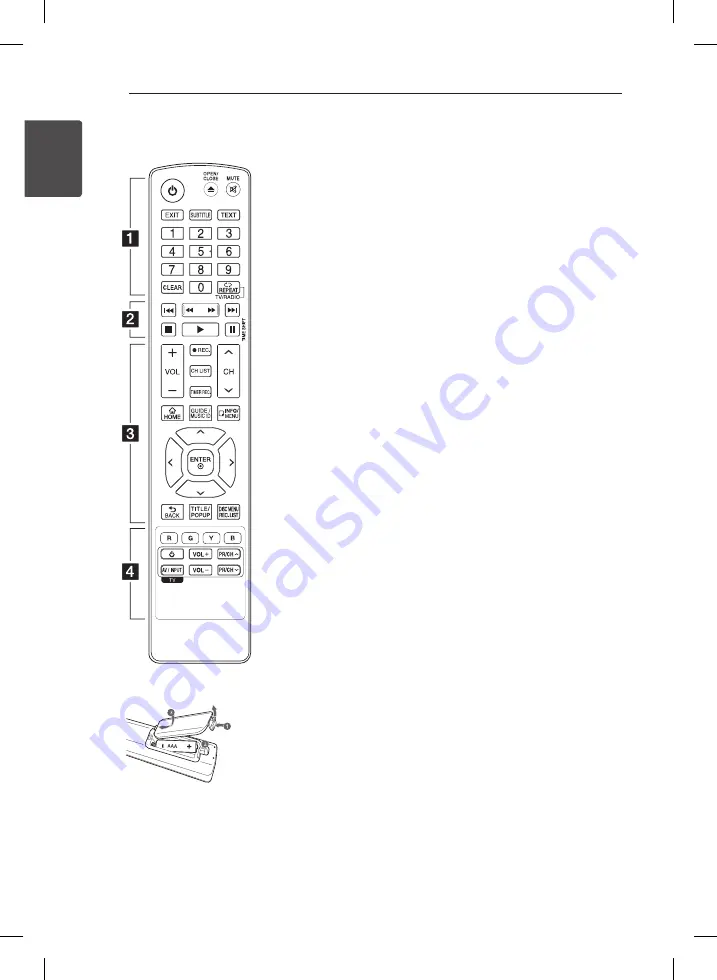
Replacement of battery

(R03)

Remove the battery cover on the 
rear of the Remote Control, and 
insert two R03 (size AAA) batteries 
with 

4

 and 

5

 matched correctly.

•  •  •  •  •  •  

a

 •  •  •  •  •  •

1


(POWER):

 Switches the player 

ON or OFF.

B

 (OPEN/CLOSE):

 Opens and 

closes the disc tray.

MUTE (

@

)

: Mutes the sound.

EXIT:

 Exits a menu or hides on-

screen information.

SUBTITLE:

 Selects a subtitle 

language.

TEXT:

 Switches between 

teletext mode and normal TV 
viewing.

0-9 numerical buttons:

 Selects 

numbered options in a menu.

CLEAR:

 Removes a mark on the 

search menu or a number when 
setting the password.

REPEAT (

h

):

 Repeats a desired 

section or sequence.

TV/RADIO: 

Switches between 

TV and radio modes.

•  •  •  •  •  •  

b

 •  •  •  •  • 

c/v

 (SCAN):

 Searches 

backward or forward.

C/V

 (SKIP):

 Goes to the 

next or previous chapter / track / 
file. 

Z

 (STOP):

 Stops playback.

d

 (PLAY):

 Starts playback.

M

 (PAUSE):

 Pauses playback.

TIME SHIFT:

 Activates pause 

live TV/playback (timeshift) for a 
live TV programme.

•  •  •  •  •  •  

c

 •  •  •  •  • 

VOL (-/+): 

Adjusts the sound 

level of the unit.

REC. (

X

): 

Starts recording.

CH LIST:

 Displays the Channel 

list.

TIMER REC.:

 Displays [Timer 

Recording] menu.

CH (

W/S

)

:

 Scans up or 

down through memorized 
programmes.

HOME (

n

):

 Displays or exits the 

[Home Menu].

GUIDE:

 Displays the EPG menu.

MUSIC ID:

 When connected 

to the network, can provide 
information about the current 
song while video playback.

INFO/MENU (

m

):

 Displays or 

exits On-Screen Display.

Direction buttons:

 Selects an 

option in the menu.

ENTER (

b

):

 Acknowledges menu 

selection.

BACK (

1

):

 Exits the menu or 

BACKs to the previous screen.

TITLE/POP UP:

 Displays the DVD 

title menu or BD-ROM’s pop-up 
menu, if available.

DISC MENU/REC.LIST: 

Accesses 

menu on a disc or switches 
between recording list menu.

•  •  •  •  •  •  

d

 •  •  •  •  • 

Coloured (R, G, Y, B) buttons:


Use to navigate BD-ROM menus. 
They are also used for [MOVIE], 
[PHOTO], [MUSIC], [Premium], [LG 
Apps] and [DTV] menu.

TV Control Buttons:

 Refer to the 

maual on the supplied CD-ROM 
disc.

Remote control

Содержание HR931C

Страница 1: ... Blu ray Disc DVD Player with built in HDD HD Tuner Please read this manual carefully before operating your set and retain it for future reference HR931C HR932C HR933C HR935C HR939C ENGLISH DEUTSCH FRANÇAIS ITALIANO ...

Страница 2: ...s radiation exposure To prevent direct exposure to laser beam do not try to open the enclosure CAUTION concerning the Power Cord Most appliances recommend they be placed upon a dedicated circuit That is a single outlet circuit which powers only that appliance and has no additional outlets or branch circuits Check the specification page of this owner s manual to be certain Do not overload wall outl...

Страница 3: ...elevant provisions of Directive 1999 5 EC 2004 108 EC 2006 95 EC 2009 125 EC and 2011 65 EU Please contact to the following address for obtaining a copy of the DoC Declaration of Conformity Contact office for compliance of this product LG Electronics Inc EU Representative Krijgsman 1 1186 DM Amstelveen The Netherlands y y Please note that this is NOT a Customer Service contact point For Customer S...

Страница 4: ...From time to time performance improvements and or additional features or services may be made available to units that are connected to a broadband home network If there is new software available and the unit is connected to a broadband home network the player will inform you about the update as follows Option 1 1 The update menu will appear on the screen when you turn on the player 2 Use A D to se...

Страница 5: ...disc USB device 15 Basic operations for video and audio content 15 On Screen display 4 Troubleshooting 16 Troubleshooting 17 Customer Support 17 Open source software notice 5 Appendix 18 Trademarks and Licenses 20 MediaHome 4 Essentials 20 System requirements 21 Installing Nero MediaHome 4 Essentials 22 Sharing files and folders 23 Specifications To view the Owner s Manual on the CD ROM Load the s...

Страница 6: ...such as movies that can be purchased or rented y y Video mode and finalized only y y Supports the dual layer disc also o Finalized AVCHD format y u i y y DVD R RW discs that contain Video Audio or Photo files y y ISO 9660 JOLIET UDF and UDF Bridge format DVD RW VR 12 cm r VR mode and finalized only Audio CD 12 cm t Audio CD CD R RW 8 cm 12 cm y u i y y CD R RW discs that contain Video Audio or Pho...

Страница 7: ... playback only H 264 MPEG 4 AVC DIVX HD MPEG1 SS MPEG2 PS MPEG2 TS Dolby Digital DTS MP3 WMA AAC AC3 SubRip srt txt SAMI smi SubStation Alpha ssa txt MicroDVD sub txt SubViewer 1 0 sub SubViewer 2 0 sub txt TMPlayer txt DVD Subtitle System txt Music files File Location File Extension Sampling Frequency Bitrate Note Disc USB DLNA PC mp3 wma wav m4a DRM free between 8 48 kHz WMA within 11 48 kHz MP3...

Страница 8: ...SE Pauses playback TIME SHIFT Activates pause live TV playback timeshift for a live TV programme c VOL Adjusts the sound level of the unit REC X Starts recording CH LIST Displays the Channel list TIMER REC Displays Timer Recording menu CH W S Scans up or down through memorized programmes HOME n Displays or exits the Home Menu GUIDE Displays the EPG menu MUSIC ID When connected to the network can p...

Страница 9: ...gram use the USB port on the rear panel of the unit a ANTENNA IN b USB Port If you want to record on external HDD connect external HDD to unit c LAN port d HDMI OUT TO TV e OPTICAL DIGITAL AUDIO OUT f AC IN connector Connect the supplied power cord g ANTENNA OUT TO TV h COMMON INTERFACE Slot for external Conditional Access CA module and smart card used to decode scrambled channels This device work...

Страница 10: ...a to the ANTENNA IN jack on the unit If you want to use an indoor antenna use one with a signal amplifier rated at 5V 100mA and set Antenna 5V to ON in the setup menu TV CABLE Outlet RF Cable Rear of this unit TV ANTENNA HDMI Connection If you have a HDMI TV or monitor you can connect it to this unit using a HDMI cable Type A High Speed HDMI Cable Connect the HDMI jack on the unit to the HDMI jack...

Страница 11: ...using Setup menu 1 Press HOME n 2 Use A D to select the Setup and press ENTER b The Setup menu appears 3 Use W S to select DISPLAY option then press D to move to the second level 4 Use A D to select the Resolution option then press ENTER b to move to the third level 5 Use W S to select the desired resolution then press ENTER b to confirm your selection ...

Страница 12: ...the local area network LAN via wired connection this player will automatically be allocated an IP address After making the physical connection a small number of home networks may require the player s network setting to be adjusted Adjust the NETWORK setting as follow Preparation Before setting the wired network you need to connect the broadband internet to your home network 1 Select Connection Set...

Страница 13: ...TER b to complete the network connection 7 If you select Test and press ENTER b at step 5 above the network connection status is displayed on the screen You can also test it on the Connection Status in the Setup menu Settings Adjust the Setup Settings You can change the settings of the player in the Setup menu 1 Press HOME n 2 Use A D to select Setup and press ENTER b The Setup menu appears 3 Use ...

Страница 14: ...For most Audio CD BD ROM and DVD ROM discs playback starts automatically 3 Press HOME n 4 Select Movie Photo or Music using A D and press ENTER b 5 Select the Disc using W S and press ENTER b While navigating Movie Photo or Music menu press green G colored button to change the device DISC USB or HDD 6 Select a file using W S A D and press d PLAY or ENTER b to play the file y y Playback functions d...

Страница 15: ...he previous chapter track file In the file list menu of a server there may have many types of contents in a folder together In this case press C or V to go to the previous or next content with same type On Screen display You can display and adjust various information and settings concerning the content BD DVD AVCHD MOVIE MOVIE N REC 1 During playback press INFO MENU m to show various playback info...

Страница 16: ...not record successfully y y Check the remaining space on the HDD y y If your source is copy protected you cannot record it using this recorder y y If you set a DTV rating for the recorder and higher rated digital programs are received the programme cannot be recorded Change the DTV rating level in order to record it Timer record does not record successfully y y Clock is not set to correct time y y...

Страница 17: ...yer s HDMI OUT jack is connected to a DVI device The DVI jack does not accept audio signal y y Check the device connected to the player s HDMI OUT jack is compatible with the audio format output from the unit BD LIVE feature does not work y y The connected USB storage may not have enough space Connect the USB storage with at least 1GB free space y y Ensure that the unit is correctly connected to t...

Страница 18: ...he AVCHD logo are trademarks of Panasonic Corporation and Sony Corporation Manufactured under license under U S Patent s 5 451 942 5 956 674 5 974 380 5 978 762 6 226 616 6 487 535 7 212 872 7 333 929 7 392 195 7 272 567 other U S and worldwide patents issued pending DTS is a registered trademark and the DTS logos Symbol DTS HD and DTS HD Master Audio are trademarks of DTS Inc 1996 2008 DTS Inc Al...

Страница 19: ... Data the Gracenote Software and the Gracenote Servers including all ownership rights Under no circumstances will Gracenote become liable for any payment to you for any information that you provide You agree that Gracenote Inc may enforce its rights under this Agreement against you directly in its own name The Gracenote service uses a unique identifier to track queries for statistical purposes The...

Страница 20: ...ntials is a software for sharing video audio and photo files stored on your computer to this player as a DLNA compatiable digital media server y y The Nero MediaHome 4 Essentials CD ROM is designed for PCs and should not be inserted in this player or in any product other than a PC y y The supplied Nero MediaHome 4 Essentials CD ROM is a customized software edition only for sharing files and folder...

Страница 21: ...re that may be running 2 Insert the supplied CD ROM disc into your computer s CD ROM drive 3 Click Nero MediaHome 4 Essentials 4 Click Run to start installation 5 Click Nero MediaHome 4 Essentials The installation is prepared and the installation wizard appears 6 Click the Next button to display the serial number input screen Click Next to go to the next step 7 If you accept all conditions click I...

Страница 22: ...e field The Network name you enter will be recognized by your player 3 Click Shares icon on the left 4 Click Local Folders tab on the Shares screen 5 Click Add icon to open the Browse Folder window 6 Select the folder containing the files you want to share The selected folder is added to the list of shared folders 7 Click Start Server icon to start the server y y If the shared folders or files are...

Страница 23: ... standard Type A OPTICAL DIGITAL AUDIO OUT 3 V p p Optical jack x 1 ANTENNA IN Antenna input 75 Ω USB Port 4 pin USB 2 0 standard x 2 System Laser Semiconductor laser wavelength 405 nm 650 nm Signal system Standard PAL NTSC colour TV system Frequency response 20 Hz to 20 kHz 48 kHz 96 kHz 192 kHz sampling Signal to noise ratio More than 100 dB Analogue OUT connectors only Harmonic distortion Less ...

Страница 24: ...ner s Manual that contains information on the advanced features is located on the CD ROM provided in an electronic version To read these files you will need to use a Personal Computer PC equipped with a CD ROM drive ...

Отзывы: