background image


Do not block any of these vents 

with food packages.

   If the vents are blocked, airflow will be interruped and
   temperature and moisture problems may occur.

IMPORTANT:

Because air circulates between both sections, any odors
formed in one section will transfer to the other. You must
thorougly clean both sections to eliminate odors.
To prevent odor transfer and drying out food, wrap or
cover foods tightly. (See the Food Storage Guide 
section for details.) 

Note:

 If you 

close the 
refrigerator 
forcefully, the 
freezer
door may open 
and close again 
due to pressure 
from internal air 
flow.


NEXT

1. Clean your refrigerator thoroughly and wipe off dust
    accumulated during shipping.
2. Install accessories such as ice cube bin, drawers, 
    shelves, etc., in their proper places. They are packed
    together to prevent possible damage during shipment.
3. Let your refrigerator run for at least 2 or 3 hours 
    before putting food in it. Check the flow of cold air in 
    the freezer compartment to ensure proper cooling.
    Your refrigerator is now ready for use.

USING YOUR REFRIGERATOR 

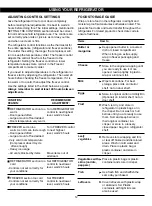
ENSURING PROPER AIR CIRCULATION

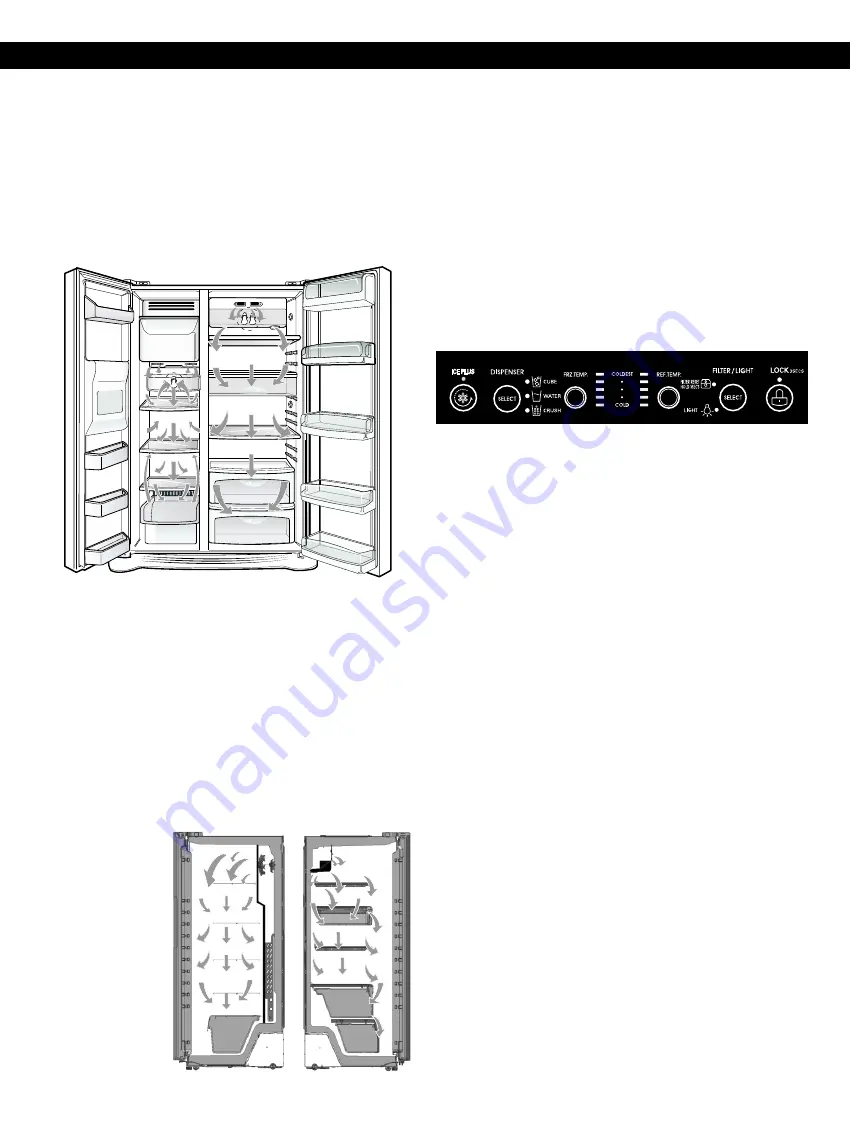
In order to ensure proper temperatures, air must flow
between the refrigerator and freezer sections. As shown 
in the illustration below, cool air enters through the 
refrigerator of the freezer section and moves up. Most of 
the air then flows through the freezer section vents and 
recirculates under the freezer floor. The rest of the air 
enters the refrigerator section through the top vent.

SETTING THE CONTROL

Display Off Mode
 

The display lights up and stays lit when the refrigerator 
is plugged in. You can change the display so that it lights 
up only when the door is opened. Press "FRZ.TEMP." 
and "ICE PLUS" buttons at the same time for 5 seconds. 
A tone will sound indicating that the display is Off. Once 
in Display Off mode, display only lights when door is 
opened or display button is pressed. Display turns off 30 
seconds after door is closed or by pressing display 
button a second time. Deactivate Display Off Mode in 
same manner as activation. 

REFRIGERATOR AND FREEZER 
CONTROLS:

Initially set the refrigerator and freezer controls 
to the recommended (middle) settings by 
pressing (REF.TEMP. Graphic) and (FRZ.TEMP. 
Graphic).

NOTE:

 When changing control settings, wait 

24 hours before making additional adjustments.
After 24 hours, adjust the compartments 
temperatures as desired. The more lit bars, the 
colder the refrigerator and freezer will be.

10

Содержание GM-L273UQGM

Страница 1: ...IGERATOR GM L279UTGM GM L273UQGM Owner s Manual Manual de Usuario Lea detenidamente estas instrucciones antes de utilizar el refrigerador y guárdelas como referencia para el futuro REFRIGERADOR GM L278USGM ...

Страница 2: ...13 Refrigerator Shelves 13 Ice Storage Bin Removal 14 Ice Storage Bin 14 Door Rack and Support 14 Water Filter 14 15 Care and Cleaning 16 18 General Cleaning Tips 16 Outside 16 Inside Walls 16 Door Liners and Gaskets 16 Plastic Parts 16 Back Cover 16 Lamp Replacement 17 Power Interruptions 17 When you go on vacation 17 When you move 18 Operations Instructions 18 When You Should Set The Icemaker Po...

Страница 3: ...recommend that any servicing be performed by a qualified individual Before replacing a burned out light bulb unplug the refrigerator or turn off power at the circuit breaker or fuse box in order to avoid contact with a live filament A burned out light bulb may break when being replaced NOTE Setting either or both controls to the OFF position does not remove power to the light circuit Do not store ...

Страница 4: ...pending on the model to OFF and then disconnect the refrigerator from the electrical source When you are finished reconnect the refrigerator to the electrical source and reset the control thermostat refrigerator control or freezer control depending on the model to the desired setting WARNING POWER CORD REPLACEMENT If the power cord is damaged it must be replaced by the manufacturer by our service ...

Страница 5: ...own below may not match your model Refrigerator Door Rack Dairy Corner J L M K Refrigerator Shelf Freezer Door Rack Freezer Shelf Drawer B C D A E Vegetable Drawer F G I For storage of ice cubes made by the icemaker Do not store anything except ice in the ice bin For storage of dairy products such as butter and cheese Freezer Lamp Base Grille Snack Pan For storage of meat or fresh food Water Filte...

Страница 6: ...cm from adjacent items and surfaces 2 5 08 cm WARNING Be careful when you work with hinge base grille stopper etc You may be injured Do not put hands or metal sticks into air vents base grille or bottom or refrigerator You may be injured or receive an electrical shock Remove tape and any temporary labels from your refrigerator before using Do not remove any warning type labels the model and serial...

Страница 7: ...ugh a narrow opening If necessary follow the directions below to remove the door handles NOTE If Loosen the set screws with a 3 32 2 38 mm Allen wrench and remove the handle the handle mounting fasteners need to be tightened or moved use a 1 4 6 35 mm Allen wrench Mounting fasteners Set screw Allen Wrench CAUTION When lifting the hinge free of the latch be careful that the door does not fall forwa...

Страница 8: ...place the door onto the lower hinge pin 1 Open the door Remove the top hinge cover screw 1 2 Use a flat blade screwdriver to pry back the hooks not shown on the cabinet underside of the cover 2 Lift up the cover 3 Disconnect all the wire harnesses 3 4 Remove the grounding screw 4 5 Rotate hinge lever 5 counterclockwise Lift the top CAUTION When lifting the hinge free of the latch be careful that t...

Страница 9: ...Adjust the level when the refrigerator door is lower than the freezer door during the installation of the refrigerator Tools you need Wrench 5 16 in 8 mm AFTER LEVELING THE DOOR HEIGHT Make sure the front leveling legs are completely touching the floor difference Height difference Height difference Height difference Height difference Using a 19 mm wrench turn the keeper nut clockwise to lossen the...

Страница 10: ...peratures air must flow between the refrigerator and freezer sections As shown in the illustration below cool air enters through the refrigerator of the freezer section and moves up Most of the air then flows through the freezer section vents and recirculates under the freezer floor The rest of the air enters the refrigerator section through the top vent SETTING THE CONTROL Display Off Mode The di...

Страница 11: ...ycle There is a replacement indicator light for the water filter cartridge on the dispenser Water filter needs replacement once every six months Filter light comes on to let you know when to replace filter After the filter press and hold the lock button more than 3 seconds FILTER RESET HOLD 3 SECS text turn off filter light Whenever pressing button setting is repeated in order Freezer Compartment ...

Страница 12: ...ns FREEZER section too cold Controls not set correctly for your conditions Turn REFRIGERATOR control to next highest level wait 24 hours Move items out of airstream Turn FREEZER control to next highest level wait 24 hours Set REFRIGERATOR control to next lower level wait 24 hours Set FREEZER control to next lower level wait 24 hours FOOD STORAGE GUIDE Wrap or store food in the refrigerator in airt...

Страница 13: ...ur freezer will not quick freeze any large quantity of food Do not put more unfrozen food into the freezer than will freeze within 24 hours no more than 2 to 3 lbs of food per cubic foot 0 9 to 1 35 kg per cubic meter of freezer space Leave enough space in the freezer for air to circulate around packages Be careful to leave enough room at the front so the door around packages Storage times will va...

Страница 14: ... door rack holding both sides and pull it out in direction 3 After dispenser is used The water collector has no self draining function It should be cleaned regularly Remove the cover by pulling the front side of water collector cover and dry it with a cloth Holes Ribs SNACK PAN Air is entered in the refrigerator when the door is open unaffected cold meat due to the position of this tray To remove ...

Страница 15: ...s to the Icemaker follow these steps 1 2 Lift the ice shelf as shown in the right figure and pull it out Car e an d Mai n t enance REFRIGERATOR SHELVES The refrigerator compartment shelf is adjustable so that you can place it at a height according to space requirement of foods Fixed shelf Lightly lift up the front part of shelf to pull it ahead then take it out while lifting the rear part of shelf...

Страница 16: ...clockwise to lock it into place The locked symbol will be lined up with the indicator arrow WATER FILTER Before removing or installing water filter 1 Take out the top shelf and move it to the lowest level 2 Remove the lamp cover by pressing the tab under the cover and pulling cover to the front 3 IMPORTANT Turn off household water supply A After installing water filter a Replace the cover lamp and...

Страница 17: ...e Do not use wax stainless steel exteriors Use a product specially designed for polishing stainless steel appliances or clean with a soft cloth or clean sponge and a mild detergent dissolved in warm water Dry thoroughly with a soft cloth NOTE Avoid door surface contact with chemical products that contain Phosphate or Chlorine Do not use cleaning waxes concentrated detergent bleaches or cleaners co...

Страница 18: ...s vegetables and prepared foods The eating quality of red meats is affected less than that of many other foods Use refrozen foods as soon as possible to save as much of their quality as you can If you choose to leave the refrigerator ON while you are away follow these steps to prepare your refrigerator before you leave 1 Use up any perishables and freeze other items 2 Empty the ice bin 3 Turn OFF ...

Страница 19: ... the cubes DO NOT place fingers or hands on the automatic icemaking mechanism while the refrigerator is plugged in WARNING operating conditions Test Switch Feeler Arm 19 Power Switch ON OFF The icemaker will fill with water when it cools to freezing A newly installed refrigerator may take 12 to 24 hours to begin making ice cubes Throw away the first few batches of ice to allow the water line to cl...

Страница 20: ...r 1 4 bar and 8 2 bar on models without a water filter and between 0 275 and 0 82 MPa 40 and 120 PSI or 2 8 Power drill Adjustable Wrench Flat head and Phillips screwdrivers 12 7 mm or Two 1 4 6 35 mm outer diameter compression nuts and 2 Ferrules sleeves to connect the copper tubing to the shutoff valve and the If your existing copper water line has a flared fitting at the end you will need an ad...

Страница 21: ... sufficient extra tubing about 8 feet 244 mm coiled into 3 turns of about 10 25 cm diameter to allow the refrigerator to move out from the wall after installation Vertical Cold Water Pipe Saddle Type Shutoff Valve Pipe Clamp Washer Inlet End Pipe Clamp Clamp Screw 7 CONNECT THE TUBING TO THE VALVE Place the compression nut and ferrule sleeve for copper tubing onto the end of the tubing and connect...

Страница 22: ...lugged into the wall outlet If your refrigerator does not have a water filter we recommend installing one If your water supply has sand or particles that could clog the screen of the refrigerator s water valve Install the filter in the water line near the refrigerator 1 Remove the plastic flexible cap from the refrigerator connection Do not uses old hoses only uses new hoses provided by the manufa...

Страница 23: ... floor walls and cabinets can make the sounds seem louder than they actually are The following describes the kinds of sounds and what may be making them The defrost timer will click when the automatic defrost cycle begins and ends The thermostat control or refrigerator control depending on the model will also click when cycling on and off Rattling noises may come from the flow of refrigerant the w...

Страница 24: ...eep food organized so it is easy to find and close the door as soon as the food is removed The refrigerator was recently plugged in and The refrigerator will take up to 24 hours to cool See the SETTING THE CONTROL section surrounding conditions The doors are not closed completely Push the doors firmly shut If they will not shut all the way see Doors will not close completely below The condenser co...

Страница 25: ...ube size using cube size selector Water shutoff valve connecting refrigerator to water Call a plumber to clear the valve line may be clogged Check if Then Check if Then Check if Then opens more easily AUTOMATIC ICEMAKER DOES NOT WORK Icemaker power switch in the O off position Move the switch to the I on position Water supply turned off or not connected See the CONNECTING THE WATER LINE section Fr...

Страница 26: ...ts to form on the back wall after the refrigerator self defrosts The doors are not closing completely See Doors will not close completely The doors are opened often When the door is opened warm humid air is allowed into the refrigerator The more the door is opened the faster the humidity builds up and the more warm air the refrigerator must cool In order to keep the refrigerator cool try to get ev...

Страница 27: ...to eliminate taste and odor problems The interior of refrigerator needs cleaning See CARE AND CLEANING section Ice storage bin needs cleaning Empty and wash bin Discard old cubes THERE IS WATER IN THE DEFROST DRAIN PAN The refrigerator is defrosting The water will evaporate It is normal for water to drip into the defrost pan It is more humid than normal Expect that the water in the defrost pan wil...

Страница 28: ...hts and you may also have other rights which vary from state to state LIMITED WARRANTY THE ABOVE WARRANTY DOES NOT APPLY TO 1 Service trips to your home to deliver and pickup install instruct or replace house fuses or correct house wiring or plumbing or correction of unauthorized repairs 2 Damage to the product caused by accident pests fire floods or acts of God 3 Repairs when your LG product is u...

Страница 29: ... MFL58393903 ...

Отзывы: