LG GC-051 Скачать руководство пользователя страница 3

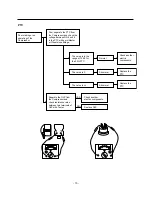
AIR RECHARGING IN COMPRESSOR

Test the refrigeration system connecting it electrically before
refilling operation. It is necessary to ascertain the function
of the motor-compressor and identify the defects
immediately. If defects have been found, empty the old
system of possible R-134a residue by breaking off the end
of the extension piece at its narrow point. (Figure 1)
Replace the filter and any damaged components. Unsolder
and pull off the piece remaining inside the service tube and
then attach an complete extension with male Hansen and
at last, solder it to the same tube again. (Figure 2)

It is necessary to execute the soldering operation with
valve open so that the fumes caused by oil residue can
come out freely without blowholes between two tubes
during the heating the of the point to be soldered.
The extension fitted with the male Hansen is connected to
the female fitting of the vacuum pump tube. (Figure 3)

Air evacuating from the system begins as soon as the
pump starts. The refrigeration system must be kept under
vacuum until the reading on the low-pressure gauge
indicates vacuum (0 absolute, -1 atm., -760 mm hg) in any
case it is advisable to keep the pump running for about 30
minutes. (Figure 3)
In case that a considerable leakage occurs it will be
necessary to stop the vacuum pump and to add asmall
quantity of Freon to the system, if vacuum should not be
obtained (pressure gauge can't fall to 1 atmosphere), start
the refrigeration unit and find the leakage with the special
leak-finder. When the defective soldering point is visible,
re-do it after opening the extension tube valve and
reestablishing the normal outside pressure inside the
group.
Because the melted alloy is sucked into the tubes and
block them, the pressure must be rebalanced when
vacuum is in the system in soldering. As soon as the

vacuum operation is over, add the quantity in grams of 
R-134a to the refrigeration system. Remember that every
system has an exact quantity of R-134a with a tolerance of
±5 grams that can be added. (Figure 4)

Before performing this operation (if the vacuum pump and
refilling cylinder are connected), make sure that the valve
placed between the vacuum pump and the refilling tube are
closed in order to keep the Freon for addition to the system.
(Figure 5)

In addition, check the graduated scale on the cylinder for
the quantity of R-134a to be added, for example, if we
have 750 grams of Freon in the cylinder and must add 140
grams to the group, this amount will be reached when 
R-134a has dropped to 610 grams, remembering that the
indicator shows a lower limit of meniscus. Do this after
choosing the scale corresponding to the gas pressure
different scales reported as the same gas pressure
indicated by the pressure gauge on the top of the column.
To make R-134a flow into the system, open the valve
placed at the base of the cylinder and connected to the
filling tube. The amount of Freon cannot be added to the
system all at once because it may cause a blocking of motor-
compressor. Therefore, proceed by adding the original
quantity of about 20-30 grams and close the valve
immediately.
The pressure rises and the motor compressor must start
sucking the gas and lowering the pressure again. Regulate
the valve again, maintaining the same manner until
reaching to the quantity of R-134a established for the
system being charged. When the system is running, the
suction pressure must be stabilized between 0.30 to
0.6(0.10 to 0.4) atmosphere.

SERVICING PRECAUTIONS

- 3 -

POINT TO BE BROKEN

SERVICE TUBE EXTENSION

CHARGE TUBE
EXTENSION

FEMALE
HANSEN

MALE HANSEN

SOLDERING POINT

Figure  1

Figure  2

TO THE
VACUUM
PUMP

PRESSURE
GAUGE

Figure  3

TO THE R-134a CYLINDER

TO THE REFRIGERATION
SYSTEM

Figure  4

FILLING OR
CHARGE TUBE

VALVE TO BE OPENED
WHEN REFILLING

VALVE TO BE CLOSED
AFTER VACUUM

TO THE CHARGE 
CYLINDER

TO THE REFRIGERATION
SYSTEM

TO THE 
VACUUM
PUMP

Figure  5

Содержание GC-051

Страница 1: ...CAUTION BEFORE SERVICING THE UNIT READ THE SAFETY PRECAUTIONS IN THIS MANUAL MODEL GC 151 REFRIGERATOR SERVICE MANUAL http biz lgservice com ...

Страница 2: ... any kind of appliance check regular current voltage and capacity 5 Don t touch metal products in the freezer with wet hands This may cause frostbite 6 Prevent water from following onto electric elements in the mechanical parts 7 Close the top door before opening the bottom door Otherwise you might hit your head when you stand up 8 When tilting the refrigerator remove any materials on the refriger...

Страница 3: ...is over add the quantity in grams of R 134a to the refrigeration system Remember that every system has an exact quantity of R 134a with a tolerance of 5 grams that can be added Figure 4 Before performing this operation if the vacuum pump and refilling cylinder are connected make sure that the valve placed between the vacuum pump and the refilling tube are closed in order to keep the Freon for addi...

Страница 4: ...del The shape of refrigerator is subject to change THERMOSTAT Regulates the operation of the motor and controlls the temperature inside the refrigerator SUPPORTER CAN Keeps any kinds of bottles MAGNETIC GASKET Tight fitting door seal keeps all the cooling power locked inside No hooks or latches ITEMS SPECIFICATIONS DOOR TYPE 1 DOOR CONDENSER TYPE WALL CONDENSER FLUSH BACK DEFROSTING SYSTEM MANUAL ...

Страница 5: ... by loosening 4 bolts fixed to base plate of the set Figure 11 5 Remove the Compressor by loosening 2 earth screws next to Compressor NOTE Replace the Compressor after peeling off painted part of earth terminal Compressor inhales the gas evaporated from Evaporator and condenses this gas and then delivers to Condenser PTC is abbreviation of Positive Temperature Coefficient and is attatched to the C...

Страница 6: ...4 CIRCUIT DIAGRAM 6 NOTE Lamp is option part ...

Страница 7: ...igerant system a quantity of R12 is introduced which is greater than that indicated the excess gas dose not terminate its expansion in the evaporator but proceeds into the return tube The refrigerant system is humid when there is a small percentage of water present which not completely retained by the dehydrator filter enters into circulation with the Freon and freezes at the capillary exit in the...

Страница 8: ...ents normal Check if the current flowing of the sub coil of the Compressor Frost doesn t form at the Evaporator when operating set for more than 30 min Check if the current flows at the main coil of the Comprossor Poor contacting point Coil shorted Low voltage Shorted Poor contacting point and broken The coil of the Compressor Motor is worn out Refrigerant leaks Poor compressing Increase the volta...

Страница 9: ...ace the PTC STARTER Starts at the voltage of 85 below Replace the PTC Check the starting state at the regular voltage above Replace OLP Normal Normal OLP works within 30 sec in forcible OLP operation by turning instant power on and off The applied voltage is not in the range of Rating Voltage 10 Test the resistance among M C S C and M S Test the resistance of the both terminals in the PTC STARTER ...

Страница 10: ... with a multitester or Wheatstone Bridge Separate the OLP from the Compressor and check resistance value between two terminals of OLP with Tester The value is in the range of 15 28 for the 22Ω PTC Check another electric components Replace OLP The value is 0 The value is Normal Check another electric components Replace the PTC Replace the PTC Abnormal Abnormal ...

Страница 11: ... change in different localities 2 optional parts GC 151S GLASS COVER T V 149B STELL COVER T V 136C 149A LAMP 406B 408B 409B 6 EXPLODED VIEW 11 411A 317A 310A 309A 308A 307A 312A 315A 127A 281B 302A 104A 283A 318A 313A 416A 410A 410G 328A 328B ...

Страница 12: ... optional parts GC 151S 12 151A 125A 149B 207A 201A 406B 126A 136A 136A 136C 281D 110B 110C 409B 110A 408B 149A 110F ...

Страница 13: ...A2021C HINGE ASSEMBLY L R 302A 5421JA0037A EVAPORATOR ASSEMBLY R 307A 2521CRA3001 COMPRESSOR SET ASSEMBLY NS30LAEG BR1EOIL R 308A 6748C 0003C P T C ASSEMBLY P330MC LUCON PX9001F 250 MURATA R 309A 6750C 0004A O L P 4TM149NFBYY 520 R 310A 3550CT0008A COVER P T C R 312A J734 00005A RUBBER SEAT R 313A 1PZZJQ3008A PIN DRAWING R 315A 3103JQ3001C COMP BASE ASSEMBLY STD R 317A 5850JQ2001E DRIER R 318A 493...

Отзывы: