background image

26

On Screen Display(OSD) Selection and Adjustment 

Main menu

Sub menu

Description

PIP  ON / OFF

PIP  INPUT

PIP  POSITION

PIP  SWAP

PIP  SWAP

PIP  SOUND 

PIP  SOUND 

PIP VOLUME

PIP VOLUME

NO

30

PIP  ON / OFF

PIP  INPUT

PIP  POSITION

PIP  SWAP

PIP  SOUND 

PIP VOLUME

PIP  ON / OFF

PIP  INPUT

PIP  POSITION

PIP  SWAP

PIP  SWAP

PIP  SOUND 

PIP  SOUND 

PIP VOLUME

PIP VOLUME

NO

30

PIP  ON / OFF

PIP  INPUT

PIP  POSITION

PIP  SWAP

PIP  SOUND 

PIP VOLUME

: Move to the upper menu
: Decrease
: Increase
: Select another sub-menu

EXIT

: Exit 

Press the      ,       buttons to reset
immediately.

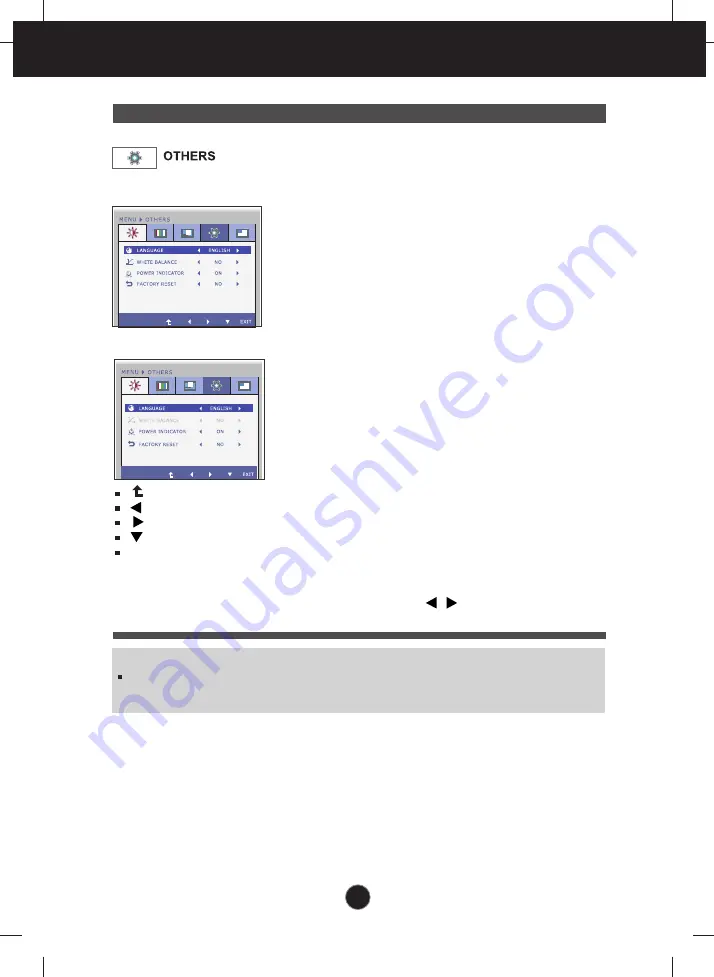
To choose the language in which the
control names are displayed.

LANGUAGE

WHITE
BALANCE

If the output of the video card is
different the required specifications,
the color level may deteriorate due
to video signal distortion. Using this
function, the signal level is adjusted
to fit into the standard output level of
the video card in order to provide the
optimal image.
Activate this function when white
and black colors are present in the
screen.

Restore all factory default settings except

"LANGUAGE." 

FACTORY
RESET

POWER
INDICATOR

Use this menu to set the power
indicator (on the bottom right of the
monitor) to ON or OFF.
If you set 

OFF

, it will go off. 

If you set 

ON

at any time, the power

indicator will automatically be turned on.

NOTE  

If this does not improve the screen image, restore the factory default settings. If necessary, execute the
WHITE BALANCE function again. This function will be enabled only when the input signal is an analog
signal. 

D-SUB input

HDMI/DVI-D input

Содержание E2370V

Страница 1: ...Order Number GETEC C1 10 202 FCC Part 15 subpart B Test Report Number GETEC E3 10 104 Page 1 1 EUT Type LED LCD Monitor FCC ID BEJE2370VV APPENDIX G USER S MANUAL ...

Страница 2: ...OWNER S MANUAL LED LCD MONITOR LED LCD MONITOR MODELS E2370V E2770V www lg com Please read this manual carefully before operating your set and retain it for future reference ENGLISH ...

Страница 3: ... plugs They may result in a shock or fire hazard Call your service technician for replacement As long as this unit is connected to the AC wall outlet it is not disconnected from the AC power source even if the unit is turned off Do not Open the Display There are no user serviceable components inside There are Dangerous High Voltages inside even when the power is OFF Contact your dealer if the disp...

Страница 4: ...x LCD permanently Do not press the LCD screen with your finger for a long time as this may cause some afterimages Some dot defects may appear as Red Green or Blue spots on the screen However this will have no impact or effect on the display performance If possible use the recommended resolution to obtain the best image quality for your LCD display If used under any mode except the recommended reso...

Страница 5: ...micals such as benzene paint thinners or alcohol Spray water onto a soft cloth 2 to 4 times and use it to clean the front frame wipe in one direction only Too much moisture may cause staining On Repacking Do not throw away the carton and packing materials They make an ideal container in which to transport the unit When shipping the unit to another location repack it in its original material On Dis...

Страница 6: ... those shown here User must use shielded signal interface cables D sub 15 pin cable DVI D cable with ferrite cores to maintain standard compliance for the product Dependingonthecountry Thank you for selecting LGE products Please make sure the following items are included with your monitor If any items are missing contact your dealer Remote control Primary Cell Battery Lithium ...

Страница 7: ...the stand 1 Place the monitor face down on the cushion or soft cloth 3 Use a Coin on the bottom of the stand base and turn screw clockwise to tighten 4 Once assembled take the monitor up carefully and face the front side 2 Assemble the Stand Base into the Stand Body in the correct direction as shown in the picture StandBase StandBody Turn the screw by using a Coin ...

Страница 8: ... turning the screw to the left Before setting up the monitor ensure that the power to the monitor the computer system and other attached devices is turned off Positioning your display Adjust the position of the panel in various ways for maximum comfort Tilt Range 5 to 15 15 5 IMPORTANT It is recommended that in order to maintain an ergonomic and comfortable viewing position the forward tilt angle ...

Страница 9: ...sents a general model your display may differ from the view as shown C DVI D This feature is not available in all countries Connect the signal input cable and tighten it up by turning in the direction of the arrow as shown in the figure Mac adapter For Apple Macintosh use a separate plug adapter is needed to change the 15 pin high density 3 row D sub VGA connector on the supplied cable to a 15 pin...

Страница 10: ...ndividual input signals AUTO Function When you encounter problems such as blurry screen blurred letters screen flicker or tilted screen while using the device or after changing screen resolution press the AUTO function button to improve resolution 3 Press the power button on the bottom right of the monitor to turn the power on When monitor power is turned on the Self Image Setting Function is exec...

Страница 11: ... Mode Button Use Super Resolution control Super Res Button Use this button to select the PIP function PIP Button Use this button to switch between the main screen and the PIP screen Swap Button To adjust the brightness Brightness Button To adjust the volume Use for the HDMI input Volume Button To select the mute Use for the HDMI input Button Replacing the Remote Control Battery 1 Take out the batt...

Страница 12: ... is connected it is automatically detected The default setting is D Sub SOURCE Hot key Control Panel Functions Front Panel Controls G MODE Button Usethisbuttontoenter USERMODE THRUMODE SUPER RESOLUTION ASPECT RATIO or AUTO BRIGHT menus For more information refer to page 15 to 20 INPUT INPUT INPUT OK OK INPUT OK D SUB D SUB D SUB DVI D DVI D DVI D ...

Страница 13: ...perly On Mode If the display is in Sleep Mode Energy Saving the power indicator is blinking red Power Button Power Indicator Exit the OSD On Screen Display EXIT Button MENU Button OSD LOCKED UNLOCKED This function allows you to lock the current control settings so that they cannot be inadvertently changed Press and hold the MENU button for several seconds The message OSD LOCKED should appear You c...

Страница 14: ...lections you can make using the OSD To make adjustments in the On Screen Display follow these steps Press the discretionary button then the main menu of the OSD appears except for the power button To access a control use the corresponding buttons Use the buttons to adjust the image to the desired level Use the button to select other sub menu items Press the EXIT Button to exit from the OSD G MODE ...

Страница 15: ...ing a clear image Use this menu to adjust the aspect ratio of a picture displayed on the screen Use this menu to adjust the screen brightness automatically To prevent picture delay frame buffer video memory is not used in this mode D SUB DVI D HDMI Main menu Sub menu Supported input Description D SUB DVI D HDMI 1 HDMI 2 INPUT DSUB DVI D HDMI Use this button to select the input signal D SUB DVI D H...

Страница 16: ...OTHERS DVI D HDMI DVI D HDMI D SUB D SUB D SUB PIP ON OFF PIP INPUT PIP POSITION PIP SWAP PIP SOUND PIP VOLUME To adjust PIP function PIP DVI D HDMI D SUB HORIZONTAL VERTICAL CLOCK PHASE OVERSCAN DISPLAY To adjust the position of the screen To improve the clarity and stability of the screen HDMI D SUB D SUB Use this menu to allow the picture to completely fill the screen removing noise around the ...

Страница 17: ...ou were introduced to the procedure of selecting and adjusting an item using the OSD system Listed below are the icons icon names and icon descriptions of the all items shown on the Menu Sub menus NOTE OSD On Screen Display menu languages on the monitor may differ from the manual Menu Name Icons Button Tip Press the G MODE Button then the main menu of the OSD appears Move to the upper menu Adjust ...

Страница 18: ...tio Once set you can select the optimized mode depending on your preferences The following is the default setting ASPECT RATIO Full SUPER RESOLUTION NORMAL BRIGHTNESS 100 If you select MODE1 in USER MODE and set ASPECT RATIO SUPER RESOLUTION and BRIGHTNESS for your preferences the settings are saved in MODE1 You can save your preferences in MODE2 and MODE3 in the same way If you set the ASPECT RAT...

Страница 19: ... ASPEC G MODE ASPEC FULL FULL FULL G MODE AUTO BRIGHT AUTO BRIGHT G MODE AUTO BRIGHT MODE 3 MODE 3 ODE G MODE G MODE THRU MODE THRU MODE THRU MODE MODE 3 MODE G MODE G MODE THRU MODE THRU MODE G MODE SUPER RESOLUTION SUPER RESOLUTION G MODE SUPER RESOLUTION G MODE SUPER RESOLUTION G MODE SUPER RESOLUTION G MODE A ASPEC G MODE ASPEC G MODE ASPEC FULL FULL FULL G MODE AUTO BRIGHT AUTO BRIGHT G MODE ...

Страница 20: ... ORIGINAL FULL T Move to the upper menu Move EXIT Exit Noise may exist according to SR SUPER RESOLUTION Mode so enjoy the clear image by selecting SR SUPER RESOLUTION Mode according to the Contents Select this when you want to use the product in the most general using environment In the General mode the SUPER RESOLUTION is turned off When the user wants a natural video screen with soft image it he...

Страница 21: ...ECT RA RATIO TIO ORIGINAL FULL ORIGINAL ORIGINAL 1 1 1 1 1 1 1 1 FULL FULL 1 1 ORIGINAL ORIGINAL FULL FULL Move to the upper menu Move EXIT Exit The picture will be displayed with Full size The picture will be displayed with input resolution ratio scaling If 640 x 480 resolution input the picture will keep at 4 3 ratio scaling The picture will be displayed depends on Input resolution No Scaling If...

Страница 22: ...back experience MODE 3 MODE G MODE SUPER RESOLUTION G MODE SUPER RESOLUTION G MODE ASPEC FULL FULL G MODE AUTO BRIGHT AUTO BRIGHT G MODE AUTO BRIGHT MODE 3 MODE 3 MODE G MODE SUPER RESOLUTION G MODE SUPER RESOLUTION G MODE ASPE FULL FULL G MODE G MODE AUTO BRIGHT AUT AUTO BRIGHT O BRIGHT G MODE AUTO BRIGHT MODE 3 OFF Move to the upper menu Move EXIT Exit Auto brightness adjustment function is turn...

Страница 23: ...ub cable and select D SUB INPUT INPUT OK OK INPUT OK INPUT OK INPUT OK D SUB D SUB D SUB D SUB D SUB DVI D DVI D DVI D DVI D DVI D DVI D This inputs video signals in digital format Connect a DVI D cable and select DVI D INPUT OK INPUT INPUT OK OK INPUT OK INPUT OK D SUB D SUB D SUB D SUB D SUB DVI D DVI D DVI D DVI D DVI D HDMI 1 This inputs video and audio signals in digital format Connect a HDMI...

Страница 24: ...ed below are the icons icon names and icon descriptions of the all items shown on the Menu Sub menus NOTE OSD On Screen Display menu languages on the monitor may differ from the manual Menu Name Icons Button Tip Press the MENU Button then the main menu of the OSD appears Move to the upper menu Adjust Decrease Increase Select another sub menu Exit ...

Страница 25: ... enabled only for HDMI signal input in YUV color format Offset As the criteria for video signal it is the darkest screen the monitor can show PIP ON OFF PIP INPUT PIP POSITION PIP SWAP PIP SWAP PIP SOUND PIP SOUND PIP VOLUME PIP VOLUME NO 30 PIP ON OFF PIP INPUT PIP POSITION PIP SWAP PIP SOUND PIP VOLUME PIP ON OFF PIP INPUT PIP POSITION PIP SWAP PIP SWAP PIP SOUND PIP SOUND PIP VOLUME PIP VOLUME ...

Страница 26: ...USER PIP ON OFF PIP INPUT PIP POSITION PIP SWAP PIP SWAP PIP SOUND PIP SOUND PIP VOLUME PIP VOLUME NO 30 PIP ON OFF PIP INPUT PIP POSITION PIP SWAP PIP SOUND PIP VOLUME Main menu Sub menu Description PRESET Mode USER Mode Select either PRESET or USER to adjust the screen color Move to the upper menu Decrease Increase Select another sub menu EXIT Exit D SUB DVI D input HDMI input HUE SATURATION COL...

Страница 27: ...nd down To minimize any vertical bars or stripes visible on the screen background The horizontal screen size will also change To adjust the focus of the display This item allows you to remove any horizontal noise and clear or sharpen the image of characters Removes noise that may occur at the edges of an image when HDMI is connected to an external device When ON is selected the image size is reduc...

Страница 28: ... different the required specifications the color level may deteriorate due to video signal distortion Using this function the signal level is adjusted to fit into the standard output level of the video card in order to provide the optimal image Activate this function when white and black colors are present in the screen Restore all factory default settings except LANGUAGE FACTORY RESET POWER INDIC...

Страница 29: ...n PIP available are as shown below PIP SOUND Use this menu to turn the PIP Sound on or off Only for HDMI input PIP SWAP Use this menu to switch between the main menu and the sub menu PIP VOLUME Use this menu to adjust the volume of the PIP Sound Only for HDMI input Select the PIP display location Every time you touch the button it will move from to Every time you press the button it will move from...

Страница 30: ... appear when you press the VOLUME button on the front of the monitor Main menu Sub menu Description Sub menu Name Menu Name Button Tip VOLUME To adjust the volume of headphone Earphone Only for HDMI input HDMI input Move to the upper menu Decrease Increase Mute EXIT Exit ...

Страница 31: ... moving the mouse or pressing any key on the keyboard to bring up the screen Try to turn on the PC This message appears when the signal from the PC video card is out of horizontal or vertical frequency range of the display See the Specifications section of this manual and configure your display again This message appears when the signal cable between your PC and your display is not connected Check...

Страница 32: ...and adjust the display to the recommended resolution or adjust the display image to the ideal setting Set the color setting higher than 24 bits true color IMPORTANT Check Control Panel Display Settings and see if the frequency or the resolution were changed If yes readjust the video card to the recommend resolution If the recommended resolution optimal resolution is not selected letters may be blu...

Страница 33: ...rlace mode and if yes change it to the recommend resolution Picture OK No sound Check whether volume is 0 Check sound muted HDMI cable installed properly Head phone cable installed properly Check sound format Not supply to compressed sound format Do you see an Unrecognized monitor Plug Play VESA DDC monitor found message Have you installed the display driver Be sure to install the display driver f...

Страница 34: ... Range AC 100 240 V 50 60 Hz 0 7 A Power Input Attached Detached O Stand Base Wall outlet type Power cord DDC 2B Analog Digital HDMI NOTE Information in this document is subject to change without notice Horizontal Freq Analog Digital 30 kHz to 83 kHz HDMI 30 kHz to 83 kHz Vertical Freq Analog Digital 56 Hz to 75 Hz HDMI 56 Hz to 61 Hz Input Form Separate Sync Digital Signal Input 15 pin D Sub Conn...

Страница 35: ...nge AC 100 240 V 50 60 Hz 0 7 A Power Input Attached Detached O Stand Base Wall outlet type Power cord DDC 2B Analog Digital HDMI NOTE Information in this document is subject to change without notice Horizontal Freq Analog Digital 30 kHz to 83 kHz HDMI 30 kHz to 83 kHz Vertical Freq Analog Digital 56 Hz to 75 Hz HDMI 56 Hz to 61 Hz Input Form Separate Sync Digital Signal Input 15 pin D Sub Connect...

Страница 36: ...0 1024 x 768 1024 x 768 1152 x 864 1280 x 1024 1280 x 1024 1680 x 1050 1680 x 1050 1920 x 1080 31 469 31 468 31 469 37 500 37 879 46 875 48 363 60 123 67 500 63 981 79 976 64 674 65 290 67 500 70 70 60 75 60 75 60 75 75 60 75 60 60 60 Recommend Mode DSUB DVI Timing Display Modes Resolution Horizontal Freq kHz Vertical Freq Hz 1 2 3 4 5 6 7 8 480P 576P 720P 720P 1080i 1080i 1080P 1080P 31 50 31 25 ...

Страница 37: ...on the cushion or soft cloth 3 Check the direction of the Stand Base and pull it from the Stand Body in the direction shown in the figure below 2 To remove the Stand Base from the Stand Body turn the screw counterclockwise using a coin StandBase StandBody 4 Loosen the screws on the back of the monitor to remove the Stand Body from the monitor E2370V E2770V ...

Страница 38: ...able with Wall mount plate Please refer to the installation guide for more details which is provided when Wall mount plate is purchased Kensington Security Slot Connected to a locking cable that can be purchased separately at most computer stores Screw Mounting Interface Dimension Hole spacing 100 mm x 100 mm E2370V 200 mm x 100 mm E2770V Wall Mount pad ...

Страница 39: ...r saving guidelines issued by the U S Environmental Protection Agency EPA Make sure to read the Important Precautions before using the product Keep the Owner s Manual CD in an accessible place for future reference The model and serial number of the SET is located on the back and one side of the SET Record it below should you ever need service MODEL SERIAL ...

Страница 40: ...e used with this System Canadian DOC Notice This Class B digital apparatus meets all requirements of the Canadian Interference Causing Equipment Regulations Cet appareil numérique de la classe B respecte toutes les exigences du Règlement sur le matériel brouilleur du Canada CE Conformity Notice for Europe Products with the CE Marking comply with the EMC Directive 89 336 EEC and LOW VOLTAGE Directi...

Страница 41: ...one or more stages The length of time to reactivate the system unit shall be reasonable for the user Labelled products must meet strict environmental demands for example in respect of the reduction of electrical and magnetical fields as well as work load and visual ergonomics Below you will find a brief summary of the ecological requirements met by this product The complete ecological criteria doc...

Страница 42: ...ty Emissions Electromagnetic fields Noise emissions Ecology The product must be prepared for recycling and the manufacturer must have a certified environmental management system such as EMAS or ISO 14 001 Restrictions on chlorinated and brominated flame retardants and polymers heavy metals such as cadmium mercury and lead The requirements included in this label have been developed by TCO Developme...

Страница 43: ...ser Recyclingprogramm erfahren möchten wenden Sie sich bitte an Ihren lokalen LG Händler oder einen Unternehmensvertreter von LG Wir richten unsere Firmenpolitik auf eine sauberere Umwelt hin aus indem wir umweltspezifische Aspekte als wichtigen Punkt in die Weiterentwicklung unseres Unternehmens einfließen lassen Zusätzliche Informationen über unsere grüne Firmenpolitik erhalten Sie auf unserer W...

Страница 44: ...limpio de LG en 1994 y este ideal ha servido para guiar nuestros principios empresariales desde entonces La Declaración es la base que nos ha permitido llevar a cabo tareas que respetan el medio ambiente siempre teniendo en cuenta aspectos sociales económicos y medioambientales Promocionamos actividades orientadas a la conservación del medio ambiente y desarrollamos nuestros productos específicame...

Страница 45: ...houden bij het ontwikkelen onze producten specifiek rekening met de milieuvriendelijkheid van onze producten Wij minimaliseren het gebruik van schadelijke stoffen in onze producten Er wordt bijvoorbeeld geen cadmium verwerkt in onze monitors Nederlands Informatie met betrekking tot recycling Deze monitor bevat materialen die schadelijk zouden kunnen zijn voor het milieu Het is belangrijk dat deze ...

Страница 46: ...ÏÔÓÌÂÌÚ Û ÛÚ ÚÓ Ë ÌÓ ËÒÔÓÎ ÁÓ Ì Ë ÛÚËÎËÁË Ó Ì ÚÓ ÂÏˇ Í Í Â Ì Â Â ÂÒÚ Ë ÚˇÊÂÎ Â ÏÂÚ ÎÎ Û ÛÚ Ó ÓÚ Ì Ò ÔÓÏÓ ÍÓÎÓ Ë ÂÒÍË Ô ËÂÏÎÂÏÓ Ó ÏÂÚÓ ÓΠÔÓ Ó ÌÓÈ ËÌÙÓ Ï ˆËÂÈ ÔÓ Ì ÂÈ Ô Ó ÏÏ ÛÚËÎËÁ ˆËË ÓÚıÓ Ó Ó ÈÚÂÒ Í ÏÂÒÚÌÓÏÛ ÔÓÒÚ ËÍÛ ËÎË Ô Â ÒÚ ËÚÂÎ ÍÓ ÔÓ ˆËË LG Ã Ó ËÂÌÚË ÛÂÏÒˇ Ì Ó ÂÒÔ ÂÌË ÍÓÎÓ Ë ÂÒÍÓÈ ÂÁÓÔ ÒÌÓÒÚË ÒÚ ˇ Ò  ˆÂÎ ÎÓ Î ÌÛ Á ËÚÛ ÓÍ ÛÊ ÂÈ Ò Â ƒÓÔÓÎÌËÚÂÎ ÌÛ ËÌÙÓ Ï ˆË Ó Ì ÂÈ ÔÓÎËÚËÍ ÔÓ Óı Ì ÓÍ ÛÊ...

Страница 47: ...geven met het huishoudelijk afval maar moeten worden ingeleverd bij speciale inzamelingspunten die door de lokale of landelijke overheid zijn aangewezen 3 De correcte verwijdering van uw oude toestel helpt negatieve gevolgen voor het milieu en de menselijke gezondheid voorkomen Smaltimento delle apparecchiature obsolete Kassering av din gamla apparat Uw oude toestel wegdoen 1 Ce symbole représenta...

Страница 48: ...saat ottamalla yhteyden paikallisiin viranomaisiin kierrätyskeskukseen tai myymälään josta ostit laitteen 1 Når der er et tegn med et kryds over en skraldespand betyder det at produktet er omfattet af EU direktiv 2002 96 EC 2 Alle elektriske og elektroniske produkter skal smides ud et andet sted end gennem den kommunale affaldsordning ved hjælp af specielle indsamlingsfaciliteter der er organisere...

Страница 49: ...Regulatory Information cont 10 Portuguese Slovak Czech Croatian Hungarian Polish ...

Страница 50: ...Regulatory Information cont 11 Estonian Latvian Lithuanian ...

Отзывы: