background image

Disc Label –

This function allows you to change the default disc name to 

something more descriptive. This name appears when you load a disc and
when you display disc information on-screen. The keyboard menu appears by
pressing ENTER while [Edit] is selected.

Disc Protect –

This function allows you to protect discs from accidental 

recording, erasure and editing by setting this option to [ON]. The DVD-R and
Video mode formatted DVD-RW are not available to protect.

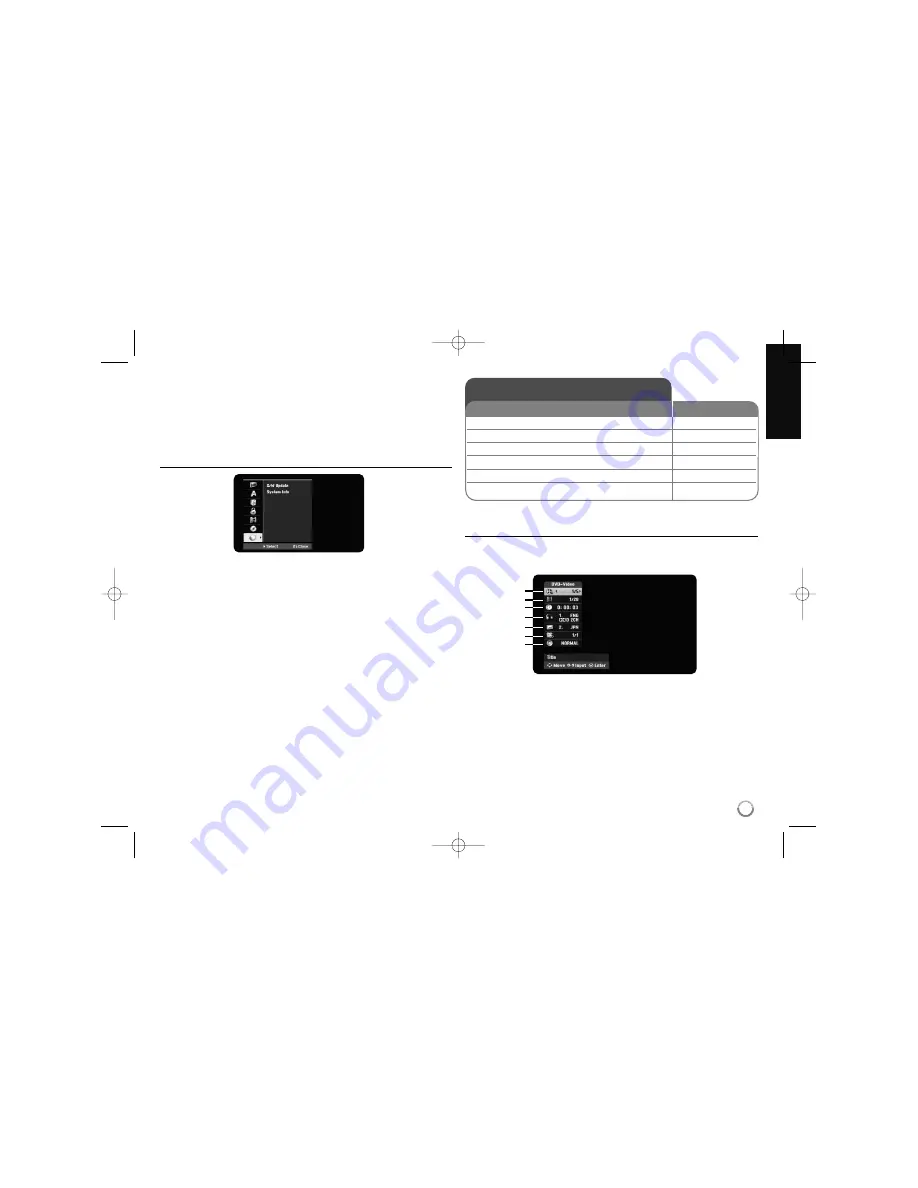
Adjust the network settings

Software Update – 

Your recorder is able to keep the built-in digital tuner up to

date with the latest software. You can either check for updates manually, or
have the unit do it automatically at regular interval. 
While the unit is in updating, there may have a disruption in reception for a few
hours. The reception should return to normal after the update is complete.
This unit must be plugged into AC power to receive updates. Do not unplug
your recorder while an update is in progress. The update is not available during
recording, Timeshift, viewing teletext or EPG menu.

[Standby mode] Updates the software when this unit is turned off. The check
mark appears when this option is selected.
[Operation Mode] Update the software when this unit is turned on. The check
mark appears when this option is selected.
[Time] Set the time to update the software.
[Freq] Selects the updates interval.(Weekly or Daily)
[Start] Updates the software immediately.

System Information  – 

Shows system information. (software version, 

DTV Signal Quality and DTV Signal Strength)

Displaying disc Information

Adjusting playback menu item

You can select an item by pressing 

vV 

and change or select the setting by

pressing 

b B

.

a

Current title/track/file / Total number of titles/tracks/files

b

Current chapter / total number of chapters

c

Elapsed playing time

d

Selected audio language or audio channel

e

Selected subtitle

f

Selected angle / Total number of angles

g

Selected sound mode

21

Displaying disc information

1 Play the disc loaded on the unit:

PLAY

2 Displays current status of playback:

DISPLAY

3 Displays the playback menu:

DISPLAY

4 Select an item: 

v

v  V

V

5 Adjust the playback menu settings: 

b

b B

B  

6 Exit the disc playback menu:

DISPLAY

ON REMOTE

a
b
c
d


DR386D-W.BAUSLLK_ENG  6/16/08  10:38 AM  Page 21

Содержание DR386D

Страница 1: ...56778743 As an ENERGY STAR Partner LG has determined that this product or product models meet the ENERGY STAR guidelines for energy efficiency ENERGY STAR is a U S registered mark DR386D W BAUSLLK_ENG 6 16 08 10 38 AM Page 1 ...

Страница 2: ...her than those specified herein may result in hazardous radiation exposure To prevent direct exposure to laser beam do not try to open the enclosure Visible laser radiation when open DO NOT STARE INTO BEAM CAUTION The apparatus should not be exposed to water dripping or splash ing and no objects filled with liquids such as vases should be placed on the apparatus CAUTION concerning the Power Cord M...

Страница 3: ...s prohibited CONSUMERS SHOULD NOTE THAT NOT ALL HIGH DEFINITION TELEVI SION SETS ARE FULLY COMPATIBLE WITH THIS PRODUCT AND MAY CAUSE ARTIFACTS TO BE DISPLAYED IN THE PICTURE IN CASE OF 625 PROGRESSIVE SCAN PICTURE PROBLEMS IT IS RECOMMENDED THAT THE USER SWITCH THE CONNECTION TO THE STANDARD DEFI NITION OUTPUT IF THERE ARE QUESTIONS REGARDING OUR TV SET COMPATIBILITY WITH THIS MODEL 625p DVD RECO...

Страница 4: ... Information 21 23 Using the digital EPG 24 25 Play a disc 25 26 Playing DivX movie files 27 Listening to a music 28 Viewing a photo 29 Recording 30 31 Editing a title 32 35 Language Codes 36 Area Codes 36 Troubleshooting 37 38 Specifications 39 Before connecting operating or adjusting this product please read this instruction booklet carefully and completely DR386D W BAUSLLK_ENG 6 16 08 10 38 AM ...

Страница 5: ...mode VR mode Auto Auto Auto Limited Yes Yes Limited Limited Yes The player must compatible with corresponding media and the media has to be finalized Mitsubishi 8x 16x Mitsubishi 4x Mitsubishi 3x Mitsubishi 8 16x Mitsubishi 2 4x 8x Mitsubishi 4x Verbatim 8x 16x Verbatim 4x Maxell 5x Verbatim 8x 16x HP 4x JVC 4x Verbatim 4x Maxell 4x Ricoh 4x RW R R RAM RWVideo RWVR R DVD Audio CD Data disc DivX JP...

Страница 6: ...ng playback by display ing disc information on screen NTSC format signals from the analog or the DV inputs is not recorded cor rectly with this unit Video signals in SECAM format from the built in TV tuner or from the ana log inputs are recorded in PAL format About the Symbol Display may appear on your TV display during operation and indicates that the function explained in this owner s manual is ...

Страница 7: ...ist menu b B v V left right up down Used to navigate on screen displays ENTER Acknowledges menu selection or displays the program list PR Scans up or down through memorized channels RETURN O Removes the on screen displays DISPLAY Accesses On Screen Display d Colour buttons Use when an EPG screen is displayed or when tuned to a teletext program of a digital broadcast The function of each button wil...

Страница 8: ... PLAY PAUSE Starts playback Pause playback or recording temporarily press again to exit pause mode g x STOP Stops playback or recording h z REC Starts recording Press repeatedly to set the recording time i RESOLUTION Sets the output resolution for HDMI and COMPONENT OUTPUT jacks HDMI 576i 576p 720p 1080i 1080p COMPONENT 576i 576p j USB Port Connect an USB Flash Memory k DV IN Connect the DV output...

Страница 9: ...the signal from the ANTENNA IN jack to your TV monitor c Audio Video connection Connect one end of the video yellow cable to the VIDEO OUTPUT jack on the unit and other end to the VIDEO INPUT jack on your TV Connect one end of the audio cables red and white to the analog AUDIO OUTPUT jacks on the unit and other ends to the AUDIO INPUT jacks on your TV d Power cord connection Connect the mains lead...

Страница 10: ...ibuted to your wall antenna outlet If you have your own antenna system you must make sure that it is equipped with antennas filter and or amplifier that can handle those frequen cies that the digital channels are transmitted on Cable TV Please observe that this recorder is not designed for the reception of regular digital cable TV signals QAM signal Despite this operators of smaller cable networks...

Страница 11: ...ceiver Dolby Digital MPEG DTS decoder or other equipment with a digital input Connect one end of the digital audio cables COAXIAL or OPTICAL to the digi tal audio output jack COAXIAL or OPTICAL on the unit and other end to the digital audio input jack COAXIAL or OPTICAL on your amplifier This recorder does not perform internal 2 channel decoding of a DTS sound track To enjoy DTS multi channel surr...

Страница 12: ...m If your TV is not equipped with Dolby Digital and MPEG decoder set the Dolby Digital and MPEG options to PCM on the setup menu See page 18 If your TV is not equipped with DTS decoder set the DTS options to OFF on the setup menu See page 18 To enjoy DTS multi channel surround you must connect this unit to a DTS compatible receiver via one of this unit s digital audio outputs If there is noise or ...

Страница 13: ...rive Withdraw the USB Flash Drive carefully when the connected USB Flash Drive is in use Notes on USB Flash Drive The contents on the disc cannot be moved or copied to a USB Flash Drive Keep the USB Flash Drive out of reach of children If swallowed seek med ical advice immediately This unit supports only USB Flash Drive with FAT16 or FAT32 format The USB Flash Drives which require additional softw...

Страница 14: ...change the settings of programmed channel by selecting Program Edit option on the left side of the channel editing screen PR Indicates the selected channel position Seek Searches for a channel automatically Searching stops when the unit tunes in a channel Ch Changes the channel number MFT Fine tunes the channel to obtain a clearer picture NICAM Sets the channels for the NICAM broadcast OK Confirm ...

Страница 15: ...f the screen Press v V to select Favourite option then press ENTER The program is set to the favourite pro gram and FAV appears on the TV screen Using the Home Menu MOVIE DISC Displays Title List menu which shows recorded titles on the disc page 32 Displays Movie List menu which shows DivX movie files on the disc page 27 Plays DVD Video disc page 25 USB Displays Movie List menu which shows DivX mo...

Страница 16: ...6 Rec Mode Displays Record Mode Set option in the SETUP Menu page 20 Record Timer Record Displays Timer Record menu page 30 16 Adjust the SETUP settings 1 Displays the HOME menu HOME 2 Select the Easy Menu option b b B B 3 Select the SETUP option ENTER 4 Select a desired option on the first level v v V V 5 Move to second level B B 6 Select a desired option on the second level v v V V 7 Move to thi...

Страница 17: ...to GMT Manual If there is no channel that broadcasts a clock signal in your area you can set the time and date manually TV Aspect Selects the aspect ratio of the connected TV If the resolution is set to 720p or 1080i TV Aspect will be disable in the setup menu 4 3 Letter Box Select this when connecting to a standard 4 3 screen TV and prefer the wide picture with bands on the upper and lower portio...

Страница 18: ...on appears on the program information display to indicate that you can select one of those Closed Caption options with the SUBTITLE button DivX Subtitle Select a language code for the DivX subtitle Adjust the audio settings Dolby Digital DTS MPEG Selects the type of digital audio signal when using the DIGITAL AUDIO OUTPUT jack Bitstream Select this when you connect this unit s DIGITAL AUDIO OUTPUT...

Страница 19: ...iew the program OFF Cancel the blocking R Restricted 18 Not for children under age 18 Strong elements of sex and or violence AV Adult Audience strong violence 15 MA Mature Adult Audience 15 Mature Adult only Mature Audience Only This program is specifically designed to be viewed by adults and therefore may be unsuitable for children under 15 M Mature Audience 15 Mature Audience only This program i...

Страница 20: ... interval 5 10 or 15 min Adjust the disc settings Disc Format You can Initialize a DVD by pressing ENTER while Start is selected The Disc Format menu appears The unit starts formatting after confirmation You can select a mode between VR and Video for DVD RW discs Everything recorded on the DVD will be erased after formatting If you load a completely blank disc the unit will initialize the disc aut...

Страница 21: ...ewing teletext or EPG menu Standby mode Updates the software when this unit is turned off The check mark appears when this option is selected Operation Mode Update the software when this unit is turned on The check mark appears when this option is selected Time Set the time to update the software Freq Selects the updates interval Weekly or Daily Start Updates the software immediately System Inform...

Страница 22: ...esired angle Selecting a sound mode This unit can produce a 3D Surround effect which simulates multi channel audio playback from two conventional stereo speakers instead of the five or more speakers normally required to listen to multi channel audio from a home theatre system During playback press DISPLAY twice to display the playback menu Use v V to select the sound option then use b B to select ...

Страница 23: ...m Switching the program list You can switch the program list to DIGITAL TV ANALOG TV or RADIO Press v to move the highlight position to top of the program list Press b B to select a DIGITAL TV ANALOG TV or RADIO Selected pro gram list appears Displaying the favourite program list You can display favourite channel list that organized by your private taste To set a favourite program use Program Edit...

Страница 24: ...en the EPG menu is displayed Now Next The screen shows now and next programs 8 Days The screen shows programs within 8 days When the EPG menu with 8 days is displayed you can also change the date of the EPG menu by pressing the green colour button then use b B to select a date You can set a timer record using EPG menu with 8 days Select a program then press red colour button The red timer icon wil...

Страница 25: ...ring selection you press a wrong number you must complete the three digit number and then enter the correct page number again Use RED GREEN buttons to move up and down pages Play a disc more you can do Playing a disc that contains a menu The menu screen may be displayed first after loading a DVD which contains a menu Use the b B v V buttons to select the title chapter you want to view then press E...

Страница 26: ...ress TITLE to displays the title menu or disc menu If the current DVD title has a menu the title menu appears on the screen Otherwise the disc menu may appears Playing repeatedly Press REPEAT repeatedly to select an item to be repeated The current title chapter folder or track will be played back repeatedly To return to normal play back press REPEAT repeatedly to select OFF Repeating a specific po...

Страница 27: ...Audio format AC3 PCM MP2 MP3 WMA Sampling frequency within 8 48 kHz MP3 within 32 48kHz WMA Bit rate within 8 320kbps MP3 within 32 192kbps WMA CD R Format ISO 9660 and JOLIET DVD R RW Format ISO 9660 UDF Bridge format Maximum Files Disc Less than 1999 total number of files and folders Notes on DivX format The DivX subtitle file name has to be identified with the DivX file name to be display on th...

Страница 28: ...n 32 192kbps WMA CD R Format ISO 9660 and JOLIET DVD R RW Format ISO 9660 UDF Bridge format Maximum Files Disc Less than 1999 total number of files and folders Creating your own program You can play the contents in the order you want by arranging the order of the music files The program is cleared when exiting the Music List screen To add or erase music on the program list press MENU LIST to displ...

Страница 29: ...screen then press ENTER The Slide Show menu appears on the screen Set the Object and Speed options then press ENTER while Start option is selected The unit starts slide show as you selected on the menu Object option Selected Views slide show of only selected files Use the MARKER button to select multiple files All Views slide show of all files Speed option Sets the Slide Show speed to Slow Normal ...

Страница 30: ... press ENTER to display Timer Record menu Adjust each field as described below using v v V V b b B B Media This option is not selectable CH PR Choose a memorized program number or one of the external inputs from which to record You cannot select DV input and radio channel Date Choose a date up to 1 month in advance Start Time Set the start time End Time Set the end time Repeat Choose a desired rep...

Страница 31: ...gram entered first takes priority Record from a camcorder You can record from a DV equipped camcorder to the DVD by connecting it with a DV cable You can also record from a digital camcorder connected to the DV in jack on the front of the unit Press AV repeatedly to select the DV input Find the place on the camcorder recording that you want to begin recording from and press REC to start recording ...

Страница 32: ...ters within that title also appear In other words chapters in the Playlist behave exactly as chapters on a DVD Video disc do Parts are sections of Original or Playlist titles From the Original and Playlist menu you can add or delete parts Adding a chapter or title to the Playlist creates a new title made up of a section i e chapter of an Original title Deleting a part removes part of a title from ...

Страница 33: ... Time search You can select the start of a title by searching through the time duration Select a title that you want to search and press ENTER Select Time in the Search option from the menu on the left of the screen and press ENTER to display the Search menu Use b b B B to find the time you want to start Each press of b b B B to moves 1 minute and press and hold b b B B to moves 5 minutes Press EN...

Страница 34: ...ame option from the menu on the left of the screen and press ENTER to display the keyboard menu Use v v V V b b B B to select a character then press ENTER to confirm your selection on the keyboard menu OK Finish the naming Cancel Cancels all entered characters Space Inserts a space at the cursor position Delete Deletes the previous character at the cursor position You can use remote control button...

Страница 35: ...21 Protect Use this to prevent accidental recording editing deleting of the inserted disc page 21 Unprotect Release the protect function Overwriting You can overwrite a new video recording on a recorded title that is not protect ed Select the TV channel or input source you want to record Press MENU LIST to display the Title List menu Use v V b B to highlights a title you want to overwrite and then...

Страница 36: ...oan 8377 Sanskrit 8365 Scots Gaelic 7168 Serbian 8382 Serbo Croatian 8372 Shona 8378 Sindhi 8368 Singhalese 8373 Slovak 8375 Slovenian 8376 Spanish 6983 Sudanese 8385 Swahili 8387 Swedish 8386 Tagalog 8476 Language Code Tajik 8471 Tamil 8465 Telugu 8469 Thai 8472 Tonga 8479 Turkish 8482 Turkmen 8475 Twi 8487 Ukrainian 8575 Urdu 8582 Uzbek 8590 Vietnamese 8673 Volapük 8679 Welsh 6789 Wolof 8779 Xho...

Страница 37: ...s in the remote control are exhausted Playback The unit does not start playback b Insert a playable disc Check the disc type colour system and regional code b Place the disc with the playback side down b Place the disc on the disc tray correctly inside the guide b Clean the disc b Cancel the Rating function or change the rating level Cannot play a disc recorded using this unit on other player b Fi...

Страница 38: ...le may result in no picture being output b Not all HDCP compatible DVI devices will work with this unit The connected HDMI device does not output sounds b Some HDMI compatible devices do not output sounds check the manual that came with the connected device b If your TV is not capable of handling 96 kHz sampling frequency set the Sampling Freq option to 48 kHz on the setup menu When this choice is...

Страница 39: ...ncy response DVD PCM 48 kHz 8 Hz to 22 kHz CD 8 Hz to 20 kHz DVD PCM 96 kHz 8 Hz to 44 kHz Signal to noise ratio More than 90 dB AUDIO OUT connector Harmonic distortion Less than 0 02 AUDIO OUT connector Dynamic range More than 95 dB AUDIO OUT connector Inputs ANTENNA IN Antenna input 75 ohms VIDEO IN 1 0 Vp p 75 ohms sync negative RCA jack x 2 AUDIO IN 2 0 Vrms more than 47 kohms RCA jack L R x 2...

Страница 40: ...DR386D W BAUSLLK_ENG 6 16 08 10 38 AM Page 40 ...

Отзывы: