background image

ENGLISH

14

Installing on a Wall

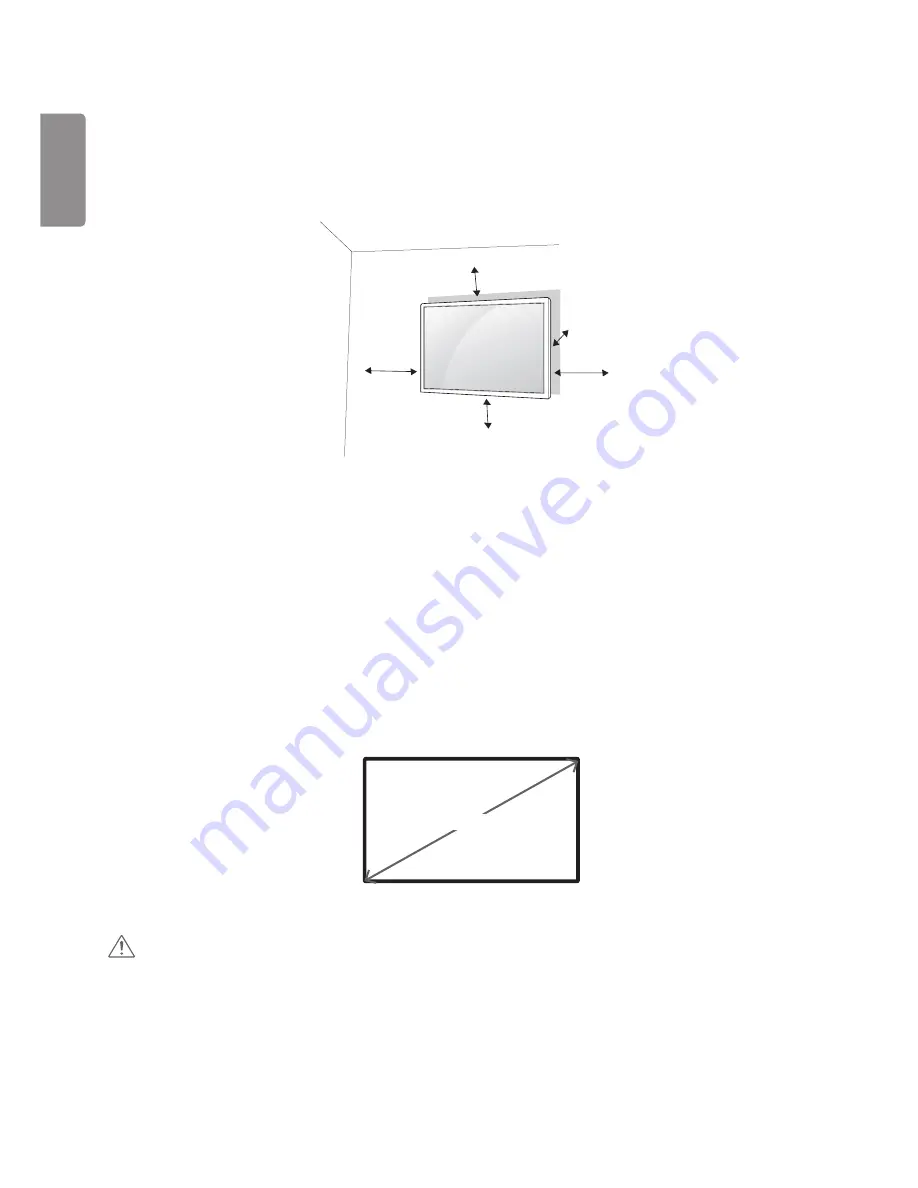
For proper ventilation, allow a clearance of 100 mm on each side and from the wall. Detailed installation instructions 

are available from your dealer, see the optional Tilt Wall Mounting Bracket Installation and Setup Guide.

100 mm

100 mm

100 mm

100 mm

100 mm

To install your monitor on a wall, attach a wall mounting bracket (optional part) to the back of the monitor.
Make sure that the wall mounting bracket is securely fixed to the monitor and to the wall.

Use only screws and wall mounting brackets that conform to VESA standards.

Screws which are longer than standard length may damage the inside of the monitor.

A non-VESA standard screw may damage the product and cause the monitor to fall. LG Electronics is not liable for 

any accidents related to the use of non-standard screws.

Please use VESA standard as below.


785 mm and above
* Fixing screws:  Diameter 8.0 mm x Pitch 1.25 mm x Length 9 mm (75TC3D)
* Fixing screws:  Diameter 6.0 mm x Pitch 1.0 mm x Length 12 mm (65TC3D, 55TC3D)

785 mm

 CAUTION


Disconnect the power cord before moving or installing the monitor to avoid risk of electric shock.


If you install the monitor on a ceiling or slanted wall, it may fall and result in injury. Use an authorized LG wall mount 

and contact your local dealer or qualified personnel to assist with the installation.


Do not over tighten the screws as this may damage the monitor and void your warranty. 


Use only screws and wall mounting brackets that meet the VESA standard. Any damage or injuries caused by misuse 

or use of improper accessories are not covered by the warranty.


To prevent injury, this apparatus must be securely attached to the wall in accordance with the installation instructions. 

(This pertains only to Australia and New Zealand.)

Содержание 55TC3D

Страница 1: ... LG Digital Signage MONITOR SIGNAGE www lg com Please read this manual carefully before operating your set and retain it for future reference 75TC3D 65TC3D 55TC3D Copyright 2017 LG Electronics Inc All Rights Reserved ...

Страница 2: ...oduct 7 Precautions In Using the Product 7 Mounting on a Wall 8 LICENSES 9 ASSEMBLY AND PREPARATION 10 Optional Accessories 11 Precaution When Using the Touch Pen 12 Parts and Buttons 13 Installing on a Wall 14 REMOTE CONTROL 16 MAKING CONNECTIONS 18 Connecting to a PC 18 External Device Connection 18 Using the Input List 20 TROUBLESHOOTING 21 PRODUCT SPECIFICATIONS 25 ...

Страница 3: ...es or is dropped you may be injured Children must pay particular attention Do not leave the power or signal cable unattended on the pathway The passerby can trip or fall which can cause electrical shock fire product breakdown or injury Install the product in a neat and dry place Dust or moisture can cause electrical shock fire or product damage If you can smell smoke or other odors or hear a stran...

Страница 4: ... deformed or fire can break out due to internal heat Do not block the ventilation hole of the product by a tablecloth or curtain The product can be deformed or fire can break out due to overheating inside the product Install the product on a flat and stable place that has no risk of dropping the product If the product is dropped you may be injured or the product may be broken Install the product w...

Страница 5: ...t by the plug Do not bend the power cord with excessive force The power line can be damaged which may cause electric shock or fire Be careful not to step or place heavy objects electronic appliances clothing etc on the power cord or AC adapter Be careful not to damage the power cord or AC adapter with sharp objects Damaged power cords may cause a fire or electric shock Never disassemble repair or ...

Страница 6: ...ging into the wall input terminal You may be electrocuted The appliance coupler is used as the disconnect device Please make sure the device is installed near the wall outlet to which it is connected and that the outlet is easily accessible As long as this unit is connected to the AC wall outlet it is not disconnected from the AC power source even if the unit is turned off CAUTION Be sure to keep ...

Страница 7: ...Do not press against or put stress on the front panel of the apparatus CAUTION Do not shock the product when moving it You may be electrocuted or the product can be damaged Do not dispose the product packing box Use it when you move Precautions In Using the Product WARNING Do not disassemble repair or modify the product at your own discretion Fire or electric shock accident can occur Contact the s...

Страница 8: ... Set the appropriate resolution and clock by referring to the User s Guide Your vision can be impaired Use authorized detergent only when cleaning the product Do not use benzene thinner or alcohol Product can be deformed Do not expose to dripping or splashing and do not place objects filled with liquids such as vases cups etc on or over the apparatus e g on shelves above the unit Batteries should ...

Страница 9: ... other countries Manufactured under license from Dolby Laboratories Dolby Dolby Vision Dolby Audio Dolby Atmos and the double D symbol are trademarks of Dolby Laboratories For DTS patents see http patents dts com Manufactured under license from DTS Licensing Limited DTS the Symbol DTS and the Symbol together DTS 2 0 Channel DTS 2 0 Digital Out DTS HD and DTS Virtual X are registered trademarks or ...

Страница 10: ...our product may vary depending on the model or region Product specifications or contents in this manual may be changed without prior notice due to upgrade of product functions SuperSign Software Manual Downloading from the LG Electronics website Visit the LG Electronics website http partner lge com and download the latest software for your model The warranty will not cover any damage caused by usi...

Страница 11: ...al product and accessories OPS kit KT OPSA Screws Connecting Cable Card Easy Setup Guide Power Cord NOTE Optional accessories are available for some models If necessary please purchase them separately Before you attach the OPS kit connect the cable to the port CAUTION Before attaching removing a KT OPSA to from a monitor make sure that you unplug the power cords connected to the monitor and the KT...

Страница 12: ...e Touch Pen 1 When the tip of the touch pen is damaged as shown in the figure replace it with a tip provided as an accessory 2 If you hold down below the guide line when using the touch pen it may occur a break or touch error Guide line ...

Страница 13: ... mode Press Enters the Interactive Digital Board Application Press Displays the current Press and Hold Activates or deactivates the Press Displays the current Press and Hold Activates or deactivates the Adjusts the volume level Press Accesses the input source list Press 1 Changes the input source or saves your input and exit menus Turns the power on or off 1 You can use the function when you acces...

Страница 14: ...ted to the use of non standard screws 4 Please use VESA standard as below 785 mm and above Fixing screws Diameter 8 0 mm x Pitch 1 25 mm x Length 9 mm 75TC3D Fixing screws Diameter 6 0 mm x Pitch 1 0 mm x Length 12 mm 65TC3D 55TC3D 785 mm CAUTION Disconnect the power cord before moving or installing the monitor to avoid risk of electric shock If you install the monitor on a ceiling or slanted wall...

Страница 15: ...y parts The wall mounting bracket is optional You can obtain additional accessories from your local dealer The length of screws required may differ depending on the wall mount Be sure to use the correct length For more information please refer to the guide provided with the wall mount ...

Страница 16: ... control sensor on the monitor Some features of the remote control may not be supported in certain models POWER Turns the monitor on or off Turns the monitor on Turns the monitor off Adjusts the brightness of the picture to reduce energy consumption INPUT Selects the input mode Used for viewing 3D videos 1 a A Toggles between numerical and alphabetical Number and Alphabet buttons Enters numerical ...

Страница 17: ...ons and confirms your input BACK Allows you to move back one step in the user interaction function Quit all OSD tasks and applications Allows you to control various multimedia devices to enjoy multimedia simply by using the remote control through the SimpLink menu Selects the TILE Mode When the Picture ID number matches the Set ID number you can control whichever monitor you want in multi display ...

Страница 18: ...cables are not provided This monitor supports the Plug and Play feature Plug and Play a feature that enables a PC to recognize devices attached by the user without device configuration or user intervention when powering up External Device Connection Some of the cables are not provided Connect a HD receiver DVD or VCR player to the monitor and select an appropriate input mode For the best picture a...

Страница 19: ...Speed HDMI TM Cable with Ethernet If you cannot hear any sound in HDMI mode please check your PC settings Some PCs require you to manually change the default audio output to HDMI If you want to use HDMI PC mode you must set your PC DTV to PC mode You may experience compatibility issues if you use HDMI PC mode Make sure the power cable is disconnected If you connect a gaming device to the monitor u...

Страница 20: ...ENGLISH 20 Using the Input List HOME HDMI1 HDMI3 HDMI2 DVI DISPLAYPORT OPS RGB ...

Страница 21: ... if the Plug and Play function is supported by referring to the graphic card user manual The screen image looks abnormal Problem Action Is the screen position wrong Check if the graphic card resolution and frequency are supported by the product If the frequency is out of range set to the recommended resolution in the Control Panel Display Setting menu The screen is displayed abnormally The proper ...

Страница 22: ...an 24 bits true color Select Control Panel Display Settings Color Table menu in Windows Screen color is unstable or mono colored Check the connection status of the signal cable Or re insert the PC graphic card Do black spots appear on the screen Several pixels red green white or black color may appear on the screen which can be attributable to the unique characteristics of the LCD panel This is no...

Страница 23: ... Control Panel Hardware and Sound Tablet PC Settings Display Display options Calibrate or Reset For information about gestures and settings on refer to the Windows Help A touch is applied to a monitor other than the one I intended Set the monitor as the default monitor This may occur if the monitor is not set as the default monitor when you are using multiple monitors Go to Control Panel Display S...

Страница 24: ...M 123 PW When changing colors using complementary colors helps to prevent image sticking BM BM BM CF CF CF OC PI PI TFT Layers Glass Glass LC CF I D UPM123 PW I D UPM123 PW ITO or MoTi Pixel Layer 2 Change the image using the same time interval Make sure that the characters or images before changing the image remain in the same location after changing the image What is image sticking When the LCD ...

Страница 25: ... DisplayPort OPS PC 30 kHz 135 kHz DVI D RGB 30 kHz 83 kHz Vertical frequency DVI D HDMI DisplayPort OPS PC 30 Hz 60 31 Hz RGB 56 Hz 75 Hz Synchronization Separate Sync Digital 65TC3D 55TC3D Maximum resolution 1920 x 1080 60 Hz This may not be supported on some OS or graphic card types Recommended resolution 1920 x 1080 60 Hz This may not be supported on some OS or graphic card types Horizontal fr...

Страница 26: ... Off Mode 0 5 W Dimensions Width x Height x Depth Weight 1760 9 mm x 1011 1 mm x 94 7 mm 74 5 kg 65TC3D LCD Panel Pixel Pitch 0 744 mm H X 0 744 mm V Power Rated Voltage AC 100 240 V 50 60 Hz 1 6 A Power Consumption On Mode 120 W Typ Sleep Mode 0 5 W Off Mode 0 5 W Dimensions Width x Height x Depth Weight 1530 8 mm x 883 8 mm x 90 4 mm 51 kg 55TC3D LCD Panel Pixel Pitch 0 630 mm H X 0 630 mm V Pow...

Страница 27: ...imum distance of 20 cm between the device and the body Only HongKong Wireless module LGSBW41 Specifications Wireless LAN Bluetooth Standard IEEE 802 11a b g n Standard Bluetooth Frequency range MHz 2400 to 2483 5 5150 to 5250 5725 to 5850 Frequency range MHz 2400 to 2483 5 Output power Max 802 11a 13 dBm 802 11b 15 dBm 802 11g 14 dBm 802 11n 2 4GHz 16 dBm 802 11n 5GHz 16 dBm Output power Max 10 dB...

Страница 28: ...44 772 59 855 1600 x 900 60 60 1280 x 1024 63 981 60 02 1680 x 1050 65 290 59 954 1920 x 1080 67 5 60 65TC3D 55TC3D Resolution Horizontal frequency kHz Vertical frequency Hz Remark 720 x 400 31 468 70 8 640 x 480 31 469 59 94 800 x 600 37 879 60 317 1024 x 768 48 363 60 0 1280 x 720 44 772 59 855 1600 x 900 60 60 1280 x 1024 63 981 60 02 1680 x 1050 65 290 59 954 1920 x 1080 67 5 60 ...

Страница 29: ... 768 47 7 60 1280 x 1024 63 981 60 02 1680 x 1050 65 290 59 954 1920 x 1080 67 5 60 3840 x 2160 67 5 30 HDMI DisplayPort OPS 3840 x 2160 135 60 HDMI1 DisplayPort OPS 65TC3D 55TC3D Resolution Horizontal frequency kHz Vertical frequency Hz Remark 800 x 600 37 879 60 317 1024 x 768 48 363 60 0 1280 x 720 44 772 59 855 1366 x 768 47 7 60 1280 x 1024 63 981 60 02 1680 x 1050 65 290 59 954 1920 x 1080 6...

Страница 30: ... 75 60 1080 50P 56 25 50 1080 60P 67 432 59 94 1080 60P 67 5 60 2160 30P 67 5 30 HDMI DisplayPort OPS 2160 50P 112 5 50 HDMI1 DisplayPort OPS 2160 60P 135 60 HDMI1 DisplayPort OPS 65TC3D 55TC3D Resolution Horizontal frequency kHz Vertical frequency Hz Remark 480 60P 31 5 60 576 50P 31 25 50 720 50P 37 5 50 720 60P 45 60 1080 50i 28 1 50 1080 60i 33 75 60 1080 50P 56 25 50 1080 60P 67 432 59 94 108...

Страница 31: ...frequency kHz Vertical frequency Hz Remark 1280 x 720 44 772 59 855 1920 x 1080 67 5 60 Multi screen DTV Support Mode 75TC3D Resolution Horizontal frequency kHz Vertical frequency Hz Remark 720 50P 37 5 50 720 60P 45 60 1080 50P 56 25 50 1080 60P 67 5 60 2160 30P 67 5 30 HDMI DisplayPort OPS PIP Main 65TC3D 55TC3D Resolution Horizontal frequency kHz Vertical frequency Hz Remark 720 50P 37 5 50 720...

Страница 32: ...oduct display functions by the screen image changing dozens of times every second like a fluorescent lamp The vertical frequency or refresh rate is the number of image displays per second The unit is Hz Horizontal frequency The horizontal interval is the time taken to display one horizontal line When 1 is divided by the horizontal interval the number of horizontal lines displayed every second can ...

Страница 33: ...ing ON or OFF this device Make sure to read the Safety Precautions before using the product The model and serial numbers of the SET are located on the back and one side of the SET Record it below should you ever need service MODEL SERIAL ...

Отзывы: