background image

ENGLISH

10

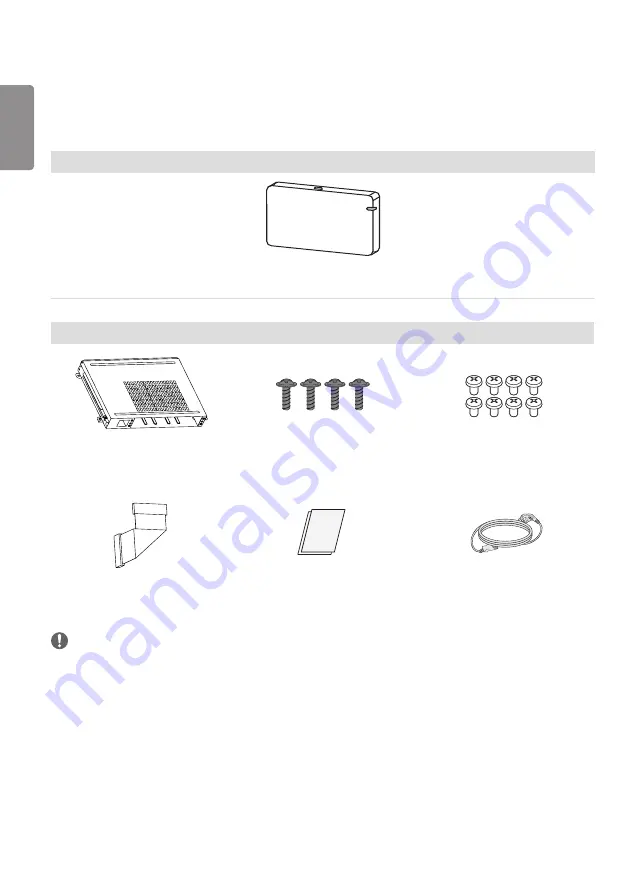
Optional Accessories

Without prior notice, optional accessories are subject to change to improve the performance of the product, and new 

accessories may be added. The illustrations in this manual may differ from the actual product and accessories.

Wi-Fi Dongle kit

AN-WF500

OPS Kit

KT-OPSA

Screws

(Diameter 3.0 mm x Length 8.0 mm)

Screws

(Diameter 3.0 mm x Length 8.0 mm)

Connecting Cable

Card (Easy Setup Guide)

Power Cord

 NOTE


Optional accessories are available for some models. If necessary, please purchase them separately.


Before you attach the OPS kit or Media Player, connect the cable to the port.


To prevent damage to the unit or the Wi-Fi dongle, power off the unit before connecting or disconnecting the Wi-FI 

dongle.

Содержание 49VH7C

Страница 1: ...Copyright 2018 LG Electronics Inc All Rights Reserved OWNER S MANUAL LG Digital Signage MONITOR SIGNAGE Please read this manual carefully before operating your set and retain it for future reference 49VM5C 49VH7C ...

Страница 2: ... ASSEMBLY AND PREPARATION 9 Optional Accessories 10 Parts and Buttons 11 Portrait Layout 12 Remove brackets before Installation 12 STORAGE METHOD FOR PANEL PROTECTION 13 Installing on a Wall 15 EXTERNAL EQUIPMENT SETUP 17 Tiling Displays 17 REMOTE CONTROL 20 MAKING CONNECTIONS 22 Connecting to a PC 22 External Device Connection 22 Using the Input List 22 Daisy Chain Monitors 24 TROUBLESHOOTING 25 ...

Страница 3: ...ence IMPORTANT PRECAUTIONS Please read these safety precautions carefully before using the product WARNING If you ignore the warning message you may be seriously injured or there is a possibility of accident or death CAUTION If you ignore the caution message you may be slightly injured or the product may be damaged WARNING Indoor Use Only ...

Страница 4: ...ds Additionally if the cord pin is wet or covered with dust dry the power plug completely or wipe dust off before plugging in the cord You may be electrocuted due to excess moisture If you don t intend to use the product for a long time unplug the power cable from the product Layers of dust can cause a fire or insulation deterioration can cause electric leakage electric shock or fire Insert the po...

Страница 5: ... is broken turn off the product and unplug the power cord If you continue to use without taking proper measures electrical shock or fire can occur Contact LG Customer Service Do not drop an object on or apply impact to the product Do not throw any toys or objects at the product It can cause injury to humans problems to the product and damage the display Keep out of reach of children and do not pla...

Страница 6: ...ifting or moving the product do not hold it upside down while holding only the stand This may cause the product to fall resulting in damage or injury Do not shock the product when moving it You may be electrocuted or the product can be damaged Make sure the panel faces forward and hold it with both hands to move If you drop the product the damaged product can cause electric shock or fire Do not pl...

Страница 7: ...lar break when working with the product for a long time Do not press on the panel with a hand or sharp object such as nail pencil or pen or make a scratch on it Keep proper distance from the product and rest from time to time Your vision may be impaired if you look at the product too closely or for too long Set the appropriate resolution by referring to the User s Guide Keep small accessories out ...

Страница 8: ... setup menu DivX Certified to play DivX video up to HD 1080p including premium content DivX DivX Certified and associated logos are trademarks of DivX LLC and are used under license Covered by DivX Patents 7 295 673 7 515 710 RE45 052 and others available at www divx com patents Manufactured under license from Dolby Laboratories Dolby and the double D symbol are trademarks of Dolby Laboratories Fo...

Страница 9: ...jury caused by the use of counterfeit components NOTE The accessories provided with your product may vary depending on the model or region Product specifications or contents in this manual may be changed without prior notice due to upgrade of product functions The warranty will not cover any damage caused by using the product in an excessively dusty environment ...

Страница 10: ... Dongle kit AN WF500 OPS Kit KT OPSA Screws Diameter 3 0 mm x Length 8 0 mm Screws Diameter 3 0 mm x Length 8 0 mm Connecting Cable Card Easy Setup Guide Power Cord NOTE Optional accessories are available for some models If necessary please purchase them separately Before you attach the OPS kit or Media Player connect the cable to the port To prevent damage to the unit or the Wi Fi dongle power of...

Страница 11: ...ay be different according to the model Buttons Changes the input source Accesses the main menus or saves your input and exits the menus Adjust the up and down Moves left and right Displays the current signal and mode Turns the power on or off ...

Страница 12: ...te the monitor clockwise 90 degrees when facing the screen Remove brackets before Installation Make sure that the protection pads are removed from each corner before installing the product NOTE Keep the removed protection pads and use them when moving the product later ...

Страница 13: ...el to touch the floor Panel 2 When laying down the product lay a cushion on a flat floor Put the product on it with the panel of the product facing down Cushion Panel 3 If there is not a cushion available ensure the floor is clean and then lay the product down carefully with the panel facing either upward or downward At this time be careful for objects not to fall on the panel Panel ...

Страница 14: ...ENGLISH 14 Incorrect Method 1 If the product is tilted onto the bezel the bottom of the panel may be damaged Panel 2 If the product is tilted onto the edge of the panel the panel may be damaged Panel ...

Страница 15: ...installation Do not over tighten the screws as this may damage the monitor and void your warranty Use only screws and wall mounting brackets that meet the VESA standard Any damage or injuries caused by misuse or use of improper accessories are not covered by the warranty To prevent injury this apparatus must be securely attached to the wall in accordance with the installation instructions This per...

Страница 16: ...autions such as Using cabinets or stands recommended by the manufacturer Only using furniture that can safely support the monitor Ensuring the monitor is not overhanging the edge of the supporting furniture Not placing the monitor on tall furniture for example cupboards or bookcases without anchoring both the furniture and the monitor to a suitable support Not placing cloth or other materials betw...

Страница 17: ...n a custom location Then that display can control other displays via an RS 232C cable Tiling Displays How to Mount the Set Example of 2 x 2 Tiling Using the screws for attaching the VESA wall mount mount the set to the wall mount plate or the wall 600 400 Screws for attaching the VESA wall mount M6 ...

Страница 18: ...ets using screws for fixing the VESA wall mount in the same way as above Set 4 joined to the rest of the sets 2 x 2 tiling 2 Adjust the spacing between the sets using the tiling guide and remove the protective sheet M4 x L6 3 Now the 2 x 2 tiling is complete You can tile in various combinations such as 3 x 3 ...

Страница 19: ...te or the wall using a VESA wall mount 600 x 400 The load applied to each set should be supported by the wall mount plate using a VESA wall mount Each set must be firmly mounted to the wall mount plate or the wall You may mount the set without using the tiling guide this does not affect the performance of the device The screws are enclosed with the other components in the box including the tiling ...

Страница 20: ...nitor on or off Turns the monitor on Turns the monitor off Reduces power consumption by adjusting peak screen brightness Selects the input mode Used for viewing 3D videos This model does not support this Toggles between numerical and alphabetical Number and Alphabet buttons Enters numerical or alphabetical characters depending upon the setting Depending upon the model this feature may not be suppo...

Страница 21: ...and confirms your input Allows you to move back one step in the user interaction function Quit all OSD tasks and applications Allows you to control various multimedia devices to enjoy multimedia simply by using the remote control through the SimpLink menu Depending upon the model this feature may not be supported Selects the TILE Mode When the Picture ID number matches the Set ID number you can co...

Страница 22: ...r supports the Plug and Play feature Plug and Play a feature that enables a PC to recognize devices attached by the user without device configuration or user intervention when powering up External Device Connection Connect a HD receiver DVD or VCR player to the monitor and select an appropriate input mode Some of the cables are not provided For the best picture and sound quality connecting externa...

Страница 23: ...e HDMI PC mode Make sure the power cable is disconnected If you connect a gaming device to the monitor use the cable provided with the gaming device It is recommended to use the speakers that are provided as optional accessories High Speed HDMI TM cables transmit a HD signal up to 1080p and higher Use the standard Macintosh adapter since an incompatible adapter is available in the market Different...

Страница 24: ...or of Monitor 1 and connect the other end to the DP In connector of the other product Monitor 1 Monitor 2 Monitor 4 Monitor 3 NOTE If the signal cable between the product and your PC is too long make sure to use the Booster or optical cable Daisy chaining the video output may be limited depending on the performance of the input device that supports HDCP ...

Страница 25: ...menu to check the input signal The Unknown Product message appears when the product is connected Problem Action Did you install the driver Check if the Plug and Play function is supported by referring to the graphics card user manual The screen image looks abnormal Problem Action Is the screen position wrong Check if the graphics card resolution and frequency are supported by the product If the fr...

Страница 26: ...d Sound is too low Adjust the volume Screen color is abnormal Problem Action Screen has poor color resolution 16 colors Set the number of colors to more than 24 bits true color Select Control Panel Display Settings Color Table in Windows The settings may differ depending on your operating system Screen color is unstable or mono colored Check the connection status of the signal cable Or re insert t...

Страница 27: ...M 123 PW ID UPM 123 PW When changing colors using complementary colors helps to prevent image sticking BM BM BM CF CF CF OC PI PI TFT Layers Glass Glass LC CF ITO or MoTi Pixel Layer 2 Change the image using the same time interval Make sure that the characters or images before changing the image remain in the same location after changing the image What is image sticking When the LCD panel displays...

Страница 28: ...ended resolution 1920 x 1080 60 Hz This may not be supported on some OS or graphics card types Horizontal frequency RGB 30 kHz to 83 kHz HDMI OPS DVI D DisplayPort 30 kHz to 83 kHz Vertical frequency RGB 50 Hz to 75 Hz HDMI OPS DVI D DisplayPort 56 Hz to 60 Hz 3840 x 2160 24p 25p 30p Synchronization Separate Sync Digital Input output ports IR IN RS 232C IN OUT HDMI IN DVI D IN DP IN OUT USB 2 0 IN...

Страница 29: ... consumption On Mode 150 W Typ Sleep Mode 0 5 W Off Mode 0 5 W Dimensions Width x Height x Depth Weight 1 075 6 mm x 605 8 mm x 86 2 mm 17 5 kg 42 3 inches x 23 8 inches x 3 3 inches 38 5 lbs RGB PC Support Mode Resolution Horizontal frequency kHz Vertical frequency Hz 640 x 480 31 469 59 94 640 x 480 37 5 75 720 x 400 31 468 70 8 800 x 600 37 879 60 317 800 x 600 46 875 75 832 x 624 49 725 74 55 ...

Страница 30: ...8 47 712 59 79 1280 x 1024 63 981 60 02 1600 x 900 60 60 1680 x 1050 65 29 59 954 1920 x 1080 67 5 60 1920 x 1200 74 038 59 95 3840 x 2160 67 5 30 DVI D PC Support Mode Resolution Horizontal frequency kHz Vertical frequency Hz 640 x 480 31 469 59 94 800 x 600 37 879 60 317 1024 x 768 48 363 60 1152 x 864 53 783 59 959 1280 x 720 45 60 1366 x 768 47 712 59 79 1280 x 1024 63 981 60 02 1600 x 900 60 ...

Страница 31: ...02 59 81 1366 x 768 47 712 59 79 1280 x 1024 63 981 60 02 1600 x 900 60 60 1680 x 1050 65 29 59 954 1920 x 1080 67 5 60 HDMI DisplayPort DTV Support Mode Resolution Horizontal frequency kHz Vertical frequency Hz 480 60p 31 5 60 576 50p 31 25 50 720 50p 37 5 50 720 60p 45 60 1080 50i 28 1 50 1080 60i 33 75 60 1080 50p 56 25 50 1080 60p 67 432 59 94 1080 60p 67 5 60 2160 24p 54 24 2160 25p 56 25 25 ...

Страница 32: ...nded that you select PC mode when connecting to a PC and select DTV mode when connecting to other devices The DTV mode refers to all modes excluding the PC mode Vertical frequency The product display functions by the screen image changing dozens of times every second like a fluorescent lamp The vertical frequency or refresh rate is the number of image displays per second The unit is Hz Horizontal ...

Страница 33: ...eed service MODEL SERIAL Temporary noise is normal when powering ON or OFF this device ENERGY STAR is a set of power saving guidelines issued by the U S Environmental Protection Agency EPA As an ENERGY STAR Partner LGE U S A Inc has determined that this product meets the ENERGY STAR guidelines for energy efficiency Refer to ENERGYSTAR gov for more information on the ENERGY STAR program ...

Страница 34: ...www lg com Please read this manual carefully before operating your set and retain it for future reference webOS 2 0 USER GUIDE LG Digital Signage MONITOR SIGNAGE ...

Страница 35: ...S 32 Connecting the Cable 32 Communication Parameter 33 Command Reference List 34 Transmission Reception Protocol 37 To obtain the source code under GPL LGPL MPL and other open source licenses that is contained in this product please visit http opensource lge com In addition to the source code all referred license terms warranty disclaimers and copyright notices are available for download LG Elect...

Страница 36: ... ball are rendered clearly on the screen Game optimizes the video image for playing videogames Photo Optimizes the screen for viewing photos This feature is available only with certain models Expert Calibration allows an expert or anyone interested in high quality pictures to manually tune the picture for the best picture quality Depending on the input signal the available Picture Modes may differ...

Страница 37: ...n becomes Color Temperature adjusts the tints of the screen to evoke feelings of warmth or coolness Advanced Controls Expert Control customizes the advanced options Dynamic Contrast Optimizes the difference between the light and dark parts of the screen according to the brightness of the image Super Resolution Sharpens the blurry or indistinguishable parts of the picture Color Gamut Selects the ra...

Страница 38: ... aspect ratio to 4 3 or 16 9 depending on the input video signal 4 3 displays the image with a 4 3 aspect ratio Zoom expands the image to fit to the width of the screen The top and bottom of the image may be cropped Cinema Zoom enlarges the image to have a cinemascope ratio of 2 35 1 without distortion 58 9 Displays the screen with a 58 9 aspect ratio You can adjust advanced settings only in the U...

Страница 39: ...ving function Advanced Picture Smart Energy Saving According to picture brightness the brightness of the monitor will be adjusted automatically to save energy Off disables the Smart Energy Saving function On enables the Smart Energy Saving function To use the SCREEN RGB PC function Only applies to certain models Advanced Picture SCREEN RGB PC Customizes the PC display options in RGB mode Set Autom...

Страница 40: ...evice to one of the Deep Colour adjustable ports you can select Deep Colour On 6G or Off 3G in the HDMI ULTRA HD Deep Colour settings menu If a compatibility issue occurs with a graphics card when the Deep Colour option is set to On at 3840 x 2160 60 Hz set the Deep Colour option to Off HDMI specifications may vary depending on the input port Check the specifications of each device before connecti...

Страница 41: ... sound settings To select a Volume Increase Rate Advanced Sound Volume Increase Amount you can set the volume range by selecting any of Low Medium High To sync audio with video Advanced Sound AV Sync Adjustment Speaker adjusts the sync between video and audio coming from external speakers such as those connected to the digital audio output port LG audio equipment or headphones From the default val...

Страница 42: ...dd a wireless network Connect via PBC Connects easily when the button of a wireless AP supporting PBC is pressed Connect via PIN Connects easily when the PIN of the wireless AP that you wish to connect to is entered in to the AP configuration webpage Advanced Settings If you input the information of network directly you can enter a wireless network If there is no wireless network available click A...

Страница 43: ...strictions set by the Internet Service Provider ISP supplying your Internet connection Any fees charged by an ISP including without limitation connection charges are your responsibility Do not connect a modular telephone cable to the LAN port Since there are various connection methods please follow the specifications of your telecommunication carrier or Internet Service Provider Network Setting me...

Страница 44: ...he On Off Timer for your monitor On Timer you can set the time when your monitor turns on Off Timer you can set the time when your monitor turns off No Signal Power Off 15Min When there is no input source the monitor will automatically turn off after 15 minutes If you don t want it to turn off automatically set No Signal Power Off to Off Auto Power Off When there is no key input the monitor will a...

Страница 45: ...12 ENGLISH To reset your monitor settings Advanced General Reset to Initial Settings Resets all monitor settings ...

Страница 46: ...SB storage device Back up files you have saved on a USB storage device frequently as loss or damage to the files may be not covered by the warranty ENTERTAINMENT Using My Media Connecting USB SD Storage Devices Connect a USB storage device such as a USB flash memory SD storage devices or an external hard drive to the display and use multimedia features CAUTION ...

Страница 47: ...ish characters Back up important files regularly as data stored on a USB storage device may be damaged We will not be responsible for any data loss If the USB HDD does not have an external power source the USB device may not be detected To ensure the device is detected connect the external power source Please use a power adapter for an external power source We do not provide a USB cable for an ext...

Страница 48: ...1 0 2 0 ass ssa txt TMPlayer psb PowerDivX dcs DLP Cinema To use Select Play Photos Videos Music All Play Selection plays back selected content To set FILTER Photos Videos Music All FILTER import contents from the selected device To set Scheduled Playing Photos Videos Music All Scheduled Playing You can play the selected content at the scheduled time ...

Страница 49: ... H 264 AVC Motion Jpeg MPEG 4 Part2 Audio MPEG 1 Layer I II MPEG 1 Layer III MP3 Dolby Digital LPCM ADPCM DTS mp4 m4v mov Videos H 264 AVC MPEG 4 Part2 Audio AAC MPEG 1 Layer III MP3 3gp 3g2 Videos H 264 AVC MPEG 4 Part2 Audio AAC AMR NB AMR WB mkv Videos H 264 AVC Audio HE AAC Dolby Digital ts trp tp mts m2ts Videos H 264 AVC MPEG 2 Audio MPEG 1 Layer I II MPEG 1 Layer III MP3 Dolby Digital Dolby...

Страница 50: ... 64 y y Maximum Normal Type 15360 W x 8640 H Progressive Type 1920 W x 1440 H png PNG y y Minimum 64 x 64 y y Maximum 5760 W x 5760 H bmp BMP y y Minimum 64 x 64 y y Maximum 1920 W x 1080 H Supported Files and Formats for Content with SuperSign Manager File extension cts sce Video file extension mpg mpeg dat ts trp tp mp4 mkv avi avi motion JPEG mp4 motion JPEG mkv motion JPEG Video format MPEG1 M...

Страница 51: ...ack of files encoded level 4 1 or higher in H 264 AVC Video files more than 30 GB in file size are not supported A DivX video file and its subtitle file must be located in the same folder A video file and its subtitle file must be located in the same folder A video file name and its subtitle file name must be identical in order to display the subtitle properly Playing a video via a USB connection ...

Страница 52: ...deo file after stopping it you can play from the point at which it was stopped Only 10 000 sync blocks can be supported within the subtitle file When playing a video you can adjust the picture size by pressing the ARC button Korean subtitle is supported only when the OSD menu is in Korean The code page options may be disabled depending on the language of the subtitle files Select the appropriate c...

Страница 53: ...n after 5 seconds you will return to the start of the song NOTE Settings You must register your product to play a DRM protected DivX video In order to register deregister purchased or rented DivX VOD contents Videos DivX VOD In order to play purchased or rented DivX VOD contents you should register your device with 10 digit DivX registration code from your device at www divx com vod Registration v...

Страница 54: ...ernal to internal memory You can delete files or folders from internal or external memory Information To check the basic information of Signage Monitor You can see the basic information on Signage Monitor You can also switch to Smart Energy Saving Mode or configure Fail Over settings You can switch to Smart Energy Saving Mode only when Energy Saving Mode is set to Off Moving Copying or Deleting a ...

Страница 55: ... To play scheduled playing instantly Select Scheduled Playing Play Button In the detailed information page of the scheduled playing click the Play button above the thumbnail to play the scheduled playing instantly By default Local Contents Scheduler lists the scheduled playing created by the currently connected devices NOTE To play a scheduled playing instantly rather than at the scheduled time th...

Страница 56: ...DVI D Other than these modes LG Signage cannot be detected by your PC 1 Connect your laptop to an AP This feature can be used without an AP but it is recommended that you connect to it for optimal performance Run the Intel WiDi program on your laptop 2 Any nearby LG Signages supporting WiDi are detected In the list of detected displays select a Signage to connect to and then click Connect Enter th...

Страница 57: ...Screen Share will be available for use To set the transfer speed Transfer Speed Transfer speed can be set to Fast or Normal When Screen Share is running this option adjusts the time difference of the image output between the device and the display Adjusting the transfer speed can repair any interruptions in displays when mirroring is used If the Screen Share app has been deleted from the HOME scre...

Страница 58: ...process using a PIN code The default PIN code is 0000 When using a PC use the full screen F11 feature in 1920 x 1080 Full HD resolution to view the same screen as the monitor CAUTION A maximum of 5 000 images stored on a USB drive SD card can be displayed from your PC or mobile device Images more than 5 000 cannot be displayed from your PC or mobile device In addition we recommend you store no mor...

Страница 59: ...ctronics may not be played Extension Codec mkv mp4 ts Video H 264 AVC HEVC Audio Dolby Digital Dolby Digital Plus AAC HE AAC Some codecs can be used after upgrading software Supported Video Codec Extension Codec asf wmv Videos VC 1 Simple and Main Profiles Audio WMA Standard WMA 10 Professional divx avi Videos DivX3 11 DivX4 DivX5 DivX6 XViD H 264 AVC Motion Jpeg MPEG 4 Part2 Audio MPEG 1 Layer I ...

Страница 60: ...n the remote control to go to the screen layout menu bar and select it to show the screen layout menu Closing Screen Layout Menu From the screen layout menu press the up arrow key on the remote control to go to the screen layout menu bar and select it or press the BACK key to close the screen layout menu Changing Screen Input Press the button on the top right of each split screen to select the des...

Страница 61: ...OTE y y Certain models may not support the following codec combinations when playing 3840 x 2160 resolution videos on the main screen in PIP mode Main 3840 x 2160 Sub HEVC HEVC H 264 HEVC VP9 VP9 y y When the 4 section screen has been selected in PBP mode up to two H 264 and MPEG2 codecs can be used on condition that the HEVC codec is in use on one screen only Resolutions supported on external inp...

Страница 62: ...n IR receiver and other monitors using RS 232C cables Each monitor is identified by a Set ID If you assign the PICTURE ID using the remote control only displays with matching PICTURE ID and Set ID can be controlled remotely AUDIO RGB DVI REMOTE CONTROL IN RS 232C OUT RS 232C IN RS 232C OUT RS 232C IN RS 232C OUT RS 232C IN IR Light Sensor RS 232C cables PICTURE ID If PICTURE ID is set to 2 only th...

Страница 63: ...mote control button 17 Number Key 7 Remote control button 18 Number Key 8 Remote control button 19 Number Key 9 Remote control button 02 Volume Remote control button 03 Volume Remote control button E0 BRIGHTNESS Page Up Remote control button E1 BRIGHTNESS Page Down Remote control button DC 3D Remote control button 32 1 a A Remote control button 2F CLEAR Remote control button 7E Remote control butt...

Страница 64: ...EEN Remote control button 63 YELLOW Remote control Button 61 BLUE Remote control button B1 Remote control button B0 Remote control button BA Remote control button 8F Remote control button 8E Remote control button 5F W BAL Remote control button 3F S MENU Remote control button 7C HOME Remote control button Some key codes are not supported depending on the model ...

Страница 65: ... model Connect the RS 232C cable as shown in the picture The RS 232C protocol is used for communication between the PC and product You can turn the product on or off select an input source or adjust the OSD menu from your PC Monitor 1 Monitor 2 Monitor 3 Monitor 4 PC RS 232C IN RS 232C OUT RS 232C IN RS 232C OUT RS 232C IN RS 232C OUT RS 232C IN RS 232C OUT RS 232C Gender 4P Cable not included RS ...

Страница 66: ...connections non standard an IR daisy chain cannot be used Be sure to only use the provided gender to connect properly When monitors connected via Daisy Chain that controls multiple monitors are turned off and on successively some monitors may not turn on In this case you can turn those monitors on by pressing the MONITOR ON button not the POWER button NOTE MONITOR ON POWER ...

Страница 67: ...x See Time 2 18 Off time schedule f c 00 to 01 19 On Time Schedule f b 00 to 01 20 Off Timer Repeat Time f e See Off Timer 21 On Timer Repeat Time f d See On Timer 22 On Timer Input f u Refer to On Timer Input 23 No Signal Power Off 15Min f g 00 to 01 24 Auto Power Off 4 Hours m n 00 to 01 25 Language f i See Language 26 Reset f k 00 to 02 27 Current Temperature d n FF 28 Key m c See Key 29 Time E...

Страница 68: ...r to Daylight Saving Time 55 PM Mode s n 0c 00 to 03 56 ISM Method j p See ISM Method 57 Network Settings s n 80 81 82 See Network Settings 58 Auto adjustment j u 01 59 H Position f q 00 to 64 60 V Position f r 00 to 64 61 H Size f s 00 to 64 62 Power On Status t r 00 to 02 63 Wake On LAN f w 00 to 01 64 Intelligent Auto t i 00 to 01 65 OSD Portrait Mode t h 00 to 02 66 Reset to Initial Settings t...

Страница 69: ...nput 80 Aspect Ratio MultiScreen x d See Aspect Ratio MultiScreen 81 Screen Mute MultiScreen x e See Screen Mute MultiScreen 82 Screen Off Always s n 0d 00 to 01 83 Screen Video Freeze k x 00 to 01 84 Wireless Wake On LAN s n 90 00 to 01 85 OSD Display k l 00 to 01 86 UPnP Mode s n 9c 00 to 01 Note Commands may not work when the external input is not used Some commands may not be supported dependi...

Страница 70: ...rease depending on the command Cr Carriage Return Corresponds to 0x0D in ASCII code White Space Corresponds to 0x20 in ASCII code Acknowledgement Command2 Set ID OK NG Data x The Product transmits ACK acknowledgement based on this format when receiving normal data At this time if the data is FF it indicates the present status data If the data is in data write mode it returns the data of the PC com...

Страница 71: ...SuperSign W webOS Player returns NG 03 Aspect Ratio Command k c Adjusts the aspect ratio Transmission k c Set ID Data Cr Data 01 4 3 02 16 9 04 Zoom 06 Set by Program 09 Just Scan 720p or higher 10 to 1F Cinema Zoom 1 to 16 21 58 9 30 Vertical Zoom 31 All Direction Zoom Available data types differ depending on the input signal For more information see the aspect ratio section of the owner s manual...

Страница 72: ...dgement k Set ID OK NG Data x 09 Color Command k i Adjusts the screen color Transmission k i Set ID Data Cr Data 00 to 64 Color 0 to 100 Acknowledgement i Set ID OK NG Data x 10 Tint Command k j Adjusts the screen tint Transmission k j Set ID Data Cr Data 00 to 64 Tint red 50 to green 50 Acknowledgement j Set ID OK NG Data x 11 Color Temperature Command x u Adjusts the screen color temperature Tra...

Страница 73: ...1F 1st to 31st Enter fa Set ID ff to view the Time 1 year month day settings 2 Setting the Auto time Data1 00 Auto 01 Manual To view the set value of the Auto time enter fa Set ID 00 ff Acknowledgement 1 a Set ID OK NG Data1 Data2 Data3 x 2 a Set ID OK NG 0 0 Data1 x 17 Time 2 hour minute second Command f x Adjusts the Time 2 hour minute second value Transmission f x Set ID Data1 Data2 Data3 Cr Da...

Страница 74: ... and Time 2 hour minute second are set Acknowledgement e Set ID OK NG Data1 Data2 Data3 x 21 On timer Repeat Time Command f d Configures On Timer Repeat Time settings Transmission f d Set ID Data1 Data2 Data3 Cr Data1 1 f1h to f7h reading data F1 reads the 1st On Timer data F2 reads the 2nd On Timer data F3 reads the 3rd On Timer data F4 reads the 4th On Timer data F5 reads the 5th On Timer data F...

Страница 75: ...ssion f u Set ID Data1 Cr f u Set ID Data1 Data2 Cr Data Add schedule 40 COMPONENT 60 RGB 70 DVI D A0 HDMI1 A1 HDMI2 OPS A2 OPS HDMI3 DVI D A5 OPS DVI D A6 HDMI3 DVI D D0 DISPLAYPORT Data1 Read schedule 1 f1h to f7h Read data F1 Select the 1st schedule input F2 Select the 2nd schedule input F3 Select the 3rd schedule input F4 Select the 4th schedule input F5 Select the 5th schedule input F6 Select...

Страница 76: ... control Transmission m c Set ID Data Cr Data IR_KEY_CODE Acknowledgement c Set ID OK NG Data x For key codes see IR Codes Some key codes are not supported depending on the model 29 Time Elapsed Command d l Checks the elapsed time Transmission d l Set ID Data Cr Data FF Read status Acknowledgement l Set ID OK NG Data x The data received is shown as a hexadecimal value 30 Product serial number Comm...

Страница 77: ...0 to FE Blue Gain 0 to 254 FF checks the blue gain value Acknowledgement o Set ID OK NG Data x 35 White Balance Red Offset Command s x Adjusts the white balance red offset value Transmission s x Set ID Data Cr Data 00 to 7F Red Offset 0 to 127 FF checks the red offset value Acknowledgement x Set ID OK NG Data x 36 White Balance Green Offset Command s y Adjusts the white balance green offset value ...

Страница 78: ...K NG Data x 41 Check Tile Mode Command d z Checks the tile mode Transmission d z Set ID Data Cr Data FF checks the tile mode Acknowledgement z Set ID OK NG Data1 Data2 Data3 x Data1 00 tile mode off 01 tile mode on Data2 00 to 0F tile column Data3 00 to 0F tile row 42 Tile ID Command d i Sets the tile ID value of the product Transmission d i Set ID Data Cr Data 01 to E1 Tile ID 1 to 225 FF checks ...

Страница 79: ...n input mode for auto switch Transmission m i Set ID Data Cr Data 00 Off 01 Auto 02 Manual Acknowledgement i Set ID OK NG Data x 48 Fail Over Input Select Command m j Selects an input source for auto switch This command is only available when the Fail Over auto mode is set to Custom Transmission m j Set ID Data1 Data2 Data3 Data4 DataN Cr Data 1 to N 1 Input priority 1 to N 1 40 COMPONENT 60 RGB 7...

Страница 80: ...ission t p Set ID Data Cr Data 00 locks off all of the keys 01 locks on all of the keys except the Power key 02 locks on all of the keys Acknowledgement x Set ID OK NG Data x When the monitor is turned off the power key works even in the locks on all of the keys 02 mode 50 Local Key Operation Command t o Configures the local key operation settings of the product Transmission t o Set ID Data Cr Dat...

Страница 81: ...ddress FF Views the temporary DNS address If Data1 is 82 Data2 80 Applies the temporarily saved IP mode Auto Manual subnet mask and gateway 81 Applies the temporary DNS address FF Information on the current network IP subnet gateway DNS Examples of settings 1 Auto sn 01 80 00 2 Manual sn 01 80 01 010177223241 255255254000 010177222001 IP 10 177 223 241 subnet 255 255 254 0 gateway 10 177 222 1 3 N...

Страница 82: ...s Set ID OK NG Data x It may not be supported depending on the model 62 Power On Status Command t r Selects the desired Power On status option Transmission t r Set ID Data Cr Data 00 LST Stays in the previous status 01 STD Stays powered off 02 PWR Stays powered on Acknowledgement r Set ID OK NG Data x 63 Wake On LAN Command f w Selects the desired Wake On LAN option Transmission f w Set ID Data Cr...

Страница 83: ...It may not be supported depending on the model 69 Pivot Mode Command t a Sets Pivot Mode to on off Transmission t a Set ID Data Cr Data 00 Off 01 On Acknowledgement a Set ID OK NG Data x This feature may not be supported in certain models 70 Studio Mode Command s n 83 Sets Studio Mode to on off Transmission s n Set ID 8 3 Data Cr Data 00 Off 01 On Acknowledgement n Set ID OK NG 8 3 Data x This fea...

Страница 84: ...ata 00 Off 01 On Acknowledgement n Set ID OK NG 8 8 Data x This feature may not be supported in certain models 76 Aspect Ratio Rotation Command s n 89 Controls the Aspect Ratio Rotation screen This command works only when Content Rotation is on Transmission s n Set ID 8 9 Data Cr Data 00 Full 01 Original Acknowledgement n Set ID OK NG 8 9 Data x This feature may not be supported in certain models ...

Страница 85: ...ged even if there is no stored list Example 1 ss 01 f1 ff ff Reads the first index data from the Easy Brightness Control Example 2 ss 01 ff Reads all index data from the Easy Brightness Control Example 3 ss 01 e1 ff ff Deletes the first index data from the Easy Brightness Control Example 4 ss 01 07 1E 46 Adds a schedule whose time is 07 30 and whose backlight is 70 Acknowledgement s Set ID OK NG D...

Страница 86: ... models 83 Screen Video Freeze Command k x Turns on off the video freeze function Transmission k x Set ID Data Cr Data 00 Turns on the freeze function 01 Turns off the freeze function Available in single input mode Acknowledgement x Set ID OK NG Data x This feature may not be supported in certain models 84 Wireless Wake on LAN Command s n 90 Sets Wireless Wake on LAN Transmission s n Set ID 9 0 Da...

Страница 87: ......

Страница 88: ...www lg com Please read this manual carefully before operating your set and retain it for future reference webOS 2 0 INSTALLATION MANUAL LG Digital Signage MONITOR SIGNAGE ...

Страница 89: ...y 0 250 Check Screen Digital Audio Input Speaker USB Auto Playback Set ID PM Mode Interface Selection OPS Power Control OPS PC Power Control Master Slave Mode Sync Mode Content Rotation Aspect Ratio Rotation Intelligent Auto Studio Mode Pivot Mode Scan Inversion White Balance Applications Crestron Factory Reset Status Message SIMPLINK Setup Multi screen Resolution Guide to Using Content Rotation P...

Страница 90: ...ration Action Cycle Bar Image Bar Color Transparency Direction Bar Image Download User Image Download User Video Download How to reset or delete downloaded bar images user images user videos Server Menu 23 Set Automatically Server IP Server Status Link Server IP Link Server Port Link Server Status Lock Mode Menu 24 USB OSD Reset to Initial Settings WiFi ENGLISH 3 ...

Страница 91: ...The top right corner is displayed enter your password The default value is 0 0 0 0 3 When the Installation Menu is displayed select the desired option Signage Setup USB Cloning Password Change Tile Mode Fail Over ISM Method Server Lock Mode NOTE Images in the manual may look different from the actual product ENGLISH 4 ...

Страница 92: ... to Block All you cannot use the remote control Power On feature is available Local Key Operation If you set Local Key Operation to Normal you can use the Local Key If you set Local Key Operation to Power Key Only you can only use the Power Key If you set Local Key Operation to Block All you cannot use the Local Key Power On feature is available Wake On LAN You can set whether to use the Wake On L...

Страница 93: ...unique identifier UUID that will be used for Beacon A UUID consists of 32 digits and each digit has a hexadecimal value 0 FF converted from a decimal number ranging from 0 to 255 Major 0 65535 Sets the main category value that matches the UUID Minor 0 65535 Sets the subcategory value that matches the Major value OK Confirmation button to apply the four values above once they are set Some models do...

Страница 94: ...used Depending on the model you can set this feature to Off On If you set this feature to On the OSD rotates 90 degrees clockwise The set must be restarted for the changed settings to be applied in some models Power On Delay 0 250 This feature delays power on in order to prevent overload when multiple monitor sets are turned on simultaneously You can set the delay interval in the range of 0 to 250...

Страница 95: ...1 to 1000 and exit the option You can control each product separately by using the Set ID you assigned to each product Auto Set ID Automatically assigns a unique set ID number to each set when several products are connected for display Reset Set ID You can reset the Set ID of the product to 1 PM Mode Power Off Normal DC off status Sustain Aspect Ratio Normal DC off status except that Switching IC ...

Страница 96: ...multiple monitors connected via RS 232C Master Slave These monitors can be set to Master or Slave Only one monitor should be set to Master mode for this feature to work properly Time Sync When Time Sync is set to On the current time of the Master monitor is sent to multiple Slave monitors connected via RS 232C to sync the time The monitors are synced every hour after the initial sync when Time Syn...

Страница 97: ...on If you set Aspect Ratio to Full the displayed position of the mouse pointer may not be accurate Image quality degradation is not a product issue when setting Content Rotation using external input Aspect Ratio Rotation Selects an aspect ratio option that will be applied to Content Rotation Original Full Intelligent Auto Adjusts the size position and phase of the monitor s screen automatically at...

Страница 98: ...e Launcher bar We recommend that if you are to remove the Screen Share app from the home launcher by unchecking the Screen Share item you should reboot your system after removal If you set Content Rotation or OSD Portrait Mode to On the SuperSign EZ app will be deleted from the launcher and the SuperSign EZ item will be disabled Crestron This function allows synchronization with an application pro...

Страница 99: ...emperature sensor An email is sent if there is no temperature sensor connected if the communication status of the temperature sensor is unknown or if the information provided by the chip provider is abnormal 3 Network Status Wireless Wired An email is sent when the network s connection status is changed The maximum number of network status changes that can be saved is limited to 50 The saved value...

Страница 100: ...lit screen mode is changed On some graphics cards capable of both HDTV signal output and PC signal output the HDTV output resolution is adjusted to 1080p or lower and the PC output resolution is adjusted for two three or four screens automatically For some graphics cards and operating systems it may be necessary to set the recommended resolution for each split mode One Screen The recommended resol...

Страница 101: ...rtrait installation setting In the original image or in Pivot mode you can turn the image into a portrait image using Content Rotation When installing the display rotated 90 degrees Set Content Rotation to 270 When installing the display rotated 270 degrees Set Content Rotation to 90 Example When installing the display rotated 90 degrees 2 2 2 2 Rotating displays 90 degrees Original Pivot Mode Con...

Страница 102: ...t Mode to On for the displays in row 2 Portrait video wall Set Scan Inversion to On and set Content Rotation to 90 for the displays in column 1 Set Content Rotation to 270 for the displays in column 2 Original 2 2 2 2 2 2 2 2 2 2 2 2 2 2 2 2 2 2 2 2 2 2 Row 2 Scan Inversion Row 2 Pivot Mode Tile Mode Rotating displays 90 degrees Contents Rotation Column 1 90 Column 2 270 Landscape Tile Mode Portra...

Страница 103: ... a settings file from a different model may not work properly on this product When import is complete the power reboots after 5 seconds Logo Image Download You can download and apply the boot images The image you want to apply must be stored in the LG_MONITOR folder at the top level of a USB device When downloading is complete the set reboots and the boot image will be applied CAUTION To use the C...

Страница 104: ...le rows Column 1 15 Set the number of Tile columns Tile ID 1 225 Set an ID for the Tile The ID you selected will be displayed on the screen Natural For more natural display the image is partly omitted to account for the distance between the screens Reset Resets the Tile Mode option When Tile is reset Tile settings will be reset to 2 x 2 NOTE If Tile Mode is enabled Smart Energy Saving will be disa...

Страница 105: ...ID 5 ID 3 ID 6 ID 7 ID 8 ID 9 4X4 When using 16 monitors 5X5 When using 25 monitors ID 1 ID 2 ID 5 ID 6 ID 3 ID 7 ID 9 ID 10 ID 11 ID 4 ID 8 ID 12 ID 13 ID 14 ID 15 ID 16 ID 1 ID 2 ID 6 ID 7 ID 3 ID 8 ID 11 ID 12 ID 13 ID 4 ID 5 ID 9 ID 10 ID 14 ID 15 ID 16 ID 21 ID 17 ID 22 ID 18 ID 23 ID 19 ID 24 ID 20 ID 25 Tile Mode Natural mode When active the part of the image that would normally be displaye...

Страница 106: ...n set Priority 1 Priority 6 NOTE If the input switches to the Internal Memory USB or SD Card due to Fail Over the content videos or images in the storage device will be played If there is content cts or cpls located in the fail_over FAIL_OVER folder in the root directory of the storage device the content will be played first If there is no content the videos or images stored in the root directory ...

Страница 107: ... bar on the screen to make the image move smoothly You can download your desired image and display it on the bar Repeat Off just 1 time If you select the desired mode and press DONE ISM operates immediately On If the screen remains still for a specified wait time ISM operates for the specified duration time Wait You can set the time between 1 24 hours This option is available only when you have se...

Страница 108: ...able only when you have selected Washing Bar Transparency Off Displays the bar opaquely On Displays the bar translucently Transparency 50 This option is available only when you have selected Washing Bar Direction Left To Right The bar is moved from left to right Right To Left The bar is moved from right to left This option is available only when you have selected Washing Bar Bar Image Download To ...

Страница 109: ... Video Download To download a video the video file must be located under the folder titled ISM on your USB drive Make sure to delete the old contents stored in the internal memory before downloading a new video file Supported video file types MP4 AVI FLV MKV MPEG TS You can download up to one video If there are no videos or if the existing videos have been deleted the default video is used The def...

Страница 110: ... SuperSign server but not yet approved Rejected indicates that your monitor is connected to the SuperSign server but has been rejected Connected indicates that your monitor is connected to the SuperSign server and has been approved Link Server IP This menu sets the IP address of the SuperSign Link Server Link Server Port This menu sets the port of the SuperSign Link Server Link Server Status Displ...

Страница 111: ... USB You can prevent the use of USB devices OSD You can prevent OSD from displaying Reset to Initial Settings You can restore the initial settings with this feature WiFi You can restrict the Wi Fi settings ENGLISH 24 ...

Страница 112: ......

Отзывы: