background image

32

EXTERNAL EQUIPMENT SETUP

EXTERNAL 

EQ
UIPMENT 

SETUP

To view a normal picture, match the resolution of RGB mode and selection of PC mode.

This function works in the following mode: RGB[PC]

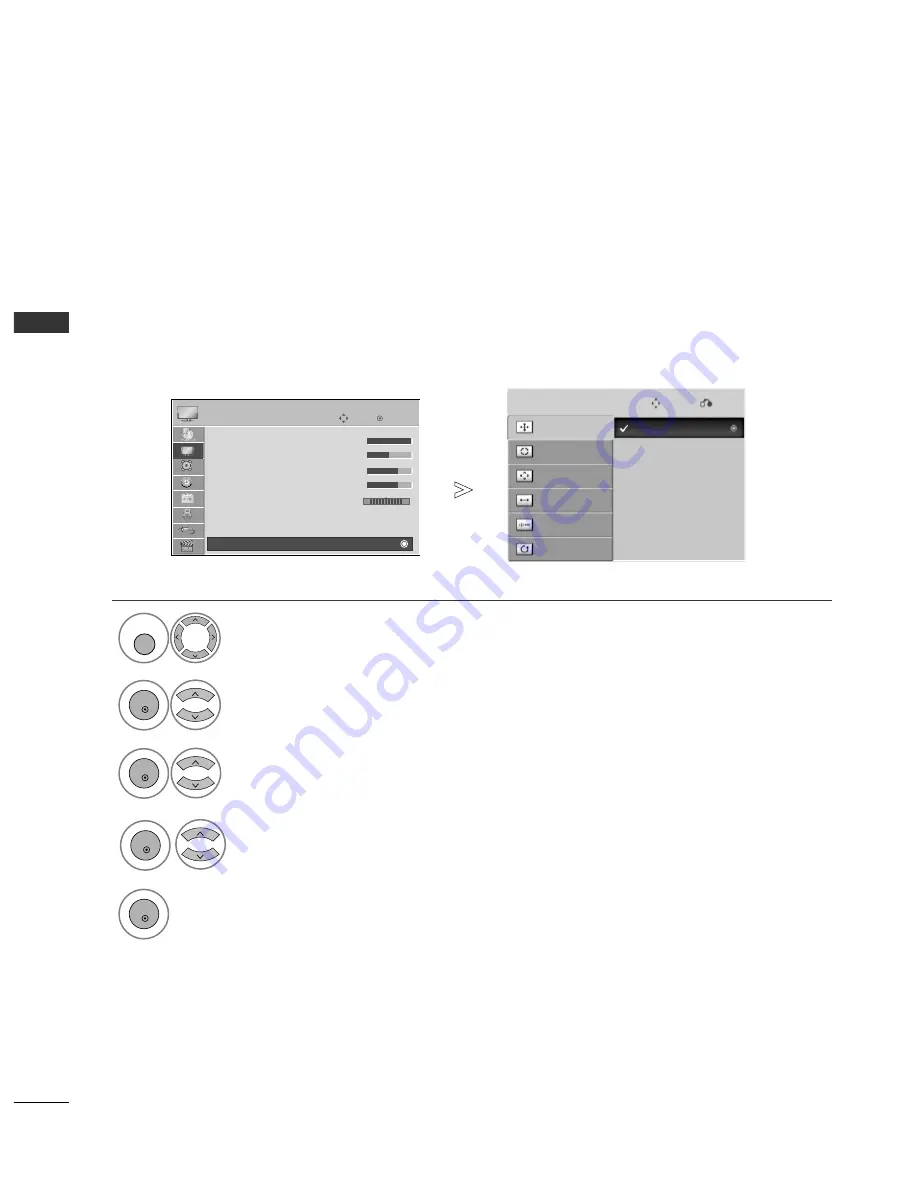
Selecting Resolution

Select P

PIIC

CT

TU

UR

RE

E.

Select S

Sccrreeeen

n.

Select R

Reesso

ollu

uttiio

on

n.

Select the desired resolution.

1

MENU

3

4

2

OK 

OK 

OK 

5

OK 

• 

Press the M

ME

EN

NU

U button to return to normal TV viewing.

• 

Press the R

RE

ET

TU

UR

RN

N button to move to the previous menu screen.

Auto Config.

SCREEN

Move

Prev.

Resolution

Position

Size

Phase

Reset

1024 x 768

1280 x 768

1360 x 768

OK

Move

• Contrast

100

• Brightness

50

• Sharpness

70

• Colour

70

• Tint

0

• Advanced Control

• Picture Reset

Screen

PICTURE

R

G

Screen

E

Содержание 42PQ6 Series

Страница 1: ...991 to 1996 I ID D N Nu um mb be er r s s 6422 42PQ60D GA 6493 50PQ60D GA 6492 50PS80FD GA 6767 50PS30FD GA 6766 60PS80FD GA Please read this manual carefully before operating your TV Retain it for future reference Record the model number and serial number of the TV Refer to the label on the back cover and quote this information To your dealer when requiring any service ...

Страница 2: ...HDMITM the HDMI logo and High Definition Multimedia Interface are trademarks or registered trademarks of HDMI Licensing ...

Страница 3: ...may cause scratching or discolouration Protection cover Refer to p 13 Cable Holder Refer to p 9 Bolts for stand assembly Refer to p 8 Except for 60PS8 x 4 x 2 Remote Control RATIO RATIO TIO FREEZE FREEZE Cable management clip Refer to p 9 Only 50 60PS8 AW 50PG60MS Except for 60PS8 Wall Mounting Bracket Separate purchase AW 60PG60MS Only 60PS8 Ferrite Core This item is not included for all models F...

Страница 4: ...Digital Mode 40 Manual Programme Tuning In Analogue Mode 41 Programme Edit 43 Software Update 45 Diagnostics 46 Selecting the Programme List 47 Favourite Programme Setup 48 Input List 49 Input Label 50 Simple manual 51 52 AV Mode 55 Initializing Reset to original factory settings 56 TO USE A USB DEVICE When connecting the a USB device 57 Photo List 58 Music List 62 Movie List 65 DivX Registration ...

Страница 5: ...e 94 TV Speakers On Off Setup 95 Selecting Digital Audio Out 96 Audio Reset 97 Stereo Reception In Analogue Mode Only 98 Speaker Sound Output Selection 98 Language Selection In Digital Mode only 99 TIME SETTING Clock Setup 100 Auto On Off Time Setting 101 Sleep Timer Setting 102 PARENTAL CONTROL RATINGS Set Password Lock System 103 Block Programme 104 Parental Control In Digital Mode only 105 Exte...

Страница 6: ...ontrol G Do not step on the glass stand or subject it to any impact It may break causing possible injury from fragments of glass or the TV may fall G Do not drag the TV The floor or the product may be damaged CAUTION Power Standby Indicator Illuminates red in standby mode The LED is off while the TV remains on 42 50PQ6 Remote Control Sensor Intelligent Sensor Adjusts picture accord ing to the surr...

Страница 7: ...sts picture according to the surrounding condi tions R Re em mo ot te e C Co on nt tr ro ol l S Se en ns so or r PROGRAMME VOLUME MENU OK INPUT POWER P MENU MENU INPUT INPUT OK OK P MENU INPUT OK P MENU INPUT OK Intelligent Sensor Adjusts picture according to the surrounding conditions Remote Control Sensor Power Standby Indicator Illuminates red in standby mode Illuminates blue when the TV is swi...

Страница 8: ...e RGB IN Input Connect the output from a PC RS 232C IN CONTROL SERVICE PORT Connect to the RS 232C port on a PC This port is used for Service or Hotel mode Audio Video Input AV IN1 AV IN2 Connect audio video output from an external device to these jacks AV Output Connect second TV or monitor to the AV OUT socket on the TV Component Input Connect a component video audio device to these jacks Antenn...

Страница 9: ...Digital Audio Component Use an Optical audio cable RGB DVI Audio Input Connect the audio from a PC or DTV HDMI Input Connect a HDMI signal to HDMI IN or DVI VIDEO signal to HDMI DVI port with DVI to HDMI cable RGB IN Input Connect the output from a PC RS 232C IN CONTROL SERVICE PORT Connect to the RS 232C port on a PC This port is used for Service or Hotel mode Audio Video Input AV IN1 AV IN2 Conn...

Страница 10: ...ng part of the bolt 1 2 3 Carefully place the TV screensidedownonacushioned surface to protect the screen from damage Assemble the TV as shown Fix the 4 bolts securely using the holes in the back of the TV G G When assembling the stand make sure to distinguish and assemble the front and rear side of the stand cor rectly NOTE FRONT Only 42 50PQ6 50PS3 Only 50PS8 1 2 3 Carefully place the TV screens...

Страница 11: ...al equipment see the E Ex xt te er rn na al l e eq qu ui ip pm me en nt t S Se et tu up p section 1 Install the C CA AB BL LE E M MA AN NA AG GE EM ME EN NT T C CL LI IP P as shown 2 CABLE MANAGEMENT CLIP CABLE HOLDER NOTE G G Do not use the CABLE MANAGEMENT CLIP to lift the TV If the TV is dropped you may be injured or the TV may be damaged Hold the C CA AB BL LE E M MA AN NA AG GE EM ME EN NT T ...

Страница 12: ...the TV NOTE G When moving the TV undo the cords first G Use a platform or cabinet strong and large enough to support the size and weight of the TV G To use the TV safely make sure that the height of the bracket on the wall and on the TV is the same 3 1 2 Use the eye bolts or TV brackets bolts to fix the product to the wall as shown in the picture If your TV has bolts in the eyebolts loosen then bo...

Страница 13: ...re that you connect the earth wire to prevent possible electric shock If grounding methods are not possible have a qualified electrician install a separate circuit breaker Do not try to earth the TV by connecting it to telephone wires lightening rods or gas pipes 4 inches 4 inches 4 inches SWIVEL STAND After installing the TV you can adjust the TV set manually to the left or right direction by 20 ...

Страница 14: ...tall wall mount on a solid wall perpendicular to the floor G Should use a special wall mount if you want to install it to ceiling or slanted wall G The surface that wall mount is to be mounted on should be of sufficient strength to support the weight of TV set e g concrete natural rock brick and hollow block G Installing screw type and length depends on the wall mount used Further information refe...

Страница 15: ...n may differ from your TV When installing the wall mounted unit use the protection cover NOT USING THE DESK TYPE STAND PROTECTION COVER Insert the P PR RO OT TE EC CT TI IO ON N C CO OV VE ER R into the TV until clicking sound ...

Страница 16: ...l all connections are made between the devices Multi family Dwellings Apartments Connect to wall antenna socket Single family Dwellings Houses Connect to wall jack for outdoor antenna Outdoor Antenna VHF UHF Wall Antenna Socket RF Coaxial Wire 75 ohm Antenna UHF Signal Amplifier VHF In poor signal areas to achieve better picture quality it may be necessary to install a signal amplifier to the ante...

Страница 17: ... digital set top box However if you do receive Digital signals from a digital set top box or other digital external device refer to the diagram as shown below Connect the video outputs Y PB PR of the digital set top box to the C CO OM MP PO ON NE EN NT T I IN N V VI ID DE EO O jacks on the TV Connect the audio output of the digital set top box to the C CO OM MP PO ON NE EN NT T I IN N A AU UD DI I...

Страница 18: ...ital set top box Refer to the owner s manual for the digital set top box Select H HD DM MI I1 1 H HD DM MI I2 2 H HD DM MI I or H HD DM MI I I IN N 4 4 Only 50 60PS8 input source using the I IN NP PU UT T button on the remote control 2 3 1 NOTE G Check that your HDMI cable is version 1 3 or higher If the HDMI cables don t support HDMI version 1 3 flicker ing or no screen display can result Please ...

Страница 19: ... on the TV Connect the audio output of the digital set top box to the A AU UD DI IO O I IN N R RG GB B D DV VI I jack on the TV Turn on the digital set top box Refer to the owner s manual for the digital set top box Select H HD DM MI I1 1 input source using the I IN NP PU UT T button on the remote control 2 3 4 1 42 50PQ6 50PS3 AV AUDIO IN RGB DVI VIDEO R AUDIO L MONO IN1 OUT R AUDIO L VIDEO COMPO...

Страница 20: ...V Turn on the DVD player insert a DVD Select C Co om mp po on ne en nt t 1 1 input source using the I IN NP PU UT T button on the remote control If connected to C CO OM MP PO ON NE EN NT T I IN N 2 2 input select C Co om mp po on ne en nt t 2 2 input source Refer to the DVD player s manual for operating instructions 2 3 4 5 1 Component Input ports To achieve better picture quality connect a DVD pl...

Страница 21: ... PU UT T button on the remote control Refer to the DVD player s manual for operating instructions 2 3 1 G G The TV can receive video and audio signals simultaneously when using a HDMI cable G G If the DVD does not support Auto HDMI you must set the output resolution appropriately G G Check that your HDMI cable is version 1 3 or higher If the HDMI cables don t support HDMI version 1 3 flickering or...

Страница 22: ...T IN R S VIDEO VIDEO ANT OUT L R AUDIO L MON IN1 OUT R AUDIO L COMPONENT IN 1 2 Wall Jack Antenna 1 2 Connecting with a RF Cable Connect the A AN NT T O OU UT T socket of the VCR to the A AN NT TE EN NN NA A I IN N socket on the TV Connect the antenna cable to the A AN NT T I IN N socket of the VCR Press the P PL LA AY Y button on the VCR and match the appropriate channel between the TV and VCR fo...

Страница 23: ...udio Left white and Audio Right red Insert a video tape into the VCR and press PLAY on the VCR Refer to the VCR owner s manual Select A AV V2 2 input source using the I IN NP PU UT T button on the remote control If connected to A AV V I IN N 1 1 input select A AV V1 1 input source 1 2 3 G G If you have a mono VCR connect the audio cable from the VCR to the A AU UD DI IO O L L M MO ON NO O jack of ...

Страница 24: ... T jacks See the Operating Manual of the second TV or monitor for further details regarding that device s input settings G G Only Digital Analogue AV1 AV2 mode can be used for AV out Component RGB HDMI input sources cannot be used for AV out G G We recommend to use the AV OUT jacks for VCR recording NOTE 2 1 AV AUDIO IN RGB DVI VIDED R AUDIO L MONO IN1 OUT R AUDIO L VIDEO COMPONENT IN COMPONENT IN...

Страница 25: ... the laser beam may damage your vision CAUTION AV AUDIO IN RGB DVI VIDED R AUDIO L MONO IN1 OUT R AUDIO L VIDEO COMPONENT IN 1 2 Connect one end of an optical cable to the TV Digital Audio Optical Output port Connect the other end of the optical cable to the digital audio optical input on the audio equipment Set the TV Speaker option Off in the AUDIO menu Gp p 9 95 5 Refer to the external audio eq...

Страница 26: ...ch the jack colours Video yellow Audio Left white and Audio Right red Select A AV V2 2 input source with using the I IN NP PU UT T button on the remote control If connected to A AV V I IN N 1 1 input select A AV V1 1 input source Operate the corresponding external equipment Refer to external equipment operating guide L R VIDEO 2 3 Camcorder Video Game Set 1 1 2 3 ...

Страница 27: ...25 EXTERNAL EQUIPMENT SETUP USB SETUP 2 3 Connect the USB device to the U US SB B I IN N jack on the TV After connecting the U US SB B I IN N jacks you use the U US SB B function G G p p 5 57 7 2 1 1 ...

Страница 28: ...UDIO VIDEO L R AUDIO VIDEO OUT L R AUDIO VIDEO AV AUDIO IN RGB DVI VIDEO R AUDIO L MONO IN1 OUT R AUDIO L VIDEO COMPONENT IN 1 2 AUDIO RGB OUTPUT 1 2 4 Connect the RGB output of the PC to the R RG GB B I IN N P PC C jack on the TV Connect the PC audio output to the A AU UD DI IO O I IN N R RG GB B D DV VI I jack on the TV Turn on the PC and the TV Select R RG GB B input source using the INPUT butt...

Страница 29: ...U UD DI IO O I IN N R RG GB B D DV VI I jack on the TV Turn on the PC and the TV Select H HD DM MI I1 1 input source using the INPUT button on the remote control 2 3 1 AV AUDIO IN RGB DVI VIDEO R AUDIO L MONO IN1 OUT R AUDIO L VIDEO COMPONENT IN 1 2 1 COMPONENT IN 1 2 42 50PQ6 50PS3 AV AUDIO IN RGB DVI VIDEO R AUDIO L MONO IN1 OUT R AUDIO L VIDEO COMPONENT IN 1 2 1 COMPONENT IN 3 1 2 50 60PS8 ...

Страница 30: ...24x768 1280x768 1360x768 1280x1024 Except for 42 50PQ6 1400x1050 Except for 42 50PQ6 1920x1080 Resolution Horizontal Frequency kHz Vertical Frequency Hz HDMI DVI DTV mode 59 94 60 59 94 60 50 00 50 00 59 94 60 50 00 59 94 60 24 00 30 50 00 59 94 60 31 649 31 469 31 47 31 50 31 25 37 50 44 96 45 00 28 125 33 72 33 75 27 00 33 750 56 25 67 433 67 50 Resolution Horizontal Frequency kHz Vertical Frequ...

Страница 31: ...uali ty G Connect the signal cable from the monitor out put port of the PC to the RGB PC port of the TV or the signal cable from the HDMI output port of the PC to the HDMI IN or HDMI DVI IN port on the TV G Connect the audio cable from the PC to the Audio input on the TV Audio cables are not included with the TV G If using a sound card adjust PC sound as required G If required adjust the settings ...

Страница 32: ...elect S Sc cr re ee en n 3 Select R Re es se et t 2 OK OK Press the M ME EN NU U button to return to normal TV viewing Press the R RE ET TU UR RN N button to move to the previous menu screen Select Y Ye es s Run R Re es se et t 4 OK 5 OK To Set Auto Config SCREEN Move Prev Resolution Position Size Phase Reset Yes No OK Move Contrast 100 Brightness 50 Sharpness 70 Colour 70 Tint 0 Advanced Control ...

Страница 33: ...UR RE E Select S Sc cr re ee en n Select P Po os si it ti io on n S Si iz ze e or P Ph ha as se e Make appropriate adjustments 1MENU 3 4 2 OK OK OK 5 OK Press the M ME EN NU U button to return to normal TV viewing Press the R RE ET TU UR RN N button to move to the previous menu screen Auto Config SCREEN Move Prev Resolution Position Size Phase Reset OK Move Contrast 100 Brightness 50 Sharpness 70 ...

Страница 34: ...e en n Select R Re es so ol lu ut ti io on n Select the desired resolution 1MENU 3 4 2 OK OK OK 5 OK Press the M ME EN NU U button to return to normal TV viewing Press the R RE ET TU UR RN N button to move to the previous menu screen Auto Config SCREEN Move Prev Resolution Position Size Phase Reset 1024 x 768 1280 x 768 1360 x 768 OK Move Contrast 100 Brightness 50 Sharpness 70 Colour 70 Tint 0 Ad...

Страница 35: ... still not correct try Auto adjustment again If picture needs to be adjusted again after Auto adjustment in RGB PC you can adjust the P Po os si it ti io on n S Si iz ze e or P Ph ha as se e Select P PI IC CT TU UR RE E Select S Sc cr re ee en n Select A Au ut to o C Co on nf fi ig g 1MENU 3 2 OK OK Press the M ME EN NU U button to return to normal TV viewing Press the R RE ET TU UR RN N button to...

Страница 36: ...tings to your preference Accepts your selection or displays the current mode RETURN EXIT INFO i AV MODE Allows the user to move return one step in an interac tive application EPG or other user interaction function Shows the present screen information Press the MENU button and then INFO button to enter the Simple Manual menu It helps you select and set images and sounds when connecting AV devices G...

Страница 37: ...ramme Move from one full set of screen information to the next one Selects a programme Selects numbered items in a menu Displays the programme table Returns to the previously viewed programme Installing Batteries Open the battery compartment cover on the back and install the batteries matching correct polarity with with Install two 1 5V AAA batteries Do not mix old or used batteries with new ones ...

Страница 38: ...he optimal setting for home environments and is the TV s default mode e S St to or re e D De em mo o mode is the optimal setting for store environments If a user modifies image quality data S St to or re e D De em mo o mode initializes the product to the image quality set by us after a certain period of time f The mode H Ho om me e U Us se e S St to or re e D De em mo o can be changed by executing...

Страница 39: ... combination which it deems the best for the images being watched Selects your desired Sound Mode A Au ud di io o Selects the sound output S Sl le ee ep p T Ti im me er r Sets the sleep timer F Fa av vo ou ur ri it te e Selects the favourite programme U US SB B D De ev vi ic ce e Selects Eject in order to eject USB device QUICK MENU Display each menu Select your desired Source Your TV s OSD On Scr...

Страница 40: ...nual Tuning Programme Edit Software Update On Diagnostics SETUP SETUP OPTION PICTURE LOCK AUDIO TIME USB OK Move Aspect Ratio 16 9 Picture Wizard Energy Saving Off Picture Mode Vivid Contrast 100 Brightness 50 Sharpness 70 Colour 70 PICTURE E OK Move Auto Volume Off Clear Voice II Off Level 3 Balance 0 Sound Mode Standard SRS TruSurround XT Off Treble 50 Bass 50 AUDIO E L R OK Move Photo List Musi...

Страница 41: ...d in L Lo oc ck k S Sy ys st te em m O On n If you wish to keep on auto tuning select S St ta ar rt t using the button Then press the OK but ton Otherwise select C Cl lo os se e A Au ut to om ma at ti ic c N Nu um mb be er ri in ng g Decide whether to use the programme numbers as sent by broad casting stations for tuning Select S SE ET TU UP P Select A Au ut to o T Tu un ni in ng g Select S St ta ...

Страница 42: ... DT TV V Select the desired channel number OK Move Auto Tuning Manual Tuning Programme Edit Software Update On Diagnostics SETUP Manual Tuning OK Move Auto Tuning Manual Tuning Programme Edit Software Update On Diagnostics SETUP Manual Tuning Your receiver will add this channel to your channel list UHF CH Bad Normal Good F F DTV G G 21 Close Add 1MENU 3 4 2 OK OK Press the M ME EN NU U button to r...

Страница 43: ...reland Hong Kong South Africa D DK K PAL D K East Europe China Africa CIS B B B B Australia To store another channel repeat steps 4 to 9 Select S SE ET TU UP P Select M Ma an nu ua al l T Tu un ni in ng g Select T TV V Select the desired pro gramme number on Select a TV system Select V V U UH HF F or C Ca ab bl le e Commence searching Select the desired channel number or Manual Tuning Manual Tunin...

Страница 44: ...so on You can use an the alphabet A A to Z Z the number 0 0 to 9 9 and blank OK OK OK Press the M ME EN NU U button to return to normal TV viewing Press the R RE ET TU UR RN N button to move to the previous menu screen OK Select S St to or re e OK Move Auto Tuning Manual Tuning Programme Edit Software Update On Diagnostics SETUP OK Move Auto Tuning Manual Tuning Programme Edit Software Update On D...

Страница 45: ...ed when you start Auto Tuning Use NUMBER buttons to input a 4 digit pass word in L Lo oc ck k S Sy ys st te em m O On n Select S SE ET TU UP P Select P Pr ro og gr ra am mm me e E Ed di it t Enter the P Pr ro og gr ra am mm me e E Ed di it t Select a programme to be stored or skipped The HITS 800 Page Change P RADIO DTV TV 800 The HITS 801 TMF 802 UKTV Br tldeas 803 ftn 804 Ideal World 805 4TVinte...

Страница 46: ...ng a programme number Select a programme number to be skipped 2 BLUE BLUE Turn the programme number to blue 3 BLUE BLUE Release 1 When programmes are to be skipped the skipped programme shows in blue and these programmes will not be selected by the P P buttons during TV viewing If you wish to select a skipped programme directly enter the programme number with the NUMBER but tons or select it in th...

Страница 47: ... Update for scheduled update stream After the Software Update is complete the System restarts Select S SE ET TU UP P Select S So of ft tw wa ar re e U Up pd da at te e Select O On n or O Of ff f If you select O On n a user con firm message box will be dis played to notify that new soft ware is found Save Software Update On Software Update On Off On On 1MENU 2 OK 3 OK 4 OK Select the Y Ye es s usin...

Страница 48: ... name of the selected MUX MUX A higher directory of channels in digital broadcasting a single MUX contains multiple channels Select S SE ET TU UP P Select D Di ia ag gn no os st ti ic cs s Display the information of Channel Display Manufacturer Model Type and Software Version Diagnostics 1MENU 3 2 OK OK 4 OK Engineering Diagnostics Manufacturer LG Electronics Inc Model Type 42PQ60D Software Versio...

Страница 49: ...cting a programme in the programme list You may find some blue programmes These have been set up to be skipped by auto pro gramming or in the programme edit mode Some programmes with the channel number shown in the programme LIST indicate there is no station name assigned Turn the pages 2 Return to normal TV viewing A Paging through a programme list Programme List 801 TMF 802 UKTV Br tldeas 803 ft...

Страница 50: ...ress the F FA AV V Favorite button repeatedly 1 Display the Favourite Programme List A Displaying the favourite programme list FAV MARK Select your desired programme Select F Fa av vo ou ur ri it te e A Selecting favourite programme 1 4 5 6 7 8 0 9 2 3 2Q MENU 4Q MENU 3 1 or Select F Fa av vo ou ur ri it te e Return to TV viewing This will automatically include the selected programme into your fav...

Страница 51: ...a Select it when watching the DTV TV A AV V Select it when watching the VCR or external equipment C Co om mp po on ne en nt t Select it when using the DVD or the Digital set top box depends on connector R RG GB B Select it when using PC depends on connector H HD DM MI I Select it when using DVD PC or Digital set top box depend on connector Antenna AV1 AV2 Component1 HDMI4 HDMI3 HDMI2 HDMI1 RGB OK ...

Страница 52: ...Off Input Label SIMPLINK On Key Lock Off Simple Manual Set ID 1 OPTION E INPUT LABEL Selects a label for each input source Select O OP PT TI IO ON N Select I In np pu ut t L La ab be el l Select the source Select the label Input Label Input Label AV1 AV2 Component1 Component2 RGB HDMI1 HDMI2 HDMI3 HDMI4 F F G G Close 1MENU 3 2 OK OK 4 Press the M ME EN NU U button to return to normal TV viewing Pr...

Страница 53: ...E SIMPLE MANUAL You can easily and effectively access the TV information by viewing a simple manual on the TV During the Simple Manual operation audio will be muted Simple Manual Select O OP PT TI IO ON N Select S Si im mp pl le e M Ma an nu ua al l Select the part of the manual you want to see 1MENU 2 OK OK 3 Press the R RE ET TU UR RN N button to return to normal TV viewing ...

Страница 54: ...ices with the SIMPLINK logo Please check the SIMPLINK logo This TV might not function properly when using it with other products with HDMI CEC function This allows you to control and play other AV devices connected to the display through HDMI cable without addi tional cables and settings If you do not want SIMPLINK menu select O Of ff f Select O OP PT TI IO ON N Select S SI IM MP PL LI IN NK K Sel...

Страница 55: ...or HDMI IN terminal of the TV to the rear terminal HDMI terminal of the SIMPLINK device with the HDMI cable G G When you switch the Input source using the INPUT button on the remote control you can stop the operation of a device con trolled by SIMPLINK Connecting to Home Theater with the SIMPLINK logo 2 3 1 G G When you select or operate a media device with home theater func tion the speaker autom...

Страница 56: ... time DVD Recorder Up to three supported at a time VCR Only one supported at a time D Di is sc c p pl la ay yb ba ac ck k Control connected AV devices by pressing the OK G A l l l l FF and GG buttons D Di ir re ec ct t P Pl la ay y After connecting AV devices to the TV you can directly control the devices and play media without additional settings S Se el le ec ct t A AV V d de ev vi ic ce e Enabl...

Страница 57: ... watching sports events G Ga am me e Optimizes video and audio for playing games 1AV MODE 2 If you select C Ci in ne em ma a in AV mode C Ci in ne em ma a will be selected both for P Pi ic ct tu ur re e M Mo od de e and S So ou un nd d M Mo od de e in P PI IC CT TU UR RE E menu and A AU UD DI IO O menu respectively If you select O Of ff f in AV mode the picture and image which you ini tially set w...

Страница 58: ...s useful to initialize the product or when you move to other city or country When the Factory Reset is completed you must restart the Initializing setup When the L Lo oc ck k S Sy ys st te em m menu is O On n the message to enter the password appears In L Lo oc ck k S Sy ys st te em m O On n if you forget your password press 7 7 7 7 on the remote control handset 1MENU 2 OK Press the M ME EN NU U b...

Страница 59: ...t have an external power source the USB device may not be detected So be sure to connect the external power source Please use a power adaptor for an external power source We do not guarantee an USB cable for an external power source G G Data in a USB storage device cannot be deleted in the NTFS file system G G If your USB memory device has multiple partitions or if you use a USB multi card reader ...

Страница 60: ...ion Popup Menu Page Change Mark Exit 1366x768 125KB KY101 09 10 2008 KY102 09 10 2008 JMJ001 09 10 2008 JMJ002 09 10 2008 JMJ003 09 10 2008 JMJ004 09 10 2008 KY103 09 10 2008 KY104 09 10 2008 KY105 09 10 2008 JMJ005 09 10 2008 JMJ006 09 10 2008 JMJ007 09 10 2008 JMJ008 09 10 2008 Up Folder 2 3 4 1 Select U US SB B Select P Ph ho ot to o L Li is st t 2 Drive1 1MENU OK OK MARK JMJ001 TO USE A USB DE...

Страница 61: ...008 09 10 2008 Up Folder 1366x768 125KB View Mark All Delete Close G G V Vi ie ew w Display the selected item G G M Ma ar rk k A Al ll l Mark all photos on the screen G G U Un nm ma ar rk k A Al ll l Deselect all marked photos G G D De el le et te e or D De el le et te e M Ma ar rk ke ed d FAT32 file system only Delete the selected photo item G G C Cl lo os se e Close the pop up menu Select the ta...

Страница 62: ...MJ002 09 10 2008 JMJ003 09 10 2008 JMJ004 09 10 2008 KR103 09 10 2008 KR104 09 10 2008 KR105 09 10 2008 JMJ005 09 10 2008 JMJ006 09 10 2008 JMJ007 09 10 2008 JMJ008 09 10 2008 Up Folder 1366x768 125KB View Mark All Delete Close Drive1 MARK JMJ001 How to view photo Detailed operations are available on full sized photo view screen Use the P P button to navigation in the photo page The aspect ratio o...

Страница 63: ... te e F FA AT T3 32 2 f fi il le e s sy ys st te em m o on nl ly y Delete photos G G O Op pt ti io on n Set values for S Sl li id de e S Sp pe ee ed d and M Mu us si ic c F Fo ol ld de er r for B BG GM M Use button and O OK K button to set values Then go to and press O OK K to save the settings You cannot change M Mu us si ic c F Fo ol ld de er r while BGM is playing G G H Hi id de e Hide the menu...

Страница 64: ... ed by this model Music file on your USB device can be played by this unit The On Screen Display may be different from your TV Images are an example to assist with the TV opera tion Screen Components MUSIC MP3 supporting file Bit rate 32 320 Sampling rate MPEG1 Layer3 32kHz 44 1kHz 48kHz Sampling rate MPEG2 Layer3 16kHz 22 05kHz 24kHz Sampling rate MPEG2 5 Layer3 8kHz 1 1 025kHz 12kHz Page 2 3 No ...

Страница 65: ... Ma ar rk k A Al ll l Mark all music titles in the folder G G U Un nm ma ar rk k A Al ll l Deselect all marked music titles G G D De el le et te e or D De el le et te e M Ma ar rk ke ed d FAT32 file system only Delete the selected music titles G G C Cl lo os se e Close the pop up menu Use the P P button to navigate up down in the music page Use M MA AR RK K button to mark or unmark a music When on...

Страница 66: ...s played is displayed behind the title G G A damaged or corrupted music does not play but displays 00 00 in playtime G G A music downloaded from a paid service with copyright protection does not start but displays inappropri ate information in playtime G G If you press O OK K A A buttons screen saver is stopped G G The P PL LA AY Y G G P Pa au us se e I II I A A G GG G F FF F buttons on the remote...

Страница 67: ...may not be played correctly or some player functions may not be usable Movie files produced with some encoders may not be played correctly If the video and audio structure of recorded file is not interleaved either video or audio is outputted HD videos with a maximum of 1920x1080 25 30P or 1280x720 50 60P are supported depending on the frame Videos with resolutions higher than 1920X1080 25 30P or ...

Страница 68: ...G2 H 264 AVC MPEG4 SP MPEG4 ASP Divx 3 1 1 Dvix 4 12 Dvix 5 x Dvix 6 Xvid 1 00 Xvid 1 01 Xvid 1 02 Xvid 1 03 Xvid 1 10 beta 1 Xvid 1 10 beta 2 H 264 AVC MPEG2 MPEG4SP MPEG4ASP Divx3 1 1 Divx4 Divx5 Divx6 Xvid 1 00 Xvid 1 01 Xvid 1 02 Xvid 1 03 Xvid 1 10 beta 1 Xvid 1 10 beta 2 H 264 AVC MPEG 1 MPEG 2 MPEG 4 SP MPEG4 ASP H 264 AVC MPEG 2 MPEG 4 SP MPEG4 ASP Divx 3 1 1 Divx 4 Divx 5 Divx 6 Xvid 1 00...

Страница 69: ...et folder or drive Select the desired movie title Show the PopUp menu Select the desired PopUp menu 2 3 1 4 OK OK OK Press the R RE ET TU UR RN N button to return to normal TV viewing MARK Title Duration NOTE G G In the case of files not supported a message regarding non supported file is displayed 1366x768 125KB Play Mark All Delete Close G G P Pl la ay y Play the selected movie Divx Play is exec...

Страница 70: ...ition can be viewed on the screen Press the P PL LA AY Y G G button to return to normal playback Press the E EN NE ER RG GY Y S SA AV VI IN NG G button repeatedly to increase the brightness of your screen Refer to p 77 Press the A AV V M MO OD DE E button repeatedly to select the desired source Refer to p 55 F FF F G GG G P PL LA AY Y G G I II I Option G G P Pi ic ct tu ur re e S Si iz ze e Select...

Страница 71: ...d Your registration Code is xxxxxxxxxx To learn more visit www divx com vod Close NOTE G G Movie files are supported as follows Resolution under 1920x1080 WxH pixels Frame rate under 30 frames sec 1920x1080 under 60 frames sec under 1280x720 G G Video Codec MPEG 1 MPEG 2 MPEG 4 DivX 3 1 1 DivX 4 12 DivX 5 x DivX 6 Xvid 1 00 Xvid 1 01 Xvid 1 02 Xvid 1 03 Xvid 1 10 beta1 Xvid 1 10 beta2 H 264 AVC i ...

Страница 72: ...deactivation is to allow deactivation of devices for users who have activated all the available devices through the web_server and are blocked from activating more devices DivX VOD allowed the consumer to activate up to 6 devices under one account but to replace or deactivate any of those devices the consumer had to contact DivX Support and request deletion Now with this added feature consumers wi...

Страница 73: ...f broadcasting programme Aspect ratio of broadcasting programme Displayed with a Teletext Programme Displayed with a Subtitle Programme Displayed with a Scramble Programme Displayed with a Dolby Programme Displayed with a Dolby Digital PLUS Programme Shows the present screen information Button Function in NOW NEXT Guide Mode Programme Guide ALL NOW NEXT 1 YLE TV1 Keno WorldBusiness 2 YLE TV2 4 TV ...

Страница 74: ...m TV2 Farmen 4 TV The Drum You Call The Hits Fashion Essentials Tänään otsikoissa 5 YLE FST 6 CNN 8 YLE24 E Date Antigues Roadshow 1 YLE TV1 6 Apr 2007 15 09 E Button Function in Date Change Mode Switch off Date setting mode GREEN GREEN Change to the selected date Select a date Switch off Date setting mode Switch off EPG or GUIDE OK Programme Guide ALL 6 Apr Fri 14 00 15 00 1 YLE TV1 Kungskonsumen...

Страница 75: ...h off EPG or GUIDE Select Remind Function setting Change to Guide or Schedule mode Save Timer Remind Select Programme Date or Start time OK Add new Timer Watching setting mode GREEN GREEN Select S Sc ch he ed du ul le e L Li is st t Change to Guide mode BLUE BLUE i Info Exit INFO Schedule List Title Start Date 6 May 16 00 Friend1 6 May 18 00 Friend2 Start Time New Remind Programme Guide Page1 1 Fr...

Страница 76: ...t ratio of broadcasting programme Displayed with a Teletext Programme Displayed with a Subtitle Programme Displayed with a Scramble Programme Displayed with a Dolby Programme Shows the present screen information 576i 720p 1080i Resolution of broadcasting programme T Th hi is s f fe ea at tu ur re e i is s e en na ab bl le ed d o on nl ly y i in n N Ne ew w Z Ze ea al la an nd d I In n N Ne ew w Z ...

Страница 77: ...ogramme Information Change to Next Week or Prev Day YELL YELLO OW W Switch off MHEG Change to Now Next mode GUIDE The MHEG will disappear after moving to a selected channel OK What s on now next 2 33pm Tue 12 Feb 4 C4 Now 2 00pm The Officaial NZ Top 40 Next 4 00pm Vodafone Select Live 3 TV3 Now 2 00pm Oprah Next 3 00pm Rugrats 2 TV2 Now 2 30pm Neighbours Next 3 00pm Jojo s Circus 1 TV ONE Now 2 30...

Страница 78: ...adcast PICTURE SIZE ASPECT RATIO CONTROL You can watch the screen in various picture formats 16 9 Just Scan Original 4 3 14 9 Zoom and Cinema Zoom If a fixed image is displayed on the screen for a long time that fixed image may become imprinted on the screen and remain visible You can adjust the enlarge proportion using button This function works in the following signal You can also adjust A As sp...

Страница 79: ...the picture will be cropped C Ci in ne em ma a Z Zo oo om m Choose Cinema Zoom when you want to enlarge the picture in correct proportion Note When enlarging or reducing the picture the image may become distorted F or G button Adjust enlarge proportion of Cinema Zoom The adjustment range is 1 16 E or D button Move the screen NOTE G G You can only select 4 4 3 3 1 16 6 9 9 Wide 1 14 4 9 9 Z Zo oo o...

Страница 80: ...igh you can see the changed result as an example In RGB PC HDMI PC DVI PC mode the changed Colour Tint and H V Sharpness values are not applied Picture Wizard With Picture Wizard you can adjust the picture quality of the original image Next Previous Adjust B Bl la ac ck k l le ev ve el l W Wh hi it te e l le ev ve el l C Co ol lo ou ur r T Ti in nt t H H S Sh ha ar rp pn ne es ss s V V S Sh ha ar ...

Страница 81: ...with the E En ne er rg gy y S St ta ar r requirements and is adjusted to the comfortable level to be viewed at home You can increase the brightness of your screen by adjusting the E En ne er rg gy y S Sa av vi in ng g l le ev ve el l or by setting the P Pi ic ct tu ur re e M Mo od de e When adjusting Energy Saving in MHEG mode the Energy Saving setting is applied after MHEG is finished Intelligent...

Страница 82: ...amme category WhentheIntelligentsensorfunctionison themostsuitablepictureisautomaticallyadjustedaccordingtothesurroundingconditions You can also adjust P Pi ic ct tu ur re e M Mo od de e in the Q Q M Me en nu u V Vi iv vi id d Strengthen the contrast brightness colour and sharpness for vivid picture S St ta an nd da ar rd d The most general screen display status C Ci in ne em ma a Optimizes video ...

Страница 83: ...the picture You may use Contrast when the bright part of the pic ture is saturated B Br ri ig gh ht tn ne es ss s Adjusts the base level of the signal in the picture S Sh ha ar rp pn ne es ss s Adjusts the level of crispness in the edges between the light and dark areas of the picture The lower the level the softer the image C Co ol lo ou ur r Adjusts intensity of all colours T Ti in nt t Adjusts ...

Страница 84: ... at tu ur re e D Dy yn na am mi ic c C Co on nt tr ra as st t D Dy yn na am mi ic c C Co ol lo ou ur r N No oi is se e R Re ed du uc ct ti io on n G Ga am mm ma a B Bl la ac ck k L Le ev ve el l F Fi il lm m M Mo od de e C Co ol lo ou ur r G Ga am mu ut t E Ed dg ge e E En nh ha an nc ce er r or x xv vY YC CC C R Re ef fe er r t to o p p 8 84 4 8 85 5 Make appropriate adjustments 1MENU 3 2 OK OK 4...

Страница 85: ... t2 2 By segmenting categories E Ex xp pe er rt t1 1 and E Ex xp pe er rt t2 2 provide more categories which users can set as they see fit offering the optimal picture quality for users This may also be used to help a professional optimize the TV performance using specific videos 1MENU 3 2 OK OK 4 OK 5 OK 6 Press the M ME EN NU U button to return to normal TV viewing Press the R RE ET TU UR RN N b...

Страница 86: ... picture levels H Hi ig gh h Make dark and middle gray level area of the picture darker L Lo ow w The picture of the screen gets darker H Hi ig gh h The picture of the screen gets brighter A Au ut to o Realizing the black level of the screen and set it to High or Low automatically Set black level of the screen to proper level This function enables to select Low or High in the following mode AV NTS...

Страница 87: ...eneral video Adjusts Red Green Blue Yellow Cyan Magenta Red Green Blue Yellow Cyan Magenta Colour The adjustment range is 30 30 Red Green Blue Yellow Cyan Magenta Tint The adjustment range is 30 30 This feature is disable in RGB PC and HDMI PC mode This is the function to adjust the overall colour of the screen to the feeling you want a Method 2 Points Pattern Inner Outer Red Green Blue Contrast R...

Страница 88: ...usted value 4 OK Press the M ME EN NU U button to return to normal TV viewing Press the R RE ET TU UR RN N button to move to the previous menu screen OK Move Contrast 100 Brightness 50 Sharpness 70 Colour 70 Tint 0 Advanced Control Picture Reset Screen PICTURE R G Picture Reset E OK Move Contrast 100 Brightness 50 Sharpness 70 Colour 70 Tint 0 Advanced Control Picture Reset Screen PICTURE R G Pict...

Страница 89: ...e to clear entirely with White Wash O Or rb bi it te er r Orbiter may help prevent ghost images However it is best not to allow any fixed image to remain on the screen To avoid a permanent image on the screen the screen will move every 2 minutes C Co ol lo ou ur r W Wa as sh h The colour block with the screen moved a little and the white pattern are alternately displayed It is diffi cult to sense ...

Страница 90: ...automatically set to O On n Once D De em mo o M Mo od de e is set to O Of ff f in S St to or re e D De em mo o D De em mo o M Mo od de e does not run and only the screen is reset The screen is reset automatically after 5 minutes in D De em mo o M Mo od de e Select O OP PT TI IO ON N 1MENU 2 OK DEMO MODE Select D De em mo o M Mo od de e Press the M ME EN NU U button to return to normal TV viewing P...

Страница 91: ...me environment S St to or re e D De em mo o mode is an optimal setting for displaying at stores Select O OP PT TI IO ON N Select M Mo od de e S Se et tt ti in ng g Select S St to or re e D De em mo o or H Ho om me e U Us se e 1MENU 2 OK OK 3 Press the M ME EN NU U button to return to normal TV viewing Press the R RE ET TU UR RN N button to move to the previous menu screen Mode Setting Store Demo M...

Страница 92: ...recommended to use a separate home theater system or amp to cope with different user environments Select A AU UD DI IO O Select A Au ut to o V Vo ol lu um me e Select O On n or O Of ff f 1MENU 3 2 OK OK Press the M ME EN NU U button to return to normal TV viewing Press the R RE ET TU UR RN N button to move to the previous menu screen OK Move Auto Volume Off Clear Voice II Off Level 3 Balance 0 Sou...

Страница 93: ...UR RN N button to move to the previous menu screen If you select O On n for C Cl le ea ar r V Vo oi ic ce e I II I S SR RS S T Tr ru uS Su ur rr ro ou un nd d X XT T feature will not work Select levels from 6 to 6 Adjustment for Clear Voice Level With selecting On 5 OK OK Move Auto Volume Off Clear Voice II Off Level 3 Balance 0 Sound Mode Standard SRS TruSurround XT Off Treble 50 Bass 50 AUDIO E ...

Страница 94: ... Optimizes sound for watching sports events G Ga am me e Optimizes sound for playing games Select A AU UD DI IO O Select S So ou un nd d M Mo od de e Select S St ta an nd da ar rd d M Mu us si ic c C Ci in ne em ma a S Sp po or rt t or G Ga am me e You can also adjust S So ou un nd d M Mo od de e in the Q Q M Me en nu u 1MENU 3 2 OK OK Press the M ME EN NU U button to return to normal TV viewing P...

Страница 95: ...u un nd d X XT T TruSurround XT is a patented SRS technology that solves the prob lem of playing 5 1 multicannel content over two speakers Select this option to sound realistic Press the M ME EN NU U button to return to normal TV viewing Press the R RE ET TU UR RN N button to move to the previous menu screen Press the M ME EN NU U button to return to normal TV viewing Press the R RE ET TU UR RN N ...

Страница 96: ... U button to return to normal TV viewing Press the R RE ET TU UR RN N button to move to the previous menu screen OK Move Auto Volume Off Clear Voice II Off Level 3 Balance 0 Sound Mode Standard SRS TruSurround XT Off Treble 50 Bass 50 AUDIO E L R OK Move Auto Volume Off Clear Voice II Off Level 3 Balance 0 Sound Mode Standard SRS TruSurround XT Off Treble 50 Bass 50 AUDIO E L R L R Balance 0L R Ba...

Страница 97: ... ME EN NU U button to return to normal TV viewing Press the R RE ET TU UR RN N button to move to the previous menu screen NOTE G G When the TV speaker is turned off while the Simplink home theater is operating the sound output auto matically switches to the Home theater speaker but when the TV speaker is turned on the sound output the TV speaker OK Move Balance 0 Sound Mode Standard SRS TruSurroun...

Страница 98: ...l will be played Manufactured under license from Dolby Laboratories Dolby and the double D symbol are trade marks of Dolby Laboratories 1MENU 3 2 OK OK Press the M ME EN NU U button to return to normal TV viewing Press the R RE ET TU UR RN N button to move to the previous menu screen There is a possibility that when HDMI mode some DVD players do not make SPDIF sound At that time set the output of ...

Страница 99: ...U button to return to normal TV viewing Press the R RE ET TU UR RN N button to move to the previous menu screen OK Move Balance 0 Sound Mode Standard SRS TruSurround XT Off Treble 50 Bass 50 Reset Digital Audio Out PCM TV Speaker On AUDIO E Reset L R OK Move Balance 0 Sound Mode Standard SRS TruSurround XT Off Treble 50 Bass 50 Reset Digital Audio Out PCM TV Speaker On AUDIO E Reset L R Resetting ...

Страница 100: ...OGUE MODE ONLY When a programme is selected the sound information for the station appears with the programme number and station name Select A Au ud di io o Select the sound output 1Q MENU 2 OK SPEAKER SOUND OUTPUT SELECTION In AV Component RGB and HDMI mode you can select output sound for the left and right loud speakers Select the sound output L L R R Audio signal from audio L input is sent to th...

Страница 101: ...may output a part of the Main audio Subtitle Language Selection G G When two or more subtitle languages are broadcast you can select the subtitle language with the SUBTITLE button on the remote control G G Press the button to select a subtitle language Subtitle Language OSD Information Status Not Available Teletext Subtitle Subtitle for Hard of Hearing Display N A Select O OP PT TI IO ON N Select ...

Страница 102: ...elect either the year month date or time option Set the year month date or time option 1MENU 3 4 2 OK OK Press the M ME EN NU U button to return to normal TV viewing Press the R RE ET TU UR RN N button to move to the previous menu screen 100 TIME SETTING OK Move Clock Off Time Off On Time Off Sleep Timer Off TIME OK Move Clock Off Time Off On Time Off Sleep Timer Off TIME Clock Clock Date 01 Month...

Страница 103: ...Of ff f T Ti im me e or O On n T Ti im me e Select R Re ep pe ea at t Set the hour Set the minutes Select O Of ff f O On nc ce e D Da ai il ly y M Mo on n F Fr ri i M Mo on n S Sa at t S Sa at t S Su un n or S Su un n To cancel O On n O Of ff f T Ti im me e function select O Of ff f For On Time function only Select I In np pu ut t Select A An nt te en nn na a A AV V C Co om mp po on ne en nt t R R...

Страница 104: ...ally switches the TV to standby after the preset time has elapsed When you switch the TV off the preset sleep timer is cancelled You can also adjust S Sl le ee ep p T Ti im me er r in the T TI IM ME E menu Select S Sl le ee ep p T Ti im me er r Select O Of ff f 1 10 0 2 20 0 3 30 0 6 60 0 9 90 0 1 12 20 0 1 18 80 0 or 2 24 40 0 m mi in n 1Q MENU 2 ...

Страница 105: ...t If a channel is locked enter the password to unlock it temporarily Select L LO OC CK K Select L Lo oc ck k S Sy ys st te em m Select O On n Set the password Input a 4 digit password Be sure to remember this number Re enter new password for confirm If you forget your password press 7 7 7 7 on the remote control handset Lock System Off Lock System Off Off On Off 1MENU 3 2 OK OK 4 5 OK OK 1 4 5 6 7...

Страница 106: ...function in L Lo oc ck k S Sy ys st te em m O On n Enter a password to watch a blocked programme Select L LO OC CK K Select B Bl lo oc ck k P Pr ro og gr ra am mm me e Enter the B Bl lo oc ck k P Pr ro og gr ra am mm me e Select a programme to be locked Block Programme 1MENU 3 2 OK OK 4 Press the M ME EN NU U button to return to normal TV viewing Press the R RE ET TU UR RN N button to move to the ...

Страница 107: ...ammed to remember which option it was last set to even if you switch the set off Prevents children from watching certain adult s TV programmes according to the ratings limit set Enter a password to watch a blocked programme Select L LO OC CK K Select P Pa ar re en nt ta al l G Gu ui id da an nc ce e Make appropriate adjustments Save 1MENU 3 2 OK OK 4 OK Press the M ME EN NU U button to return to n...

Страница 108: ...AL INPUT BLOCKING Enables you to block an input Select L LO OC CK K Select I In np pu ut t B Bl lo oc ck k Select input source Select O On n or O Of ff f Save 1MENU 4 2 OK 3 OK OK 5 OK Press the M ME EN NU U button to return to normal TV viewing Press the R RE ET TU UR RN N button to move to the previous menu screen Input Block Input Block AV1 AV2 Component1 Component2 RGB HDMI1 HDMI2 HDMI3 HDMI4 ...

Страница 109: ...an be used to prevent unau thorized viewing Select O OP PT TI IO ON N Select K Ke ey y L Lo oc ck k Select O On n or O Of ff f Save In K Ke ey y L Lo oc ck k O On n if the TV is turned off press the r r I INPUT P D or E or P button on the TV or POWER INPUT P or NUMBER buttons on the remote control then the set will be turned on With the K Ke ey y L Lo oc ck k O On n the display K Ke ey y L Lo oc c...

Страница 110: ... teletext The initial page or last page viewed appears on the screen Two page numbers TV station name date and time are displayed on the screen headline The first page number indicates your selection while the second shows the current page displayed Press the T TE EX XT T button to switch off teletext The previous mode reappears SWITCH ON OFF A A Page selection Enter the desired page number as a t...

Страница 111: ...olutions to riddles or puzzles A A U Up pd da at te e Displays the TV picture on the screen while waiting for a new teletext page The display will appear at the top left hand corner of the screen When the updated page is available then display will change to the page number Select this menu again to view the updated teletext page FASTEXT The teletext pages are colour coded along the bottom of the ...

Страница 112: ...d inserted correctly into the mains A Check your antenna direction and or location A Test the mains outlet by plugging another TV into the same outlet A This is normal the image is muted during the TV startup process Please contact your service centre if the picture has not appeared after five minutes A Adjust Colour in menu option A Allow a sufficient distance between the TV and the VCR A Try ano...

Страница 113: ... e in menu option A A change in ambient humidity or temperature may result in an unusual noise when the TV is switched on or off and does not indicate a fault with the TV A Check HDMI cable over version 1 3 A Check USB cable over version 2 0 Picture OK No sound Unusual sound from inside the TV No sound when connecting HDMI or USB No output from one of the speakers This feature is not available for...

Страница 114: ...er and a little fabric softener or dish washing detergent Wring the cloth until it is almost dry and then use it to wipe the screen Ensure there is no excess water on the screen Allow any water or dampness to evaporate before switching on Cleaning the Cabinet A To remove dirt or dust wipe the cabinet with a soft dry lint free cloth A Do not to use a wet cloth Extended Absence G If you expect to le...

Страница 115: ...ches 35 kg 77 1 lbs 32 5 kg 71 6 lbs AC100 240V 50 60Hz 1216 7 x 818 1 x 353 0 mm 47 9 x 32 2x 13 9inches 1216 7x 759 1 x 83 0 mm 47 9 x 29 9 x 3 3 inches 35 4 kg 78 0 lbs 32 8 kg 72 3 lbs AC100 240V 50 60Hz 50PQ6 50PQ60D GA Supported movie files Television System Programme Coverage External Antenna Impedance Digital Analogue DVB T PAL B G DK I UHF 21 69 BG VHF UHF 1 69 CATV 01 47 I VHF UHF 1 69 C...

Страница 116: ... C3 C4 C5 C6 C7 D0 D1 D2 D3 D4 D5 D6 D7 D0 D1 D2 D3 D4 D5 D6 D7 Lead code Low custom code High custom code Data code Data code Repeat code Tf 4 5 ms 9 ms 2 25 ms 9 ms 0 55 ms 0 56 ms 1 12 ms 0 56 ms 2 24 ms Tf Tf Tf 108ms 455KHz Bit 0 Bit 1 1 How to Connect A Connect your wired remote control to the Remote Control port on the TV 2 Remote Control IR Codes A Output waveform Single pulse modulated wi...

Страница 117: ...EEZE RATIO R C BUTTON POWER ON OFF R C BUTTON R C BUTTON R C BUTTON R C BUTTON R C BUTTON R C BUTTON R C BUTTON R C BUTTON R C BUTTON R C BUTTON R C BUTTON R C BUTTON R C BUTTON R C BUTTON R C BUTTON R C BUTTON R C BUTTON R C BUTTON R C BUTTON R C BUTTON R C BUTTON R C BUTTON R C BUTTON R C BUTTON R C BUTTON R C BUTTON R C BUTTON R C BUTTON R C BUTTON R C BUTTON R C BUTTON R C BUTTON R C BUTTON 08...

Страница 118: ...not supplied with the product Type of Connector D Sub 9 Pin Male No Pin Name 1 No connection 2 RXD Receive data 3 TXD Transmit data 4 DTR DTE side ready 5 GND 6 DSR DCE side ready 7 RTS Ready to send 8 CTS Clear to send 9 No Connection 1 5 6 9 RS 232C Configurations 7 Wire Configurations Standard RS 232C cable PC TV RXD 2 3 TXD TXD 3 2 RXD GND 5 5 GND DTR 4 6 DSR DSR 6 4 DTR RTS 7 8 CTS CTS 8 7 RT...

Страница 119: ...rmal Demo Mode On Mode Setting Store Demo Factory Reset OPTION E Set ID Use this function to specify a set ID number Refer to Real Data Mapping G p p 1 12 21 1 Press R RE ET TU UR RN N to move to the previous menu screen Select O OP PT TI IO ON N Select S Se et t I ID D Adjust S Se et t I ID D to choose the desired TV ID number The adjustment range of SET ID is 1 99 Set ID 1 Set ID 1 F F 1 G G Clo...

Страница 120: ...se desired monitor ID number in option menu Adjustment range is 1 99 When selecting Set ID 0 every connect ed set is controlled Set ID is indicated as decimal 1 99 on menu and as Hexa decimal 0x0 0x63 on transmission receiving protocol DATA To transmit command data Transmit FF data to read status of com mand Cr Carriage Return ASCII code 0x0D ASCII code space 0x20 Command1 Command2 Set ID Data Cr ...

Страница 121: ...creen mute off Picture on Video mute off 01 Screen mute on Picture off 10 Video mute on In case of video mute on only TV will display On Screen Display OSD But in case of Screen mute on TV will not display OSD k d Set ID Data Cr Ack d Set ID OK NG Data x 0 05 5 V Vo ol lu um me e C Co on nt tr ro ol l C Co om mm ma an nd d k k f f G To adjust volume You can also adjust volume with the VOLUME butto...

Страница 122: ...E menu Transmission 1 10 0 S Sh ha ar rp pn ne es ss s C Co om mm ma an nd d k k k k Data Min 00 Max 64 Refer to Real data mapping 1 See page 121 k k Set ID Data Cr Ack k Set ID OK NG Data x 1 15 5 B Ba al la an nc ce e C Co om mm ma an nd d k k t t G To adjust balance You can also adjust balance in the AUDIO menu Transmission Data Min 00 Max 64 Refer to Real data mapping 1 See page 121 k t Set ID...

Страница 123: ...ion Data 00 Skip 01 Add m b Set ID Data Cr Ack b Set ID OK NG Data x 1 18 8 E En ne er rg gy y S Sa av vi in ng g C Co om mm ma an nd d j j q q G To reduce the power consumption of the TV You can also adjust Energy Saving in OPTION menu Transmission j q Set ID Data Cr Ack q Set ID OK NG Data x 1 19 9 A Au ut to o C Co on nf fi ig gu ur re e C Co om mm ma an nd d j j u u G To adjust picture positio...

Страница 124: ... Set ID Data Cr 0 0 0 0 0 0 0 External Input Input Number Ack b Set ID OK NG Data x External Input Data 0 0 0 1 Analogue 0 0 0 0 DTV 0 0 1 0 AV 0 1 0 0 Component 0 1 1 0 RGB 1 0 0 1 HDMI Input Number Data 0 0 0 0 Input1 0 0 1 1 Input4 0 0 1 0 Input3 0 0 0 1 Input2 2 22 2 K Ke ey y C Co om mm ma an nd d m m c c G To send IR remote key code Transmission Data Key code Refer to page 151 m c Set ID Dat...

Страница 125: ...r a period of three 3 years from the date of the distribution of this product by LG Electronics You can obtain a copy of the GPL LGPL MPL licenses from http www gnu org licenses old licenses gpl 2 0 html http www gnu org licenses old licenses lgpl 2 1 html http www mozilla org MPL MPL 1 1 html Also you can obtain the translation of GPL LGPL licenses from http www gnu org licenses old licenses gpl ...

Страница 126: ...ect your rights with two steps 1 copyright the software and 2 offer you this license which gives you legal permission to copy distribute and or modify the software Also for each author s protection and ours we want to make certain that everyone understands that there is no war ranty for this free software If the software is modified by someone else and passed on we want its recipients to know that...

Страница 127: ... is a work based on the Program the distribution of the whole must be on the terms of this License whose permissions for other licensees extend to the entire whole and thus to each and every part regard less of who wrote it Thus it is not the intent of this section to claim rights or contest your rights to work written entirely by you rather the intent is to exercise the right to control the distr...

Страница 128: ...tirely from distribution of the Program If any portion of this section is held invalid or unenforceable under any particular circumstance the balance of the sec tion is intended to apply and the section as a whole is intended to apply in other circumstances It is not the purpose of this section to induce you to infringe any patents or other property right claims or to contest validity of any such ...

Страница 129: ...ar name of author This program is free software you can redistribute it and or modify it under the terms of the GNU General Public License as published by the Free Software Foundation either version 2 of the License or at your option any later version This program is distributed in the hope that it will be useful but WITHOUT ANY WARRANTY without even the implied warranty of MERCHANTABILITY or FITN...

Страница 130: ...ibutor we want to make it very clear that there is no warranty for the free library Also if the library is modified by someone else and passed on the recipients should know that what they have is not the original version so that the original author s reputation will not be affected by problems that might be introduced by others Finally software patents pose a constant threat to the existence of an...

Страница 131: ...does and what the program that uses the Library does 1 You may copy and distribute verbatim copies of the Library s complete source code as you receive it in any medi um provided that you conspicuously and appropriately publish on each copy an appropriate copyright notice and dis claimer of warranty keep intact all the notices that refer to this License and to the absence of any warranty and distr...

Страница 132: ...ial from a header file that is part of the Library the object code for the work may be a derivative work of the Library even though the source code is not Whether this is true is especially significant if the work can be linked without the Library or if the work is itself a library The threshold for this to be true is not precisely defined by law If such an object file uses only numerical paramete...

Страница 133: ...not accept this License Therefore by modifying or distributing the Library or any work based on the Library you indicate your acceptance of this License to do so and all its terms and conditions for copying distributing or modifying the Library or works based on it 10 Each time you redistribute the Library or any work based on the Library the recipient automatically receives a license from the ori...

Страница 134: ...INCIDENTAL OR CONSEQUENTIAL DAMAGES ARISING OUT OF THE USE OR INABILITY TO USE THE LIBRARY INCLUDING BUT NOT LIMITED TO LOSS OF DATA OR DATA BEING RENDERED INACCURATE OR LOSSES SUSTAINED BY YOU OR THIRD PARTIES OR A FAILURE OF THE LIBRARY TO OPERATE WITH ANY OTHER SOFTWARE EVEN IF SUCH HOLDER OR OTHER PARTY HAS BEEN ADVISED OF THE POSSIBILITY OF SUCH DAMAGES END OF TERMS AND CONDITIONS How to Appl...

Страница 135: ... which is described in the Source Code notice required by Exhibit A as Original Code and which at the time of its release under this License is not already Covered Code governed by this License 1 10 1 Patent Claims means any patent claim s now owned or hereafter acquired including without limitation method process and apparatus claims in any patent Licensable by grantor 1 11 Source Code means the ...

Страница 136: ...The Source Code version of Covered Code may be distributed only under the terms of this License or a future version of this License released under Section 6 1 and You must include a copy of this License with every copy of the Source Code You distribute You may not offer or impose any terms on any Source Code version that alters or restricts the applicable version of this License or the recipients ...

Страница 137: ... distribute the Executable version of Covered Code or ownership rights under a license of Your choice which may contain terms different from this License provided that You are in compliance with the terms of this License and that the license for the Executable version does not attempt to limit or alter the recipient s rights in the Source Code version from the rights set forth in this License If Y...

Страница 138: ... if within 60 days after receipt of notice You either i agree in writing to pay Participant a mutually agreeable reasonable royalty for Your past and future use of Modifications made by such Participant or ii withdraw Your litigation claim with respect to the Contributor Version against such Participant If within 60 days of notice a reasonable royalty and payment arrangement are not mutually agree...

Страница 139: ... an equitable basis Nothing herein is intended or shall be deemed to constitute any admission of liability 13 MULTIPLE LICENSED CODE Initial Developer may designate portions of the Covered Code as Multiple Licensed Multiple Licensed means that the Initial Developer permits you to utilize portions of the Covered Code under Your choice of the NPL or the alter native licenses if any specified by the ...

Страница 140: ......

Отзывы: