background image

Sound Mode
Auto Volume
Balance

0

TV Speaker

SETUP

O

PICTURE

O

TIME

O

OPTION

O

AUDIO 

G

Prev.

Menu

TIME MACHINE

O

98

TV SPEAKER ON/OFF SETUP

SOUND & LANGU

A

GE CONTR

OL

SOUND & LANGUAGE CONTROL

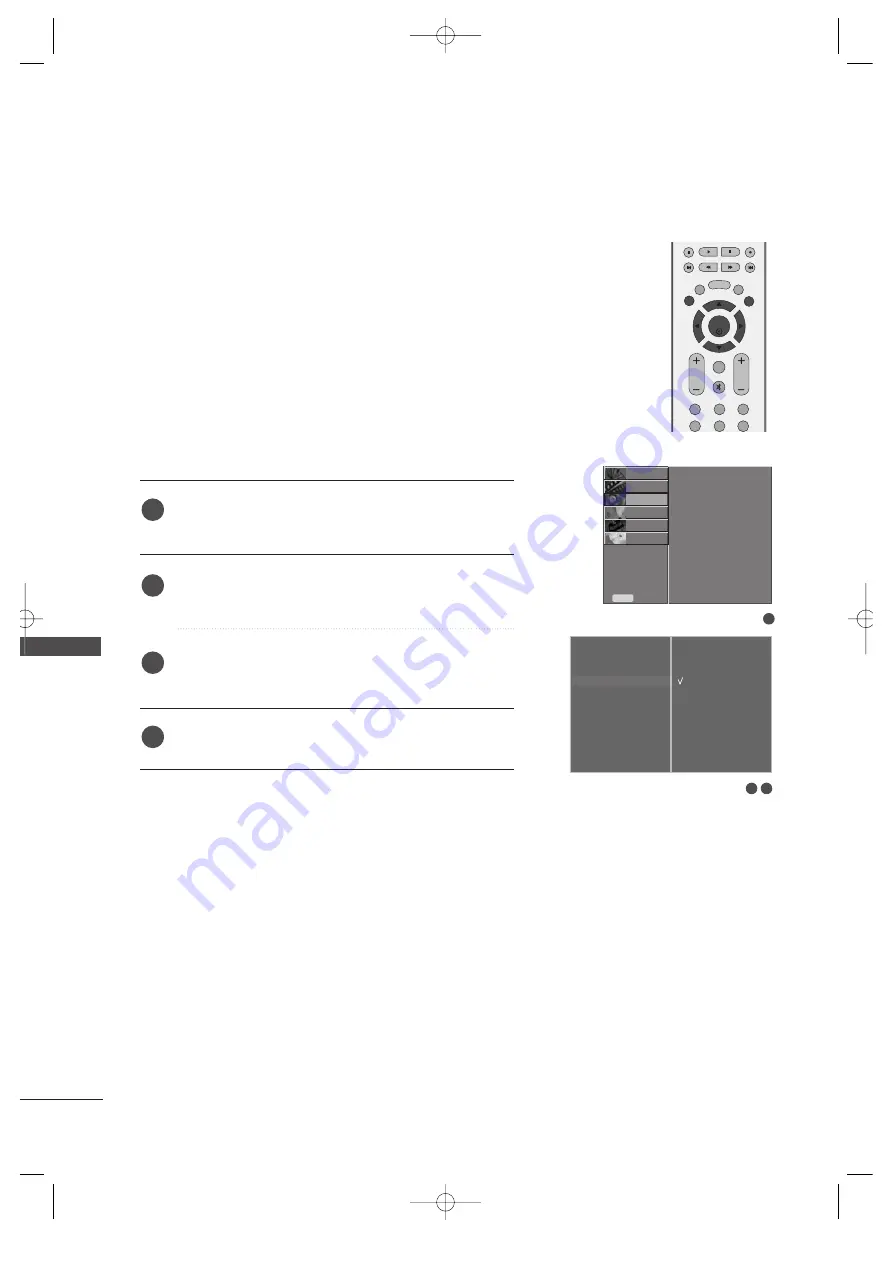
You can adjust the internal speaker status.

In AV, COMPONENT, RGB and HDMI mode, internal speaker
audio can be outputted even though there is no video signal.

If you want to use your external hi-fi stereo system, turn off the
internal speakers of the set.

Press the M

MEEN

NU

U button and then 

D

D

//   

E

E

button to select

the A

AU

UD

DIIO

O menu.

Press the

G

G

button and then 

D

D

//   

E

E

button to select T

T V

V

SSp

peeaakkeerr

Press the

G

G

button and then 

D

D

//

E

E

button to select 

O

O nn or O

Offff.

Press the EEX

XIIT

T  button to return to normal TV viewing.

1

2

3

4

1

2 3

Sound Mode
Auto Volume
Balance

0

TV Speaker

G

Off
On

MENU

VOL

CH

EXIT

CH EDIT

LIVE TV

TIME

MACHINE

1

2

3

4

5

6

FAV/

MARK

MUTE

ENTER 

TIME

CONTROL

TIME

CONTROL

MFL36546204en_2  11/2/07 1:46 PM  Page 98

Содержание 42PB4RT

Страница 1: ...ia LGEDI Indonesia LGEAK Kazakhstan LGERS Mexico 8 9 Special Instructions 3 Product Name 32 42LB9RT MD 42 50PB4RT MA 10 LEE BO BEE 07 8 20 KANG KWANG SUK 07 8 20 L America This part contain Eco hazardous substances Pb Cd Hg Cr6 PBB PBDE etc within LG standard level Details should be followed Eco SCM management standard LG 56 A 2524 Especially Part should be followed and controlled the following sp...

Страница 2: ...Pagination sheet Pagination sheet P NO MFL36546204 Total pages 248 pages 1 Rear cover LG SP P No LG SP LG EN 120 Blank page Rear cover LG EN 1 Blank page Front cover Blank page 120 Blank page ...

Страница 3: ...su distribuidor cuando requiera el servicio LCD TV PLASMA TV MANUAL DE USUARIO MODELOS DE LCD TV 3 32 2L LB B9 9R RT T 3 32 2L LB B9 9R RT TB B 3 32 2L LB B9 9R RT TE E 4 42 2L LB B9 9R RT T 4 42 2L LB B9 9R RT TB B 4 42 2L LB B9 9R RT TE E MODELOS DE PLASMA TV 4 42 2P PB B4 4R RT T 4 42 2P PB B4 4R RT TH H 5 50 0P PB B4 4R RT T 5 50 0P PB B4 4R RT TH H P NO MFL36546204 071 1 REV04 Printed in Kore...

Страница 4: ...MFL36546204sp_1 11 2 07 11 42 AM Page 2 ...

Страница 5: ...ecificada de seguridad puede ser puesto inmediatamente junto a la instrucción de la seguridad ADVERTENCIA Lea estas instrucciones Guarde estas instrucciones Tenga cuidaddo con todas las advertencias Siga todas las instrucciones No utilice este aparato cerca de agua Limpie sólo con un paño seco No bloquee ninguna abertura de la venti lación Instalelo de acuerdo a las instruc ciones del fabricante N...

Страница 6: ...tenga cuidado cuando mueve el carrito con el aparato para prevenir la lesión por la caida Nunca toque el producto ni la antena durante una tormenta o un relampago Do deje un choque impactante o tampoco deje caer ningun objeto en el producto y no deje caer algo en la pantalla Ud puede herirse o el producto puede ser dañado Refiérase a todos los servicios con personal calificado El servicio será req...

Страница 7: ... pellizcado cerrado con una puerta o que caminen sobre él Ponga principal atención a los enchufes los tomacorrientes de pared y al punto donde sale el cable del aparato Marca de uso al aire libre ADVERTENCIA Para reducir el riesgo de un incendio o un choque eléctrico no exponga este aparado en la lluvia tampoco en la humedad Marca de la ubicación mojada No debe exponer el aparato a goteras o salpi...

Страница 8: ...del TV en la Pared 14 Conexión Basica 15 Instalación de un Pedestal de Escritorio 17 Montar en una Pared Instalación horizontal 17 Conexión de la Antena 1 8 CONFIGURACIÓN DE EQUIPO EXTERNO Configuración de HDSTB 19 Instalación del DVD 22 Instalación del VCR 25 Conexiónes de los equipos externos 28 Configuración de AV OUT Salida AV 29 Sonido Estéreo externo 29 USB en configuración 30 Instalación de...

Страница 9: ...o 93 CONTROL DE IMAGEN E IDIOMA Nivelador Automático de Volumen 94 Ajuste de la frecuencia del sonido 95 Ajuste de la frecuencia del sonido opción del usuario 96 Ajuste de Balance 97 Bocina 98 Selección del Lenguaje en la pantalla 99 CONTROL DE IMAGEN APÉNDICE Lista de Verificación de los Problemas 105 Mantenimiento 107 Especificaciones del Producto 108 Programando el Control Remoto 1 10 Codigos d...

Страница 10: ...er las imagenes de su PC y video simultáneamente Instalación Fácil El peso ligero y el grosor delgado hacen instalar más fácil su TV de plasma en varios lugares donde no caben las TVs convencionales Proceso de la manufactura de la TV de Plasma se pueden presentar unos puntos pequeños y colorados en la pantalla Una TV de plasma está compuesta de 0 9 a 2 2 millones de celdas Normalmente ocurren unos...

Страница 11: ...a con demasiada fuerza podría rayar o decolorar la superficie P Pa ar ra a l lo os s m mo od de el lo os s d de e T TV V d de e P Pl la as sm ma a 2 soportes de pared 2 pernos de ojo ManualdeUsuario Manual de Usuario S Só ól lo o p pa ar ra a 3 32 2 1 pernos para la instalación vertical Refiérase ap 13 4 pernos para la base Refiérase ap 13 2 pernos 2 soportes de TV 2 soportes de pared ENTER INPUT ...

Страница 12: ...de TV ENTER INPUT MODE TV TV DVD RATIO MENU VOL CH PIP EXIT TIME CONTROL TIME CONTROL LIVE TV MTS TIME MACHINE VCR PIP CH PIP CH PIP INPUT POWER FAV MARK CAPTION SIMPLINK INPUT MUTE SWAP CH EDIT BRIGHT G p p 5 52 2 G p p 6 68 8 7 76 6 TV grabada Grabación manual Lista programada Lista de fotos Lista de música Lista de películas Menú TV ALTA NORMAL TIME MACHINE TIME MACHINE Espacio libre Inicio MFL...

Страница 13: ... limpieza incluido en el caso de que éste se incluya CH VOL ENTER MENU INPUT CH VOL ENTER MENU INPUT CH VOL ENTER MENU INPUT Botones de CHANNEL Botones de VOLUME Botón MENU Botón ENTER Botón INPUT Botón de POWER Para los modelos de TV de Plasma Sensor de Control Remoto Indicador de Encendido Standby Se ilumina en rojo en el modo de espera Se ilumina en blanco al encender la TV Se ilumina en naranj...

Страница 14: ... I CH VOL Botones de CHANNEL Botones de VOLUME Botón ENTER Botón MENU Botón INPUT Botón de POWER Sensor de Control Remoto Intelligent Eye Indicador de Encendido Standby Se ilumina en rojo en el modo de espera Se ilumina en blanco al encender la TV MFL36546204sp_1 11 2 07 11 42 AM Page 10 ...

Страница 15: ...IO AUDIO VIDEO VIDEO S VIDEO 9 5 2 3 Entrada de HDMI DVI1 HDMI2 Conecte una señal de HDMI O la señal de DVI VIDEO a este puerto con el cable de DVI al HDMI Entrada de RGB Audio Conecte la salida del monitor de una PC al puerto de la entrada apropiado AV IN 1 Entrada de Audio Video Conecte la salida de audio video de un dispositi vo externo a estos puertos Salida de AV Conecte una segunda TV o Moni...

Страница 16: ... de HDMI DVI1 HDMI2 Conecte una señal de HDMI O la señal de DVI VIDEO a este puerto con el cable de DVI al HDMI Entrada de RGB Audio Conecte la salida del monitor de una PC al puerto de la entrada apropiado AV IN 1 Entrada de Audio Video Conecte la salida de audio video de un dispositivo externo a estos puertos Salida de AV Conecte una segunda TV o Monitor Entrada de la Antena Conecte las señales ...

Страница 17: ...la parte poste rior del producto en los hoyos proporcionados FIJACIÓN DE LA TV A UNA MESA O ESCRITORIO Sólo el modelo 32LB9RT Si desea fijar la TV a una mesa o escritorio deberá ajustarla de forma segura a la superficie mediante el uso de tornillos metálicos como se indica a continuación De no hacerlo podría ocasionar la caída de la TV provocando daños en la unidad y lesiones personales graves 1 p...

Страница 18: ... Para usar el producto seguramente asegúrese de que la altura de los soportes montados en la pared sea la misma que la del producto 2 3 1 1 2 Utilice los pernos de anillo o utilice soportes pernos para fijar el equipo a la pared como muestra la imagen Si su equipo tiene sus pernos en la posición de los pernos de anillo antes de su inserción afloje éstos Introduzca los pernos de anillo o utilice so...

Страница 19: ... necesario Para conectar un equipo adicional consulte la sección Conexiones de equipamiento externo Vuelva a instalar el sujetador de cables como se muestra 2 1 3 Tome el sujetador de cables con ambas manos y empújelo como se muestra SUJETADOR DE CABLES MFL36546204sp_1 11 2 07 11 42 AM Page 15 ...

Страница 20: ... ambos lazos en ambos lados del organizador de cables Acomode los cables usando el portacables Esta función no está disponible para todos los modelos Sujete el ORGANIZADOR DE CABLES con ambas manos y extráigalo Extraer mientras sujeta los lazos en ambos lados del organizador de cables NOTA G G No agarre el organizador de cables cuando mueve el producto Si el producto se cae ud se puede herir o el ...

Страница 21: ...4 pulgadas 4 pulgadas 4 pulgadas 4 pulgadas 4 pulgadas Proveedor de potencia Interruptor de corto de circuito CONEXIÓN A TIERRA Asegúrese de que un cable a tierra esté conectado para pre venir descarga eléctrica Si los métodos de conexión a tierra no son posibles debe llamar a un electricista calificado para que instale un interruptor de circuito No intente a conectar el cable a tierra con los ala...

Страница 22: ...trada de pared o antena exterior son conexiones a una caja de cables Para lograr la mejor calidad de imagen ajuste la posición de la antena si fuera necesario Viviendas Apartamentos Conectar al enchufe de antena en la pared Casa privada Conectar a un enchufe de pared de la antena exterior Antena de exterior Enchufe de antena de la pared Cable Coaxial RF 75 ohm Antenna UHF Amplificador de la señal ...

Страница 23: ... la unidad Encienda el Set top box digital Refiérase al manual de usuario del Set top box digital Seleccione la entrada de la fuente C Co om mp po on ne en nt te e 1 1 usando el botón I IN NP PU UT T del control remoto Si está conectado al C CO OM MP PO ON NE EN NT T I IN N 2 2 seleccione la entrada de la fuente C Co om mp po on ne en nt te e 2 2 2 3 4 1 Señal 480i 480p 720p 1080i 1080p 50 60Hz Co...

Страница 24: ...un cable de HDMI Conecte la salida de HDMI IN del Set top box digital al puerto de H HD DM MI I D DV VI I I IN N 1 1 o H HD DM MI I I IN N 2 2 en la unidad Seleccione la entrada de la fuente H HD DM MI I1 1 D DV VI I o H HD DM MI I2 2 usando el botón I IN NP PU UT T del control remoto Encienda el Set top box digital Refiérase al manual de usuario del Set top box digital 2 3 1 MFL36546204sp_1 11 2 ...

Страница 25: ... DVI RGB IN 1 2 Conecte la salida de DVI del Set top box digital al puerto de H HD DM MI I D DV VI I I IN N 1 1 en la unidad Conecte las salidas de audio del Set top box al puerto de A AU UD DI IO O R RG GB B D DV VI I en la unidad Encienda el Set top box digital Refiérase al manual de usuario del Set top box digital Seleccione la entrada de la fuente de H HD DM MI I1 1 D DV VI I usando el botón d...

Страница 26: ...Y Y PB B Y Cb Pb PR R Y Cr Pr Conecte las salidas de video Y PB PR del DVD a los puertos de C CO OM MP PO ON NE EN NT T I IN N V VI ID DE EO O1 1 en la unidad Conecte las salidas de audio del DVD a los puertos de C CO OM MP PO ON NE EN NT T I IN N A AU UD DI IO O1 1 en la unidad Encienda el reproductor de DVD inserte un DVD Seleccione la entrada de la fuente C Co om mp po on ne en nt t1 1 usando e...

Страница 27: ...IO O en la unidad Encienda el reproductor de DVD inserte un DVD Si está conectado a la entrada de A AV V I IN N2 2 seleccione la entrada de la fuente A AV V2 2 Refiérase al manual de usuario del reproductor de DVD para seguir las instrucciones 2 3 4 5 1 HDMI IN MI DVI IN 1 2 USB IN USB IN AV IN 2 L MONO R AUDIO AUDIO VIDEO VIDEO S VIDEO L R S VIDEO VIDEO OUTPUT SWITCH ANT IN ANT OUT COMPONENT IN 1...

Страница 28: ...N N 1 1 o H HD DM MI I I IN N 2 2 en la unidad Seleccione la entrada de la fuente H HD DM MI I1 1 D DV VI I o H HD DM MI I2 2 usando el botón I IN NP PU UT T del control remoto Refiérase al manual de usuario del reproductor de DVD para seguir las instrucciones 1 2 3 G G La TV puede recibir las señales de video y audio simultáneamente usando el cable de HDMI G G Si el DVD no soporte la función de A...

Страница 29: ...encia deje una distancia adecuada entre el VCR y la TV Si el formato de imagen es de 4 3 las imagenes congeladas en los lados de la pantalla se pueden quedar visibles permanentemente Este fenómeno es común para todos los fabricantes y por lo tanto la garantía de los fabricantes no cubre los productos que presentan este fenómeno Conecte al conector de la antena exterior de RF del VCR al conector de...

Страница 30: ...DEO VIDEO OUTPUT SWITCH ANT IN ANT OUT Conecte las salidas de A AU UD DI IO O V VI ID DE EO O entre la TV y el VCR Coincida los colores de salidas Video amarillo Audio izquierdo blanco y Audio derecho rojo Inserte una cinta de video en el VCR y presione el botón PLAY del VCR Vea el manual de usuario del VCR Seleccione la entrada de la fuente A AV V1 1 usando el botón I IN NP PU UT T del control re...

Страница 31: ... Video Conecte la salida de S VIDEO del VCR a la entrada de S S V VI ID DE EO O en la unidad La calidad de la imagen mejora en comparación con una entrada compuesta cable RCA Conecte las salidas de audio del VCR a los puertos de A AU UD DI IO O de la unidad Inserte una cinta de video en el VCR y presione el botón PLAY del VCR Vea el manual de usuario del VCR Seleccione la entrada de la fuente A AV...

Страница 32: ...E EO O entre la TV y un equipo externo Coincida los colores de puertos Video amarillo Audio izquierdo blanco y Audio derecho rojo Seleccione la salida de la fuente A AV V2 2 usando el botón I IN NP PU UT T del control remoto Si está conectado a la entrada de A AV V I IN N1 1 seleccione la entrada de la fuente A AV V1 1 Opere el equipo externo correspondiente Refiérase a la guía de la operación de ...

Страница 33: ...sor Configure los parlantes a través del amplificador estéreo análogo de acuerdo con las instrucciones que se proporcionan con el amplificador 2 1 1 1 El televisor tiene una capacidad especial de salida de señal que le permite conectar un segundo televisor o monitor AV OUT AV OUT ANTENNA IN ANTENNA IN AV OUT VARIABLE AUDIO OUT L R S VIDEO VIDEO Conecte el segundo televisor o monitor a los conector...

Страница 34: ...EQUIPO EXTERNO USB IN USB IN AV IN 2 L MONO R AUDIO AUDIO VIDEO VIDEO S VIDEO o Conecte el dispositivo USB a las tomas de ENTR USB en el lateral de la TV Tras conectar las tomas de ENTR USB utilice la función TIME MACHINE pág 60 2 1 1 MFL36546204sp_1 11 2 07 11 42 AM Page 30 ...

Страница 35: ...N RGB OUTPUT AUDIO HDMI DVI IN 1 RGB IN 1 2 Esta TV proporciona la capacidad de Plug and Play significa que la PC se ajusta automáticamente a los ajustes de la TV Cuando la conecta con un cable de D sub de 15 pines Conecte la salida de RGB de la PC al puerto de R RG GB B P PC C en la unidad Conecte las salidas de audio del Set top box al puerto de A AU UD DI IO O R RG GB B D DV VI I en la unidad E...

Страница 36: ... IN DVI PC OUTPUT AUDIO 1 2 Conecte la salida de DVI del Set top box digital al puerto de H HD DM MI I D DV VI I I IN N 1 1 en la unidad Conecte las salidas de audio del Set top box al puerto de A AU UD DI IO O R RG GB B D DV VI I en la unidad Encienda la PC y la unidad Seleccione la entrada de la fuente de H HD DM MI I1 1 D DV VI I usando el botón de I IN NP PU UT T del control remoto 2 3 4 1 G G...

Страница 37: ...d G Conecte el cable de audio desde el PC a la entrada de audio del equipo Los cables de audio no están incluidos con el equipo G Si utiliza una tarjeta de sonido ajuste el sonido del PC como proceda G Este equipo utiliza una solución VESA Plug and Play El equipo proporciona datos EDID al sistema del PC mediante un protocolo DDC El PC se ajusta automáticamente al utilizar este equipo G El protocol...

Страница 38: ... más ajuste después del ajuste automático en RGB PC ud puede ajustar con C Co on nf fi ig g m ma an nu ua al l Presione el botón E EX XI IT T para regresar a la TV donde estaba viendo Automáticamente ajusta la posición de la imagen y minimiza cualquier temblor en la imagen Si la imagen aún no está correcta su unidad está funcionando apropiadamente pero necesita más ajuste C Co on nf fi ig gu ur ra...

Страница 39: ...er ruido horizontal y afila la imagen de los carácteres Presione el botón M ME EN NU U y luego el botón D D E E para seleccionar el menú I IM MA AG GE EN N Presione el botón G G y luego el botón D D E E para seleccionar P Pa an nt ta al ll la a Presione el botón G G y luego el botón D D E E para seleccionar C Co on nf fi ig g m ma an nu ua al l Presione el botón G G y luego el botón D D E E para s...

Страница 40: ... D D E E para seleccionar P Pa an nt ta al ll la a Presione el botón G G y luego el botón D D E E para seleccionar M Mo od do o X XG GA A Presione el botón G G y luego presione el botón D D E E para seleccionar la resolución XGA deseada Presione el botón E EX XI IT T para regresar a la TV donde estaba viendo Seleccionando los Modos Amplios XGA 1 2 3 4 5 1 3 4 2 Para ajustar Config auto Config manu...

Страница 41: ...Presione el botón G G y luego el botón D D o E E para seleccionar R Re ea aj ju us st te e Presione el botón G G Ud puede inicializar Fase Reloj posición tamaño de PIP y posición de PIP Presione el botón E EX XI IT T para regresar a la TV donde estaba viendo 1 2 3 4 Inicializando Reajuste de la configuración original de Fábrica 1 3 4 2 Para ajustar Config auto Config manual Modo XGA Reajuste G Par...

Страница 42: ...illo cambiando el modo PIP PIP CH SWAP PIP INPUT SIZE POSITION Se cambia el modo de sub imagen a PIP o DW Selecciona un programa para la sub imagen Intercambiar las imágenes principales secundarias en PIP DW Selecciona la fuente de entrada para sub imagen en los modos de PIP Imagen Doble Ajusta el tamaño de la sub imagen Mueve la sub imagen TIME CONTROL VCR DVD Botones de Control Controla algunas ...

Страница 43: ...con el TV Cuando ud presiona este botón aparecerá el menú de Simplink en la pantalla G G p p 5 50 0 CAPTION MTS Selecciona el modo de subtítulos Selecciona el sonido MTS THUMBSTICK Arriba Abajo Izquierda Derecha TIME CONTROL ENTER Le permite navegar a través de los menús en la pantalla y ajustar el sistema de acuerdo a sus preferencias Ajusta la función de Time machine Acepta su selección o desple...

Страница 44: ...ctamente En este momento la TV se cambia al modo de espera En el modo de espera para encender la TV presione los botones I IN NP PU UT T C CH H D D E E de la TV o presione los botones P PO OW WE ER R T TV V I IN NP PU UT T C CH H N Nú úm me er ro o 0 0 9 9 del control remoto asi se encenderá la TV 1 AJUSTE DEL VOLUMEN Presione el botón C CH H o de NÚMERO para seleccionar un número del canal 2 3 1 ...

Страница 45: ... de Aspecto Restablecer Imagen Pantalla Demo CONFIGU O AUDIOO HORAO OPCIÓNO IMAGEN G Prev Menu Modo de Audio Volumen Automático Balance 0 Bocina de TV CONFIGU O IMAGENO HORAO OPCIÓNO AUDIO G Prev Menu Reloj Hora de Apagado Hora de Encendido Hora del Apagador Apagador Auto CONFIGU O IMAGENO OPCIÓNO AUDIOO HORA G Prev Menu TIMEMACHINEO TIMEMACHINEO TIME MACHINE Control de tiempo Calidad de grabado T...

Страница 46: ...tos canales con Sinto manual Esta función no está disponible en la grabación de programas VER EL TV CONTROL DE CONFIGURACIÓN 1 4 Sinto auto 0 TV 5 MENU VOL CH EXIT CH EDIT LIVE TV TIME MACHINE 1 2 3 4 5 6 7 8 9 0 FAV MARK MUTE SLEEP REVIEW ENTER TIME CONTROL TIME CONTROL Presione el botón M ME EN NU U y luego el botón D D o E E para seleccionar el menú C CO ON NF FI IG GU U Presione el botón G G y...

Страница 47: ...ue ud quiere agregar o eliminar Presione el botón C CH H E ED DI IT T Presione el botón C CH H E ED DI IT T para seleccionar M Me em mo or ri ia a o B Bo or rr ra ar r Presione el botón E EN NT TE ER R 1 2 3 4 También ud puede hacer la S Si in nt to o m ma an nu ua al l con el menú C CO ON NF FI IG GU U Sinto auto Sinto manual Favorito IMAGENO AUDIOO HORAO OPCIÓNO CONFIGU G Prev Menu TIMEMACHINEO ...

Страница 48: ... CONTROL Presione el botón M ME EN NU U y luego el botón D D o E E para seleccionar el menú C CO ON NF FI IG GU U Presione el botón G G y luego el botón D D o E E para seleccionar S Si in nt to o m ma an nu ua al l Presione el botón G G y luego el botón D D o E E para seleccionar F Fi in no o Presione el botón F F o G G para hacer la sintonía fina para la mejor imgen y sonido Presione el botón E E...

Страница 49: ...n nu ua al l Presione el botón G G y luego el botón D D o E E para seleccionar B Bo oo os st te er r Presione el botón F F o G G para seleccionar O On n u O Of ff f Presione el botón E EN NT TE ER R para almacenarlo Presione el botón E EX XI IT T para regresar a la TV donde estaba viendo o presione el botón M ME EN NU U para regresar al menú previo 1 2 3 4 5 6 Sinto auto Sinto manual Favorito IMAG...

Страница 50: ...deseado Para almacenar otro programa repita los pasos de 3 a 5 Presione el botón E EX XI IT T para regresar a la TV donde estaba viendo o presione el botón M ME EN NU U para regresar al menú previo Esta función nos permite explorar rápidamente hasta 8 canales de su elección sin que tenga que esperar que su TV explore los canales que estén en medio Presione repetidamente el botón F FA AV V para sel...

Страница 51: ...ne el botón G G y luego el botón D D o E E para seleccionar la fuente AV1 AV2 Componente1 Componente2 RGB HDMI1 DVI o HDMI2 Presione el botón G G y luego el botón D D o E E para seleccionar la etiqueta Presione el botón E EX XI IT T para regresar a la TV donde estaba viendo Idioma Language Etiqueta de Entrada G SIMPLINK Bloqueado Subtít Texto Poner ID Metodo ISM Bajo consumo Para ajustar 1 2 3 4 5...

Страница 52: ... necesita el control remoto para controlar la TV que esté configurada Esta función puede ser usada para la vista no autorizada Esta unidad está programada para recordarse la opción de última configuración aunque ud apaga la unidad Presione el botón M ME EN NU U y luego el botón D D o E E para seleccionar el menú O OP PC CI IÓ ÓN N Presione el botón G G y luego el botón D D o E E para selec cionar ...

Страница 53: ...otón E EX XI IT T para regresar a la TV donde estaba viendo 1 2 3 4 3 2 1 Idioma Language Etiqueta de Entrada SIMPLINK G Bloqueado Subtít Texto Poner ID Metodo ISM Bajo consumo Off On Funciona sólo con dispositivos con logotipo SIMPLINK Verifique el logotipo SIMPLINK Esto le permite controlar y reproducir otros dispositivos AV conectados a la pantalla a través del cable HDMI sin cables ni configur...

Страница 54: ... de el l t te el le ev vi is so or r Cambie al canal del televisor anterior sin importar el modo actual R Re ep pr ro od du uc cc ci ió ón n d de e D DI IS SC C D Di is sc co o Seleccione y reproduzca los discos Cuando exis tan varios discos disponibles los títulos de los discos aparecerán en la parte inferior de la pantalla R Re ep pr ro od du uc cc ci ió ón n d de e V VC CR R Reproduzca y contro...

Страница 55: ...hacer funcionar el dispositivo externo con Simplink presione el botón TV entre el botón MODE del control remoto G G Al encender la fuente de Entrada con el botón INPUT en el control remoto puede detener el funcionamiento del dispositivo operado por Simplink G G Cuando selecciona o hace funcionar el dispositivo de medios con la función home theater el parlante automáticamente cambia al parlante de ...

Страница 56: ...ona el control de tiempo y la grabación de funciones si la señal está debil Presione el botón M ME EN NU U y luego el botón D D o E E para seleccionar el menú T TI IM ME E M MA AC CH HI IN NE E Presione el botón G G y luego el botón D D o E E para seleccionar C Co on nt tr ro ol l d de e t ti ie em mp po o Presione el botón G G y luego el botón D D o E E para seleccionar O On n u O Of ff f Presion...

Страница 57: ...ón el HDD puede tardar un máximo de 3 minutos en inicializarse G G La función de grabación no se iniciará para un programa protegido contra copia G G Como una emisión analógica se transfiere a una señal digital el video que contiene movimientos rápidos puede mostrar bandas cruzadas Esto ocurre al comprimir la señal analógica y después restaurarla en la señal digital La unidad intentará reducir el ...

Страница 58: ... us se e I II I y después use el botón R RE EW W F FF F para la cámara lenta mientras se muestra el Al usar el botón F F o G G durante la reproducción el cursor podrá visualizarse en pantalla Pulse el botón P PL LA AY Y G G para volver a la reproducción normal Si desea volver a la emisión actual en directo pulse el botón LIVE TV F FF F G GG G I IF FF F G GG GI I F F G G LIVE TV P PL LA AY Y G G I ...

Страница 59: ... 1 2 3 Presione el botón M ME EN NU U y luego el botón D D o E E para seleccionar el menú T TI IM ME E M MA AC CH HI IN NE E Presione el botón G G y luego el botón D D o E E para seleccionar Formato de HDD Pulse el botón G G para iniciar el Formato de HDD Presione el botón E EX XI IT T para regresar a la TV donde estaba viendo 1 2 3 4 Si pulsa el botón G G aparecerá este mensaje Si selecciona Sí a...

Страница 60: ...tra a continuación Grabación instantánea Use esta función para grabar el programa que está viendo en la pantalla principal Esta función graba el programa actualmente en reproducción 1 10 0m mi in n 2 20 0m mi in n 3 30 0m mi in n 4 40 0m mi in n 5 50 0m mi in n 6 60 0m mi in n 1 10 0m mi in n 2 20 0m mi in n 3 30 0m mi in n 4 40 0m mi in n 5 50 0m mi in n 6 60 0m mi in n S Si in n c ca am mb bi io...

Страница 61: ...omo podría ser G G Los programas se almacenan por separado conforme al sistema de colores en uso p ej PAL NTSC G G El tiempo disponible para la grabación manual es de un máximo de 4 horas y un mínimo de 5 minutos El tiempo extra de grabación añadido al ajuste existente iguala el tiempo final de grabación Una vez ajustado el tiempo de grabación seleccione E EN NT TE ER R Se mostrará la barra de est...

Страница 62: ...ha a H Ho or ra a D Du ur ra ac ci ió ón n F Fr re ec cu ue en nc ci ia a Una vez configurada la G Gr ra ab ba ac ci ió ón n m ma an nu ua al l pulse el botón E EN NT TE ER R 2 3 1 2 1 Sun Jan 1 11 03 AM Entrada TV Fecha Hora Duración Frecuencia AV1 Sun Jan 1 12 03 AM 30 Min Una vez Menú Navegación Modificar OK Salir Grabación manual TV grabada Lista programada Lista de fotos Lista de música Lista...

Страница 63: ...paldo USB Formato de HDD USB Subtítulo CONFIGU O AUDIOO HORAO OPCIÓNO IMAGEN O Prev Menu TIMEMACHINEG Presione el botón M ME EN NU U y luego el botón D D o E E para seleccionar el menú T TI IM ME E M MA AC CH HI IN NE E Presione el botón G G y luego el botón D D o E E para seleccionar Calidad de grabado Presione el botón G G y luego el botón D D o E E para seleccionar A Al lt ta a o N No or rm ma ...

Страница 64: ...grama utilitario diferente y no admitido por Windows podría no ser reconocido G G Conecte la alimentación a un dispositivo de almacenamiento USB que requiera un suministro de potencia exter no De lo contrario el dispositivo podría no ser reconocido G G Conecte un dispositivo de almacenamiento USB con el cable provisto por el fabricante del USB De conectarlo con otro tipo de cable o un cable excesi...

Страница 65: ...E E para seleccionar F Fo or rm ma at to o d de e H HD DD D U US SB B Pulse el botón G G para iniciar el F Fo or rm ma at to o d de e H HD DD D U US SB B 2 Control de tiempo Calidad de grabado TV grabada Lista programada Grabación manual Formato de HDD DivX Reg Code Respaldo USB USB HDD Format Subtítulo CONFIGU O AUDIOO HORAO OPCIÓNO IMAGENO TIMEMACHINE Para ajustar Formato de HDD USB G G 1 3 2 De...

Страница 66: ...rabada Entrada TV60 Fecha Wed Mar10 2007 Duración 20 min Calidad Alta No Title TV60 Wed Mar10 10 20 AM No Title TV62 Wed Mar10 3 10 AM No Title TV30 Wed Mar14 2 25 PM No Title TV30 Wed Mar19 6 02 AM No Title TV32 Wed Mar19 4 20 PM ALTA NORMAL 11h 24m 22h 46m Menú Navegación Menúemergente Desplazar pág Marcar Salir Espacio libre Página 2 3 Sin marcar TV grabada TV grabada Menú Navegación Menú emerg...

Страница 67: ...ca todas las fotos en pantalla G G D De es sm ma ar rc ca ar r t to od do o cambiar las fotos marcadas a fotos desmarcadas G G E El li im mi in na ar r elimina la grabación seleccionada G G R Re en no om mb br ra ar r edita el título del programa grabado G G C Co op pi ia a a a H HD DD D U US SB B Copia el programa grabado en el HDD interno al dispositivo de almacenamiento USB Se activa únicamente...

Страница 68: ... menú desplegable Pulse repetidamente el botón E EX XI IT T para volver a la visualización de TV o pulse T TI IM ME E M MA AC CH HI IN NE E para volver al menú Si el HDD experimenta un programa al realizar una función Grabación relacionada con la DVR aparecerá este mensaje Si la temperatura es inferior a cero 0 aparecerá un mensaje de advertencia y deberá reiniciar el HDD 4 4 Iniciación del disco ...

Страница 69: ... el sistema FAT32 Únicamente admite las funciones de copia de seguridad de archivos por lo tanto no se permite la reproducción directa de la Lista de elementos grabados con el OSD actual A fin de reproducir los contenidos grabados los archivos deben desplazarse al HDD interno a través de la función Copiar a la lista de elementos grabados desde el menú emergente Visualice la lista de los programas ...

Страница 70: ... este mensaje Al seleccionar Sí la copia de seguridad será cancelada y el sistema regresará al modo de entrada Si se trans fieren más de dos archivos éstos serán almacenados y las operaciones de copia de seguridad de los archivos en proceso de transferencia y programados para la copia de seguridad serán canceladas Al seleccionar No regresará a la pantalla del proceso de copia de seguridad G G C Ca...

Страница 71: ...dirigirse directamente a la cabecera del programa Si pulsa el botón S ST TO OP P A A podrá ver el equipo F FF F G GG G I IF FF F G GG GI I F F G G LIVE TV S ST TO OP P A A P PL LA AY Y G G I II I Uso del control remoto Es posible cambiar la reproducción a cualquier punto dentro de la reproducción del programa grabado 67 Reproduccion de programas grabados TIME MACHINE Puede reproducir el programa s...

Страница 72: ...a a d de e f fo ot to os s 3 4 1 2 5 TV grabada Grabación manual Lista programada Lista de música Lista de películas Menú TV Lista de fotos LISTA DE FOTOS ALTA NORMAL MENU VOL CH EXIT ENTER TIME CONTROL TIME CONTROL CH EDIT LIVE TV TIME MACHINE FAV MARK MUTE TIME MACHINE TIME MACHINE Espacio libre Muestra la unidad seleccionada Se desplaza al archivo de nivel superior Página actual páginas totales...

Страница 73: ...CH HI IN NE E para regresar al inicio previo 69 TIME MACHINE 2 3 4 5 1 Selección de fotografías y menú emergente Como se ilustra es posible listar hasta 6 fotos en miniatura por página G G V Ve er r mostrar el elemento seleccionado G G M Ma ar rc ca ar r t to od do o marca todas las fotos en pantalla G G V Ve er r l lo o m ma ar rc ca ad do o mostrar las fotos marcadas G G D De es sm ma ar rc ca a...

Страница 74: ...trarán todas las fotos en la carpeta actual Cuando disponga de imagines seleccionadas éstas se mostrarán durante el pase de diapositivas Para iniciar el pase de diapositivas presione el botón E EN NT TE ER R Establezca el intervalo de tiempo del pase de diapositivas en O Op pc ci ió ón n G G B BG GM M disfrute de la música mientras visualiza fotos a pantalla completa Para iniciar BGM presione el b...

Страница 75: ...NT TE ER R Utilice el botón F F G G y E EN NT TE ER R para establecer los valores A continuación presione de nuevo y presione E EN NT TE ER R para guardar los cambios realizados No es posible cambiar la Carpeta de música mientras BGM se encuentra en reproducción G G O Oc cu ul lt ta ar r oculte el menú en la visualización a pantalla completa Utilice el botón F F G G para seleccionar O Oc cu ul lt ...

Страница 76: ...s de música marcados Botones correspondientes en el mando a distancia 1 3 4 5 6 2 Presione el botón T TI IM ME E M MA AC CH HI IN NE E y luego el botón D D o E E para seleccionar el menú L Li is st ta a d de e m mú ús si ic ca a TV grabada Grabación manual Lista programada Lista de fotos Lista de películas Menú TV Lista de música ALTA NORMAL MENU VOL CH EXIT ENTER TIME CONTROL TIME CONTROL CH EDIT...

Страница 77: ...siguiente pista seleccionada Cuando no existen pistas seleccionadas para la reproducción se reproducirá la siguiente pista de la carpeta actual Si se dirige a otra carpeta y presiona E EN NT TE ER R detendra la reproducción de la pista actual G G R Re ep pr ro od d m ma ar rc ca ad da a reproduce las pistas de música seleccionadas Una vez finaliza la reproducción de una pista automáticamente se in...

Страница 78: ...ica se mostrará delante del título musical G G Una pista de música dañada o corrupta no se reproducirá y mostrará 00 00 en el tiempo de reproducción G G Una pista de música descargada de un servicio de pago con protección de copyright no se inicia pero mues tra información inadecuada en lugar del tiempo de reproducción G G Pulse los botones E EN NT TE ER R A A E EX XI IT T para hacer desaparecer e...

Страница 79: ...ones correspondientes en el mando a distancia 1 3 4 5 2 Dispositivo USB Página 2 3 Drive1 Lista de películas Lista de películas Menú Navegación Menú emergente Desplazar pág Marcar Salir Av carp 3 4 1 2 5 Archivos de PELÍCULA admitidos avi Divx Formato de vídeo DivX3 xx DivX4 xx DivX5 xx XVID 3IV1 3IV2 FVFW DMK2 RMP4 DIV3 DIV4 DIV5 DIV6 MP43 COL1 AP41 nAVI DX50 Formato de audio AC3 PCM MP2 MP3 Frec...

Страница 80: ...r rc ca ar r t to od do o marcar todas las películas de la carpeta G G D De es sm ma ar rc ca ar r t to od do os s anular la selección de todas las películas marcadas G G C Ca an nc ce el la ar r cierra el menú desplegable 3 4 5 1 2 Dispositivo USB Página 2 3 Drive1 Lista de películas Lista de películas Menú Navegación Menú emergente Desplazar pág Marcar Salir Av carp Dispositivo USB Página 2 3 Dr...

Страница 81: ...E Presione el botón G G y luego el botón D D o E E para selec cionar S Su ub bt tí ít tu ul lo o Pulse el botón G G para iniciar el S Su ub bt tí ít tu ul lo o Presione el botón D D E E F F G G para seleccionar la opción de subtítulos deseada Presione el botón E EX XI IT T para volver a la reproducción de la película 1 2 3 4 5 On Off Control Posición Sinc Idioma Control activa y desactiva los subt...

Страница 82: ... g C Co od de e Pulse el botón G G para iniciar el D Dv vi ix x R Re eg g C Co od de e Presione el botón E EX XI IT T para regresar a la TV donde estaba viendo 1 2 3 4 CONFIGU O AUDIOO HORAO OPCIÓNO IMAGENO Prev Menu TIMEMACHINE MENU VOL CH EXIT ENTER TIME CONTROL TIME CONTROL CH EDIT LIVE TV TIME MACHINE FAV MARK Para ajustar Control de tiempo Calidad de grabado TV grabada Lista programada Grabac...

Страница 83: ... P PI IP P C CH H para seleccionar un programa para la sub imagen El número del programa seleccionado está desplegado debajo del número del programa de la imagen principal Viendo la PIP Imagen Doble Presione el botón PIP para accesar a la sub imagen Cada vez que presione PIP la imagen cambiará como se muestra a continuación Modo PIP Modo DW1 PIP Apagada ENTER INPUT MODE TV TV DVD RATIO MENU VOL PO...

Страница 84: ...ajo Selección de la fuente de entrada para la Sub imagen Imagen doble Presione el botón P PI IP P I IN NP PU UT T para seleccionar la fuente de entrada para la sub imagen Cada vez que presione el botón P PI IP P I IN NP PU UT T cada fuente de entrada para la sub imagen estará desplegada TV Todos AV1 Todos Excepto por AV1 AV2 Todos Excepto por AV2 Componente1 Todos Excepto por Componente1 Component...

Страница 85: ... a ajustar horizontal mente la imagen en proporción linear para llenar la pantalla completa útil para la visualización de DVDs en formato 4 3 4 4 3 3 La siguiente selección le llevará a visualizar una imagen con la relación de aspecto original 4 3 y con barras grises a ambos lados derecho e izquierdo Presione el botón R RA AT TI IO O repetidamente para seleccionar el formato de la imagen deseado U...

Страница 86: ...Zooml DE Zoom2 DE NOTA G G Únicamente puede seleccionar el formato 1 16 6 9 9 Ancho 4 4 3 3 Zoom 1 2 en modo TV AV1 2 Componente HDMI G G La fuente de entrada RGB PC y HDMI PC utilizan una proporción de aspecto de 4 3 ó 16 9 G G Puede seleccionar 4 4 3 3 1 16 6 9 9 Z Zo oo om m1 1 Z Zo oo om m2 2 únicamente en el modo Programas de TV grabados Lista de películas Reproducción G G En la función Retar...

Страница 87: ... seleccionar I In nt te el ll li ig ge en nt t E Ey ye e LCD TV models only D Di in ná ám mi ic co o E Es st tá án nd da ar r S Su ua av ve e U Us su ua ar ri io o1 1 u U Us su ua ar ri io o2 2 Presione el botón E EX XI IT T para regresar a la TV donde estaba viendo Modo imagen ajusta la TV para la apariencia de la mejor imagen Seleccione el valor preconfigurado en el menú Modo imagen basando en l...

Страница 88: ... Presione el botón M ME EN NU U y luego el botón D D E E para seleccionar el menú I IM MA AG GE EN N Presione el botón G G y luego el botón D D E E para seleccionar T Te em mp pe er ra at tu ur ra a C Co ol lo or r Presione el botón G G y luego el botón D D E E para seleccionar F Fr rí ía a M Me ed di io o C Cá ál li id da a u U Us su ua ar ri io o Presione el botón E EX XI IT T para regresar a la...

Страница 89: ...n E EX XI IT T para regresar a la TV donde estaba viendo Modo imagen Opción del Usuario C Co on nt tr ra as st te e Ajusta la diferencia entre nivel claro y obscuro en la imagen B Br ri il ll lo o Aumenta o disminuye el grado de blanco en su imagen C Co ol lo or r Ajusta la intensidad de todos los colores N Ni it ti id de ez z Ajusta el nivel de encrepadura en los bordes entre area claro y obscuro...

Страница 90: ... botón D D E E para seleccionar T Te em mp pe er ra at tu ur ra a C Co ol lo or r Presione el botón G G y luego el botón D D E E para seleccionar U Us su ua ar ri io o Presione el botón G G y luego el botón D D E E para seleccionar R Ro oj jo o V Ve er rd de e o A Az zu ul l Presione el botón G G y luego presione el botón F F o G G para hacer el ajuste apropiado Presione el botón E EX XI IT T para...

Страница 91: ...G y luego presione el botón F F G G para seleccionar On o Off Presione el botón E EX XI IT T para regresar a la TV donde estaba viendo XD es una tecnología de perfeccionamiento de imagen exclusiva de LG Electronics que permite desplegar una fuente HD a través de un avanzado procesador de algoritmo de señal digital Esta función no está disponible en el modo RGB HDMI PC A A C Co on nt tr ra as st te...

Страница 92: ...o el botón D D E E para seleccionar el menú I IM MA AG GE EN N Presione el botón G G y luego el botón D D E E para seleccionar X XD D D De em mo o Presione el botón G G para comenzar X XD D D De em mo o Para detener X XD D D De em mo o presione el botón M ME EN NU U 1 2 3 4 XD Demo XD Off XD On Salida Menu 1 3 2 Modo imagen Temperatura Color Avanzado Relación de Aspecto Restablecer Imagen Pantalla...

Страница 93: ...Av va an nz za ad do o Presione el botón G G y luego el botón D D E E para seleccionar C Ci in ne e Presione el botón F F o G G para seleccionar O On n u O Of ff f Presione el botón E EX XI IT T para regresar a la TV donde estaba viendo o presione el botón M ME EN NU U para regresar al menú previo 1 2 3 4 5 1 3 2 4 Modo imagen Temperatura Color Avanzado G Relación de Aspecto Restablecer Imagen Pan...

Страница 94: ...ve el l d de e N Ne eg gr ro o Presione el botón F F o G G para seleccionar B Ba aj jo o o A Al lt to o A A B Ba aj jo o La reflexión de pantalla se pone más obscura A A A Al lt to o La reflexión de pantalla se pone más clara Presione el botón E EX XI IT T para regresar a la TV donde estaba viendo 1 2 3 4 5 1 3 2 4 Modo imagen Temperatura Color Avanzado G Relación de Aspecto Restablecer Imagen Pan...

Страница 95: ...D D E E para seleccionar R Re es st ta ab bl le ec ce er r I Im ma ag ge en n Presione el botón G G Presione el botón E EX XI IT T para regresar a la TV donde estaba viendo Regresa a la configuración principal de la fabrica de Modo Imagen Temperatura Color XD y Avanzado 1 2 3 1 3 2 Modo imagen Temperatura Color Avanzado Relación de Aspecto Restablecer Imagen G Pantalla Demo Para ajustar MENU VOL C...

Страница 96: ...rá aunque ud cambie la imagen Evite que permanezca una imagen fija en la pantalla para un largo periodo de tiempo No está disponible esta función en los modelos de TV de LCD B Bl la an nq qu ue ea ar r Blanqueo remueve imagenes permanentes de la pantalla N No ot ta a Puede que una imagen excesivamente permanente sea imposible de limpiar completamente con Blanquear O Or rb bi it te er r Orbiter pue...

Страница 97: ...a seleccionar el menú O OP PC CI IÓ ÓN N Presione el botón G G y luego presione el botón D D o E E para seleccionar B Ba aj jo o c co on ns su um mo o Presione el botón G G y luego presione el botón D D o E E para seleccionar O On n o O Of ff f Presione el botón E EX XI IT T para regresar a la TV donde estaba viendo 1 2 3 4 1 3 2 Idioma Language Etiqueta de Entrada SIMPLINK Bloqueado Subtít Texto ...

Страница 98: ...u um me en n A Au ut to om má át ti ic co o Presione el botón G G y luego el botón D D o E E para selec cionar O On n u O Of ff f Presione el botón E EX XI IT T para regresar a la TV donde estaba viendo o presione el botón M ME EN NU U para regresar al menú previo Volumen automático mantiene automáticamente un nivel igual de volumen aunque ud cambie programas 1 2 3 4 1 3 2 Modo de Audio Volumen Au...

Страница 99: ...a disfrutar del sonido original cuando escucha la música P Pe el lí íc cu ul la as s Seleccione esta opción para disfrutar del sonido sublime D De ep po or rt te es s Seleccione esta opción para ver los deporte de la transmisión U Us su ua ar ri io o Seleccione esta opción para usar configuraciones de audio definido por el usuario Presione el botón M ME EN NU U y luego el botón D D o E E para sele...

Страница 100: ... y luego el botón D D o E E para seleccionar U Us su ua ar ri io o Presione el botón G G Seleccione una banda de sonido presionando el botón D D o E E Configure el nivel de un sonido apropiado con los botones F F o G G Presione el botón E EX XI IT T para regresar a la TV donde estaba viendo Ajuste el igualador del sonido 1 2 3 4 5 6 1 3 4 2 5 Modo de Audio G Volumen Automático Balance 0 Bocina de ...

Страница 101: ...a seleccionar el menú A AU UD DI IO O Presione el botón G G y luego el botón D D o E E para seleccionar B Ba al la an nc ce e Presione el botón G G y luego presione el botón F F o G G para hacer un ajuste deseado Presione el botón E EX XI IT T para regresar a la TV donde estaba viendo 1 2 3 4 1 3 2 Modo de Audio Volumen Automático Balance 0 G Bocina de TV L R MENU VOL CH EXIT CH EDIT LIVE TV TIME ...

Страница 102: ...stema externo de estéreo hi fi apague las bocinas internas de la unidad Presione el botón M ME EN NU U y luego el botón D D o E E para seleccionar el menú A AU UD DI IO O Presione el botón G G y luego el botón D D o E E para seleccionar B Bo oc ci in na a d de e T TV V Presione el botón G G y luego el botón D D o E E para seleccionar O On n u O Of ff f Presione el botón E EX XI IT T para regresar ...

Страница 103: ...sione el botón G G y luego el botón D D o E E para seleccionar I Id di io om ma a L La an ng gu ua ag ge e Presione el botón G G y luego presione el botón D D o E E para seleccionar su idioma deseado De aquí en adelante la exhibición en la pantalla aparecerá en el idioma selecccionado Presione el botón E EX XI IT T para regresar a la TV donde estaba viendo 1 2 3 4 MENU VOL CH EXIT CH EDIT LIVE TV ...

Страница 104: ...ionar la opción de año fecha u hora Una vez seleccionada utilice el botón D o E para configurar las opciones de año fecha y hora Presione el botón E EX XI IT T para regresar a la TV donde estaba viendo Deberá realizar correctamente la configuración horaria antes de utilizar la función de encendido apagado por temporizador y reserva de la función de grabación 1 2 3 4 5 1 3 4 2 Reloj G Hora de Apaga...

Страница 105: ...ajustar el nivel de volumen al encederse Presione el botón G G y luego presione el botón D D o E E para seleccionar el canal Presione el botón E EX XI IT T para regresar a la TV donde estaba viendo El temporizador apagado cambia la unidad automáticamente al modo de espera en el tiempo prefijo Después de dos horas de que está cambiada la unidad por la función de encendido se cambiará al modo de esp...

Страница 106: ...lega el número de minutos que desea ud en la pantalla presione el botón E EN NT TE ER R El temporizador empieza a contar del número de minutos seleccionado 1 2 NOTA G G Para ver el tiempo remanente para dormir presione el botón S SL LE EE EP P una vez G G Para cancelar el tiempo para dormir presione el botón S SL LE EE EP P repetidamente hasta que aparezca G G Cuando ud apaga la unidad la unidad d...

Страница 107: ...E E para seleccionar el menú H HO OR RA A Presione el botón G G y luego el botón D D o E E para seleccionar A Ap pa ag ga ad do or r A Au ut to o Presione el botón G G y luego el botón D D o E E para seleccionar O On n u O Of ff f Presione el botón E EX XI IT T para regresar a la TV donde estaba viendo 1 2 3 4 1 1 2 3 Reloj Hora de Apagado Hora de Encendido Hora del Apagador Apagador Auto G Off On...

Страница 108: ...s de subtitulaje Algunas veces las estaciones de Televisión transmiten cuatro señales de subtitulaje diferentes en el mismo canal Seleccionando Modo 1 o el Modo 2 usted puede escoger cuál señal visualizar Modo 1 es la señal usual con subtítulos mientras que otro modo puede desplegar demostraciones o información sobre la programación actual El televisor puede no recibir señales de subtitulaje en I ...

Страница 109: ... contactar a su centro de servicio si la imagen no aparece cinco minutos después Ajuste Color en la opción del menú Mantenga una distancia suficiente entre el producto y el VCR Intente otro canal El problema puede ser con la transmisión Están instalados apropiadamente los cables de video Active cualquier función para restablecer el brillo de la imagen Verifique la inteferencia local como aparatos ...

Страница 110: ...s st tá á f fu ue er ra a d de el l r ra an ng go o E El l c co ol lo or r d de e p pa an nt ta al ll la a e es s i in ne es st ta ab bl le e o o c co ol lo or r ú ún ni ic co o B Ba ar rr ra a o o r ra ay ya a v ve er rt ti ic ca al l e en n e el l f fo on nd do o R Ru ui id do o h ho or ri iz zo on nt ta al l y y P Po os si ic ci ió ón n i in nc co or rr re ec ct ta a N No o s si ir rv ve e l la...

Страница 111: ...te de ropa o detergente de platos Escurra la tela hasta que esté casi seca luego limpie la pantalla con ella Asegurese que no haya el exceso de agua por la pantalla luego dejela secar por el aire antes de encender su TV Limpiando el gabinete Para remover la suciedad o polvo limpie el gabinete con una tela suave seca y sin pelusa Favor de asegurarse no usar una tela mojada Ausencia Extendida Si ud ...

Страница 112: ...E MB Dimensiones Ancho x Altura x Profundidad Peso incluyendo la base excluyendo la base incluyendo la base excluyendo la base 805 8 x 619 7 x 283 9 mm 31 7 x 24 4 x 1 1 2 pulgadas 805 8 x 554 1 x 79 0 mm 31 7 x 21 8 x 3 1 pulgadas 32 6 pounds 14 8 kg 27 8 pounds 12 6 kg 3 32 2L LB B9 9R RT T 3 32 2L LB B9 9R RT TB B 3 32 2L LB B9 9R RT TE E 32LB9RT MD 32LB9RTB MB 32LB9RTE MB AC100 240V 50 60Hz NT...

Страница 113: ...7 6 kg 4 42 2P PB B4 4R RT T 4 42 2P PB B4 4R RT TH H 42PB4RT MA 42PB4RTH MA Dimensiones Ancho x Altura x Profundidad Peso incluyendo la base excluyendo la base incluyendo la base excluyendo la base 1308 0 x 906 5 x 370 0 mm 51 5 x 35 7 x 14 6 pulgadas 1308 0 x 845 0 x 89 5 mm 51 5 x 33 2 x 3 5 pulgadas 94 1 pounds 42 7 kg 83 8 pounds 38 0 kg 5 50 0P PB B4 4R RT T 50PB4RT MA Dimensiones Ancho x Al...

Страница 114: ...programación para el componente correspondiente puede ser encontrados en las páginas siguientes Si el código está correcta el dispositivo se apagará Presione el botón MENU para memorizar el código Luego de parpadear dos veces se almacenará este código Pruebe las funciones del control remoto para ver si el componente responde apropiadamente Si no repita desde el paso 2 5 El control remoto es de una...

Страница 115: ...TSUBISHI 013 020 045 046 049 051 059 061 151 MTC 034 040 MULTITECH 024 034 NEC 012 023 039 043 048 NORDMENDE 043 OPTONICA 053 054 PANASONIC 066 070 074 083 133 140 145 PENTAX 013 020 031 033 063 PHILCO 031 034 067 PHILIPS 031 033 034 054 067 071 101 PILOT 101 PIONEER 013 021 048 PORTLAND 108 PULSAR 072 QUARTZ 01 1 014 QUASAR 033 066 075 145 RCA 013 020 033 034 040 041 062 063 107 109 140 144 145 1...

Страница 116: ... D4 D5 D6 D7 Lead code Low custom code High custom code Data code Data code Repeat code Tf 4 5 ms 9 ms 2 25 ms 9 ms 0 55 ms 0 56 ms 1 12 ms 0 56 ms 2 24 ms Tf Tf Tf 108ms 455KHz Bit 0 Bit 1 1 Cómo conectar Conecte su control remoto de cable al puerto de control remoto en la TV 2 Códigos de IR de Control Remoto Salida de la forma de onda Pulso simple modulado con la señal de 37 917KHz en 455KHz T1 ...

Страница 117: ...C Botón R C Botón R C Botón R C Botón R C Botón R C Botón R C Botón R C Botón R C Botón R C Botón R C Botón R C Botón R C Botón R C Botón R C Botón R C Botón R C Botón R C Botón R C Botón R C Botón R C Botón R C Botón R C Botón R C Botón R C TV POWER INPUT RATIO BRILLO BRILLO SIMPLINK PIP CAPTION MTS PIP CH PIP CH SWAP PIP INPUT TIME MACHINE STOP A TIME MACHINE PLAY G TIME MACHINE PAUSE II TIME MA...

Страница 118: ...C no se proporcionan con el TV El uso de esta función en modo Time MACHINE no está disponible DMI IN DMI IN 2 VARIABLE AUDIO OUT VARIABLE AUDIO OUT AUDIO AV IN 1 AV IN 1 AV OUT AV OUT ANTENNA IN ANTENNA IN AUDIO RGB DVI RGB PC RGB IN RGB IN RS 232C IN CONTROL SERVICE RS 232C IN CONTROL SERVICE L MONO R AUDIO VIDEO Tipo del Conector Macho D Sub 9 Pines No Nombre de Pin 1 No conexión 2 RXD Recepción...

Страница 119: ...e ajuste de Set ID es de 1 99 Presione el botón E EX XI IT T para regresar a la TV donde estaba viendo Use esta función para especificar un número de ID de la unidad Refiérase a Grupeo de datos reales 1 G G p p 1 11 19 9 Configuración de ID 2 3 4 1 Idioma Language Etiqueta de Entrada SIMPLINK Bloqueado Subtít Texto Poner ID Metodo ISM Bajo consumo 1 2 3 1 G F Configuraciones de RS 232C Configuraci...

Страница 120: ...idad está indicado en decimal 1 99 en el menú en Hexadecimal 0x0 0x63 en la transmisión recibiendo el protocolo DATO Para transmitir los datos de comando Transmite el dato FF a leer estados de comando Cr Retorno Código ASCII como 0x0D Código ASCII como espacio 0x20 Command1 Command2 Set ID Dato Cr Reconocimiento de OK La TV transmite ACK reconocimiento basando en este for mato cuando recibe un dat...

Страница 121: ...do apagado Transmisión Dato 0 Mudo encendido de pantalla Imagen apagada Dato 1 Mudo apagado de pantalla Imagen encendida k d Set ID Dato Cr k e Set ID Dato Cr Ack d Set ID OK Dato x 0 05 5 C Co on nt tr ro oll d de e v vo ollu um me en n C Co om ma an nd do o2 2 f f G Para ajustar el volumen Ud también puede ajustar el volmen con los botones de volumen del control remoto Transmisión Dato Min 0 Max...

Страница 122: ...idad use este modo Cuando la potencia principal enciende y apaga el bloqueo de control remoto será liberado m Set ID OK Data x 1 13 3 P PI IP P D DW W C Co om ma an nd do o2 2 n n G Para controlar PIP Imagen sobre imagen DW Ud puede controlar PIP DW usando el botón PIP del control remoto o en el menú PIP DW Transmisión k n Set ID Dato Cr Ack Data 0 PIP DW apagado 1 PIP 2 DW1 3 DW2 n Set ID OK Dato...

Страница 123: ...V con la función de tiempo apagado Dato 9 Apague la TV con la función de auto dormido Dato a Apague la TV para detectar el AV Esta función es para leer sólo Ack p Set ID OK NG Dato x 2 22 2 M Mé ét to od do o I IS SM M C Co om ma an nd do o 1 1 j j C Co om ma an nd do o 2 2 p p G Para controlar el método ISM Ud puede ajustar el Metodo ISM en el menú Opción opción Transmisión j p Set ID Dato Cr Dat...

Страница 124: ...0 1 0 Input3 0 0 0 1 Input2 2 26 6 S Se elle ec cc ciió ón n d de e e en nt tr ra ad da a C Co om ma an nd do o1 1 x x C Co om ma an nd do o2 2 b b E En nt tr ra ad da a d de e lla a iim ma ag ge en n p pr riin nc ciip pa all 2 25 5 M Ma an nd da ar r e ell c có ód diig go o I IR R C Co om ma an nd do o1 1 m m C Co om ma an nd do o2 2 c c G Para mander el código de botón remote IR Transmisión Dato...

Страница 125: ...MFL36546204sp_2 11 2 07 10 27 AM Page 121 ...

Страница 126: ...MFL36546204sp_2 11 2 07 11 20 AM Page 122 ...

Страница 127: ...quote this information to your dealer when you require service LCD TV MODELS 3 32 2L LB B9 9R RT T 3 32 2L LB B9 9R RT TB B 3 32 2L LB B9 9R RT TE E 4 42 2L LB B9 9R RT T 4 42 2L LB B9 9R RT TB B 4 42 2L LB B9 9R RT TE E PLASMA TV MODELS 4 42 2P PB B4 4R RT T 4 42 2P PB B4 4R RT TH H 5 50 0P PB B4 4R RT T 5 50 0P PB B4 4R RT TH H LCD TV PLASMA TV OWNER S MANUAL MFL36546204en_1 11 2 07 1 40 PM Page...

Страница 128: ...MFL36546204en_1 11 2 07 1 40 PM Page 2 ...

Страница 129: ...rawing that illustrates the intent of a specific safety instruction may be placed immediately adjacent to that safety instruction Read these instructions Keep these instructions Heed all warnings Follow all instructions Do not use this apparatus near water Clean only with dry cloth Do not block any ventilation openings Install in accordance with the manufacturer s instructions Do not install near ...

Страница 130: ...us combination to avoid injury from tip over Never touch this apparatus or antenna during a thunder or lighting storm Do not allow a impact shock or any objects to fall into the product and do not drop onto the screen with something You may be injured or the product can be damaged Refer all servicing to qualified service person nel Servicing is required when the apparatus has been damaged in any w...

Страница 131: ... physical or mechanical abuse such as being twisted kinked pinched closed in a door or walked upon Pay particular attention to plugs wall outlets and the point where the cord exits the appliance Outdoor Use Marking WARNING To Reduce The Risk Of Fire Or Electric Shock Do Not Expose This Appliance To Rain Or Moisture Wet Location Marking Apparatus shall not be exposed to dripping or splashing and no...

Страница 132: ...TV to a Desk 13 Attaching the TV to a Wall 14 Back Cover for Wire Arrangement 15 Desktop Pedestal Installation 17 Wall Mount Horizontal installation 17 Antenna Connection 1 8 EXTERNAL EQUIPMENT SETUP HD Receiver Setup 19 DVD Setup 22 VCR Setup 25 Other A V Source Setup 28 AV Output Setup 29 External Stereo Setup 29 USB in Setup 30 PC Setup 31 Screen Setup for PC Mode 34 PREPARATION TIME MACHINE Ti...

Страница 133: ...Minimization ISM Method 92 Low Power Picture Mode 93 SOUND LANGUAGE CONTROL Auto Volume Leveler 94 Preset Sound Settings Sound Mode 95 Sound Setting Adjustment User Mode 96 Balance 97 TV Speakers On Off Setup 98 On Screen Menu Language Selection 99 PICTURE CONTROL APPENDIX Troubleshooting 105 Maintenance 107 Product Specifications 108 Programming the Remote Control 1 10 IR Codes 1 12 External Cont...

Страница 134: ...sly Versatile The light weight and thin size makes it easy to install your plasma display in a variety of locations where conventional TVs do not fit The Plasma TV Manufacturing Process a few minute colored dots may be present on the Plasma TV screen The Plasma TV is composed of 0 9 to 2 2 million cells A few cell defects will normally occur in the Plasma TV manufacturing process Several tiny minu...

Страница 135: ...ch or discoloration Cable Management P Pl la as sm ma a T TV V m mo od de el ls s 2 Wall brackets 2 eye bolts Owner sManual Owner s Manual 3 32 2 o on nl ly y 1 bolts for stand fixing Refer to p 13 4 bolts for stand assembly Refer to p 13 ENTER INPUT MODE TV TV DVD RATIO MENU VOL CH PIP EXIT TIME CONTROL TIME CONTROL LIVE TV MTS TIME MACHINE VCR PIP CH PIP CH PIP INPUT POWER 1 2 3 4 5 6 7 8 9 0 FA...

Страница 136: ...st or TV Menu ENTER INPUT MODE TV TV DVD RATIO MENU VOL CH PIP EXIT TIME CONTROL TIME CONTROL LIVE TV MTS TIME MACHINE VCR PIP CH PIP CH PIP INPUT POWER FAV MARK CAPTION SIMPLINK INPUT MUTE SWAP CH EDIT BRIGHT G p p 5 52 2 G p p 6 68 8 7 76 6 Recorded TV Manual Record Schedule List Photo List Music List Movie List TV Menu HIGH NORMAL TIME MACHINE TIME MACHINE Free Space MFL36546204en_1 11 2 07 1 4...

Страница 137: ...duct with a polishing cloth CH VOL ENTER MENU INPUT CH VOL ENTER MENU INPUT CH VOL ENTER MENU INPUT CHANNEL Buttons VOLUME Buttons MENU Button ENTER Button INPUT Button POWER Button Plasma TV Models Remote Control Sensor Power Standby Indicator illuminates red in standby mode illuminates green when the set is switched on illuminates orange when the set is switched off during recording MFL36546204e...

Страница 138: ...n MENU Button INPUT Button POWER Button Remote Control Sensor Intelligent Eye Adjusts picture according to the surrounding conditions Power Standby Indicator illuminates red in standby mode illuminates green when the set is switched on illuminates orange when the set is switched off during recording MFL36546204en_1 11 2 07 1 40 PM Page 10 ...

Страница 139: ...UDIO VIDEO VIDEO S VIDEO 9 5 2 3 HDMI DVI1 HDMI2 Input Connect a HDMI signal to HDMI IN Or DVI VIDEO signal to HDMI DVI port with DVI to HDMI cable RGB Audio Input Connect the monitor output from a PC to the appropriate input port Audio Video Input AV IN 1 Connect audio video output from an external device to these jacks AV Output Connect second TV or monitor to the AV OUT socket on the set Antenn...

Страница 140: ...to HDMI IN Or DVI VIDEO signal to HDMI DVI port with DVI to HDMI cable RGB Audio Input Connect the monitor output from a PC to the appropriate input port Audio Video Input AV IN 1 Connect audio video output from an external device to these jacks AV Output Connect second TV or monitor to the AV OUT socket on the set Antenna Input Connect over the air signals to this jack Component Input 1 2 Connect...

Страница 141: ...hown Install the 4 bolts securely in the back of the product in the holes provided ATTACHING THE TV TO A DESK Only 32LB9RT If you wish to attach the TV to a desk it must be securely fastened to the desk using a metal screw as shown below Failure to securely attach the TV may result in the TV falling which may cause damage to the TV and serious personal injury 1 bolt Stand Deck MFL36546204en_1 11 2...

Страница 142: ...of the product G To use the product safely make sure that the height of the bracket that is mounted on the wall is same as that of the product 2 3 1 1 2 Use the eye bolts or TV brackets bolts to fix the product to the wall as shown in the picture If your product has the bolts in the eye bolts position before inserting the eye bolts loosen the bolts Insert the eye bolts or TV brackets bolts and tig...

Страница 143: ... To connect an additional equipment see the External equipment Setup section Reinstall the C CA AB BL LE E M MA AN NA AG GE EM ME EN NT T as shown 2 1 3 Hold the C CA AB BL LE E M MA AN NA AG GE EM ME EN NT T with hands and push it as shown CABLE MANAGEMENT MFL36546204en_1 11 2 07 1 40 PM Page 15 ...

Страница 144: ...g the loops on the both sides of the cable management Bundle the cables using the supplied twist holder This feature is not available for all models Hold the C CA AB BL LE E M MA AN NA AG GE EM ME EN NT T with both hands and pull it out Pull it out as holding the loops on the both sides of the cable management NOTE G G Do not hold the CABLE MANAGEMENT when moving the product If the product is drop...

Страница 145: ...ion and Setup Guide 4 inches 4 inches 4 inches 4 inches 4 inches Power Supply Short circuit Breaker GROUNDING Ensure that you connect the earth ground wire to prevent possible electric shock If grounding methods are not possi ble have a qualified electrician install a separate circuit breaker Do not try to ground the unit by connecting it to telephone wires lightening rods or gas pipes DESKTOP PED...

Страница 146: ... VIDEO S VIDEO HDMI IN HDMI DVI IN 1 1 2 2 COMPONENT IN AV IN 1 AV OUT ANTENNA IN L MONO R AUDIO VIDEO For optimum picture quality adjust antenna direction An antenna cable and converter are not supplied Multi family Dwellings Apartments Connect to wall antenna socket Single family Dwellings Houses Connect to wall jack for outdoor antenna Outdoor Antenna Wall Antenna Socket RF Coaxial Wire 75 ohm ...

Страница 147: ...IO O jacks on the set Turn on the digital set top box Refer to the owner s manual for the digital set top box Select C Co om mp po on ne en nt t1 1 input source with using the I IN NP PU UT T button on the remote control If connected to C CO OM MP PO ON NE EN NT T I IN N 2 2 select C Co om mp po on ne en nt t2 2 input source 2 3 4 1 Signal 480i 480p 720p 1080i 1080p 50 60Hz Component 1 2 Yes Yes Y...

Страница 148: ... HDMI cable Connect the HDMI output of the digital set top box to the H HD DM MI I D DV VI I I IN N 1 1 or H HD DM MI I I IN N 2 2 jack on the set Select H HD DM MI I1 1 D DV VI I or H HD DM MI I2 2 input source with using the I IN NP PU UT T button on the remote control Turn on the digital set top box Refer to the owner s manual for the digital set top box 2 3 1 MFL36546204en_1 11 2 07 1 40 PM Pa...

Страница 149: ... RGB DVI RGB IN 1 2 Connect the DVI output of the digital set top box to the H HD DM MI I D DV VI I I IN N 1 1 jack on the set Connect the audio output of the digital set top box to the A AU UD DI IO O R RG GB B D DV VI I jack on the set Turn on the digital set top box Refer to the owner s manual for the digital set top box Select H HD DM MI I1 1 D DV VI I input source with using the I IN NP PU UT...

Страница 150: ...b Pb PR R Y Cr Pr Connect the video outputs Y PB PR of the DVD to the C CO OM MP PO ON NE EN NT T I IN N V VI ID DE EO O jacks on the set Connect the audio outputs of the DVD to the C CO OM MP PO ON NE EN NT T I IN N A AU UD DI IO O jacks on the set Turn on the DVD player insert a DVD Select C Co om mp po on ne en nt t1 1 input source with using the I IN NP PU UT T button on the remote control If ...

Страница 151: ... input jacks on the set Turn on the DVD player insert a DVD Select A AV V2 2 input source with using the I IN NP PU UT T button on the remote control Refer to the DVD player s manual for operating instructions 2 3 4 5 1 HDMI IN MI DVI IN 1 2 USB IN USB IN AV IN 2 L MONO R AUDIO AUDIO VIDEO VIDEO S VIDEO L R S VIDEO VIDEO OUTPUT SWITCH ANT IN ANT OUT COMPONENT IN 1 2 MFL36546204en_1 11 2 07 1 40 PM...

Страница 152: ...V VI I I IN N 1 1 or H HD DM MI I I IN N 2 2 jack on the set Select H HD DM MI I1 1 D DV VI I or H HD DM MI I2 2 input source with using the I IN NP PU UT T button on the remote control Refer to the DVD player s manual for operating instructions 1 2 3 G G TV can receive the video and audio signal simultaneously with using a HDMI cable G G If the DVD does not support Auto HDMI you need to set the o...

Страница 153: ...ise interference leave an adequate distance between the VCR and TV Typically a frozen still picture from a VCR If the 4 3 picture format is used the fixed images on the sides of the screen may remain visible on the screen Connect the A AN NT T O OU UT T socket of the VCR to the A AN NT TE EN NN NA A I IN N socket on the set Connect the antenna cable to the A AN NT T I IN N socket of the VCR Press ...

Страница 154: ...O VIDEO VIDEO L R S VIDEO VIDEO OUTPUT SWITCH ANT IN ANT OUT Connect the A AU UD DI IO O V VI ID DE EO O jacks between TV and VCR Match the jack colors Video yellow Audio Left white and Audio Right red Insert a video tape into the VCR and press PLAY on the VCR Refer to the VCR owner s manual Select A AV V1 1 input source using the I IN NP PU UT T button on the remote control If connected to A AV V...

Страница 155: ...n S Video cable Connect the S VIDEO output of the VCR to the S S V VI ID DE EO O input on the set The picture quality is improved compared to normal composite RCA cable input Connect the audio outputs of the VCR to the A AU UD DI IO O input jacks on the set Insert a video tape into the VCR and press PLAY on the VCR Refer to the VCR owner s manual Select A AV V2 2 input source with using the I IN N...

Страница 156: ...ID DE EO O jacks between TV and external equipment Match the jack colors Video yellow Audio Left white and Audio Right red Select A AV V2 2 input source with using the I IN NP PU UT T button on the remote control If connected to A AV V I IN N1 1 select A AV V1 1 input source Operate the corresponding external equipment Refer to external equipment operating guide 1 2 3 MFL36546204en_1 11 2 07 1 40 ...

Страница 157: ... LE E A AU UD DI IO O O OU UT T jacks on the set Set up your speakers through your analog stereo amplifier according to the instructions provided with the amplifier 2 1 1 1 The TV has a special signal output capability which allows you to hook up the second TV or monitor AV OUT AV OUT ANTENNA IN ANTENNA IN AV OUT VARIABLE AUDIO OUT L R S VIDEO VIDEO Connect the second TV or monitor to the TV s A A...

Страница 158: ...V IN 2 L MONO R AUDIO AUDIO VIDEO VIDEO S VIDEO or Connect the USB device to the U US SB B I IN N jacks on the side of TV After connecting the U US SB B I IN N jacks you use the T TI IM ME E M MA AC CH HI IN NE E function G G p p 6 60 0 2 1 1 MFL36546204en_1 11 2 07 1 40 PM Page 30 ...

Страница 159: ...B DVI RGB PC RGB IN RGB OUTPUT AUDIO HDMI DVI IN 1 RGB IN 1 2 This TV provides Plug and Play capability meaning that the PC adjusts automatically to the TV s settings When connecting with a D sub 15 pin cable Connect the RGB output of the PC to the R RG GB B P PC C jack on the set Connect the PC audio output to the A AU UD DI IO O R RG GB B D DV VI I jack on the set Turn on the PC and the set Sele...

Страница 160: ... IN 1 AUDIO RGB DVI RGB IN DVI PC OUTPUT AUDIO 1 2 Connect the DVI output of the PC to the H HD DM MI I D DV VI I I IN N 1 1 jack on the set Connect the PC audio output to the A AU UD DI IO O R RG GB B D DV VI I jack on the set Turn on the PC and the set Select H HD DM MI I1 1 D DV VI I input source with using the I IN NP PU UT T button on the remote control 2 3 4 1 G G If the PC has a DVI output ...

Страница 161: ...C to the HDMI IN or HDMI DVI IN port on the set G Connect the audio cable from the PC to the Audio input on the set Audio cables are not included with the set G If using a sound card adjust PC sound as required G This set uses a VESA Plug and Play Solution The set provides EDID data to the PC system with a DDC protocol The PC adjusts automatically when using this set G DDC protocol is preset for R...

Страница 162: ...d more after Auto adjust ment in RGB you can adjust the Manual Config Press the E EX XI IT T button to return to TV viewing Automatically adjusts picture position and minimizes image shaking After adjustment if the image is still not correct your set is functioning properly but needs further adjustment A Au ut to o c co on nf fi ig gu ur re e This function is for the automatic adjustment of the sc...

Страница 163: ...a as se e This function allows you to remove any horizontal noise and clear or sharpen the image of characters Press the M ME EN NU U button and then use D D E E button to select the PICTURE menu Press the G G button and then use D D E E button to select Screen Press the G G button and then use D D E E button to select Manual Config Press the G G button and then use D D E E button to select Phase ...

Страница 164: ... G G button and then use D D E E button to select Screen Press the G G button and then use D D E E button to select XGA Mode Press the G G button and then use D D E E button to select the desired XGA resolution Press the E EX XI IT T button to return to TV viewing Selecting Wide XGA mode 1 2 3 4 5 1 3 4 2 To Set Auto Config Manual Config XGA Mode G Reset 1024 X 768 1280 X 768 1360 X 768 1366 X 768...

Страница 165: ...and then use D D E E button to select Screen Press the G G button and then use D D E E button to select Reset Press the G G button Press the E EX XI IT T button to return to TV viewing 1 2 3 4 Initializing Reset to original factory settings 1 3 4 2 To Set Auto Config Manual Config XGA Mode Reset G To Set Picture Mode Color Temperature Advanced Aspect Ratio Picture Reset Screen G Demo MENU VOL CH E...

Страница 166: ...ings brightness by changing mode source PIP PIP CH SWAP PIP INPUT SIZE POSITION Switches the sub picture PIP DW mode Selects a channel for the sub picture Exchanges the main sub images in PIP DW Selects the input source for the sub picture in PIP DW picture mode Adjusts the sub picture size Moves the sub picture TIME CONTROL VCR DVD control buttons Controls some video cassette recorders or DVD pla...

Страница 167: ... devices connected to TV When you toggle this button the Simplink menu appears at the screen G G p p 5 50 0 CAPTION MTS Selects CAPTION mode Selects the MTS sound Mono Stereo or SAP THUMBSTICK Up Down Left Right TIME CONTROL ENTER Allows you to navigate the on screen menus and adjust the system settings to your preference Adjusts the Time machine function Accepts your selection or displays the cur...

Страница 168: ...ly At this moment the TV switches to standby mode In standby mode to turn TV on press the I IN NP PU UT T C CH H D D E E button on the TV or press the P PO OW WE ER R T TV V I IN NP PU UT T C CH H N Nu um mb be er r 0 0 9 9 button on the remote control and then the TV will switch on 1 VOLUME ADJUSTMENT Press the C CH H or N NU UM MB BE ER R buttons to select a channel number 2 3 1 1 INPUT MODE TV ...

Страница 169: ...IOO TIMEO OPTIONO SETUP G Prev Menu Picture Mode Color Temperature Advanced Aspect Ratio Picture Reset Screen Demo SETUPO AUDIOO TIMEO OPTIONO PICTURE G Prev Menu Sound Mode Auto Volume Balance 0 TV Speaker SETUPO PICTUREO TIMEO OPTIONO AUDIO G Prev Menu Clock Off Time On Time Sleep Time Auto Sleep SETUPO PICTUREO OPTIONO AUDIOO TIME G Prev Menu TIMEMACHINEO TIMEMACHINEO TIME MACHINE MENU Time Con...

Страница 170: ... delete those channels with Manual Tuning It s not available to use this function on recording program WATCHING TV SETUP CONTROL 1 4 Auto Tuning 0 TV 5 MENU VOL CH EXIT CH EDIT LIVE TV TIME MACHINE 1 2 3 4 5 6 7 8 9 0 FAV MARK MUTE SLEEP REVIEW ENTER TIME CONTROL TIME CONTROL Press the M ME EN NU U button and then use D D or E E button to select the S SE ET TU UP P menu Press the G G button and th...

Страница 171: ...dd or delete Press the C CH H E ED DI IT T button Press the C CH H E ED DI IT T button to select M Me em mo or ry y or E Er ra as se e Press the E EN NT TE ER R button 1 2 3 4 You can also use the S SE ET TU UP P menu to adjust M Ma an nu ua al l T Tu un ni in ng g Auto Tuning Manual Tuning Favorite Channel PICTUREO AUDIOO TIMEO OPTIONO SETUP G Prev Menu TIMEMACHINEO TV 7 Memory on Fine 0 Booster ...

Страница 172: ... TIME CONTROL Press the M ME EN NU U button and then use D D or E E button to select the S SE ET TU UP P menu Press the G G button and then use D D or E E button to select M Ma an nu ua al l T Tu un ni in ng g Press the G G button and then use D D or E E button to select F Fi in ne e Press the F F or G G button to adjust the picture to your preference Press the E EN NT TE ER R button to store it P...

Страница 173: ... D or E E button to select M Ma an nu ua al l T Tu un ni in ng g Press the G G button and then use D D or E E button to select B Bo oo os st te er r Press the F F or G G button to select O On n or O Of ff f Press the E EN NT TE ER R button to store it Press the E EX XI IT T button to return to TV viewing or press the M ME EN NU U button to return to the previous menu 1 2 3 4 5 6 Auto Tuning Manual...

Страница 174: ... channel number for first favorite channel Repeat steps 3 to 5 to memorize other favorite channels You can store up to 8 channels Press the E EX XI IT T button to return to TV viewing or press the M ME EN NU U button to return to the previous menu This function lets you select your favorite channels directly Repeatedly press the F FA AV V button to select stored favorite channels 1 2 3 4 5 6 1 2 3...

Страница 175: ...Press the G button and then use D E button to select the source AV1 AV2 Component1 Component2 RGB HDMI1 DVI or HDMI2 Press the G button and then use D or E button to select the label Press EXIT button to return to normal TV viewing Language Input Label G SIMPLINK Key Lock Caption Text Set ID ISM Method Low Power To Set 1 2 3 4 5 AV1 G AV2 Component1 Component2 RGB HDMI1 DVI HDMI2 Off VCR DVD Set T...

Страница 176: ...ile viewing the set The TV can be set so that the remote control is needed to control it This feature can be used to prevent unauthorized viewing This TV is programmed to remember which option it was last set to even if you turn the set off Press the M ME EN NU U button and then D D E E button to select the O OP PT TI IO ON N menu Press the G G button and then D D E E button to select K Ke ey y L ...

Страница 177: ... to normal TV viewing 1 2 3 4 3 2 1 Language Input Label SIMPLINK G Key Lock Caption Text Set ID ISM Method Low Power Off On This operates only for the devices with the SIMPLINK logo Please check the SIMPLINK logo This allows you to control and play other AV devices connected to the display through HDMI cable without additional cables and settings If you do not want SIMPLINK menu select Off It s n...

Страница 178: ...r ro ov viid de e t th hiis s f fu un nc ct tiio on n SIMPLINK Functions T TV V v vi ie ew wi in ng g Switch to the previous TV channel regardless of the current mode D DI IS SC C p pl la ay yb ba ac ck k Select and play discs When multiple discs are available the titles of the discs are conveniently displayed at the bottom of the screen V VC CR R p pl la ay yb ba ac ck k Play and control the conn...

Страница 179: ...e G G When operating the external device with SIMPLINK press the TV button among the MODE button on the remote controller G G When you switch the Input source with the INPUT button on the remote controller you can stop the operation of device controlled by SIMPLINK G G When you select or operate the media device with home theater function the speaker automatically switches to home theater speaker ...

Страница 180: ... and Recording functions might not work if the signal strength is weak Press the M ME EN NU U button and then use D D E E button to select the T TI IM ME E M MA AC CH HI IN NE E menu Press the G G button and then use D D E E button to select the T Ti im me e C Co on nt tr ro ol l Press the G G button and then use D D E E button to select O On n or O Of ff f Press the EXIT button to return to norma...

Страница 181: ... turning power on it may take up to a maxi mum of 3 minutes to initialize the HDD G G The Recording function will not initiate for a copy protected program G G Because an analog broadcast is transferred to a digital signal video that contains rapid movement may show cross stripes This happens when the analog signal is compressed and then restored in the digital signal The unit will attempt to redu...

Страница 182: ... I button and then use the R RE EW W F FF F button for slow motion the icon is displayed When using the F F or G G button during playback a cursor indicating the posi tion can be viewed on the screen Press the P PL LA AY Y G G button to return to normal playback If you want to return to the current live broadcast press the LIVE TV button F FF F G GG G I IF FF F G GG GI I F F G G LIVE TV P PL LA AY...

Страница 183: ...G 1 2 3 Press the M ME EN NU U button and then use D D E E button to select the T TI IM ME E M MA AC CH HI IN NE E menu Press the G G button and then use D D E E button to select HDD Format Press the G G button to start HDD Format Press the EXIT button to return to normal TV viewing 1 2 3 4 if you press the G G button this message is displayed if you select Yes this message is displayed When compl...

Страница 184: ...own below Instant Record Use this function to record the programme you are watching on the main screen This function records the currently displayed program 1 10 0m mi in n 2 20 0m mi in n 3 30 0m mi in n 4 40 0m mi in n 5 50 0m mi in n 6 60 0m mi in n 1 10 0m mi in n 2 20 0m mi in n 3 30 0m mi in n 4 40 0m mi in n 5 50 0m mi in n 6 60 0m mi in n N No o C Ch ha an ng ge e While recording if you pr...

Страница 185: ...ording will not be as good as it could be G G Programs are stored separately according to the color system that they are using e g PAL NTSC G G Manual Recording available time is maximum 4 hours and minimum 5 minutes The extra recording time added to existing setting equals the final recording time After adjusting the recording time select E EN NT TE ER R The Status bar will be displayed Press the...

Страница 186: ...V V D Da at te e T Ti im me e D Du ur ra at ti io on n F Fr re eq qu ue en nc cy y After setting the M Ma an nu ua al l R Re ec co or rd d press the E EN NT TE ER R button 2 3 1 2 1 Sun Jan 1 11 03 AM Input TV Date Time Duration Frequency AV1 Sun Jsn 1 12 03 AM 30Min Once Menu Navigation Modify OK Exit Manual Record Recorded TV Schedule List Photo List Music List Movie List TV Menu Manual Record H...

Страница 187: ...HDD Format DivX Reg Code USB Backup USB HDD Format Subtitle SETUPO AUDIOO TIMEO OPTIONO PICTURE O Prev Menu TIMEMACHINEG Press the M ME EN NU U button and then use D D E E button to select the T TI IM ME E M MA AC CH HI IN NE E menu Press the G G button and then use D D E E button to select Record Quality Press the G G button and then use D D E E button to select H Hi ig gh h or N No or rm ma al l...

Страница 188: ...ch is not supported by Windows it may not be recognized G G Please connect power to a USB storage device which requires an external power supply If not the device may not be recognized G G Please connect a USB storage device with cable is offered by USB maker If connected with cable is not offered by USB maker or an excessively long cable the device may not be recognized G G Some USB storage devic...

Страница 189: ...U U button and then use D D E E button to select the T TI IM ME E M MA AC CH HI IN NE E menu Press the G G button and then use D D E E button to select USB HDD Format Press the G G button to start USB HDD Format 2 Time Control Record Quality Recorded TV Schedule List Manual Record HDD Format DivX Reg Code USB Backup USB HDD Format Subtitle SETUPO AUDIOO TIMEO OPTIONO PICTURE O TIMEMACHINE To set U...

Страница 190: ...d TV ded TV Input TV60 Date Wed Mar10 2007 Duration 20 min Quality High No Title TV60 Wed Mar10 10 20 AM No Title TV62 Wed Mar10 3 10 AM No Title TV30 Wed Mar14 2 25 PM No Title TV30 Wed Mar19 6 02 AM No Title TV32 Wed Mar19 4 20 PM HIGH NORMAL 11h 24m 22h 46m Menu Navigation Popup Menu Move Page Mark Exit Free Space Page 2 3 Not Marked Recor Recorded TV ded TV Menu Navigation Popup Menu Move Page...

Страница 191: ... U Un nm ma ar rk k A Al ll l Change marked recorded programs to unmarked recorded programs G G D De el le et te e Delete the selected recorded programs G G R Re en na am me e Edit recorded program title G G C Co op py y t to o U US SB B H HD DD D Copies the recorded program in the internal HDD to the USB storage device It is activated only when a USB HDD available for backup is connected USB back...

Страница 192: ...ss E EX XI IT T button to return to TV viewing or press T TI IM ME E M MA AC CH HI IN NE E button to return to the H Ho om me e menu If the HDD has a problem performing a recording related function this message is displayed If the temperature is below zero 0 a warning message is displayed and you will not be able to use the TIME MACHINE functions 4 4 HDD initialization is in progress Cannot operat...

Страница 193: ...B 1 partition disk and FAT32 system It only supports file backup features therefore playback of the Recorded List directly from the current OSD is not allowed In order to play the recorded contents the files must be moved to the internal HDD through the Copy to Recorded List from the popup menu View the list of the backed up recorded program by using the Copy to USB HDD from the Recorded TV It mov...

Страница 194: ... is selected the backup is cancelled and is converted back to input mode If more than two files are transferred the transferred file is stored and the backup operations on the files in progress of transferring and scheduled for backup are cancelled When No is selected returns to the backup process screen G G C Ca an nc ce el l Close the pop up menu While backup is being performed in the back groun...

Страница 195: ...turn to normal playback Press the LIVE TV button to jump at the front of the program If you press the S ST TO OP P A A button you can watch set F FF F G GG G I IF FF F G GG GI I F F G G LIVE TV S ST TO OP P A A P PL LA AY Y G G I II I Using the remote control You can shift playback to any point within playing the recorded program 67 Playing recorded programs TIME MACHINE You can play the selected ...

Страница 196: ...he P Ph ho ot to o L Li is st t menu 3 4 1 2 5 Recorded TV Manual Record Schedule List Music List Movie List TV Menu Photo List PHOTO LIST HIGH NORMAL MENU VOL CH EXIT ENTER TIME CONTROL TIME CONTROL CH EDIT LIVE TV TIME MACHINE FAV MARK MUTE TIME MACHINE TIME MACHINE Free Space Displays the selected drive Moves to upper level file Current page Total pages Total number of marked thumbnail photos C...

Страница 197: ...E E button to return to the H Ho om me e menu 69 TIME MACHINE 2 3 4 5 1 Photo Selection and PopUp Menu As shown up to 6 thumbnail photos are listed per page G G V Vi ie ew w Display the selected item G G M Ma ar rk k A Al ll l Mark all photos on the screen G G V Vi ie ew w M Ma ar rk ke ed d Display the marked photos G G U Un nm ma ar rk k A Al ll l Deselect all marked photos G G C Ca an nc ce el ...

Страница 198: ...d all photos in the current folder are displayed during slide show When selected the selected photos are displayed during slide show To start slide show press E EN NT TE ER R button on S et the time interval of the slide show in O Op pt ti io on n G G B BG GM M Listen to music while viewing photos in full size To start BGM press E EN NT TE ER R button on Set the BGM device and album in O Op pt ti ...

Страница 199: ...pt ti io on n and press E EN NT TE ER R button Use F F G G button and E EN NT TE ER R button to set values Then go to and press E EN NT TE ER R to save the settings You cannot change M Mu us si ic c F Fo ol ld de er r while BGM is playing G G H Hi id de e Hide the menu on the full sized screen Use F F G G button to select H Hi id de e and press E EN NT TE ER R button To see the menu again on the f...

Страница 200: ...responding buttons on the remote control 1 3 4 5 6 2 Press the T TI IM ME E M MA AC CH HI IN NE E button and then use D D E E button to select the M Mu us si ic c L Li is st t menu Recorded TV Manual Record Schedule List Photo List Movie List TV Menu Music List HIGH NORMAL MENU VOL CH EXIT ENTER TIME CONTROL TIME CONTROL CH EDIT LIVE TV TIME MACHINE FAV MARK MUTE TIME MACHINE TIME MACHINE Free Spa...

Страница 201: ... Once a music finishes playing the next selected one will be played When there are no selected musics to play the next one in the current folder will be played If you go to a different folder and press the E EN NT TE ER R button the current music in playback will stop G G P Pl la ay y M Ma ar rk ke ed d Play the selected musics Once a music finishes playing the next selected one will be played aut...

Страница 202: ...usic is playing is displayed in front of the music title G G A damaged or corrupted music does not play but displays 00 00 in playtime G G A music downloaded from a paid service with copyright protection does not start but displays inappropriate information in playtime G G If you press E EN NT TE ER R A A E EX XI IT T buttons screen saver is stopped G G The P PL LA AY Y G G P Pa au us se e I II I ...

Страница 203: ...rol 1 3 4 5 2 USB Device Page1 1 Drive1 Movie List Movie List Menu Navigation Popup Menu Move Page Mark Exit UP Folder 3 4 1 2 5 MOVIE avi Divx supporting file Video format DivX3 xx DivX4 xx DivX5 xx XVID 1 1 1 XVID 1 1 2 XVID 1 1 3 3IV1 3IV2 FVFW DMK2 RMP4 DIV3 DIV4 DIV5 DIV6 MP43 COL1 AP41 nAVI DX50 Audio format AC3 PCM MP2 MP3 Sampling frequency within 8 48 khz MP3 Bit rate within 8 320 kbps MP...

Страница 204: ...e screen changes G G M Ma ar rk k A Al ll l Mark all Movie in the folder G G U Un nm ma ar rk k A Al ll l Deselect all marked Movies G G C Ca an nc ce el l Close the pop up menu 3 4 5 1 2 USB Device Page 1 1 Drive1 Movie List Movie List Menu Navigation Popup Menu Move Page Mark Exit UP Folder USB Device Page 1 1 Drive1 Movie List Movie List Menu Navigation Popup Menu Move Page Mark Exit UP Folder ...

Страница 205: ...E E M MA AC CH HI IN NE E menu Press the G G button and then use D D E E button to select S Su ub bt ti it tl le e Press the G G button to start S Su ub bt ti it tl le e Press the D D E E F F G G button to select the desired subtitle option Press the EXIT button to return to Movie playing 1 2 3 4 5 On Off Control Position Sync Language Control Turns the position of the subtitle on and off during m...

Страница 206: ...i iv vX X R Re eg g C Co od de e Press the G G button to start D Di iv vX X R Re eg g C Co od de e Press the EXIT button to return to normal TV viewing 1 2 3 4 SETUPO AUDIOO TIMEO OPTIONO PICTURE O Prev Menu TIMEMACHINE MENU VOL CH EXIT ENTER TIME CONTROL TIME CONTROL CH EDIT LIVE TV TIME MACHINE FAV MARK To set Time Control Record Quality Recorded TV Schedule List Manual Record HDD Format DivX Re...

Страница 207: ...ton to select a channel for the sub picture The selected program number is displayed just below the channel number of main picture Watching PIP Double Window Press the P PI IP P button to access the sub picture Each press of PIP changes the PIP options PIP Mode DW1 Mode PIP Off ENTER INPUT MODE TV TV DVD RATIO MENU VOL POSITION CH PIP EXIT TIME CONTROL TIME CONTROL CH EDIT LIVE TV MTS TIME MACHINE...

Страница 208: ...picture moves Input Source Selection for Sub Picture Press the P PI IP P I IN NP PU UT T button to select the input source for the sub picture Each press of P PI IP P I IN NP PU UT T button is pressed each input source for the sub picture is displayed TV All AV1 All Except AV1 AV2 All Except AV2 Component1 All Except Component1 Component2 All Except Component2 RGB All Except RGB HDMI1 DVI All Exce...

Страница 209: ...lection will lead you to adjust the picture horizontally in a linear proportion to fill the entire screen useful for viewing 4 3 formatted DVDs 4 4 3 3 Following selection will lead you to view a picture with an original 4 3 aspect ratio with gray bars appearing at both the left and right sides Press the R RA AT TI IO O button repeatedly to select the desired picture format You can also adjust A A...

Страница 210: ...g a halfway trade off between alteration and screen coverage Zooml DE Zoom2 DE NOTE G G You can only select 1 16 6 9 9 Wide 4 4 3 3 Zoom 1 2 in TV AV1 2 Component HDMI mode G G You can only select 1 16 6 9 9 Wide 4 4 3 3 in RGB HDMI PC mode only G G You can select 4 4 3 3 1 16 6 9 9 Z Zo oo om m1 1 Z Zo oo om m2 2 in Recorded TV Movie List Play back mode only G G In Time Control Delay Recording De...

Страница 211: ...button to select I In nt te el ll li ig ge en nt t E Ey ye e LCD TV models only D Dy yn na am mi ic c S St ta an nd da ar rd d M Mi il ld d U Us se er r 1 1 or U Us se er r 2 2 Press the E EX XI IT T button to return to normal TV viewing Picture Mode adjusts the TV for the best picture appearance Select the preset value in the P Pi ic ct tu ur re e M Mo od de e menu based on the program category I...

Страница 212: ... r1 1 2 2 of P Pi ic ct tu ur re e m mo od de e only Press the M ME EN NU U button and then D D E E button to select the P PI IC CT TU UR RE E menu Press the G G button and then D D E E button to select C Co ol lo or r T Te em mp pe er ra at tu ur re e Press the G G button and then D D E E button to select either C Co oo ol l M Me ed di iu um m W Wa ar rm m or U Us se er r Press the E EX XI IT T b...

Страница 213: ...mal TV viewing Picture Mode User option C Co on nt tr ra as st t Adjusts the difference between the light and dark levels in the picture B Br ri ig gh ht tn ne es ss s Increases or decreases amount of white in the your picture C Co ol lo or r Adjusts intensity of all colors S Sh ha ar rp pn ne es ss s Adjusts the level of crispness in the edges between the light and dark areas of the picture The l...

Страница 214: ...G G button and then D D E E button to select C Co ol lo or r T Te em mp pe er ra at tu ur re e Press the G G button and then D D E E button to select U Us se er r Press the G G button and then D D E E button to select R Re ed d G Gr re ee en n or B Bl lu ue e Press the F F G G button to make appropriate adjustments Press the E EX XI IT T button to return to normal TV viewing 1 2 3 4 5 6 1 3 2 5 4 ...

Страница 215: ... and then F F G G button to select O On n or O Of ff f Press the E EX XI IT T button to return to normal TV viewing XD is LG electronic s unique picture improving technology to display a real HD source through an advanced digital signal processing algorithm It s not available to use this function in RGB HDMI PC mode A A X XD D C Co on nt tr ra as st t Optimizing the contrast automatically accordin...

Страница 216: ... and then D D E E button to select the P PI IC CT TU UR RE E menu Press the G G button and then D D E E button to select X XD D D De em mo o Press the G G button to begin X XD D D De em mo o To stop X XD D D De em mo o press the M ME EN NU U button 1 2 3 4 XD Demo XD Off XD On Exit Menu 1 3 2 Picture Mode Color Temperature Advanced Aspect Ratio Picture Reset Screen Demo G To Start MENU VOL CH EXIT...

Страница 217: ... E E button to select A Ad dv va an nc ce ed d Press the G G button and then D D E E button to select C Ci in ne em ma a Press the G G button and then F F G G button to select O On n or O Of ff f Press the E EX XI IT T button to return to normal TV viewing 1 2 3 4 5 1 3 2 4 Picture Mode Color Temperature Advanced G Aspect Ratio Picture Reset Screen Demo Cinema Black Level Off Auto Picture Mode Col...

Страница 218: ...s the G G button and then D D E E button to select B Bl la ac ck k L Le ev ve el l Press the G G button and then F F G G button to select L Lo ow w or H Hi ig gh h A A L Lo ow w The reflection of the screen gets darker A A H Hi ig gh h The reflection of the screen gets brighter Press the E EX XI IT T button to return to normal TV viewing 1 2 3 4 5 1 3 2 4 Picture Mode Color Temperature Advanced G ...

Страница 219: ...n to select P Pi ic ct tu ur re e R Re es se et t Press the G G button to initialize the adjusted value Press the E EX XI IT T button to return to normal TV viewing Returns to the default settings Picture Mode Color Temperature XD Advanced Aspect Ratio at the factory 1 2 3 1 3 2 Picture Mode Color Temperature Advanced Aspect Ratio Picture Reset G Screen Demo To Set MENU VOL CH EXIT CH EDIT LIVE TV...

Страница 220: ... image remaining even when you change the image Avoid allowing a fixed image to remain on the set s screen for a long period of time It s not available to use this function in LCD models W Wh hi it te e w wa as sh h White wash removes permanent images from the screen Note An excessive permanent image may be impossible to clear entirely with White Wash O Or rb bi it te er r Orbiter may help prevent...

Страница 221: ...button and then D D E E button to select the O OP PT TI IO ON N menu Press the G G button and then D D E E button to select L Lo ow w P Po ow we er r Press the G G button and then D D E E button to select O On n or O Of ff f Press the E EX XI IT T button to return to TV viewing 1 2 3 4 1 3 2 Language Input Label SIMPLINK Key Lock Caption Text Set ID ISM Method Low Power G Off On MENU VOL CH EXIT C...

Страница 222: ...en D D E E button to select A Au ut to o V Vo ol lu um me e Press the G G button and then D D E E button to select O On n or O Of ff f Press the E EX XI IT T button to return to normal TV viewing Auto Volume automatically keeps on an equal volume level even if you change programs 1 2 3 4 1 3 2 Sound Mode Auto Volume G Balance 0 TV Speaker Off On MENU VOL CH EXIT CH EDIT LIVE TV TIME MACHINE 1 2 3 ...

Страница 223: ...nal sound when lis tening to the music M Mo ov vi ie e Select this option to enjoy sublime sound S Sp po or rt ts s Select this option to watch sports broadcasting U Us se er r Select this option to use the user defined audio set tings Press the M ME EN NU U button and then D D E E button to select the A AU UD DI IO O menu Press the G G button and then D D E E button to select S So ou un nd d M Mo...

Страница 224: ... G button and then D D E E button to select U Us se er r Press the G G button Select a sound band by pressing the D D E E button Make appropriate sound level with the F F G G button Press the E EX XI IT T button to return to normal TV viewing Adjust the sound equalizer 1 2 3 4 5 6 1 3 4 2 5 Sound Mode G Auto Volume Balance 0 TV Speaker SRS TSXT Standard Music Movie Sports User 120Hz F G 200Hz 500H...

Страница 225: ...utton to select the A AU UD DI IO O menu Press the G G button and then D D E E button to select B Ba al la an nc ce e Press the G G button and then F F G G button to make desired adjustment Press the E EX XI IT T button to return to normal TV viewing 1 2 3 4 1 3 2 Sound Mode Auto Volume Balance 0 G TV Speaker L R MENU VOL CH EXIT CH EDIT LIVE TV TIME MACHINE 1 2 3 4 5 6 FAV MARK MUTE ENTER TIME CO...

Страница 226: ...tereo system turn off the internal speakers of the set Press the M ME EN NU U button and then D D E E button to select the A AU UD DI IO O menu Press the G G button and then D D E E button to select T TV V S Sp pe ea ak ke er r Press the G G button and then D D E E button to select O On n or O Of ff f Press the E EX XI IT T button to return to normal TV viewing 1 2 3 4 1 2 3 Sound Mode Auto Volume...

Страница 227: ...lect the O OP PT TI IO ON N menu Press the G button and then use D D E E button to select L La an ng gu ua ag ge e Press the G button and then use D D E E button to select your desired language Press the E EN NT TE ER R button Press the E EX XI IT T button to return to normal TV viewing 1 2 3 4 5 MENU VOL CH EXIT CH EDIT LIVE TV TIME MACHINE 1 2 3 4 5 6 FAV MARK MUTE ENTER TIME CONTROL TIME CONTRO...

Страница 228: ...or G button to select either the year date or time option Once selected use the D or E button to set the year date and time options Press the E EX XI IT T button to return to normal TV viewing You must set the time correctly before using on off time function and reservation recording function 1 2 3 4 5 1 3 4 2 Clock G Off Time On Time Sleep Time Auto Sleep MENU VOL CH EXIT CH EDIT LIVE TV TIME MAC...

Страница 229: ...ume level at turn on C Ch h Press the G G button and then D D E E button to select the channel Press the E EX XI IT T button to return to normal TV viewing The Off Time automatically switches the set to standby at the preset time Two hours after the set is switched on by the on time function it will automatically switch back to standby mode unless a button has been pressed Once the on time off tim...

Страница 230: ...d 240 When the number of minutes you want is displayed on the screen the timer begins to count down from the number of minutes selected 1 2 NOTE G G To view the remaining sleep time press the S SL LE EE EP P button once G G To cancel the sleep time repeatedly press the S SL LE EE EP P button until the display Min appears G G When you switch the set off the set releases the preset sleep time You ca...

Страница 231: ... E E button to select the T TI IM ME E menu Press the G G button and then D D E E button to select A Au ut to o S Sl le ee ep p Press the G G button and then D D E E button to select O On n or O Of ff f Press the E EX XI IT T button to return to normal TV viewing 1 2 3 4 1 1 2 3 Clock Off Time On Time Sleep Time Auto Sleep G Off On MENU VOL CH EXIT CH EDIT LIVE TV TIME MACHINE 1 2 3 4 5 6 FAV MARK...

Страница 232: ...s TV stations broadcast four different caption signals on the same channel By selecting Mode1 to Mode2 you can choose which signal you view Mode1 is usually the signal with the captions while another mode might show demonstration or programming information Your TV might not receive caption signals normally in the following situations I IG GN NI IT TI IO ON N Picture may flutter drift suffer from b...

Страница 233: ...ce center if the picture has not appeared after five minutes Adjust Color in menu option Keep a sufficient distance between the product and the VCR Try another channel The problem may be with the broadcast Are the video cables installed properly Activate any function to restore the brightness of the picture Check for local interference such as an electrical appliance or power tool Station or cable...

Страница 234: ... o ou ut t o of f r ra an ng ge e S Sc cr re ee en n c co ol lo or r i is s u un ns st ta ab bl le e o or r s si in ng gl le e c co ol lo or r V Ve er rt ti ic ca al l b ba ar r o or r s st tr ri ip pe e o on n b ba ac ck kg gr ro ou un nd d H Ho or ri iz zo on nt ta al l N No oi is se e I In nc co or rr re ec ct t p po os si it ti io on n T Th he e a au ud di io o f fu un nc ct ti io on n d do oe...

Страница 235: ...softener or dish washing detergent Wring the cloth until it s almost dry and then use it to wipe the screen Make sure the excess water is off the screen and then let it air dry before you turn on your TV Cleaning the Cabinet To remove dirt or dust wipe the cabinet with a soft dry lint free cloth Please be sure not to use a wet cloth Extended Absence If you expect to leave your TV dormant for a lon...

Страница 236: ...TE MB Dimensions Width x Height x Depth Weight with stand without stand with stand without stand 805 8 x 619 7 x 283 9 mm 31 7 x 24 4 x 1 1 2 inches 805 8 x 554 1 x 79 0 mm 31 7 x 21 8 x 3 1 inches 32 6 pounds 14 8 kg 27 8 pounds 12 6 kg 3 32 2L LB B9 9R RT T 3 32 2L LB B9 9R RT TB B 3 32 2L LB B9 9R RT TE E 32LB9RT MD 32LB9RTB MB 32LB9RTE MB AC100 240V 50 60Hz NTSC PAL M N VHF 2 13 UHF 14 69 CATV...

Страница 237: ... 30 2 x 12 2 inches 1 130 0 x 715 0 x 85 0 mm 44 5 x 28 1 x 3 3 inches 68 6 pounds 31 1 kg 60 9 pounds 27 6 kg 4 42 2P PB B4 4R RT T 4 42 2P PB B4 4R RT TH H 42PB4RT MA 42PB4RTH MA Dimensions Width x Height x Depth Weight with stand without stand with stand without stand 1308 0 x 906 5 x 370 0 mm 51 5 x 35 7 x 14 6 inches 1308 0 x 845 0 x 89 5 mm 51 5 x 33 2 x 3 5 inches 94 1 pounds 42 7 kg 83 8 p...

Страница 238: ...ammed for the code Enter a code number using the number buttons on the remote control Programming code numbers for the corresponding component can be found on the following pages Again if the code is correct the device will turn off Press the M ME EN NU U button to store the code Test the remote control functions to see if the component responds properly If not repeat from step 2 The remote is a m...

Страница 239: ...UBISHI 013 020 045 046 049 051 059 061 151 MTC 034 040 MULTITECH 024 034 NEC 012 023 039 043 048 NORDMENDE 043 OPTONICA 053 054 PANASONIC 066 070 074 083 133 140 145 PENTAX 013 020 031 033 063 PHILCO 031 034 067 PHILIPS 031 033 034 054 067 071 101 PILOT 101 PIONEER 013 021 048 PORTLAND 108 PULSAR 072 QUARTZ 01 1 014 QUASAR 033 066 075 145 RCA 013 020 033 034 040 041 062 063 107 109 140 144 145 147...

Страница 240: ...1 D2 D3 D4 D5 D6 D7 D0 D1 D2 D3 D4 D5 D6 D7 Lead code Low custom code High custom code Data code Data code Repeat code Tf 4 5 ms 9 ms 2 25 ms 9 ms 0 55 ms 0 56 ms 1 12 ms 0 56 ms 2 24 ms Tf Tf Tf 108ms 455KHz Bit 0 Bit 1 1 How to Connect A Connect your wired remote control to the Remote Control port on the TV 2 Remote Control IR Codes A Output waveform Single pulse modulated with 37 917KHz signal ...

Страница 241: ...BUTTON R C BUTTON R C BUTTON R C BUTTON R C BUTTON R C BUTTON R C BUTTON R C BUTTON R C BUTTON R C BUTTON R C BUTTON R C BUTTON R C BUTTON R C BUTTON R C BUTTON R C BUTTON R C BUTTON R C BUTTON R C BUTTON R C BUTTON R C BUTTON R C BUTTON R C BUTTON R C BUTTON R C BUTTON R C BUTTON TV POWER INPUT RATIO BRIGHTNESS BRIGHTNESS SIMPLINK PIP CAPTION MTS PIP CH PIP CH SWAP PIP INPUT TIME MACHINE STOP A T...

Страница 242: ...th the TV It s not available to use this function in Time MACHINE mode DMI IN DMI IN 2 VARIABLE AUDIO OUT VARIABLE AUDIO OUT AUDIO AV IN 1 AV IN 1 AV OUT AV OUT ANTENNA IN ANTENNA IN AUDIO RGB DVI RGB PC RGB IN RGB IN RS 232C IN CONTROL SERVICE RS 232C IN CONTROL SERVICE L MONO R AUDIO VIDEO Type of Connector D Sub 9 Pin Male No Pin Name 1 No connection 2 RXD Receive data 3 TXD Transmit data 4 DTR...

Страница 243: ... SET ID is 1 99 Press E EX XI IT T button to return to normal TV viewing Use this function to specify a set ID number Refer to Real Data Mapping 1 S Se ee e p pa ag ge e p p 1 11 19 9 Set ID 2 3 4 1 Language Input Label SIMPLINK Key Lock Caption Text Set ID ISM Method Low Power 1 2 3 1 G F RS 232C Configurations 7 Wire Configurations Standard RS 232C cable PC TV RXD 2 3 TXD TXD 3 2 RXD GND 5 5 GND...

Страница 244: ...lled Set ID is indicated as decimal 1 99 on menu and as Hexa decimal 0x0 0x63 on transmission receiving protocol DATA To transmit command data Transmit FF data to read status of command Cr Carriage Return ASCII code 0x0D ASCII code space 0x20 Command1 Command2 Set ID Data Cr OK Acknowledgement The set transmits ACK acknowledgement based on this format when receiving normal data At this time if the...

Страница 245: ...ture on k d Set ID Data Cr Ack d Set ID OK Data x 0 05 5 V Vo ol lu um me e C Co on nt tr ro ol l C Co om mm ma an nd d 2 2 f f G To adjust volume You can also adjust volume with the VOLUME buttons on remote control Transmission Data Min 0 Max 64 Refer to Real data mapping 1 See page 1 19 k f Set ID Data Cr Ack f Set ID OK Data x 0 06 6 C Co on nt tr ra as st t C Co om mm ma an nd d 2 2 g g G To a...

Страница 246: ... is released m Set ID OK Data x 1 13 3 P PI IP P D DW W C Co om mm ma an nd d2 2 n n G To control the PIP Picture In picture DW You can also control the PIP DW using the PIP button on the remote control or in the PIP DW menu Transmission k n Set ID Data Cr Ack Data 0 PIP DW off 1 PIP 2 DW1 3 DW2 n Set ID OK Data x k q Set ID Data Cr Ack q Set ID OK Data x 1 15 5 B Ba al la an nc ce e C Co om mm ma...

Страница 247: ...he TV off by Off time function 9 Turn the TV off by Auto sleep function a Turn the TV off by AV board detect Ack p Set ID OK NG Data x 2 22 2 I IS SM M M Me et th ho od d C Co om mm ma an nd d 1 1 j j C Co om mm ma an nd d 2 2 p p G To control the ISM method You can also adjust ISM Method in OPTION menu It s not available to use this function in LCD TV models Transmission j p Set ID Data Cr Data 0...

Страница 248: ...1 HDMI Input Number Data 0 0 0 0 Input1 0 0 1 1 Input4 0 0 1 0 Input3 0 0 0 1 Input2 2 26 6 I In np pu ut t s se elle ec ct t C Co om mm ma an nd d1 1 x x C Co om mm ma an nd d2 2 b b M Ma aiin n P Piic ct tu ur re e I In np pu ut t 2 25 5 K Ke ey y C Co om mm ma an nd d1 1 m m C Co om mm ma an nd d1 1 c c G To send IR remote key code Transmission Data Key code Refer to page 1 13 m c Set ID Data C...

Страница 249: ...MFL36546204en_2 11 2 07 1 46 PM Page 121 ...

Страница 250: ...MFL36546204en_2 11 2 07 1 46 PM Page 122 ...

Отзывы: