background image

10

ENGLISH

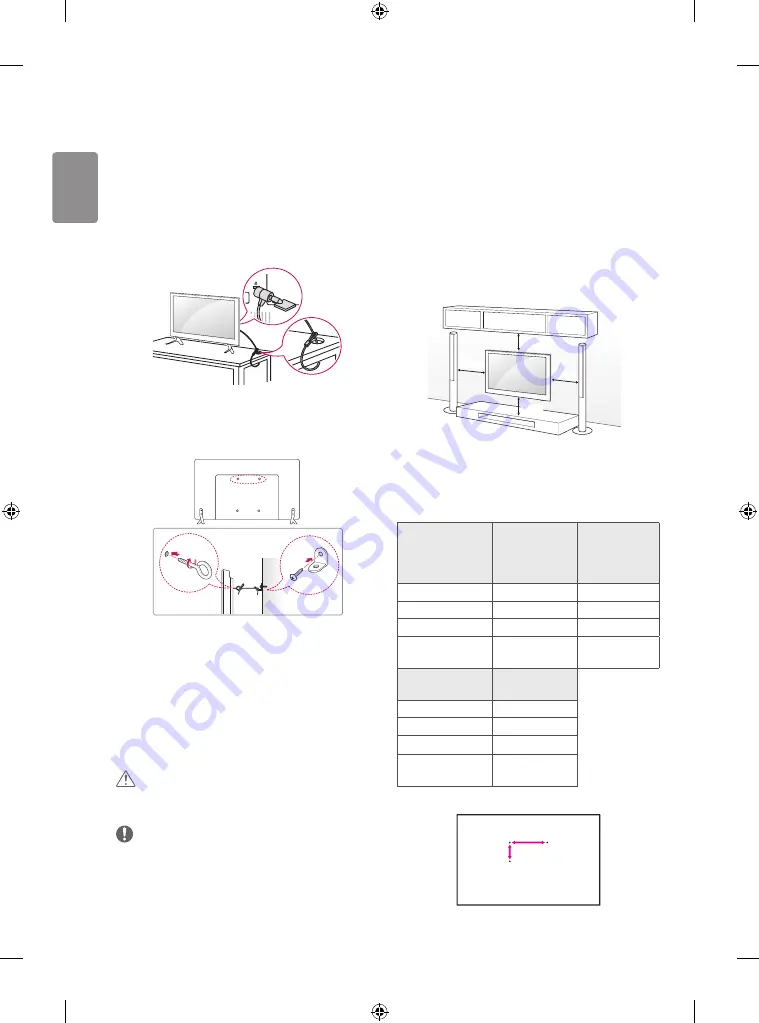
Using the kensington security 

system 

(This feature is not available for all models.)

•  Image shown may differ from your TV.

The Kensington security system connector is located at the rear of the 
TV. For more information of installation and using, refer to the manual 
provided with the Kensington security system or visit 

http://www.

kensington.com

. Connect the Kensington security system cable between 

the TV and a table.

Securing the TV to a wall 

(This feature is not available for all models.)

1  Insert and tighten the eye-bolts, or TV brackets and bolts on the back 

of the TV. 

•  If there are bolts inserted at the eye-bolts position, remove the 

bolts first.

2  Mount the wall brackets with the bolts to the wall. 

Match the location of the wall bracket and the eye-bolts on the rear 
of the TV.

3  Connect the eye-bolts and wall brackets tightly with a sturdy rope. 

Make sure to keep the rope horizontal with the flat surface.

 CAUTION

•  Make sure that children do not climb on or hang on the TV.

 NOTE

•  Use a platform or cabinet that is strong and large enough to 

support the TV securely.

•  Brackets, bolts and ropes are not provided. You can obtain 

additional accessories from your local dealer.

Mounting on a wall

Attach an optional wall mount bracket at the rear of the TV carefully 
and install the wall mount bracket on a solid wall perpendicular to 
the floor. When you attach the TV to other building materials, please 
contact qualified personnel. LG recommends that wall mounting be 
performed by a qualified professional installer. We recommend the use 
of LG’s wall mount bracket. LG Branded wall mount is easy to move with 
cables connected. When you do not use LG’s wall mount bracket, please 
use a wall mount bracket where the device is adequately secured to the 
wall with enough space to allow connectivity to external devices. It is 
advised to connect all the cables before installing fixed wall mounts.

10 cm

10 cm

10 cm

10 cm

Make sure to use screws and wall mount bracket that meet the VESA 
standard. Standard dimensions for the wall mount kits are described in 
the following table.

Separate purchase (Wall mounting bracket)

Model

43LF54**
32LF55**
32/43LF51**
32LF50**

42LF55**

VESA (mm) (A x B)

200 x 200

400 x 400

Standard screw

M6

M6

Number of screws

4

4

Wall mount bracket 

LSW240B
MSW240

LSW440B
MSW240

Model

49LF51**
49LF54**

VESA (mm) (A x B)

300 x 300

Standard screw

M6

Number of screws

4

Wall mount bracket 

LSW350B
MSW240

A

B

Содержание 32LF510A-TA

Страница 1: ...P No MFL68744894 1509 REV03 Printed in Korea LED TV LF51 www lg com Depending on model AAA AAA X 4 M4 X L14 ...

Страница 2: ...i ...

Страница 3: ...1 1 2 A B 1 3 2 4 ...

Страница 4: ...AVIN2 AUDIO OUT ANTENNA CABLE IN AUDIO VIDEO L R AVIN2 AUDIO OUT AVIN2 AUDIO OUT VIDEO MONO AUDIO L R AUDIO L R IN USB IN DC IN 19 V SVC ONLY 2 A A ...

Страница 5: ... Depending on model DC IN 19 V 2 3 1 3 DC IN 19 V 2 1 4 ...

Страница 6: ...6 1 2 4 3 5 1 2 4 3 Depending on model ...

Страница 7: ...A TC 49LF510A TA 49LF513A TA 49LF510A TC 49LF513A TC A x B x C mm 734 x 474 x 172 976 x 621 x 208 7 1108 x 696 x 208 7 A x E x F mm 734 x 438 x 71 976 x 583 x 81 5 1108 x 657 x 81 5 D kg 4 7 8 5 10 9 D G1 G2 kg 4 5 8 2 10 6 Power requirement 19 V 1 6 A 19 V 2 5 A 19 V 3 2 A A F C B E G1 G2 D ...

Страница 8: ... MFL68744894 ...

Страница 9: ...s manual carefully before operating your set and retain it for future reference Safety and Reference OWNER S MANUAL LED TV LG LED TV applies LCD screen with LED backlights MFL68662405 P NO MFL68662405 1509 REV00 Printed in Korea ...

Страница 10: ...dry the power plug completely or wipe dust off You may be electrocuted due to excess moisture Make sure to connect Mains cable to compliant AC mains socket with Grounded earth pin Except for devices which are not grounded on earth Otherwise possibility you may be electrocuted or injured Insert power cable plug completely into wall socket otherwise if not secured completely into socket fire ignitio...

Страница 11: ... You may be electrocuted Depending on model Do not put or store inflammable substances near the product There is a danger of combustion explosion or fire due to careless handling of the inflammable substances Do not drop metallic objects such as coins hair pins chopsticks or wire into the product or inflammable objects such as paper and matches Children must pay particular attention Electrical sho...

Страница 12: ...Otherwise this may result in fire electric shock malfunction or product deformation Never Disassemble the AC adapter or power cord This may result in fire or electric shock Be careful in handling the adapter to prevent any external shocks to it An external shock may cause damage to the adapter CAUTION Install the product where no radio wave occurs There should be enough distance between an outside...

Страница 13: ...ke sure the connecting cables are long enough Otherwise the product may fall over which may cause injury or damage the product Do not turn the product On Off by plugging in or unplugging the power plug to the wall outlet Do not use the power plug for switch It may cause mechanical failure or could give an electric shock Please follow the installation instructions below to prevent the product from ...

Страница 14: ...he cord to unplug the power cord from the power board as this could be hazardous When moving the product make sure you turn the power off first Then unplug the power cables antenna cables and all connecting cables TheTV set or power cord may be damaged which may create a fire hazard or cause electric shock When moving or unpacking the product work in pairs because the product is heavy Otherwise th...

Страница 15: ...ion And theTV should be turned off if it will not be watched for some time as this will reduce energy consumption The energy consumed during use can be significantly reduced if the level of brightness of the picture is reduced and this will reduce the overall running cost The items supplied with your product may vary depending on the model Product specifications or contents of this manual may be c...

Страница 16: ...r or a diluted mild detergent Then wipe immediately with a dry cloth Avoid touching the screen at all times as this may result in damage to the screen Do not push rub or hit the screen surface with your fingernail or a sharp object as this may result in scratches and image distortions Do not use any chemicals as this may damage the product Do not spray liquid onto the surface If water enters theTV...

Страница 17: ... NOTE When your finger over the joystick button and push it to the up down left or right be careful not to press the joystick button If you press the joystick button first you may not be able to adjust the volume level and saved programmes Mounting on a table Image shown may differ from yourTV 1 Lift and tilt theTV into its upright position on a table Leave a 10 cm minimum space from the wall for ...

Страница 18: ...e not provided You can obtain additional accessories from your local dealer Mounting on a wall Attach an optional wall mount bracket at the rear of theTV carefully and install the wall mount bracket on a solid wall perpendicular to the floor When you attach theTV to other building materials please contact qualified personnel LG recommends that wall mounting be performed by a qualified professional...

Страница 19: ...he manual supplied with the wall mount When installing the wall mounting bracket use the adhesive label provided The adhesive label will protect the opening from accumulating dust and dirt Only when the label is provided Provided item Adhesive label When attaching a wall mounting bracket to theTV insert the wall mount spacers into theTV wall mount holes to adjust the vertical angle of theTV Only w...

Страница 20: ...V regardless of the order of the TV port If you record aTV program on a DVD recorder orVCR make sure to connect theTV signal input cable to theTV through a DVD recorder orVCR For more information of recording refer to the manual provided with the connected device Refer to the external equipment s manual for operating instructions If you connect a gaming device to theTV use the cable supplied with ...

Страница 21: ...iewing from any mode Accesses the Quick menus 1 Changes the image mode Depending on model 1 Selects an AV mode Depending on model 2 Selects an AV mode Depending on model 2 Switches the BOLLYWOOD sound mode Depending on model Changes the input source Number buttons Enters numbers Accesses the saved programme list Returns to the previously viewed programme B FAV C B Adjusts the volume level Accesses...

Страница 22: ...t http opensource lge com In addition to the source code all referred license terms warranty disclaimers and copyright notices are available for download LG Electronics will also provide open source code to you on CD ROM for a charge covering the cost of performing such distribution such as the cost of media shipping and handling upon email request to opensource lge com This offer is valid for thr...

Страница 23: ...to Storage 4 Press the Navigation buttons or Number buttons to select the desired programme number 5 Press the Navigation buttons to scroll to System 6 Press the Navigation buttons to scroll toTV System 7 Press the Navigation buttons to scroll to Band 8 Press the Navigation buttons to scroll to V UHF or Cable 9 Press the Navigation buttons to scroll to Channel 10 Press the Navigation buttons and t...

Страница 24: ...cting a programme on the programme list 1 Press LIST to access the programme list 2 Press the Navigation buttons to select to desired programme and press OK 3 When you return to the previous menu press LIST NOTE You may find some blue programmes They have been set up to be skipped by auto programming or in the programme edit mode Some programmes with the programme number shown in the programme lis...

Страница 25: ...ematic look Game Uses the optimized image and sound settings for fast gaming When playing a video game using PlayStation or Xbox it is recommended to use the Game mode When in Game mode functions related to picture quality will be optimized for playing games Using the input list Selecting an input source 1 Press INPUT to access the input sources The connected device displays on each input source 2...

Страница 26: ... connected USB storage device is working When such device is suddenly separated or unplugged the stored files or the USB storage device may be damaged Please do not connect the USB storage device which was artificially manoeuvred on the PC The device may cause the product to malfunction or fail to be played Never forget to use only a USB storage device which has normal music files image files or m...

Страница 27: ...PopUp Menu ꔵ Move Page ꘂ Mark Option Exit USB Device Free Space 4 GB Page 1 1 No Marked MUSIC LIST Top Folder Title Duration DriveA DriveA 4 folder s 2 file s Up Folder ꔂ Move ꔉ PopUp Menu ꔵ Move Page ꘂ Mark Exit 4 1 6 3 2 5 USB Device Free Space 4 GB Page 1 1 No Marked MOVIE LIST No Description 1 Moves to the upper level folder 2 Preview Displays the thumbnail folder name of the file in the selec...

Страница 28: ... 09 03 2015 KY105 11 27 2015 GUU 11 27 2015 JMJ005 11 27 2015 3872 x 2592 2604 KB JMJ002 11 27 2015 JMJ006 11 27 2015 JMJ003 11 27 2015 JMJ007 11 27 2015 Up Folder JMJ004 11 27 2015 JMJ008 11 27 2015 ꔂ Move ꔉ PopUp Menu ꔵ Move Page ꘂ Mark Exit PHOTO LIST USB Device Free Space 4 GB Page 1 1 No Marked Button Description Navigation button Scrolls through the files OK Views the highlighted file or ent...

Страница 29: ...g menus buttons DriveA Title Duration ꕗ 00 00 01 34 Up Folder ꔂ Move ꔉ PopUp Menu ꔵ Move Page ꘂ Mark Option Exit USB Device Free Space 4 GB Page 1 1 No Marked MUSIC LIST Button Description Navigation button Scrolls through the files OK Views the highlighted file or enters the mark mode Moves to the previous or next page FAV Enters the mark mode Menu Description Play Plays the selected music file P...

Страница 30: ...folder s 2 file s Up Folder ꔂ Move ꔉ PopUp Menu ꔵ Move Page ꘂ Mark Exit USB Device Free Space 4 GB Page 1 1 No Marked MOVIE LIST Button Description Navigation button Scrolls through the files OK Views the highlighted file or enters the mark mode Moves to the previous or next page FAV Enters the mark mode Menu Description Play Plays the selected movie file Once a movie file finishes playing the nex...

Страница 31: ...ted in the same folder A video file name and its subtitle file name must be identical for it to be displayed Playing a video via a USB connection that doesn t support high speed may not work properly Files encoded with GMC Global Motion Compensation and Qpel Quarterpel Motion Estimation may not be played Trick Mode does not support other functions than if video files do not have index information ...

Страница 32: ...vod divx com Close 6 When you are finished press EXIT When you return to the previous menu press BACK NOTE Movie files are supported as follows Resolution Under 1920 x 1080 W x H pixels Frame Rate Under 30 frames sec Video Codec MPEG 1 MPEG 2 MPEG 4 H 264 AVC DivX 3 11 DivX 4 DivX 5 DivX 6 Xvid 1 00 Xvid 1 01 Xvid 1 02 Xvid 1 03 Xvid 1 10 beta1 Xvid 1 10 beta2 JPEG VC1 Sorenson H 263 H 264 DivX VO...

Страница 33: ...uttons to scroll to SETUP 2 Press the Navigation buttons to scroll to the setting or option you want and press OK 3 When you return to the previous menu press BACK Image shown may differ from yourTV OK Move Auto Tuning Manual Tuning Programme Edit Move OK SETUP The available programme settings are described in the following Setting Description AutoTuning Tunes and stores all available programmes t...

Страница 34: ... movie theatre Soccer Optimizes the video image for high and dynamic actions by emphasizing primary colours such as white grass or sky blue Game Optimizes the video image for a fast gaming screen such as PCs or games Basic image options Setting Description Backlight Adjusts the brightness of the screen by controlling the LCD backlight If you decrease the brightness level the screen becomes darker ...

Страница 35: ...glare Film Mode Makes video clips recorded in film look more natural This feature operates only in 480i 576i 1080i Resolution Colour Gamut Advanced control Maximizes the utilization of colour to increase colour quality Standard Displays standard set of colours Wide Increase number of colours used Edge Enhancer Shows clearer and distinctive yet natural edges of the video NOTE Depending on input sig...

Страница 36: ... weak in stereo reception you can switch to mono In mono reception the clarity of sound is improved y y Language selection for dual language broadcast If a programme can be received in two languages dual language you can switch to DUAL I DUAL II or DUAL I II DUAL I Sends the primary broadcast language to the loudspeakers DUAL I I Sends the secondary broadcast language to the loudspeakers DUAL I I ...

Страница 37: ... Sets the length of time until theTV to turns off When you turn theTV off and turn it on again the SleepTimer feature will be set to off Automatic Standby Depending on model If you do not press any button on theTV or remote control for a certain period theTV will automatically switch to standby mode OPTION settings 1 Press SETTINGS and the Navigation buttons to scroll to OPTION 2 Press the Navigat...

Страница 38: ...programmes The programmes can be selected but the screen blank and the audio is muted Input Block Blocks the input sources ENTERTAINMENT settings 1 Press SETTINGS and the Navigation buttons to scroll to ENTERTAINMENT 2 Press the Navigation buttons to scroll to the setting or option you want and press OK 3 When you return to the previous menu press BACK Image shown may differ from yourTV OK Move EN...

Страница 39: ...ng the corresponding coloured button Page selection 1 Press the INDEX button to select the index page 2 You can select the pages which are colour coded along the bottom line with corresponding coloured buttons 3 As with SIMPLE teletext mode you can select a page by entering its three digit page number with the Number buttons in FASTEXT mode 4 The button can be used to select the preceding or follo...

Страница 40: ...ignal or Invalid Format is displayed Turn theTV off on using the remote control Reconnect the HDMI cable Restart the PC with theTV on Specifications Environment condition Operating Temperature 0 C to 40 C Operating Humidity Less than 80 Storage Temperature 20 C to 60 C Storage Humidity Less than 85 AnalogueTV Depending on Country Television system PAL SECAM B G D K PAL I NTSC M PAL B B Programme c...

Страница 41: ...19040GPCU ADS 40LSI 19 2 19040G ADS 45SN 19 2 19040G Manufacturer APD Model WA 40D19FI Manufacturer Lien Chang Model LCAP16B E LCAP16B A LCAP25B Input AC 100 240V 50 60 Hz Output 19V 2 1 A 43 49LF510 43 49LF513 Manufacturer Lien Chang Model LCAP40 Manufacturer APD Model DA 65F19 Input AC 100 240V 50 60 Hz Output 19V 3 42 A ...

Страница 42: ...Record the model number and serial number of the TV Refer to the label on the back cover and quote this information to your dealer when requiring any service MODEL SERIAL ...

Отзывы: