background image

61

SOUND 


LANGU

A

GE 

CONTR

OL

SOUND & LANGUAGE CONTROL

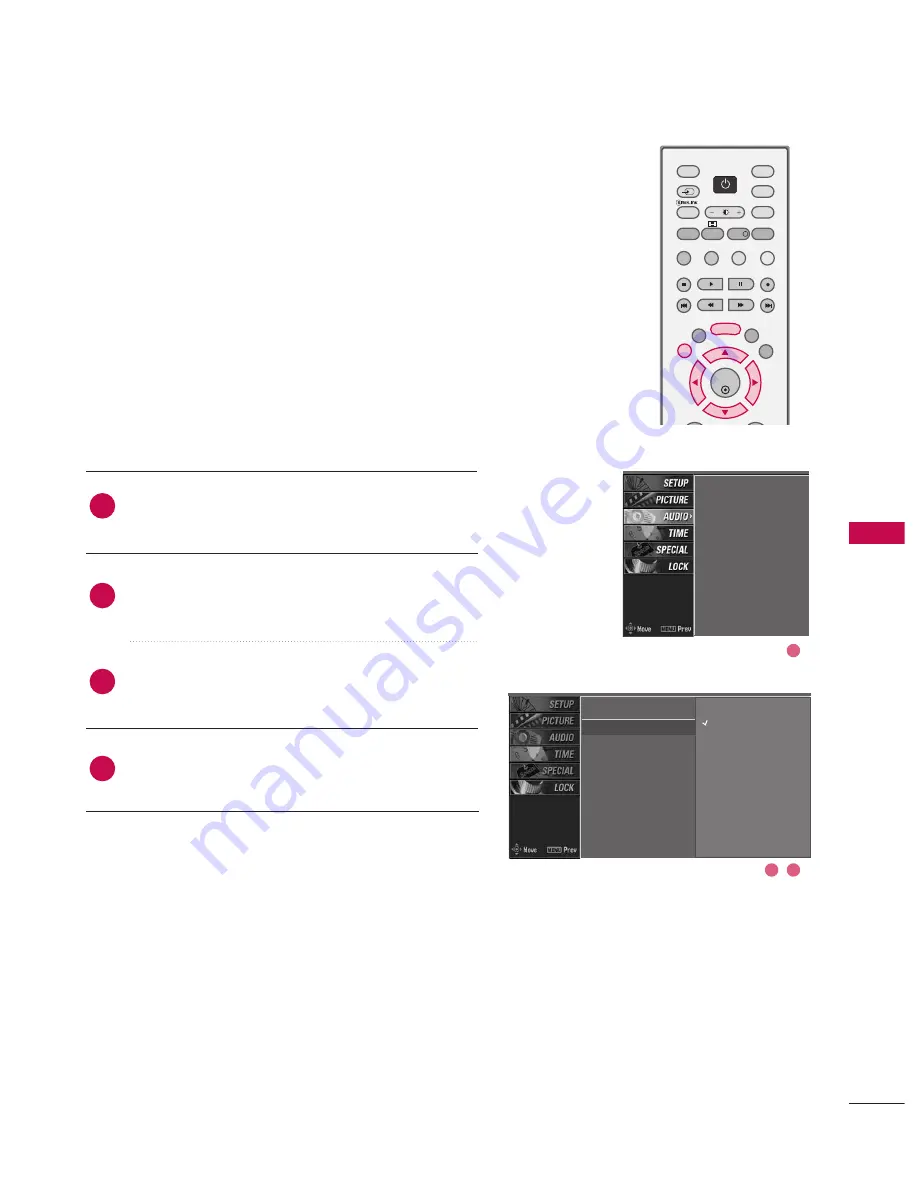
AUTO VOLUME LEVELLER (AVL)

AVL automatically keeps on an equal volume level even if
you change programmes.

Press the 

M

ME

EN

NU

U

button and then use

D


or 

E


button

to select the A

AU

UD

DIIO

O menu.

Press the 

G


button and then use

D


or 

E


button to

select A

AV

VLL. 

Press the 

G


button and then use

D


or 

E


button to

select O

On

n or O

Offff.

Press 

E

EX

XIIT

T

button to return to normal TV viewing.

SSM

AVL                           

G

Balance

TV Speaker

2

3

4

1

SSM

AVL

Balance

TV Speaker

2

3

1

Off

On

OK 

TV

D/A

INPUT

DVD

EXIT

LIST

MENU

TEXT

GUIDE

VCR

POWER

POWER

RATIO

FAV

SUBTITLE

BRIGHT

INFO

!

INPUT

MODE

SIMPLINK

POWER

Содержание 26LCD7D-AB

Страница 1: ...I ID D N Nu um mb be er r 4616 26LC7D 26LC7D AB 4624 32LC7D 32LC7D AB 4623 37LC7D 37LC7D AB 4622 42LC7D 42LC7D AB ...

Страница 2: ......

Страница 3: ... PR INPUT MODE i i Remote Control Power Cord 2 TV Bracket Bolts Cable Management Twister Holder Arrange the wires with the twister holder 2 TV Brackets 2 Wall Brackets Polishing Cloth Polish the screen with the cloth This feature is not available for all models Slightly wipe stained spot on the exterior only with the polishing cloth if there is stain or fingerprint on the exterior Do not wipe roug...

Страница 4: ... Menus Selection and Adjustment 35 Auto Programme Tuning 36 Manual Programme Tuning 37 Fine Tuning 39 Assigning a Station Name 40 Programme Edit 41 Calling Up the Programme List 43 Input Source Selection 44 Key Lock 45 SIMPLINK 47 Digital Signal Strength 48 PICTURE CONTROL Picture Size Aspect Ratio Control 49 Preset Picture Settings PSM Preset 50 Auto Colour Tone Control Warm Medium Cool 51 Adapti...

Страница 5: ...ing 73 PARENTAL CONTROL RATINGS Set Password Lock System 74 Programme Blocking 76 Parental Guidance 77 External Input Blocking 78 TELETEXT Switch On Off 79 Simple Text 79 TOP Text 79 Fastext 80 Special Teletext Functions 80 APPENDIX Troubleshooting 81 Maintenance 83 Product Specifications 84 Programming the Remote Control 85 IR Codes 87 External Control Through RS 232C 90 ...

Страница 6: ...OGRAMME D D E E Button This is a simplified representation of the front panel Image shown may be somewhat different from your TV If your product has a protection film attached remove the film and then wipe the product with a polishing cloth Remote Control Sensor Power Standby Indicator Illuminates red in standby mode Illuminates green when the set is switched on ...

Страница 7: ...ts the video signal from a video device 1 2 4 7 8 3 HDMI DVI IN Connect a HDMI signal Or DVI VIDEO signal to the this port with a HDMI to DVI cable RGB AUDIO IN Connect the output from a set top box or PC to the appropriate input port RS 232C IN CONTROL SERVICE PORT Connect to the RS 232C port on a PC Remote Control Port Connect your wired remote control ANTENNA IN Connect antenna signals to this ...

Страница 8: ... 3 Carefully place the product screen side down on a cushioned surface that will protect product and screen from damage Assemble the product stand with the product as shown Install the 4 bolts securely in the back of the product in the holes provided ...

Страница 9: ...net that is big and strong enough for the size and weight of the product G To use the product safely make sure that the height of the bracket that is mounted on the wall is same as that of the product 3 Use the eye bolts or TV brackets bolts to fix the product to the wall as shown in the picture If your product has the bolts in the eye bolts position before inserting the eye bolts loosen the bolts...

Страница 10: ...MENT as shown How to remove the CABLE MANAGEMENT G G Hold the CABLE MANAGEMENT with both hands and pull it upward G G Do not hold the CABLE MANAGEMENT when moving the product If the product is dropped you may be injured or the product may be broken NOTE 1 2 Bundle the cables using the supplied twister holder This Feature is not available for all models 3 TWISTER HOLDER CABLE MANAGEMENT ...

Страница 11: ...endations CAUTION 4 inches 4 inches Power Supply Short circuit Breaker Image shown may be somewhat different from your TV GROUNDING Ensure that you connect the earth ground wire to prevent possible electric shock If grounding methods are not possible have a qualified electrician install a separate circuit breaker Do not try to ground the unit by connecting it to telephone wires lightening rods or ...

Страница 12: ...ON WALL MOUNT HORIZONTAL INSTALLATION For proper ventilation allow a clearance of 4 on each side and from the wall Detailed installation instructions are available from your dealer 4 inches 4 inches 4 inches 4 inches 4 inches ...

Страница 13: ...n the analogue cable and digital programme scans are complete NOTE ANTENNA IN To improve the picture quality in a poor signal area please purchase a signal amplifier and install properly If the antenna needs to be split for two TV s install a 2 Way Signal Splitter If the antenna is not installed properly contact your dealer for assistance Antenna UHF Signal Amplifier VHF AV IN 3 L MONO R AUDIO VID...

Страница 14: ...VI When connecting with a Component cables Connect the video outputs Y PB PR of the digital set top box to the C CO OM MP PO ON NE EN NT T I IN N V VI ID DE EO O 1 1 jacks on the set Match the jack colors Y green PB blue and PR red Connect the audio output of the digital set top box to the C CO OM MP PO ON NE EN NT T I IN N A AU UD DI IO O 1 1 jacks on the set Turn on the digital set top box Refer...

Страница 15: ...l 2 1 COMPONENT IN VIDEO AUDIO DIGITAL AUDIO OUT RGB IN RGB PC AUDIO RGB DVI COMPONENT IN COMPONENT IN VIDEO VIDEO AUDIO AUDIO RGB IN RGB IN RGB PC RGB PC AUDIO RGB DVI DIGITAL AUDIO OUT HDMI DVI IN HDMI DVI IN 2 1 HDMI DTV OUTPUT DVI DVI 1 G G If the digital set top box supports Auto HDMI function the output resolution of the source device will be automatically set to 1280x720p G G If the digital...

Страница 16: ...N 1 RGB IN RGB IN RGB PC AUDIO AUDIO RGB DVI RGB DVI L R DVI DTV OUTPUT VIDEO 2 DVI DVI AUDIO Connect the DVI output of the digital set top box to the H HD DM MI I DVI IN 1 jack on the set Connect the audio output of the digital set top box to the A AU UD DI IO O R RG GB B D DV VI I jack on the set Turn on the digital set top box Refer to the owner s manual for the digital set top box Select H HD ...

Страница 17: ... the video outputs Y PB PR of the DVD to the C CO OM MP PO ON NE EN NT T I IN N V VI ID DE EO O1 1 jacks on the set Match the jack colours Y green PB blue and PR red Connect the audio outputs of the DVD to the C CO OM MP PO O N NE EN NT T I IN N A AU UD DI IO O1 1 jacks on the set Turn on the DVD player insert a DVD Select C Co om mp po on ne en nt t 1 1 input source using the I IN NP PU UT T butt...

Страница 18: ... S VIDEO AUDIO AUDIO 1 2 Connect the S VIDEO output of the DVD to the S S V VI ID DE EO O input on the set Connect the audio outputs of the DVD to the A AU UD DI IO O input jacks on the set Turn on the DVD player insert a DVD Select A AV V1 1 input source using the I IN NP PU UT T button on the remote control If connected to A AV V I IN N 2 2 input select A AV V2 2 input source Refer to the DVD pl...

Страница 19: ...nection is necessary Select H HD DM MI I1 1 D DV VI I or H HD DM MI I 2 2 input source using the I IN NP PU UT T button on the remote control Refer to the DVD player s manual for operating instruc tions 2 1 G G If the DVD supports Auto HDMI function the DVD output resolution will be automatically set to 1280x720p G G If the DVD does not support Auto HDMI you need to set the output resolution appro...

Страница 20: ...IO AUDIO RGB IN RGB IN RGB PC RGB PC AUDIO RGB DVI AV IN 1 VIDEO AUDIO MONO RS 232C IN CONTROL SERVICE AV OUT REMOTE CONTROL IN DIGITAL DIGITAL AUDIO AUDIO OUT OUT OPTICAL S VIDEO ANTENNA ANTENNA IN IN 2 1 COMPONENT IN VIDEO AUDIO AV IN 1 VIDEO AUDIO HDMI DVI IN 2 1 R VIDEO DVI DVI DVI AUDIO L R S VIDEO VIDEO OUTPUT SWITCH ANT IN ANT OUT Wall Jack Antenna 1 2 Connect the RF antenna out socket of t...

Страница 21: ...DVI AUDIO Connect the A AU UD DI IO O V VI ID DE EO O jacks between TV and VCR Match the jack colours Video yellow Audio Left white and Audio Right red Insert a video tape into the VCR and press PLAY on the VCR Refer to the VCR owner s manual Select A AV V1 1 input source using the I IN NP PU UT T button on the remote control If connected to A AV V I IN N2 2 select A AV V2 2 input source 1 G G If ...

Страница 22: ... IN 1 AV IN 1 VIDEO VIDEO AUDIO AUDIO MONO S VIDEO S VIDEO L R S VIDEO VIDEO OUTPUT SWITCH ANT IN ANT OUT DVI AUDIO When connecting with an S Video cable Connect the S VIDEO output of the VCR to the S S V VI ID DE EO O input on the set Connect the audio outputs of the VCR to the A AU UD DI IO O input jacks on the set Insert a video tape into the VCR and press PLAY on the VCR Refer to the VCR owner...

Страница 23: ...nnect the A AU UD DI IO O V VI ID DE EO O jacks between TV and external equipment Match the jack colours Video yel low Audio Left white and Audio Right red Select A AV V2 2 input source using the I IN NP PU UT T button on the remote control If connected to A AV V I IN N1 1 input select A AV V1 1 input source Operate the corresponding external equipment 1 1 2 3 ...

Страница 24: ...s clear If the refresh rate of the PC graphic card can not be changed change the PC graphic card or consult the manufacturer of the PC graphic card NOTE COMPONENT IN VIDEO AUDIO DIGITAL AUDIO OUT I IN RGB IN AUDIO RGB DVI ANTEN IN HDMI DVI IN HDMI DVI IN 2 COMPONENT IN COMPONENT IN VIDEO VIDEO AUDIO AUDIO VIDEO S VIDEO MON RS 232C IN CONTROL SERVICE REMOTE CONTROL IN DIGITA DIGITAL AUDIO AUDIO O O...

Страница 25: ...IDEO AUDIO AUDIO AV IN 1 VIDEO S VIDEO AUDIO MONO RS 232C IN CONTROL SERVICE AV OUT REMOTE CONTROL IN DIGITAL DIGITAL AUDIO AUDIO OUT OUT OPTICAL HDMI DVI IN HDMI DVI IN 1 RGB IN RGB IN RGB PC AUDIO AUDIO RGB DVI RGB DVI L R DVI PC OUTPUT VIDEO HDMI DVI IN 2 DVI DVI DVI AUDIO Connect the DVI output of the PC to the H HD DM MI I D DV VI I I IN N 1 1jack on the set Connect the PC audio output to the...

Страница 26: ... signal is displayed in the HDMI DVI Input In this case that Video Resolution is not supported If Invalid Format is displayed refer to the Source Device manual or contact your service centre G G Avoid keeping a fixed image on the screen for a long period of time The fixed image may become permanently imprinted on the screen G G The synchronization input form for Horizontal and Vertical frequencies...

Страница 27: ...K button Press the O OK K button and then use D D or E E button to select R Re es se et t Press the G G button and then use F F or G G button to select Y Ye es s Press the O OK K button To initialize the adjusted values This function allows you to return to the good picture repro duction programmed at the factory and cannot be change 1 2 3 1 2 3 Initializing Reset to original factory values 1 2 3 ...

Страница 28: ...2C IN NTROL SERVICE REMOTE ONTROL IN DIGITAL AUDIO AUDIO OUT OUT OPTICAL AV OUT AV OUT VIDEO L R S VIDEO VIDEO DVI AUDIO Connect the second TV or monitor to the TV s A AV V O OU UT T jacks See the Operating Manual of the second TV or monitor for further details regarding that device s input settings G G Digital Component1 2 RGB PC HDMI1 DVI HDMI2 input sources cannot be used for AV out G G We reco...

Страница 29: ...ICAL PTICAL DVI AUDIO G G When connecting with external audio equipments such as amplifiers or speakers please turn the TV speakers off NOTE G G Do not look into the optical output port Looking at the laser beam may damage your vision CAUTION Connect one end of an optical cable to the TV Digital Audio Optical Output port Connect the other end of the optical cable to the digi tal audio optical inpu...

Страница 30: ...he set between ON and STANDBY See a list of AV devices connected to TV When you toggle this button the Simplink menu appears at the screen G G p p 4 46 6 4 47 7 Adjusts brightness on screen It returns to the default settings brightness by changing mode source Control some video cassette recorders or DVD players RECORD button is not available for DVD player Accepts your selection or displays the cu...

Страница 31: ...red buttons EXIT SUBTITLE MENU LIST FAV FAVOURITE TELETEXT BUTTONS Selects the remote operating mode TV VCR DVD Select other operating modes for the remote to operate external devices Selects your desired picture format Shows the present screen information Shows a programme schedule They are used as per the indications or functions displayed on the TV screen in the case of Text displays Teletext E...

Страница 32: ...way on vacation disconnect the power plug from the wall power outlet Ensure the power cord is connected correctly When connected to power the TV switches to standby mode In standby mode press the I IN NP PU UT T P PR R D D or E E button on the TV or press the P PO OW WE ER R I IN NP PU UT T D D A A I IN NP PU UT T P PR R or N Nu um mb be er r 0 0 9 9 button on the remote control Select the viewing...

Страница 33: ...amme list 1 VOLUME ADJUSTMENT Press the V VO OL L or button to adjust the volume If you want to switch the sound off press the M MU UT TE E button You can cancel the Mute function by pressing the M MU UT TE E I I I II I or V VO OL L or button ER OK TV D A INPUT DVD SIZE INDEX TIME REVEAL Q VIEW LIST EXIT MENU TEXT GUIDE VCR POWER 1 2 3 4 5 6 7 8 9 0 APM RATIO FAV SUBTITLE SLEEP I II VOL BRIGHT MUT...

Страница 34: ... programme details will vary depending on the particular broadcaster This function can be used only when the EPG information is broadcasted by broadcasting companies The EPG displays the programme description for next 7 days Switch on off EPG Select a programme TV D A INPUT DVD EXIT LIST MENU TEXT GUIDE VCR POWER RATIO FAV SUBTITLE BRIGHT INFO INPUT MODE SIMPLINK OK Press the G GU UI ID DE E butto...

Страница 35: ...Programme EXIT Switch off EPG INFO i The detail information on or off Button Function in 7 Days Guide Mode Remote Control Buttons Function GREEN Change to Now Next Guide RED Enter Timer Reservation Cancel setting mode YELLOW Shows the Schedule List BLUE Selects the Radio programmes D E F G Select the Broadcasting Programme EXIT Switch off EPG Page Move Selects the page Day Move Selects the day INF...

Страница 36: ... Function YELLOW Change to Guide PR Page Up Down Delete the selected item Button Function in Reservation Setting Mode Schedule List Button Function in Extended Description Box Remote Control Buttons Function Change to the selected channel INFO i The detail information on or off Digital ...

Страница 37: ...nus Your TV s OSD On Screen Display may differ slightly from what is shown in this manual SETUP PICTURE SPECIAL LOCK TIME Auto programme Manual programme Programme edit Signal strength Set ID PSM Color Temperature XD Advanced Video preset Auto clock Manual clock Off time On time Sleep timer Auto sleep Input Subtitle Child lock ARC XD demo SIMPLINK AUDIO SSM AVL Balance TV Speaker Lock system Set p...

Страница 38: ...le to use the P PR R or or NUMBER buttons to scan the stations you programmed Stations can be tuned using automatic or manual modes A password is required to gain access to Auto programme or Manual programme menu if the Lock system is turned on If you forgot your password press 7 7 7 7 on the remote con trol In Australia if no station name can be assigned to a station the pro gramme number is assi...

Страница 39: ...l program ming select YES with using F F or G G button Then press the O OK K button Otherwise select N NO O When the programme is stored the Programme edit menu appears on the screen See the Programme Edit section to edit the stored programme Press E EX XI IT T button to return to normal TV viewing Auto programme Manual programme G Programme edit Signal strength Set ID Auto programme Manual progra...

Страница 40: ... ha an nn ne el l Press the D D or E E button to select the desired channel number Press the G G button to select S Se ea ar rc ch h Press the D D or E E button to commence searching If a station is found the search will stop If this station is the one required press the F F or G G button to select Storage Select the desired pro gramme number with the D D or E E button Press the O OK K button to s...

Страница 41: ...ct F Fi in ne e Press the D D or E E button to fine tune for the best picture and sound Press the O OK K button to store Press E EX XI IT T button to return to normal TV viewing 2 3 4 5 6 1 Auto programme Manual programme G Programme edit Signal strength Set ID Auto programme Manual programme Programme edit Signal strength Set ID Auto programme Manual programme Programme edit Signal strength Set I...

Страница 42: ...the position and make your choice of the second character and so on Press the O OK K button to store Press E EX XI IT T button to return to normal TV viewing 2 3 4 5 6 7 1 Auto programme Manual programme G Programme edit Signal strength Set ID Auto programme Manual programme Programme edit Signal strength Set ID Auto programme Manual programme Programme edit Signal strength Set ID D D E E Band V U...

Страница 43: ...D D button twice The selected pro gramme is deleted all the following programmes are shifted up one position C Co op py yi in ng g a a p pr ro og gr ra am mm me e I In n A An na al lo og gu ue e M Mo od de e O On nl ly y a Select a programme to be copied with the D D or E E or F F or G G buttons b Press the G GR RE EE EN N button c Move the programme to the desired programme number with the D D or...

Страница 44: ...e P PR R or button during normal TV viewing If you want to select the skipped programme directly enter the pro gramme number with the NUMBER buttons or select it in the programme edit or table menu S Se el le ec ct ti in ng g F Fa av vo ou ur ri it te e P Pr ro og gr ra am mm me e a Select your favourite programme number with D D or E E or F F or G G buttons and then press the F FA AV V button It ...

Страница 45: ...splay the Programme table menu The programme list appears on the screen Select a programme with the D D or E E or F F or G G buttons The set switches to the chosen programme number 1 2 1 2 NOTE G G You may find some blue programmes They have been set up to be skipped by auto programming or in the programme edit mode G G Some programmes with the channel number shown in the programme LIST indicate t...

Страница 46: ...turn to normal TV viewing Alternatively you can select the Digital Analogue AV1 2 Component 1 2 RGB PC HDMI1 DVI or HDMI 2 mode by pressing the INPUT button Press the D A INPUT button to select digital or analogue mode Input Subtitle Child lock ARC XD demo SIMPLINK 2 3 4 1 Input G Subtitle Child lock ARC XD demo SIMPLINK Digital Analogue AV1 AV2 Component1 Component2 RGB PC HDMI1 DVI HDMI2 POWER T...

Страница 47: ... needed to control it This feature can be used to prevent unautho rized viewing Input Subtitle Child lock ARC XD demo SIMPLINK 2 3 4 1 Input Subtitle Child lock G ARC XD demo SIMPLINK Off On NOTE G G With the lock on the display C Ch hi il ld d l lo oc ck k O On n appears on the screen if any button on the front panel is pressed while viewing the TV G G The display C Ch hi il ld d l lo oc ck k O O...

Страница 48: ...r the devices with the SIMPLINK logo Please check the SIMPLINK logo This allows you to control and play other AV devices connected to the display through HDMI cable without additional cables and settings If you do not want SIMPLINK menu select Off Input Subtitle Child lock ARC XD demo SIMPLINK 1 Input Subtitle Child lock ARC XD demo SIMPLINK G Off On 2 3 POWER TV D A INPUT DVD TEXT GUIDE VCR POWER...

Страница 49: ...A AV V d de ev vi ic ce e Enables you to select one of AV devices connected to TV and play it P Po ow we er r o of ff f a al ll l d de ev vi ic ce es s When you power off TV all connected devices are turned off S Sw wi it tc ch h a au ud di io o o ou ut t Offers an easy way to switch audio out A A d de ev viic ce e w wh hiic ch h iis s c co on nn ne ec ct te ed d t to o T TV V t th hr ro ou ug gh ...

Страница 50: ...ing 2 3 1 Reveals how strong your DTV signal is and whether you need to adjust your antenna The higher the signal strength the less likely you are to experience picture degradation Digital TV Signals May not be available in all areas nor broadcast all programmes Auto programme Manual programme Programme edit Signal strength Set ID Auto programme Manual programme Programme edit Signal strength Set ...

Страница 51: ...Cinema Zoom Choose Cinema Zoom when you want to enlarge the picture in correct proportion Note When enlarging or reducing the picture the image may become distorted You can adjust the enlarge proportion of Cinema Zoom using D D or E E button The adjustment range is 1 16 NOTE POWER TV D A INPUT DVD EXIT LIST MENU TEXT GUIDE VCR POWER RATIO FAV SUBTITLE BRIGHT SIMPLINK INFO INPUT MODE OK Press the R...

Страница 52: ...e P PI IC CT TU UR RE E menu Press the G G button and then use D D or E E button to select P PS SM M Press the G G button and then use D D or E E button to select D Dy yn na am mi ic c S St ta an nd da ar rd d M Mi il ld d U Us se er r1 1 or U Us se er r2 2 Press E EX XI IT T button to return to normal TV viewing 2 4 3 1 PSM G Colour temperature XD Advanced Video preset Dynamic Standard Mild User1...

Страница 53: ... button and then use D D or E E button to select C Co ol lo ou ur r t te em mp pe er ra at tu ur re e Press the G G button and then use D D or E E button to select either W Wa ar rm m M Me ed di iu um m C Co oo ol l or U Us se er r Press E EX XI IT T button to return to normal TV viewing PSM Colour temperature G XD Advanced Video preset Warm Medium Cool User PSM Colour temperature XD Advanced Vide...

Страница 54: ...G While in the APM mode only the P PO OW WE ER R A AP PM M O OK K E EX XI IT T D D or E E or F F or G G V VO OL LU UM ME E or M MU UT TE E buttons on the remote control are usable G G APM screen will automatically disappear after approx 40 seconds unless a button is pressed 2 1 D Dy yn na am mi ic c Standard User1 Mild EXIT Navigate Select Exit 1 2 G G D D E E F F TV D A INPUT DVD EXIT VOL SIZE IN...

Страница 55: ...S Sh ha ar rp pn ne es ss s or T Ti in nt t Press the G G button and then use F F or G G button to make appropriate adjustments Press E EX XI IT T button to return to normal TV viewing You can adjust picture Contrast Brightness Colour Sharpness and Tint options to the levels you prefer PSM Colour temperature XD Advanced Video preset Dynamic Standard Mild User 1 G user 2 Contrast 85 F F G E E User1...

Страница 56: ...use D D or E E button to select R Re ed d G Gr re ee en n or B Bl lu ue e Press the G G button and then use F F or G G button to make appropriate adjustments The adjustment range of R Re ed d G Gr re ee en n or B Bl lu ue e is 20 20 Press E EX XI IT T button to return to normal TV viewing PSM Colour temperature XD Advanced Video preset PSM Colour temperature XD Advanced Video preset 2 3 4 5 6 1 Us...

Страница 57: ...TV D A INPUT DVD TEXT GUIDE VCR POWER RATIO BRIGHT INFO INPUT MODE SIMPLINK BRIGHTNESS ADJUSTMENT Press the button Adjust the desired screen brightness Adjust the brightness using this button on the remote control 2 1 1 2 ...

Страница 58: ... and XD noise PSM Colour temperature XD G Advanced Video preset Manual XD contrast On XD colour On XD noise On PSM Colour temperature XD Advanced Video preset 2 3 4 1 S Se el le ec ct ti in ng g t th he e M Ma an nu ua al l 1 Press the G G button and then use F F or G G but ton to select X XD D c co on nt tr ra as st t X XD D c co ol lo ou ur r or X XD D n no oi is se e X XD D c co on nt tr ra as ...

Страница 59: ... E E button to select O On n or O Of ff f Press E EX XI IT T button to return to normal TV viewing Set up the TV for the best picture appearance for viewing movies This feature operates only in AV1 AV2 and Component 480i mode PSM Colour temperature XD Advanced G Video preset Cinema Off Black level Auto PSM Colour temperature XD Advanced Video preset 2 3 4 5 1 ADVANCED CINEMA 3 4 2 1 OK TV D A INPU...

Страница 60: ...o o Realizing the black level of the screen and set it to High or Low automatically L Lo ow w The black level of the screen gets darker H Hi ig gh h The black level of the screen gets brighter Press E EX XI IT T button to return to normal TV viewing Adjusting the contrast and the brightness of the screen using the black level of the screen This feature operates only in AV1 AV2 HDMI1 DVI or HDMI2 m...

Страница 61: ... Press the G G button to reset the picture menu options to original values Use to quickly reset all the Picture menu options to their original factory preset values PSM Colour temperature XD Advanced Video preset G Selection G or presets the video configuration PSM Colour temperature XD Advanced Video preset 2 3 1 2 3 1 OK TV D A INPUT DVD EXIT LIST MENU TEXT GUIDE VCR POWER POWER RATIO FAV SUBTIT...

Страница 62: ... E EX XI IT T button to stop XD demo Allows you to select your preferred picture mode after compare the four different picture Dynamic Standard Mild and User1 or User2 settings Input Subtitle Child lock ARC XD demo SIMPLINK 2 3 4 1 Input Subtitle Child lock ARC XD demo G SIMPLINK Selection Gor leads you to the XD demo 2 3 1 Dynamic Standard User1 Mild Press to end EXIT OK TV D A INPUT DVD EXIT LIS...

Страница 63: ...the A AU UD DI IO O menu Press the G G button and then use D D or E E button to select A AV VL L Press the G G button and then use D D or E E button to select O On n or O Of ff f Press E EX XI IT T button to return to normal TV viewing SSM AVL G Balance TV Speaker 2 3 4 1 SSM AVL Balance TV Speaker 2 3 1 Off On OK TV D A INPUT DVD EXIT LIST MENU TEXT GUIDE VCR POWER POWER RATIO FAV SUBTITLE BRIGHT...

Страница 64: ...ot adjustable Press the M ME EN NU U button and then use D D or E E button to select the A AU UD DI IO O menu Press the G G button and then use D D or E E button to select S SS SM M Press the G G button and then use D D or E E button to select S St ta an nd da ar rd d M Mu us si ic c M Mo ov vi ie e S Sp po or rt ts s or U Us se er r Press E EX XI IT T button to return to normal TV viewing SSM G A...

Страница 65: ...to select U Us se er r Press the G G button and then use D D or E E button to select the desired sound option T Tr re eb bl le e B Ba as ss s or F Fr ro on nt t s su ur rr ro ou un nd d 2 3 4 1 SSM AVL Balance TV Speaker SSM AVL Balance TV Speaker Standard Music Movie Sports User G User Treble 50 G Bass 50 Front surround Off Press to confirm MENU SOUND SETTING ADJUSTMENT USER MODE OK TV D A INPUT ...

Страница 66: ...r ro ou un nd d X XT T Press E EX XI IT T button to return to normal TV viewing Front surround SRS TruSurround XT S SR RS S T Tr ru uS Su ur rr ro ou un nd d X XT T Takes advantage of any multi channel format without needing to add extra speakers or equipment Dialog clari ty bass enrichment and the addition of stereo audio enhancement produces an immersive sound experience from standard stereo mat...

Страница 67: ...ess the G G button and then use F F or G G button to make appropriate adjustments Press E EX XI IT T button to return to normal TV viewing Adjust the left right sound of speaker to suit your taste and room situations L R Balance 0 2 3 4 1 SSM AVL Balance TV Speaker SSM AVL Balance 0 TV Speaker L R 2 3 1 OK TV D A INPUT DVD EXIT LIST MENU TEXT GUIDE VCR POWER POWER RATIO FAV SUBTITLE BRIGHT INFO IN...

Страница 68: ...ton to select O On n or O Of ff f Press E EX XI IT T button to return to normal TV viewing Turn the TV speakers off if using external audio equipment In AV1 2 Component1 2 RGB PC HDMI1 DVI and HDMI2 mode the audio signal can be outputted even though there is no video signal SSM AVL Balance TV Speaker G Off On 2 3 4 1 SSM AVL Balance TV Speaker 2 3 1 OK TV D A INPUT DVD EXIT LIST MENU TEXT GUIDE VC...

Страница 69: ...edly press the I I I II I button to select the sound output L R Audio signal from audio L input is sent to the left loud speaker and audio signal from audio R input is sent to the right loud speaker L L Audio signal from audio L input is sent to left and right loud speakers R R Audio signal from audio R input is sent to left and right loud speakers NOTE G G In digital mode repeatedly press the I I...

Страница 70: ... tl le e Press the G G button and then use D D or E E button to select O On n or O Of ff f Press E EX XI IT T button to return to normal TV viewing Input Subtitle Child lock ARC XD demo SIMPLINK 2 3 4 1 You can select Subtitle on or off with the TEXT button in DTV mode Input Subtitle G Child lock ARC XD demo SIMPLINK Off On 2 3 1 TV D A INPUT DVD EXIT LIST MENU GUIDE VCR POWER BRIGHT RATIO SUBTITL...

Страница 71: ...k Press the G G button and then use D D or E E button to select O On n Press the G G button and then use D D or E E button to select your viewing area time zone N NS SW W A AC CT T N NT T T TA AS S W WA A S SA A Q QL LD D or V VI IC C Press E EX XI IT T button to return to normal TV viewing Auto clock G Manual clock Off time On time Sleep timer Auto sleep Off On Auto clock Manual clock Off time On...

Страница 72: ...ption Once selected use the D D or E E button to set the year date and time options Press E EX XI IT T button to return to normal TV viewing If the current time setting is wrong reset the clock manually Auto clock Manual clock G Off time On time Sleep timer Auto sleep Year Date Time Auto clock Manual clock Off time On time Sleep timer Auto sleep 2 3 4 1 2 3 1 OK TV D A INPUT DVD EXIT LIST MENU TEX...

Страница 73: ...programme at turn on Press the G G button and then use D D or E E to set the sound level at turn on Press E EX XI IT T button to return to normal TV viewing Auto clock Manual clock Off time On Time G Sleep timer Auto sleep Off On Time 6 30 AM PR 0 Vol 17 Auto clock Manual clock Off time On time Sleep timer Auto sleep 2 3 4 5 6 7 1 The time function operates only if the current time has been set Th...

Страница 74: ...utton repeatedly to select O Of ff f When you switch the set off the set cancels the preset sleep time You don t have to remember to switch the set off before you go to sleep The sleep timer automatically switches the set to standby after the preset time has elapsed You can also set up the Sleep timer in the TIME menu Auto clock Manual clock Off time On time Sleep timer G Auto sleep Off 10 min 20 ...

Страница 75: ... D or E E button to select A Au ut to o s sl le ee ep p Press the G G button and then use D D or E E button to select O On n or O Of ff f Press E EX XI IT T button to return to normal TV viewing Auto clock Manual clock Off time On time Sleep timer Auto sleep G Off On Auto clock Manual clock Off time On time Sleep timer Auto sleep 2 3 4 1 2 3 1 OK TV D A INPUT DVD EXIT LIST MENU TEXT GUIDE VCR POWE...

Страница 76: ...sw wo or rd d Press the G G button and then choose any 4 digits for your new password next to New As soon as the 4 digits are entered re enter the same 4 digits to C Co on nf fi ir rm m The new password is memorized Press E EX XI IT T button to return to normal TV viewing Change the password by inputting a new password twice Lock system Set password Block programme Parental guidance Aux block Lock...

Страница 77: ... you select O On n the Lock System is enabled Press E EX XI IT T button to return to normal TV viewing Enables or disables the blocking scheme you set up previously Lock system G Set password Block programme Parental guidance Aux block Off On Lock system Set password Block programme Parental guidance Aux block 2 3 1 2 1 OK TV D A INPUT DVD EXIT LIST MENU TEXT GUIDE VCR POWER RATIO FAV SUBTITLE BRI...

Страница 78: ... OK K button to block or unblock it Press E EX XI IT T button to return to normal TV viewing Lock system Set password Block programme G Parental guidance Aux block Selection G or leads you to the block programme screen Lock system Set password Block programme Parental guidance Aux block 2 3 4 1 Select a channel number that you wish to block 2 3 1 PARENTAL CONTROL RATINGS PARENTAL CONTROL RATINGS O...

Страница 79: ...t G G P PG G M M M MA A A AV V or R R G General audience PG Parental guidance suggested M Mature audiences MA Mature adult audiences AV Adult audiences R Restricted Blocking Off Permits all programs Press E EX XI IT T button to return to normal TV viewing Lock system Set password Block programme Parental guidance Aux block Lock system Set password Block programme Parental guidance G Aux block G PG...

Страница 80: ...to select a source Press the G G button and then use the D D or E E button to select O On n or O Of ff f on the each source Press E EX XI IT T button to return to normal TV viewing Lock system Set password Block programme Parental guidance Aux block Lock system Set password Block programme Parental guidance Aux block G AV1 On AV2 On Component1 Off Component2 On RGB PC Off HDMI1 DVI On HDMI2 Off 2 ...

Страница 81: ...ress from block to block Use the yellow button to proceed to the next group with automatic overflow to the next block With the G GR RE EE EN N button you can proceed to the next existing page with automatic overflow to the next group Alternatively the P PR R button can be used The red button permits to return to previous selection Alternatively the P PR R button can be used A A D Di ir re ec ct t ...

Страница 82: ...EXT mode 4 The P PR R or button can be used to select the preceding or following page i R RE EV VE EA AL L Press this button to display concealed infor mation such as solutions of riddles or puzzles Press this button again to remove the informa tion from the display S SI IZ ZE E Selects double height text Press this button to enlarge the top half of the page Press this button again to enlarge the ...

Страница 83: ...pted No broadcast on station tuned with Auto off activated Check whether the product is turned on Try another channel The problem may be with the broadcast Is the power cord inserted into wall power outlet Check your antenna direction and or location Test the wall power outlet plug another product s power cord into the outlet where the product s power cord was plugged in This is normal the image i...

Страница 84: ...de the product No output from one of the speakers T Th he er re e i is s a a p pr ro ob bl le em m i in n P PC C m mo od de e O On nl ly y P PC C m mo od de e a ap pp pl li ie ed d Adjust resolution horizontal frequency or vertical frequency Check the input source Work the Auto configure or adjust clock phase or H V position Option Check the signal cable Reinstall the PC video card The signal is o...

Страница 85: ...and a little fabric softener or dish washing detergent Wring the cloth until it s almost dry and then use it to wipe the screen Make sure the excess water is off the screen and then let it air dry before you turn on your TV Cleaning the Cabinet To remove dirt or dust wipe the cabinet with a soft dry lint free cloth Please be sure not to use a wet cloth Extended Absence If you expect to leave your ...

Страница 86: ...1 5A 36 5x27 3x1 1 0inches 92 7 0x692 8x2 80 5mm 36 5x24 8x3 5inches 92 7 0x630 0x88 0mm 44 1pounds 20kg 35 3pounds 1 6 0kg AC100 240V 50 60Hz 1 8A 40 7x29 5x1 1 3inches 1 0 3 3 4x7 5 0 0x2 8 7 6mm 40 7x27 0x3 5inches 1 03 3 4x686 8x88 5mm 54 9pounds 24 9kg 45 0pounds 20 4kg AC100 240V 50 60Hz 2 3A PAL B G DVB T VHF 0 12 UHF 20 75 CATV 02 44 DTV 06 12 27 69 75 ohm 32 104 F 0 40 C Less than 80 4 14...

Страница 87: ... will be illuminated If you don t press any button for 20 seconds the light on the mode button will be turned off In that case you have to repeat from step 2 Enter code numbers using the number button on the remote by referring the code table on the following pages When pressing the button the light blinks If the device turned off the programming is successful Press the M ME EN NU U button to stor...

Страница 88: ...emote control Button 5B EXIT Remote control Button 92 APM Remote control Button A9 GUIDE Remote control Button 7E SIMPLINK Remote control Button 39 SUBTITLE Remote control Button 64 SIZE Remote control Button 70 INDEX Remote control Button 26 TIME Remote control Button 2A REVEAL Remote control Button 20 TEXT Remote control Button 72 RED Remote control Button 71 GREEN Remote control Button 63 YELLO...

Страница 89: ...5 C6 C7 D0 D1 D2 D3 D4 D5 D6 D7 D0 D1 D2 D3 D4 D5 D6 D7 Lead code Low custom code High custom code Data code Data code Repeat code Tf 4 5 ms 9 ms 2 25 ms 9 ms 0 55 ms 0 56 ms 1 12 ms 0 56 ms 2 24 ms Tf Tf Tf 108ms 455KHz Bit 0 Bit 1 1 How to Connect Connect your wired remote control to the Remote Control port on the TV 2 Remote Control IR Codes Output waveform Single pulse modulated with 37 917KHz...

Страница 90: ... 046 059 MINOLTA 013 020 MITSUBISHI 013 020 045 046 049 051 059 061 151 MTC 034 040 MULTITECH 024 034 NEC 012 023 039 043 048 NORDMENDE 043 OPTONICA 053 054 PANASONIC 066 070 074 083 133 140 145 PENTAX 013 020 031 033 063 PHILCO 031 034 067 PHILIPS 031 033 034 054 067 071 101 PILOT 101 PIONEER 013 021 048 PORTLAND 108 PULSAR 072 QUARTZ 01 1 014 QUASAR 033 066 075 145 RCA 013 020 033 034 040 041 06...

Страница 91: ...63 076 POST NEWS WEEK016 PRUCER 059 PTS 01 1 048 071 072 073 074 PULSAR 100 RCA 047 REGAL 049 050 REGENCY 057 REMBRANT 025 SAMSUNG 102 107 030 068 SCIENTIFIC ATLANTA 003 01 1 041 042 043 045 046 SHERITECH 022 SIGNAL 030 SIGNATURE 052 SL MARX 030 SPRUCER 047 078 STARCOM 002 004 008 009 STARGATE 008 030 TADIRAN 030 TAEKWANG 1 10 TAIHAN 105 TANDY 017 TEXSCAN 029 TOCOM 039 040 056 TOSHIBA 100 UNIKA 00...

Страница 92: ... cables are not supplied with the TV HDMI DVI IN 2 COMPONENT IN COMPONENT IN VIDEO VIDEO AUDIO AUDIO RGB IN RGB PC AV IN 1 VIDEO S VIDEO AUDIO MONO AV OUT DIGITAL AUDIO OUT RS 232C IN RS 232C IN CONTROL SERVICE CONTROL SERVICE VIDEO DVI DVI AUDIO Type of Connector D Sub 9 Pin Male No Pin Name 1 No connection 2 RXD Receive data 3 TXD Transmit data 4 DTR DTE side ready 5 GND 6 DSR DCE side ready 7 R...

Страница 93: ...ta Mapping1 See page 93 SET ID Communication Parameters Baud rate 9600 bps UART Data length 8 bits Parity None Stop bit 1 bit Communication code ASCII code Use a crossed null modem cable RS 232C Configurations Auto programme Manual programme Programme edit Signal strength Set ID G 1 Auto programme Manual programme Programme edit Signal strength Set ID 2 1 3 4 PC TV RXD 2 3 TXD TXD 3 2 RXD GND 5 5 ...

Страница 94: ...If the data is data write mode it returns the data of the PC computer E Er rr ro or r A Ac ck kn no ow wl le ed dg ge em me en nt t The TV transmits ACK acknowledgement based on this for mat when receiving abnormal data from non viable functions or communication errors Data1 Illegal Code Data2 Not supported function Data3 Wait more time 01 Power k a 0 1 02 Input Select k b 0 8 03 Aspect Ratio k c ...

Страница 95: ...llu um me e M Mu ut te e C Co om mm ma an nd d2 2 e e To control volume mute on off You can also adjust mute using the MUTE button on remote control Transmission k e Set ID Data Cr Data 0 Volume mute on Volume off Data 1 Volume mute off Volume on Acknowledgement e Set ID OK NG Data x 0 06 6 V Vo ollu um me e C Co on nt tr ro oll C Co om mm ma an nd d2 2 f f To adjust volume You can also adjust vol...

Страница 96: ... an nd d2 2 s s To adjust bass You can also adjust bass in the Audio menu Transmission k s Set ID Data Cr Data Min 0 Max 64 transmit by Hexadecimal code Refer to Real data mapping1 See page 93 Acknowledgement s Set ID OK NG Data x 1 16 6 B Ba al la an nc ce e C Co om mm ma an nd d2 2 t t To adjust balance You can also adjust balance in the Audio menu Transmission k t Set ID Data Cr Data Min 0 Max ...

Страница 97: ...3 Digital TV 0 3E7 2 22 2 S Se en nd d I IR R C Co od de e C Co om mm ma an nd d m m c c To send IR remote key code Transmission m c Set ID Data Cr Data Key code Refer to page 86 Acknowledgement c Set ID OK NG Data x 2 23 3 I In np pu ut t S Se el le ec ct t C Co om mm ma an nd d x x b b To select input source for TV Transmission x b Set ID Data Cr Data 00 Digital Data 41 Component2 Data 10 Analog...

Страница 98: ......

Отзывы: