background image

20

ENG

ENGLISH

CUSTOMIZING SETTINGS

Each option is described below.
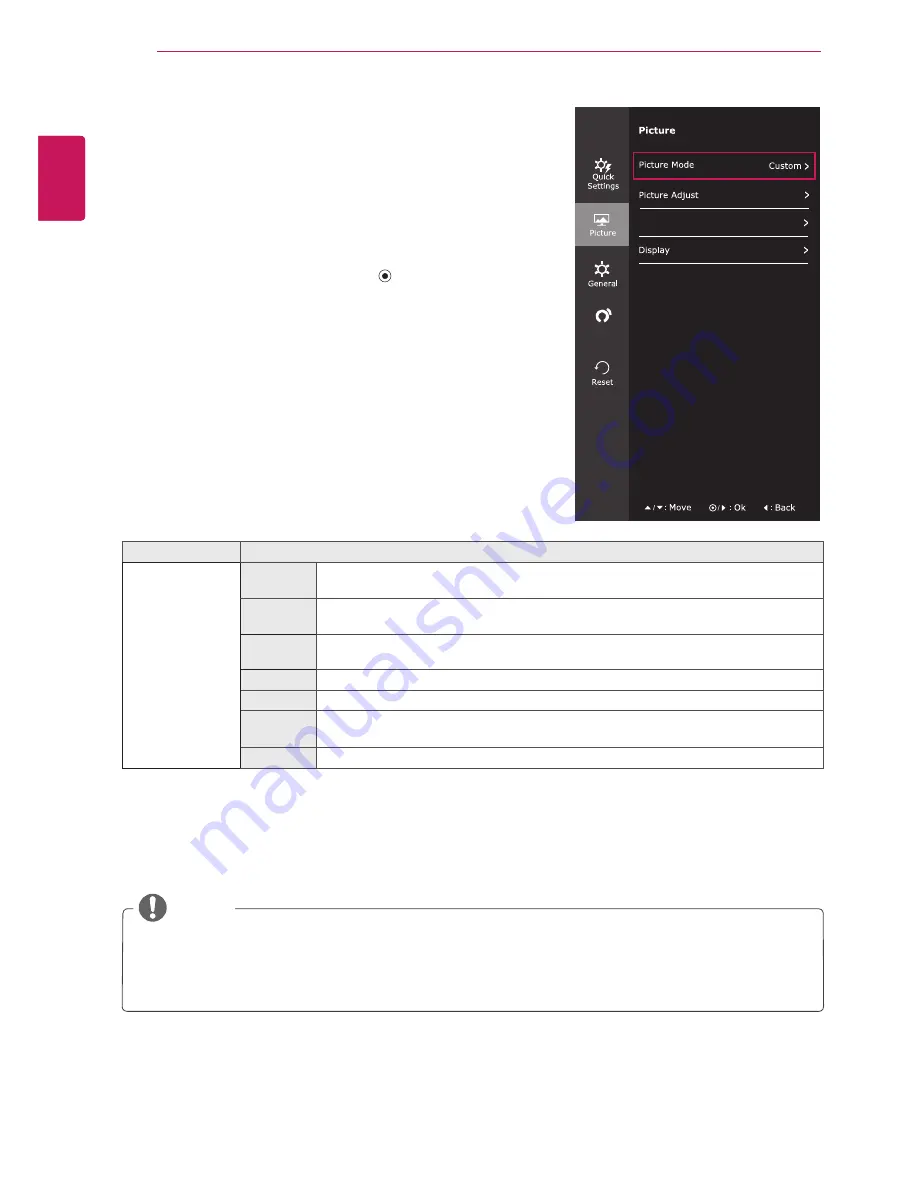
-Picture 

1  

To view the 

OSD menu

, press the 

joystick button

 at 

the bottom of the monitor and then enter the 

Menu

.

2  

Go to 

Picture

 by moving the joystick.

3  

Configure the options following the instructions that 
appear in the bottom right corner.

4  

To return to the upper menu or set other menu items, 

move the joystick to ◄ or pressing (

 / OK) it.

5  

If you want to exit the OSD menu, move the joystick 

to ◄ until you exit.

Menu > Picture 

Description

Picture Mode

Custom

Allows the user to adjust each element. The color mode of the main menu can be ad-

justed.

Reader 1

It is a mode that the screen is adjusted to the best for the newspaper. If you want 

screen more bright, you can control brightness in Menu OSD.

Reader 2

It is a mode that the screen is adjusted to the best for the cartoon. If you want screen 

more bright, you can control brightness in Menu OSD.

Photo

Optimizes the screen to view photos.

Cinema

Optimizes the screen to improve the visual effects of a video.

Color 

weakness

This mode is for users who cannot distinguish between red and green.It enables users 

with color weakness to easily distinguish between the two colors.

Game

Optimizes the screen for gameplay. 

Color Adjust

Auto

Configuration

NOTE


y

This is subsidiary for color weakness user. Therefore if you feel uncomfortable with the screen, 
please turn off this function.


y

This function can’t distinguish some colors in some images.

Содержание 22MP58A

Страница 1: ...MP58VQ 22MP58HQ 24MP58VQ 24MP58HQ 24MP58D 27MP58HQ 27MP58VQ Please read this manual carefully before operating your set and retain it for future reference Owner s Manual IPS LED MONITOR LED MONITOR LG LED Monitors are LCD Monitors with LED Backlighting ...

Страница 2: ... holder 14 USING THE MONITOR SET 14 Connecting to a PC 14 D SUB connection 14 DVI D connection 14 HDMI connection 15 Connecting to AV Devices 15 HDMI connection 16 Connecting to External Devices 16 Peripheral device connection 17 CUSTOMIZING SETTINGS 18 Customizing settings 18 Menu Settings 18 Quick Settings 20 Picture 23 General 24 Auto Configuration 25 Reset 26 Picture mode 27 TROUBLESHOOTING 29...

Страница 3: ...ensing LLC in the United States and other countries The following content is only applied to the monitor which is sold in Europe market and which needs to meet the ErP Directive This monitor is set to be turned off automatically in 4 hours after you turned on display if there is no adjustment to display To make this setting be disabled change the option to Off in OSD menu of Automatic Standby 22MP...

Страница 4: ... product The illustrations in this manual may differ from the actual product and accessories CD Owner s Manual Card Depending on the country Depending on the country Power Cord AC DC Adapter AC DC Adapter or D SUB Cable This cable is not included in all countries DVI D Cable This cable is not included in all countries 27MP67VQ 24MP67VQ 22MP67VQ 23MP67VQ 22MP67HQ 23MP67HQ 24MP67HQ 27MP67HQ Stand Bo...

Страница 5: ...fe span y y Any damages or injuries by using unapproved accessories are not covered by the warranty y y The accessories supplied with your product may vary depending on the model y y Product specifications or contents in this manual may be changed without prior notice due to upgrade of product functions CAUTION NOTE ...

Страница 6: ...e Joystick Button You can easily control the functions of the monitor by pressing the joystick button or moving it left right with your finger Basic Functions Power on Press the joystick button once with your finger to turn on the monitor Power off Press and hold the joystick button once with your finger to turn off the monitor Volume Control You can control the volume by moving the joystick butto...

Страница 7: ...7 ENG ENGLISH ASSEMBLING AND PREPARING 22MP58A 22MP58D 22MP58HQ 24MP58HQ 27MP58HQ 24MP58D 22MP58VQ 24MP58VQ 27MP58VQ Connection panel See p 14 16 Parts and buttons Input Connector ...

Страница 8: ...to create images y y It is advisable to place the monitor in the original box or packing material before at tempting to move it y y Before moving or lifting the monitor discon nect the power cord and all cables y y Hold the top and bottom of the monitor frame firmly Do not hold the panel itself y y When holding the monitor the screen should face away from you to prevent it being scratched y y When...

Страница 9: ...arrow to hinge body After assembling you must check if the Stand body latched in or not 3 Please push the Stand Base in the direction of the arrow as shown below and assemble together Please use a driver or coin to insert thumb screw and turn right arrow direction lock It is necessary to thoroughly tighten it with Thumb Screw or the monitor will shake 4 Please set the Monitor upright and install t...

Страница 10: ... or coin insert thumb screw and turn left arrow direction unlock Please pull the Stand Base in the direction of the arrow as shown below and disassemble as shown below 4 After fixing the monitor in one hand remove the Stand body by pulling it strongly in the direction of the arrow as shown below 1 2 1 2 If it is difficult to remove you can push the Latch with a small flat head screw driver or a fl...

Страница 11: ...from the actual product y y Do not carry the monitor upside down by just hold ing the stand base This may cause the monitor to fall off the stand and could result in personal injury y y When lifting or moving the monitor do not touch the monitor screen The force applied to the moni tor screen may cause damage to it y y If you use the monitor panel without the stand base its joystick button may cau...

Страница 12: ...another location Otherwise electric shock may occur CAUTION Cable holder When you adjust the angle do not hold the bottom of the Monitor set frame as shown on the following illustration as may injure your fingers Do not touch or press the screen when adjusting the angle of the monitor Do not hold this set like below picture Monitor screen can detach from stand base and injure your body WARNING ...

Страница 13: ...on and using refer to the manual supplied with the Kensington security system or visit http www kensington com Connect the Kensington security system cable between the Monitor set and a table The Kensington security system is optional You can obtain it from most electronics stores NOTE Tilt from 15 to 2 degrees up or down to adjust the angle of the Monitor set to suit your view NOTE Front Rear ...

Страница 14: ...lied cable to a 15 pin 2 row connector y y When using a D Sub signal input cable connector for Macintosh NOTE HDMI connection Transmits the digital video and audio signals from your PC to the Monitor set Connect the PC and the Monitor set with the HDMI cable as shown in the following illustrations DVI D connection Transmits a digital video signal from your PC to the Monitor set Connect the PC and ...

Страница 15: ...or set y y If you turn the Monitor set on while it is cold the screen may flicker This is normal y y Some red green or blue spots may appear on the screen This is normal NOTE Connecting to AV Devices HDMI connection Transmits the digital video and audio signals from your AV devices to the monitor Connect your AV device to the monitor with the HDMI cable as il lustrated below y y If you use HDMI PC...

Страница 16: ...devices to the monitor using headphone ports y y Peripheral devices are sold separately y y Cables with angled plugs may have clear ance issues use straight plugs when pos sible Angle Type Straight Type NOTE NOTE y y Headphones or speakers may not work nor mally depending on the server PC settings sold separately ...

Страница 17: ...tion Main menu disabled Enables the main menu Main menu enabled Enters the picture mode feature Main menu disabled Enables the main menu Main menu enabled Turns off the monitor Main Menu Features Main Menu Description Menu Configures the screen settings Picture Mode Select picture mode to achieve the best display effect Input You can operate the change of input sig nals When two input signals over...

Страница 18: ...olume 22MP58HQ 22MP58VQ 24MP58HQ 24MP58VQ 27MP58VQ 27MP58HQ Adjusts the volume NOTE y y Jog joystick button down in the Volume menu will enable disable the Mute function Ratio Adjusts the screen ratio Wide Displays the video in wide screen regardless of the video signal input Original Displays a video according to the input video signal aspect ratio SMART ENERGY SAVING High Enables SMART ENERGY SA...

Страница 19: ...G SETTINGS y y Saving Data depends on the Panel So those values should be different from each panel and panel vendor If option of SMART ENERGY SAVING is High or Low monitor luminance become higher or lower depend on source NOTE ...

Страница 20: ...ode that the screen is adjusted to the best for the newspaper If you want screen more bright you can control brightness in Menu OSD Reader 2 It is a mode that the screen is adjusted to the best for the cartoon If you want screen more bright you can control brightness in Menu OSD Photo Optimizes the screen to view photos Cinema Optimizes the screen to improve the visual effects of a video Color wea...

Страница 21: ...hter Low The picture of the screen gets darker Response Time 22MP58HQ 22MP58VQ 24MP58HQ 24MP58VQ 27MP58VQ 27MP58HQ Sets a response time for displayed pictures based on the speed of the screen For a normal environment it is recommended that you use Normal For a fast moving picture it is recommended that you use High Setting to High may cause image sticking High Sets the response time to High Middle...

Страница 22: ...and saturation of the six colors Red_Hue Red_Saturation Green_ Hue Green_Saturation Blue_Hue Blue_Saturation Cyan_Hue Cyan_Saturation Magenta_Hue Magenta_Saturation Yellow_ Hue Yellow_Saturation and saving the settings Hue Adjusts tone of the screen Saturation Adjusts the saturation of the screen colors The lower the value less saturated and bright the colors become The higher the value the more s...

Страница 23: ...0 Off 1440x900 1600x900 Off OSD Lock Prevents incorrect key input On Key input is disabled NOTE All functions except for the OSD Lock mode and the Exit button for Brightness Con trast Volume Input and General are disabled Off Key input is enabled NOTE The function is enabled only when the screen resolution on your computer is set to the following except that the PC output wrong resolution General ...

Страница 24: ...ons that appear in the bottom right corner 4 To return to the upper menu or set other menu items move the joystick to or pressing OK it 5 If you want to exit the OSD menu move the joystick to until you exit Each option is described below Menu Auto Configuration Description Do you want to Auto confuguration Yes Operate the Auto configuration for optimal display in D SUB Cancel Cancel the select NOT...

Страница 25: ... the options following the instructions that appear in the bottom right corner 4 To return to the upper menu or set other menu items move the joystick to or pressing OK it 5 If you want to exit the OSD menu move the joystick to until you exit Each option is described below Menu Reset Description Do you want to reset your settings Reset Returns to the default settings Cancel Cancel the select ...

Страница 26: ...e screen is adjusted to the best for the newspaper If you want screen more bright you can control brightness in Menu OSD Reader 2 It is a mode that the screen is adjusted to the best for the cartoon If you want screen more bright you can control brightness in Menu OSD Photo Optimizes the screen to view photos Cinema Optimizes the screen to improve the visual effects of a video Color weak ness This...

Страница 27: ...al in 5 minutes the monitor goes to DPM mode Can t you control some functions in OSD Can t you select some menu in OSD y y You can unlock the OSD controls at any time by entering the OSD lock menu and changing items to off Display image is incorrect Display Position is incorrect y y Enter the Auto Configuration function and select the Yes item to automatically adjust your display image to the idea...

Страница 28: ... the screen may be flickering Change the resolution to the recommended resolution 1080P Display image is incorrect The screen color is mono or abnormal y y Check if the signal cable is properly connected and use a screwdriver to fasten if necessary y y Make sure the video card is properly inserted in the slot y y Set the color setting higher than 24 bits true color at Control Panel Settings The sc...

Страница 29: ...CAP26 A manufactured by LIEN CHANG ELECTRONIC ENTERPRISE or Type LCAP26 E manufactured by LIEN CHANG ELECTRONIC ENTERPRISE or Type LCAP26 I manufactured by LIEN CHANG ELECTRONIC ENTERPRISE or Type LCAP26 B manufactured by LIEN CHANG ELECTRONIC ENTERPRISE or Type LCAP51 manufactured by LIEN CHANG ELECTRONIC ENTERPRISE or Type PA 1021 23 manufactured by Lite On Technology Corporation OUTPUT 19 V 1 3...

Страница 30: ...30 kHz to 61 kHz Automatic Vertical Frequency 56 Hz to 75 Hz D SUB 56 Hz to 75 Hz DVI D 56 Hz to 75 Hz HDMI Input Form Separate Sync Digital Video Input Signal Input 15 pin D SUB Connector DVI D Connector Digital HDMI Connector Input Form RGB Analog 0 7 Vp p 75 ohm Digital Plug Play DDC 2B Analog DDC 2B Digital DDC 2B HDMI ...

Страница 31: ...anufactured by LIEN CHANG ELECTRONIC ENTERPRISE or Type LCAP26 E manufactured by LIEN CHANG ELECTRONIC ENTERPRISE or Type LCAP26 I manufactured by LIEN CHANG ELECTRONIC ENTERPRISE or Type LCAP26 B manufactured by LIEN CHANG ELECTRONIC ENTERPRISE or Type LCAP51 manufactured by LIEN CHANG ELECTRONIC ENTERPRISE or Type PA 1021 23 manufactured by Lite On Technology Corporation OUTPUT 19 V 1 3 A Dimens...

Страница 32: ...Hz to 61 kHz Automatic Vertical Frequency 56 Hz to 75 Hz D SUB 56 Hz to 75 Hz DVI D 56 Hz to 75 Hz HDMI Input Form Separate Sync Digital Video Input Signal Input 15 pin D SUB Connector DVI D Connector Digital HDMI Connector Input Form RGB Analog 0 7 Vp p 75 ohm Digital Plug Play DDC 2B Analog DDC 2B Digital DDC 2B HDMI ...

Страница 33: ...C ENTERPRISE or Type LCAP26A E manufactured by LIEN CHANG ELECTRONIC ENTERPRISE or Type LCAP26A I manufactured by LIEN CHANG ELECTRONIC ENTERPRISE or Type LCAP26A B manufactured by LIEN CHANG ELECTRONIC ENTERPRISE or Type LCAP51A manufactured by LIEN CHANG ELECTRONIC ENTERPRISE or Type PA 1031 23 manufactured by Lite On Technology Corporation OUTPUT 19 V 1 7 A Dimensions Width x Height x Depth Wit...

Страница 34: ...o 61 kHz Automatic Vertical Frequency 56 Hz to 75 Hz D SUB 56 Hz to 75 Hz DVI D 56 Hz to 75 Hz HDMI Input Form Separate Sync Digital Video Input Signal Input 15 pin D SUB Connector DVI D Connector Digital HDMI Connector Input Form RGB Analog 0 7 Vp p 75 ohm Digital Plug Play DDC 2B Analog DDC 2B Digital DDC 2B HDMI ...

Страница 35: ... 60 023 75 1152 x 864 67 500 75 1280 x 1024 63 981 60 1280 x 1024 79 976 75 1680 x 1050 65 290 60 1920 x 1080 67 500 60 Recommend Mode HDMI Timing Video Factory support mode Preset Mode Horizontal Frequency kHz Vertical Frequency Hz HDMI 480P 31 50 60 O 576P 31 25 50 O 720P 37 50 50 O 720P 45 00 60 O 1080P 56 25 50 O 1080P 67 50 60 O Recommend Mode Indicator Mode LED Color On Mode White Only 15 se...

Страница 36: ...R POSTURE Adjust the Monitor set and your posture to allow you to view images at the optimal viewing angle Place your hands gently on the keyboard keeping your arms bent at the elbows and horizontally outright Adjust the location of the Monitor set to avoid it reflecting light ...

Страница 37: ...claration of Conformity Trade Name LG Model 22MP58A 22MP58D 22MP58HQ 22MP58VQ 24MP58D 24MP58HQ 24MP58VQ 27MP58HQ 27MP58VQ Responsible Party LG Electronics Inc Address 1000 Sylvan Ave Englewood Cliffs NJ 07632 U S A TEL 201 266 2534 As an ENERGY STAR Partner LGE U S A Inc has determined that this product meets the ENERGY STAR guidelines for energy efficiency ENERGY STAR is a set of power saving gui...

Отзывы: