background image

20

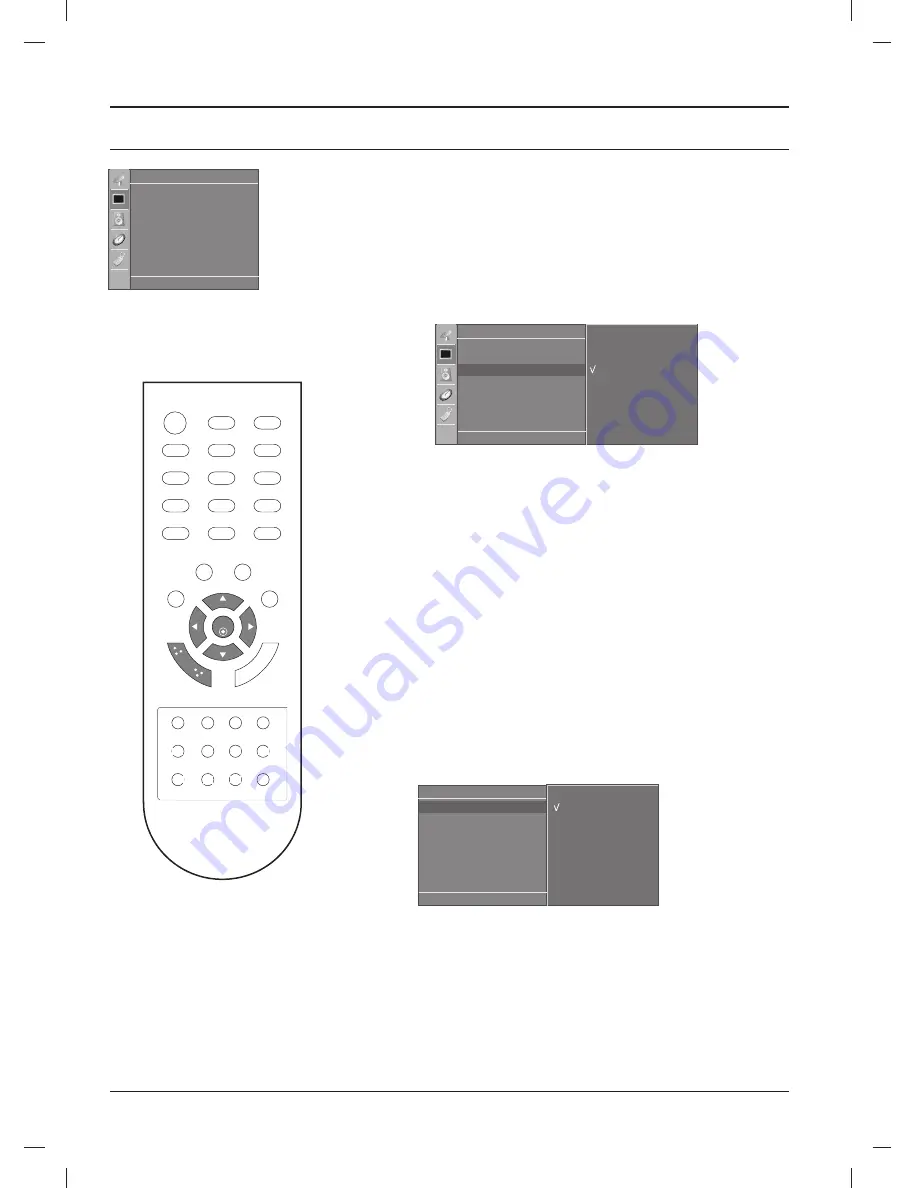
XD function

XD is LG electronic's unique picture improving technology to display a
real HD source through an advanced digital signal processing algorithm.

1. Press 

the 

MENU 

button and then 

D


E


button to select the

Picture

menu.

2. Press the 

G

G

button and then 

D


E


button to select 

XD

.

3. Press the 

G

G

button and then 

D


E

E

button to select

Auto

or

Manual

.

4. Press the 

OK 

button.

5. Repeatedly press the 

MENU 

button to return to normal TV

viewing.

Selecting the Manual

This menu is activatived after selecting the 

User

of 

PSM

.

1. Press the 

G

G

button and then 

D

D

//   

E

E

button to select 

XD

Contrast

,

XD Colour

or 

XD NR

.

2. Press the 

G

G

button and then 

D

D

/

E

E

button to select 

On

or 

Off

.

3. Repeatedly press the 

MENU 

button to return to normal TV

viewing.

XD Contrast :

Optimizing the contrast automatically according to the
brightness of the reflection.

XD Colour :

Adjusting the colors of the reflection automatically to

reproduce as closely as possible to the natural colors.

XD NR :

Removing the noise up to the point where it does not dam-
age the original picture.

Picture

DE  F G

OK MENU

PSM

CSM

XD

G

Reset

Auto

Manual

Picture

DE  F G

OK MENU

PSM
CSM
XD
Reset

Manual

DE  F G

OK MENU

XD Contrast

G

XD Colour

XD NR

Picture adjustment

On

Off

1

2

3

4

5

6

8

7

9

0

OK 

LIST

MUTE

VOL

HOLD SIZE

MIX

TIME

REVEAL

MODE UPDATE

INDEX

VOL

PR

PR

TEXT

PSM

SSM

Q.VIEW

POWER

TV

INPUT

M

EN

U

SLEEP

I/II

*

?

i

M

Содержание 20HIZ20

Страница 1: ...eading this manual and operating your set Retain it for future reference Record model number and serial number of the set See the label attached on the back cover and quote this information to your dealer when you require service OWNER S MANUAL MODEL 20HIZ20 20LS1R ...

Страница 2: ...our Status Memory XD function Cinema Reset Sound adjustment 22 SSM Sound Status Memory Sound adjustment Stereo Dual reception NICAM reception Sound output selection Time Menu 24 Clock On Off time Auto sleep Sleep timer Other functions 26 Child lock XD Demo TV AV and PC modes Auto AV switching Teletext 29 Switch on off SIMPLE text TOP text FASTEXT Special teletext functions Connection of external e...

Страница 3: ...the product as shown Note Here shown may be somewhat different from your set stand body cover base Detaching stand 1 Place the set with its front facing downward on a cushion or soft cloth 2 Hold the stand with both hands and bend it upward 3 Pull each side of cover base backward during pressing latch upward 4 Hold cover base and pull with shake it backward to separate from stand body 5 Pull stand...

Страница 4: ...ent Hold the Cable management with both hands and pull it upward Note Do not hold the CABLE MANAGEMENT when moving the product If the product is dropped you may be injured or the product may be broken Connection of TV 1 Connect the aerial cable to the socket marked ANTENNA IN on the back For the best reception an outdoor aerial should be used 2 To connect an additional equipment see the Connection...

Страница 5: ...ow a clearance of 4 on each side and from the wall Detailed installation instructions are available from your dealer see the optional Tilt Wall Mounting Bracket Installation and Setup Guide For proper ventilation allow a clearance of 4 on each side and from the wall 4 inches 4 inches 4 inches 4 inches R Desktop Pedestal Installation ...

Страница 6: ...fects may be visible on the screen appearing as tiny red green or blue spots However they have no adverse effect on the monitor s performance c Avoid touching the LCD screen or holding your finger s against it for long periods of time Doing so may produce some temporary distortion effects on the screen Positioning your display Adjust the position of the panel in various ways for maximum comfort 12...

Страница 7: ...IST displays the programme table 4 PSM Picture Status Memory recalls your preferred picture setting 5 MUTE switches the sound on or off Press the MUTE button The sound is switched off and the dis play appears You can cancel it by pressing the MUTE F F G G I II or SSM button 6 D D E E Programme Up Down selects a programme or a menu item switches the set on from standby F F G G Volume Down Up adjust...

Страница 8: ... broadcast 15 COLOURED BUTTONS These buttons are used for teletext only TELETEXT models or programme edit No function Battery installation Note To avoid damage from possible battery leakage remove the batteries if you do not plan to use the remote control handset for an extended period of time The remote control handset is powered by two AAA batteries To load the batteries turn the remote control ...

Страница 9: ...cepts your selection or displays the current mode 5 F F G G Volume Down Up adjusts the volume adjusts menu settings 6 E E D D Programme Down Up selects a programme or a menu item switches the set on from standby 7 REMOTE CONTROL SENSOR 8 POWER STANDBY INDICATOR illuminates red in standby mode illuminates green when the set is switched on 9 Clock displays the clock Top panel INPUT MENU VOL PR I OK ...

Страница 10: ...rols AC IN SERVICE ONLY ANTENNA IN RS 232C IN CONTROL SERVICE SPEAKER OUT MONO S VIDEO AV IN 2 VIDEO AV 1 Rear FOR SERVICE JACK RS 232C IN JACK ANTENNA INPUT EURO SCART SOCKET AC INPUT AUDIO VIDEO INPUT S VIDEO INPUT SPEAKER OUT INPUT ...

Страница 11: ...L menu 2 Press the G G button and then D D E E button to select Language The menus can be shown on the screen in the selected language Or Press the G G button and then D D E E button to select Country 3 Press the G G button and then D D E E F G button to select your desired language or country 4 Press the OK button 5 Repeatedly press the MENU button to return to normal TV viewing Note a If you don...

Страница 12: ...me selection You can select a programme number with the D D E E or NUMBER buttons Volume adjustment Press the F F G G button to adjust the volume 8 7 9 0 OK LIST MUTE VOL HOLD SIZE MIX TIME REVEAL MODE UPDATE INDEX VOL PR PR TEXT PSM SSM Q VIEW M E N U SLEEP I I I i M On screen menus STATION menu PICTURE menu SOUND menu SPECIAL menu TIME menu Station DE F G OK MENU Auto programme Manual programme ...

Страница 13: ... E E button to select Storage from 6 Select the beginning programme number with the F F G G button or NUMBER buttons on the Storage from pull down menu Any number under 10 is entered with a numeric 0 in front of it i e 05 for 5 7 Press the OK button 8 Press the D D E E button to select Search 9 Press the G G button to begin auto programming All receivable stations are stored To stop auto programmi...

Страница 14: ...e OK button 9 Press the D D E E button to select Band 10 Press the G G button and then D D E E button to select VHF UHF or Cable on the Band menu 11 Press the OK button 12 Press the D D E E button to select Channel 13 Select the desired programme with F F G G button or NUMBER buttons 14 Press the OK button 15 Press the D D E E button to select Search 16 Press the G G button and then F F G G button...

Страница 15: ...opposite direction 4 Select the position by pressing the F F G G button and then make your choice of the second character and so on 5 Press the OK button to store it 6 Repeatedly press the MENU button to return to normal TV viewing Fine tuning Normally fine tuning is only necessary if reception is poor 1 Repeat the Manual programme tuning steps 1 to 2 2 Press the G G button and then D D E E button...

Страница 16: ...umber with the D D E E or F F G G button 4 Press the YELLOW button again to release this function Skipping a programme number 1 Select a programme number to be skipped with the D D E E or F F G G button 2 Press the BLUE button The skipped programme turns to blue 3 Press the BLUE button again to release the skipped programme When a programme number is skipped it means that you will be unable to sel...

Страница 17: ...mmes stored in the memory by displaying the programme table Displaying programme table Press the LIST button to display the Programme table menu The programme table appears on the screen One programme table contains ten programmes as below Note a You may find some blue programmes They have been set up to be skipped by auto programming or in the programme edit mode b Some programmes with the channe...

Страница 18: ...programmed for optimum picture reproduction at the factory and cannot be changed Picture adjustment You can adjust picture contrast brightness colour intensity sharpness tint to the levels you prefer 1 Press the MENU button and then D D E E button to select the Picture menu 2 Press the G G button and then D D E E button to select PSM 3 Press the G G button and then D D E E button to select User 4 ...

Страница 19: ...s the MENU button and then D D E E button to select the Picture menu 2 Press the G G button and then D D E E button to select CSM 3 Press the G G button and then D D E E button to select a color set ting on the CSM menu Cool Normal Warm or User Red Green Blue 4 Press the OK button 5 Repeatedly press the MENU button to return to normal TV viewing Picture DE F G OK MENU PSM CSM XD Reset Picture DE F...

Страница 20: ...D Contrast XD Colour or XD NR 2 Press the G G button and then D D E E button to select On or Off 3 Repeatedly press the MENU button to return to normal TV viewing XD Contrast Optimizing the contrast automatically according to the brightness of the reflection XD Colour Adjusting the colors of the reflection automatically to reproduce as closely as possible to the natural colors XD NR Removing the n...

Страница 21: ...o select Reset 3 Press the G G button to initialize the adjusted value 4 Repeatedly press the MENU button to return to normal TV viewing Note This feature is not available for all models Picture DE F G OK MENU PSM CSM XD Reset Picture DE F G OK MENU PSM CSM XD Reset G To set 1 2 3 4 5 6 8 7 9 0 OK LIST MUTE VOL HOLD SIZE MIX TIME REVEAL MODE UPDATE INDEX VOL PR PR TEXT PSM SSM Q VIEW POWER TV INPU...

Страница 22: ...ing Flat Music Movie Sports or User with SSM button on the remote control The sound settings Flat Music Movie and Sports are programmed for optimum sound reproduction at the factory and cannot be changed Note If you press the SSM button after making appropriate adjustment on the User sub menu the display User automatically appears even though you have already set a factory preset setting Flat Musi...

Страница 23: ...sound can be received Sound output can be selected according to the type of received broadcast as follows by pressing the I II button repeatedly 1 When NICAM mono is received you can select NICAM MONO or FM MONO 2 When NICAM stereo is received you can select NICAM STEREO or FM MONO If the stereo signal is weak switch to FM mono 3 When NICAM dual is received you can select NICAM DUAL I NICAM DUAL I...

Страница 24: ...the G G button and then D D E E button to adjust the minute 6 Only On time function Press the G G button and then D D E E button to adjust volume level and programe number 7 Press the MENU button to save Note a In the event of power interruption disconnection or power failure the clock must be reset b Two hours after the set is switched on by the on time function it will automatically switch back ...

Страница 25: ...set to standby after the preset time has elapsed Press the SLEEP button to select the number of minutes The display will appear on the screen followed by 10 20 30 60 90 120 180 and 240 The timer begins to count down from the number of minutes selected Note a To view the remaining sleep time press the SLEEP button once b To cancel the sleep time repeatedly press the SLEEP button until the display a...

Страница 26: ...utton to select On or Off on the Child lock menu 4 Press the MENU button to save 5 Repeatedly press the MENU button to return to normal TV viewing With the lock on the display Child lock on appears on the screen if any button on the top panel is pressed while viewing the TV Special DE F G OK MENU Language Country Child lock G XD Demo On Off Special DE F G OK MENU Language Country Child lock XD Dem...

Страница 27: ...to select XD Demo 3 Press the G G button to begin XD Demo 4 Press the MENU button to return to normal TV viewing Special DE F G OK MENU Language Country Child lock XD Demo G To start Special DE F G OK MENU Language Country Child lock XD Demo XD Demo XD Off XD On Exit Menu 1 2 3 4 5 6 8 7 9 0 OK LIST MUTE VOL HOLD SIZE MIX TIME REVEAL MODE UPDATE INDEX VOL PR PR TEXT PSM SSM Q VIEW POWER TV INPUT M...

Страница 28: ...other equipment is connected to the set Note When a VCR is connected via the aerial socket the set is used in TV mode See the Connection of external equipment sec tion The AV modes are AV 1 VCR connected to the Euro scart socket of the set AV 2 VCR connected to the AV IN 2 or S Video of the set Auto AV switching If your VCR outputs an AV switching voltage when connected to the Euro scart socket th...

Страница 29: ...ss the TEXT button to switch off teletext The previous mode reappears SIMPLE text Page selection 1 Enter the desired page number as a three digit number with the NUMBER buttons If during selection you press a wrong number you must complete the three digit number and then re enter the cor rect page number 2 The D D E E button can be used to select the preceding or following page Programming a colou...

Страница 30: ...EAL Press this button to display concealed information such as solutions of riddles or puzzles Press this button again to remove the information from the display SIZE Selects double height text Press this button to enlarge the top half of the page Press this button again to enlarge the bottom half of the page Press this button again to return to the normal display UPDATE Displays the TV picture on...

Страница 31: ...want to keep on watching in TV mode press the D D E E or NUM BER buttons Otherwise press the INPUT button on the remote control handset to select AV1 The VCR play back picture appears on the screen You can also record programmes received by the TV on video tape Note a Signal type RGB i e the signals red green and blue can only be selected for the Euro scart and the AV1 can be received These signal...

Страница 32: ...he INPUT button to select AV 2 4 Press the PLAY button on the VCR The VCR playback picture appears on the screen DVD input sockets Euro scart socket 1 Connect the Euro scart socket of the DVD to the Euro scart socket of the set 2 Press the INPUT button to select AV1 3 Press the PLAY button on the DVD The DVD playback picture appears on the screen AV 1 S VIDEO AV IN 2 RGB PC DTV IN ANTENNA IN VIDEO...

Страница 33: ...ut 5V Standby output 8 No connection 9 No Connection Type of Connector D Sub 9 Pin Male RS 232C Configurations RS 232C Setup SERVICE ONLY RS 232C IN CONTROL SERVICE AV IN 2 VIDEO AV 1 RGB IN PC DTV HDMI DVI IN AUDIO OUT VARIABLE RS 232C IN CONTROL SERVICE 9 9 1 5 6 7 Wire Configurations Standard RS 232C cable PC TV SET RX 2 3 TX TX 3 2 RX GND 5 5 GND IR Out 4 6 N C N C 6 4 IR Out Power Output 7 8 ...

Страница 34: ...rmat when receiving abnormal data from non viable functions or communication errors Data1 Illegal Code Data2 Not supported function Data3 Wait more time Command2 Set ID NG Data x 01 Power k a 0 1 02 Aspect Ratio k c 03 Screen Mute k d 0 1 04 Volume Mute k e 0 1 05 Volume Control k f 0 64 06 Contrast k g 0 64 07 Brightness k h 0 64 08 Colour k i 0 64 09 Tint k j 0 64 10 Sharpness k k 0 64 11 OSD Se...

Страница 35: ...d2 2 e e To control volume mute on off You can also adjust mute using the MUTE button on remote control Data 0 Volume mute off Volume on Data 1 Volume mute on Volume off Transmission k e Set ID Data Cr Acknowledgement e Set ID OK Data x 0 05 5 V Vo ollu um me e C Co on nt tr ro oll C Co om mm ma an nd d2 2 f f To adjust volume You can also adjust volume with the volume buttons on remote control Da...

Страница 36: ...ID OK Data x 1 15 5 B Ba alla an nc ce e C Co om mm ma an nd d2 2 t t To adjust balance You can also adjust balance in the SOUND menu Data Min 0 Max 64 Refer to Real data mapping 1 See page 6 Transmission k t Set ID Data Cr Acknowledgement t Set ID OK Data x 1 10 0 S Sh ha ar rp pn ne es ss s C Co om mm ma an nd d2 2 k k To adjust the screen sharpness You can also adjust sharpness in the PICTURE m...

Страница 37: ...tiin ng g C Co om mm ma an nd d1 1 jj C Co om mm ma an nd d2 2 r r To adjust orbiter operation time term This feature is not available for all models Data Min 1 Max FE Refer to Real data mapping 1 Transmission j r Set ID Data Cr Acknowledgement r Set ID OK Data x 2 24 4 O Or rb biit te er r P Piix xe ell S Se et tt tiin ng g C Co om mm ma an nd d1 1 jj C Co om mm ma an nd d2 2 s s To adjust pixel ...

Страница 38: ...d2 2 c c To send IR remote key code Data Key code Refer to page 9 Transmission m c Set ID Data Cr Acknowledgement c Set ID OK Data x 2 28 8 I In np pu ut t s se elle ec ct t C Co om mm ma an nd d1 1 x x C Co om mm ma an nd d2 2 b b M Ma aiin n P Piic ct tu ur re e I In np pu ut t To select input source for TV Data Structure Transmission x b Set ID Data Cr 2 29 9 I In np pu ut t s se elle ec ct t C...

Страница 39: ...a key is depressed Low custom code Lead code High custom code Data code Data code C0 C1 C2 C3 C4 C5 C6 C7 D0 D1 D2 D3 D4 D5 D6 D7 D0 D1 D2 D3 D4 D5 D6 D7 Repeat code Tf 4 5 ms 9 ms 2 25 ms 9 ms 0 55 ms 0 56ms 1 12ms Tf Tf Tf 108ms 455KHz 0 56ms 2 24ms Bit 0 Bit 1 Remote Control IR Codes Output waveform Single pulse modulated with 37 917KHz signal at 455KHz T1 Tc Carrier frequency FCAR 1 TC fOSC 12...

Страница 40: ...T R C Button 0A I II R C Button 43 MENU R C Button 07 F F R C Button 06 G G R C Button 40 D D R C Button 41 E E R C Button 44 OK R C Button 72 RED R C Button 71 GREEN R C Button 63 YELLOW R C Button 61 BLUE R C Button 02 VOL R C Button 03 VOL R C Button 00 PR R C Button 01 PR R C Button 09 MUTE R C Button 53 LIST R C Button 10 19 Number Key 0 9 R C Button 1A Q VIEW R C Button 62 POSITION R C Butto...

Страница 41: ...tune to another station Station signal is weak reorient antenna to receive weaker station Check for sources of possible interference Lines or streaks in pictures Check antenna Change the direction of the antenna Check whether the product is turned on Try another channel The problem may be with the broadcast Is the power cord inserted into wall power outlet Check your antenna direction and or locat...

Страница 42: ...al noise when the product is turned on or off and does not indicate a fault with the product No output from one of the speakers Adjust Balance in menu option Screen color is unstable or single color Check the signal cable Reinstall the PC video card The signal is out of range There is a problem in PC mode Only PC mode applied Adjust resolution horizontal frequency or vertical frequency Check the i...

Страница 43: ...50 60Hz 1 0A 60W 20LS1R 573 2mm x 189 7mm x 435 5mm 22 6inches x 7 5inches x 17 1inches 20LS1R 6 9kg 15 3lbs PAL SECAM B G D K PAL I II SECAM L L VHF E2 E12 UHF E21 E69 CATV S1 S20 HYPER S21 S47 75 Ω Power Requirement Power Consumption Dimensions Width x Depth x Height Weight Net Television System Programme Coverage External Antenna Impedance ...

Страница 44: ......

Страница 45: ...Installation menu Installation Guide MODEL 20HIZ20 20LS1R ...

Страница 46: ... io on n o of f c co on nt tr ro ol ls s 3 4 I In ns st ta al ll la at ti io on n M Me en nu u Introduction 5 LG Hotel Mode setup 6 10 TVLink Loader 1 1 Password Change 1 2 Set ID Setup 1 2 Clock Setup 1 3 Configuration setup 1 4 External Speaker Interface 1 4 2 ...

Страница 47: ... a menu 4 OK accepts your selection or displays the current mode 5 F F G G Volume Down Up adjusts the volume adjusts menu settings 6 E E D D Programme Down Up selects a programme or a menu item switches the set on from standby 7 REMOTE CONTROL SENSOR 8 POWER STANDBY INDICATOR illuminates red in standby mode illuminates green when the set is switched on Top panel INPUT MENU VOL PR I OK Front 1 2 3 ...

Страница 48: ...ols AC IN SERVICE ONLY ANTENNA IN RS 232C IN CONTROL SERVICE SPEAKER OUT MONO S VIDEO AV IN 2 VIDEO AV 1 Rear FOR SERVICE JACK RS 232C IN JACK ANTENNA INPUT EURO SCART SOCKET AC INPUT AUDIO VIDEO INPUT S VIDEO INPUT SPEAKER OUT INPUT ...

Страница 49: ... EN NU U button for more than 5 second using the user remote control programme informa tion will appear at top right on the screen Enter a four digit password The TV is set with the initial password 1 1 0 5 and then OK button Use the D D E E button to select the desired menu C 40 9 00 04 1 2 3 Station DE F G OK MENU Auto programme Manual programme Programme edit Favourite programme Installation Me...

Страница 50: ...d work in On status If main power were turned off in Stand by status TVSet would work in Stand by status 2 2 P Po ow we er r O On n S St ta at tu us s Decide to work all functions of Hotel Mode Operation or not by setting Hotel Mode Operation as Yes Work or No Do Not Work When Hotel Mode Operation is set to Yes Work all functions of Hotel Mode apply When Hotel Mode Operation is set to No Do Not Wo...

Страница 51: ...NPUT key doesn t work When Input Source Change is set to No Change impossible user s input pressing Program key numeral key List key Q View key in all Input source except TV source doesn t work and when entering Station Menu itemin the Main Menu OSD except TV mode doesn t accepted Because entering Station Menu item makes present mode as TV mode even though present mode is not TV mode For the funct...

Страница 52: ...u key action to enter the Installation Menu and key action to enter Password are available When LG IR Operation is set to Yes Work all keys are available 8 8 L LG G I IR R O Op pe er ra at ti io on n Decide to operate Local Key or not by setting Local Key Operation as Yes Work or No Do Not Work When Local Key Operation is set to No Do Not Work all Local Key doesn t work except volume up down key a...

Страница 53: ...has priority If both Program and On Time is set but just the value is different then Program value has priority 1 11 1 2 2 V Vo ol lu um me e Set to Yes Work or No Do Not Work If A V Setting is changed from No to Yes parameters that are set before entering Installation Menu are applied whenever turn on power Following Parameters are applied to basic Picture section PSM mode Picture Data Contrast B...

Страница 54: ...ia al l Yes Yes Yes Yes Yes Yes Yes Yes Yes 0 Max PR 1 0 100 Yes Yes 0 100 0 99 1 10 No No No No No No No No No Off Off No No No STD Yes Yes Yes Yes Yes Yes Yes 100 No Off Off No No 1 1 Hotel Mode Operation Power On Status Station Menu Program Change Input Source Change Menu Display OSD Display LG IR Operation Local Key Operation Max Volume Power On Default Program Volume A V Setting Radio Video B...

Страница 55: ...l TVLink Loader doesn t move and point the TVLink Loader towards the below center on the set during this time Use the U UP P D DO OW WN N button to select the TVLink Loader Press the M MO OD DE E button in order to change from key to key and then press the U UP P button Press the S SE EN ND D or R RE EC CI IE EV VE E button R RE EC CI IE EV VE E RS232 is the main connection for receiving data S SE...

Страница 56: ... D E E button to select the Set ID Setup S Se et t I ID D L Lo oc ck k Set the Set ID item in Special Menu whether to activate or not Set to Yes Work or No Do Not Work S Se et t I ID D Set the Set ID of TV Set with 1 99 1 Set ID Setup Installation Menu V2 0 MCU Version 2 02 LG Hotel Mode Setup G G TV Link Loader G G Password Change G G Set ID Setup G G Clock Setup G G Configuration Setup G G MENU ...

Страница 57: ...e Range 0 99 P Po ow we er ro on n D Di im mm mi in ng g v va al lu ue e Range 0 99 PR for TTX Clock You can adjust the Program to take clock information from Teletext when the AC Power is on The default value is OFF When the power is off When you install in the Hotel you can adjust the Program according to the Hotel system The indication of Front Clock LED Display is selectable NOTE Clock Setup C...

Страница 58: ...ONTROL SERVICE AV 1 I In nt te er rf fa ac ce e b bo ox x T Ty yp pe e o of f C Co on nn ne ec ct to or r D D S Su ub b 9 9 P Pi in n M Ma al le e No Pin Name 1 No connection 2 RX 3 TX 4 IR Out 5 GND 6 No connection 7 Power Output 5V Standby output 8 No connection 9 No Connection Male connector on box viewed towards connector RGB IN PC DTV AUDIO OUT VARIABLE HDMI IN RS 232C IN CONTROL SERVICE 9 9 ...

Страница 59: ...to Yes the function to convert or separate Image and Sound automatically according to RJP Control signal is activated This Function is available on HIZ22 models 3 3 R Re em mo ot te e J Ja ac ck k P Pa ac ck k The On Timer automatically switches the set to standby at the preset time You can set the On Timer once or daily at the preset time 4 4 O On n T Ti im me er r O Op pe er ra at ti io on n Ext...

Отзывы: