


56
Instruction / Safety Information
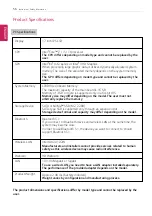
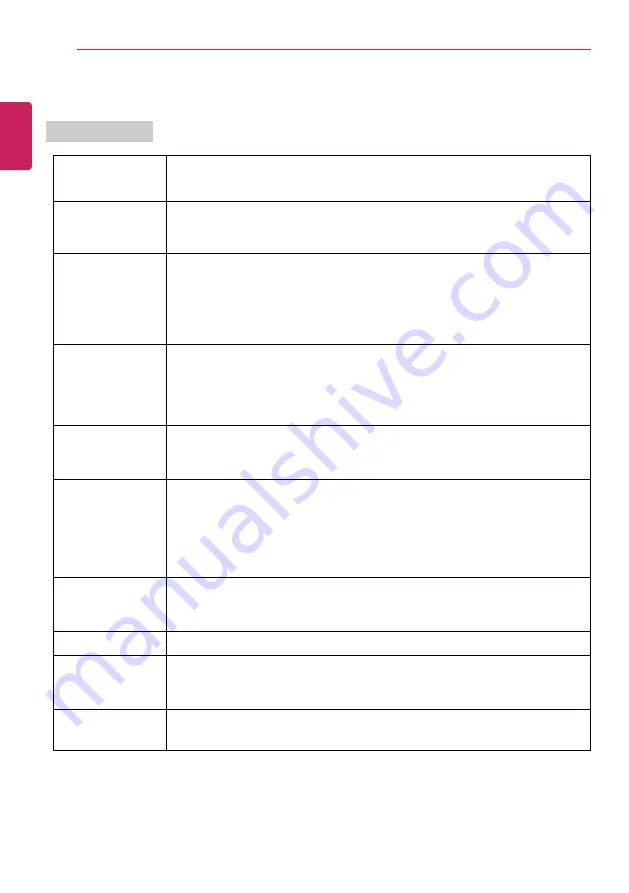
Product Specifications
PC Specifications
Display
17 inch IPS LCD
CPU
Intel
®
Core
™
i7 / i5 / i3 processor
The CPU differs depending on model type and cannot be replaced by the
user.
GPU
Intel
®
Iris
®
X
e
Graphics or Intel
®
UHD Graphics
When processing large graphic data, it utilizes dynamically allocated system
memory. The size of the allocated memory depends on the system memory
size.
The GPU differs depending on model type and cannot be replaced by the
user.
System Memory
LPDDR4x Onboard Memory
The maximum capacity of the main board is 16 GB.
Memory of 3 GB or more is supported only in a 64-bit O/S.
Memory size may differ depending on the model. The user must not
arbitrarily replace the memory.
Storage Device
SATA or NVMe
™
SSD (M.2 2280)
SATA-type SSD is supported only through an expansion slot.
Storage device format and capacity may differ depending on the model.
Bluetooth
Bluetooth 5.1
If you connect to Bluetooth device and wireless LAN at the same time, the
system may become slow.
In order to use Bluetooth 5.1, the device you want to connect to should
support Bluetooth 5.1.
Wireless LAN
Intel
®
AX201D2W
Manufacturers and installers cannot provide services related to human
safety as this wireless device may cause radio interference.
Webcam
HD Webcam
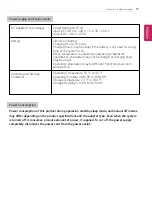
LAN
10/100 Megabit or Gigabit
To use a wired LAN, you need to have a LAN adapter installed separately.
The performance of the provided adapter depends on the model.
Product Weight
Approx. 2.98 lbs (battery included)
Weight varies by configuration and manufacturing process.
The product dimensions and specifications differ by model type and cannot be replaced by the
user.
ENGLISH
Содержание 17Z95N Series
Страница 1: ...LG EASY GUIDE NOTEBOOK 17Z95N Series www lg com Copyright 2021 LG Electronics Inc All rights reserved ...
Страница 22: ...22 Instruction Safety Information Regulatory Notices ENGLISH ...
Страница 23: ...Instruction Safety Information 23 ENGLISH ...
Страница 24: ...24 Instruction Safety Information ENGLISH ...
Страница 25: ...Instruction Safety Information 25 ENGLISH ...
Страница 26: ...26 Instruction Safety Information ENGLISH ...
Страница 27: ...Instruction Safety Information 27 ENGLISH ...
Страница 28: ...28 Instruction Safety Information ENGLISH ...
Страница 29: ...Instruction Safety Information 29 ENGLISH ...
Страница 30: ...30 Instruction Safety Information ENGLISH ...
Страница 31: ...Instruction Safety Information 31 ENGLISH ...
Страница 32: ...32 Instruction Safety Information ENGLISH ...
Страница 33: ...Instruction Safety Information 33 ENGLISH ...
Страница 34: ...34 Instruction Safety Information ENGLISH ...
Страница 35: ...Instruction Safety Information 35 ENGLISH ...
Страница 36: ...36 Instruction Safety Information ENGLISH ...
Страница 37: ...Instruction Safety Information 37 ENGLISH ...
Страница 38: ...38 Instruction Safety Information ENGLISH ...
Страница 39: ...Instruction Safety Information 39 ENGLISH ...
Страница 40: ...40 Instruction Safety Information ENGLISH ...
Страница 41: ...Instruction Safety Information 41 ENGLISH ...
Страница 42: ...42 Instruction Safety Information ENGLISH ...
Страница 43: ...Instruction Safety Information 43 ENGLISH ...
Страница 44: ...44 Instruction Safety Information ENGLISH ...
Страница 45: ...Instruction Safety Information 45 ENGLISH ...
Страница 46: ...46 Instruction Safety Information ENGLISH ...
Страница 47: ...Instruction Safety Information 47 ENGLISH ...
Страница 48: ...48 Instruction Safety Information ENGLISH ...
Страница 49: ...Instruction Safety Information 49 ENGLISH ...
Страница 50: ...50 Instruction Safety Information ENGLISH ...
Страница 51: ...Instruction Safety Information 51 ENGLISH ...
Страница 52: ...52 Instruction Safety Information ENGLISH ...
Страница 53: ...Instruction Safety Information 53 ENGLISH ...
Страница 54: ...54 Instruction Safety Information ENGLISH ...
Страница 55: ...Instruction Safety Information 55 ENGLISH ...
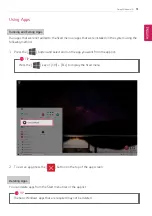
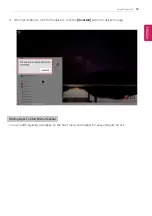
Страница 68: ...68 Using Windows 10 3 The selected app is added to the Start menu or taskbar ENGLISH ...
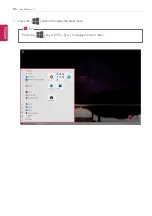
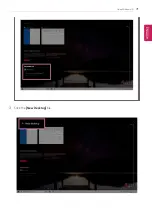
Страница 71: ...Using Windows 10 71 3 Click the New Desktop tile ENGLISH ...
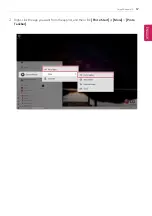
Страница 72: ...72 Using Windows 10 4 Desktop 1 and Desktop 2 are created 5 Select an app in the preview or desktop ENGLISH ...
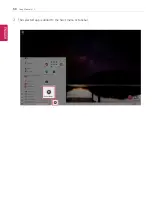
Страница 73: ...Using Windows 10 73 6 The screen is toggled to the selected app or desktop ENGLISH ...
Страница 80: ...80 Using Windows 10 ENGLISH ...
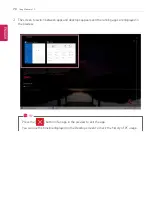
Страница 89: ...Using Windows 10 89 3 To change the detailed settings of the PC press the All Settings tile ENGLISH ...
Страница 90: ...90 Using Windows 10 Using the Start Menu 1 Press the button and select the Settings menu ENGLISH ...
Страница 103: ...Using the PC 103 3 Go to Keyboard Backlight and select your desired options ENGLISH ...
Страница 113: ...Using the PC 113 2 When the Settings screen appears select Devices 3 Select Mouse Additional Mouse Options ENGLISH ...
Страница 133: ...Using the PC 133 2 When the Settings screen appears select Devices ENGLISH ...
Страница 135: ...Using the PC 135 4 Select a device to connect to 5 Complete the Bluetooth connection as directed ENGLISH ...
Страница 137: ...Using the PC 137 2 Connect the wired LAN cable to the LAN port ENGLISH ...
Страница 139: ...Using the PC 139 4 Select Network Internet Status Change adapter options ENGLISH ...
Страница 140: ...140 Using the PC 5 Right click Ethernet and select the Properties menu ENGLISH ...
Страница 141: ...Using the PC 141 6 Select Internet Protocol Version 4 TCP IPv4 and then click Properties ENGLISH ...
Страница 145: ...Using the PC 145 3 Select the Access Point you want to connect to and press Connect ENGLISH ...
Страница 159: ...Using Software 159 1 Select the All List Update needed menu item ENGLISH ...
Страница 161: ...Using Software 161 1 Select the Notification Setting menu 2 Set Auto Update Search to ON or OFF ENGLISH ...
Страница 164: ...164 Using Software 1 Press the icon on the taskbar ENGLISH ...
Страница 176: ...176 Restoring the System 1 Select Keep my files ENGLISH ...
Страница 179: ...Restoring the System 179 1 Select Remove everything ENGLISH ...
Страница 185: ...Setup and Upgrade 185 1 Reboot the system and press F2 2 In a few moments the system setup screen appears ENGLISH ...
Страница 206: ...206 Setup and Upgrade 3 Boots using the selected device ENGLISH ...
Страница 208: ...208 Setup and Upgrade 2 Select System Display ENGLISH ...
Страница 215: ...FAQ 215 2 Select System Display ENGLISH ...
Страница 220: ...220 FAQ 1 Select Keep my files ENGLISH ...
Страница 223: ...FAQ 223 1 Select Remove everything ENGLISH ...
Страница 231: ...FAQ 231 3 Select the Access Point you want to connect to and press Connect ENGLISH ...


