background image

Using Media Browser

43

Using Media Browser

Setting the wireless network

To use the Media Browser on your wireless TV, you will first need to configure your computer network and install the Media Library software. 
If your computer does not have a wireless LAN card, one will need to be purchased and installed.

You should purchase the wireless LAN card (or Access Point(AP)) separately 

802.11g

adaptor (or 802.11g Access Point(AP)) that complies with Wi-Fi. 

You cannot use the 

802.11a

wireless LAN card (or, 

802.11a 

Access Point(AP)) for this wireless TV.

We recommend that you use the USB type adaptor that is easy to configure, or the wireless LAN card  that runs in 802.11g only.

Setting method 1

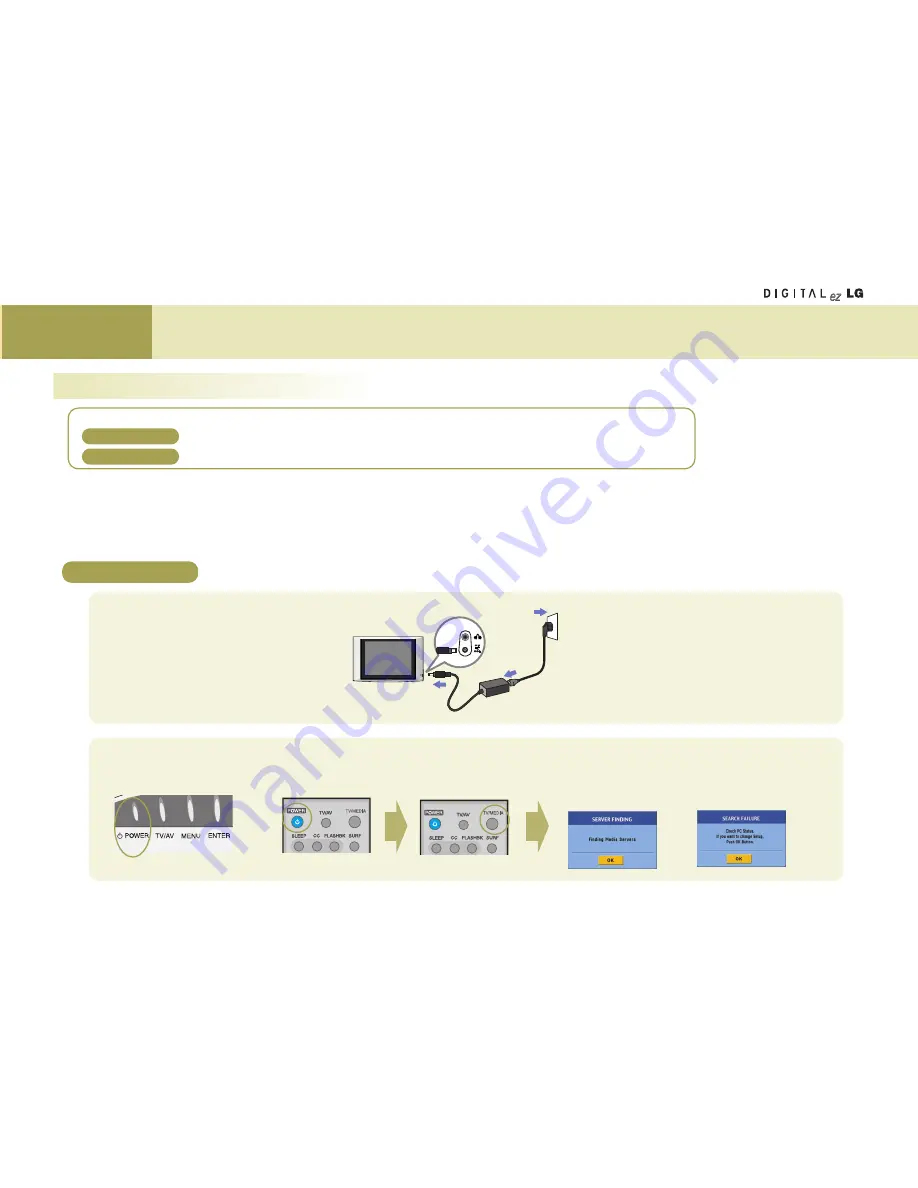
1

Connect the power to the wireless TV.

Wireless TV

DC power adaptor

2

Turn on the wireless TV.

Switch to the 

‘Media Browser’

by pressing 

TV/MEDIA

button.

'SERVER FINDING'

or 

'SEARCH FAILURE'

window

will appear on the TV screen as shown in the figure.
Do not click the 

[OK]

on the screen but take the 

following steps.

Upper side of the wireless TV

Remote control

Remote control

or

or

Power cord

Setting method 1

Setting method 2

There are

two methods

for setting the wireless network.

If you use the wireless LAN card for the first time, take the steps described in the ‘Setting method 1’.

If you’re familiar with wireless LAN card use, take the steps described in the ‘Setting method 2’. 

(See page 50)

Содержание 15LW1R

Страница 1: ...1 Wireless LCD TV User s Guide 15LW1R 15LW1RA Please read the Safety Precautions section carefully to use this product properly ...

Страница 2: ...r other interference to the wireless network A mosaic screen may appear if network connection is poor since broadcasting is converted to the MPEG format before transmitted wirelessly Connection quality can be affected by other devices that transmit radio waves There is approximately a 1 5 second delay between the signal source and the display POWE R POWE R Wireless TV Max 35m PC Wireless transmiss...

Страница 3: ...he Picture Adjusting the picture automatically Adjusting contrast Adjusting brightness Adjusting depth of color Adjusting sharpness Adjusting tint 04 05 06 07 09 16 16 17 18 19 19 20 22 23 24 25 26 27 28 29 29 30 30 30 31 31 32 32 32 33 33 34 34 43 62 Adfusting Sound Adjusting best sound automatically Using the SAP SecondaryAudio Program function AVL Auto Volume Leveler Adjusting sound balance Spe...

Страница 4: ...ence will not occur in a particular installation If this equipment does cause harmful interference to radio or television reception which can be determined by turning the equipment off and on the user is encouraged to try to correct the interference by one or more of the following measures Reorient or relocate the receiving antenna Increase the separation between the equipment and receiver Connect...

Страница 5: ...dequately shielded electronic system in motor vehicles EXPOSURE TO RF ENERGY Use only the supplied or an approved replacement antenna Do not touch the antenna unnecessarily when the TV is in use SAFETY INFORMATION FOR RF EXPOSURE BODY WORN OPERATION This device was tested for typical body worn operations with the back of the TV kept 15 mm from the body To maintain compliance with FCC RF exposure r...

Страница 6: ...e lower the power output Before a TV model is available for sale to the public it must be tested and certified to the FCC that it does not exceed the limit established by the government adopted requirement for safe exposure The tests are performed in positions and locations e g at the ear and worn on the body as required by the FCC for each model The highest SAR value for this model when tested fo...

Страница 7: ...tus including amplifiers that produce heat 9 Do not defeat the safety purpose of the polarized or grounding type plug A polarized plug has two blades with one wider than the other A grounding type plug has two blades and a third grounding prong The wide blade or the third prong is provided for your safety When the provided plug does not fit into your outlet consult an electrician for replacement o...

Страница 8: ...ain or moisture does not operate normally or has been dropped On Disposal a The fluorescent lamp used in this product contains a small amount of mercury b Do not dispose of this product with general household waste Disposal of this product must be carried out in accordance to the regulations of your local authority FCC Compliance Information This device complies with Part 15 of FCC Rules Operation...

Страница 9: ...u can be seriously injured or even killed Please keep this User s Guide at the place where everybody can easily access after reading this User s Guide Installation Take care in placements of cables do not cross walking paths If somebody is caught by the cord and collapses he can receive an electric shock or be injured or the product can be damaged Do not put heavy objects on the TV or let children...

Страница 10: ...ut a fluid container such as flower vase flowerpot cup cosmetics or medical supplies as well as decorations or candles on the wireless TV or wireless trans mission unit You could receive an electric shock or it could cause a fire Do not use the product while it has defects like no video or no sound Turn the product off unplug it and contact a service center You could receive an electric shock or i...

Страница 11: ...hich can cause electric leakage electric shock or fire due to heating ignition or worn out insulation Do not insert any conductive material into the opening of the power cable You could receive an electric shock CAUTION concerning the Power Cord Most appliances recommend they be placed upon a dedicated circuit that is a single outlet circuit which powers only that appliance and has no additional o...

Страница 12: ... product on an unstable and vibrating surface The product could fall or be turned over which could cause injury When installing in an entertainment center or on a shelf ensure that the front of the product is not projecting out beyond the front of the cabinet or shelf The centre of gravity can be unbalanced which could cause an injury or breakdown of the product Install the product in a place free...

Страница 13: ...evice when carrying or transporting You could be injured or the product could be damaged If the power plug or the outlet is covered with dust clean it It could cause a fire Unplug the power cable the signal cable and the battery before cleaning the product You could receive an electric shock or it could cause a fire Consult with customer service or a service center about cleaning once a year A fir...

Страница 14: ...inner or alcohol The product can be deformed Unplug the power cord and wipe with a soft cloth instead of a wet cloth If water infiltrates through a crevice it could cause an electric shock accident or product breakdown Viewing distance from the prod uct should be about 5 7 times of the diagonal distance of the screen Your vision can be impaired if you watch the TV too closely for a long time Other...

Страница 15: ...ethod Do not keep the battery pack close to a metallic object like a key or a clip The battery pack could be dam aged it could cause a fire or you could be burned due to rapid temperature rising by over current Do not store high temperature over 60 degrees or humidity area There is a risk of an explosion or a fire Handle the battery pack with care since it contains lithium There is a risk of an ex...

Страница 16: ...mission unit in the system or connection to the computer Shows the battery status of the system For more details see page 19 Shows blue color under normal operation Brightness becomes dimmer as time goes by Press the button to turn on and press again to turn off Each time you press this button the signal will be switched in the following order Shows Hides the OSD On Screen Display menu screen whil...

Страница 17: ... Power Standby indicator Network status indicator Shows the power status of the wireless transmission unit Red during normal oper ation and yellow while in standby mode Wireless TV connection indicator Blue when a network connection has been established with wireless TV S video output port 2 3 1 RS 232C Bottom of the wireless TV bottom of the wireless transmission unit S video input port AV output...

Страница 18: ...g the mounting type stand Unfold the wireless TV stand and put it on the mounting stand If the stand is not fixed properly the stand can be separated and broken down Press the TV until you hear a click sound to fix it in place firmly 10 35 TV stand Adjust the angle of the stand as shown below Be careful because the stand can be broken if you apply excessive force while the stand is unfolded When w...

Страница 19: ...installing the battery pack The maximum battery pack usage time can differ according to the usage temperature or usage duration If the battery pack is not used for a long time it can be dis charged In this case charge the battery pack first before use Wireless TV Battery pack 1 2 To charge the battery Battery pack Status LED Battery pack Charging and Maximum Usage time When using the battery pack ...

Страница 20: ...o use the Media Browser in the TV or vice versa FLASHBK Use this button to select the previous channel SURF See page 31 CH PAGE TV Changes the channel Media Browser Moves the list page by page VOL Use this button to adjust the volume MUTE Use this button to suppress the sound from the speaker Media handling buttons Used in the Media Browser MENU TV Adjusts the TV functions Media Browser Moves to t...

Страница 21: ...n status to your preference See page 32 Media Browser Arranges the list EZ AUDIO TV Adjust the audio status to your preference See page 35 Media Browser Selects multiple files Media Browser Starts the slide show Plays back the music file randomly Shows Hides the movie caption AUDIO Each time you press the button Mono Stereo SAP will be displayed sequentially See page 35 Media Browser Plays back th...

Страница 22: ...power to the wireless TV Connecting the electric power to the wireless transmission unit Connect the power as shown in the following figure to use the wireless TV Wireless TV DC adaptor Power cord Wireless transmission unit DC adaptor PO W ER Power cord Antenna cable ...

Страница 23: ...l a radio amplifier booster If you have difficulty in installing the antenna consult a specialized antenna dealer or the sales shop you purchased the antenna from Do not attach the wireless transmission unit to the wall If you find a mosaic pattern on the screen or the screen is not displayed properly due to poor network connection set the front side of the wireless transmission unit to face towar...

Страница 24: ...ice Wireless transmission unit Other TV 1 Connecting with RCA cables 2 Connecting with S Video cables 3 If you connect more than 2 TV sets the image quality may deteriorate Do not attach the wireless transmission unit to the wall If you find a mosaic pattern on the screen or the screen is not displayed properly due to poor network connection set the front side of the wireless transmission unit to ...

Страница 25: ... the wall Antenna cable Direct connection 1 Press the TV AV button on the remote control and select the Video Input Insert a tape into the video player and press the PLAY button 2 Do not attach the wireless transmission unit to the wall If you find a mosaic pattern on the screen or the screen is not displayed properly due to poor network connection set the front side of the wireless transmission u...

Страница 26: ...onnecting the wireless transmission unit to the external device To watch the cable TV you should subscribe to the local CATV broadcasting service provider and install the converter separately When connection with Composite Video When connecting with the antenna Press the TV AV button on the remote control and select Video Input 1 Select the channel you want using the converter remote control 2 How...

Страница 27: ...can occur depending on the network connections status Wireless transmission unit Front Necessary Connection Cables RCA cable Connect the connection port with the same color when connecting the wireless transmission unit to the external device Press the TV AV button on the remote control and select Video Input 1 Start the Video input device 2 How to use Rear view of other external device Camcorder ...

Страница 28: ...Media Browser 2 Press the TV MEDIA button on the remote control to watch TV Channel display Remaining battery amount display Press the button on the remote control to display the remaining battery amount Remaining battery display Media Browser Home screenshot 1 2 Move to the Watching TV menu using and buttons and press the button TV screenshot N A Image Description Battery is not inserted Very low...

Страница 29: ...age 3 1 2 Press the EXIT button to hide the menu screen Press the MENU button to move to the previous menu screen On screen Menus Language Selection The menus can be shown on the screen in the selected language 29 EXIT Input Caption Text Captions Sleep Timer Key Lock Language G G English FranÇais MENU Special ...

Страница 30: ... Scan 1 3 2 Memorizing all broadcasting channels Memorizing or clearing the specific channels 3 1 2 30 If the CATV channel is duplicated with the public TV the CATV channel will be selected Each time you press the number button 0 9 for channel selection CATV public channel selection will be toggled Press the or Exit button while running Ez Scan to stop channel setting Then the channel s scanned at...

Страница 31: ...avorite channel list You can set up to 6 channels that you prefer 1 3 2 Press the EXIT button to hide the menu screen Press the MENU button to move to the previous menu screen Setting Favorite Channels If you want to watch your favorite channels only press the SURF button Each time you press the button the selected favorite channel will be displayed sequentially 31 EXIT Ez Scan Manual Prog Favorit...

Страница 32: ...U button to move to the previous menu screen Press the button Select Picture Move to Contrast Move to Ez Video 1 3 2 3 1 2 Press the EZ VIDEO button Press the EZ VIDEO button to adjust the screen to your preference 32 EXIT Ez Video G G Contrast Brightness Color Sharpness Tint User Night Optimum Clear Soft MENU Picture EXIT Ez Video Contrast G G Brightness Color Sharpness Tint MENU Picture Contrast...

Страница 33: ...olor you want Press the EXITbutton to hide the menu screen Press the MENU button to move to the previous menu screen Press the button Select Picture Move to Color Move to Brightness 1 3 2 3 1 2 33 EXIT Ez Video Contrast Brightness G G Color Sharpness Tint MENU Picture Brightness 50 50 EXIT Ez Video Contrast Brightness Color G G Sharpness Tint MENU Picture Color 50 50 ...

Страница 34: ...Picture Adjust tint you want Press the EXIT button to hide the menu screen Press the MENU button to move to the previous menu screen Press the button Select Picture Move to Tint Move to Sharpness 1 3 2 3 1 2 34 EXIT Ez Video Contrast Brightness Color Sharpness G G Tint MENU Picture Sarpness 50 50 EXIT Ez Video Contrast Brightness Color Sharpness Tint G G MENU Picture Tint 0 0 ...

Страница 35: ...t accompanies the stereo program if the broadcaster transmits an additional sound signal as well as the original one Mono The primary language is heard from left and right speakers Signal mode is mono Stereo The primary language is heard from left and right speakers Signal mode is stereo SAP The secondary audio program is heard from left and right speakers Select Sound Move to Sound Select the sou...

Страница 36: ...e you want Move to Sound Press the button Select On or Off Select Sound Move to Sound Adjust the sound balance you want Press the button Select Sound Move to Balance Move to AVL 1 3 2 3 1 2 Press the EXIT button to hide the menu screen Press the MENU button to move to the previous menu screen EXIT Ez Audio Stereo Mode AVL G G Balance MENU Sound EXIT Ez Audio Stereo Mode AVL Balance G G MENU Sound ...

Страница 37: ...gram provided for the hearing impaired TEXT The term for the words that appear in a large black frame and almost cover the entire screen usually messages provided by the broadcaster Press the EXIT button to hide the menu screen Press the MENU button to move to the previous menu screen Press the TV AV button Each time you press the TV AV button the input sig nal will be changed sequen tially EXIT I...

Страница 38: ...3 2 Press the EXIT button to hide the menu screen Press the MENU button to move to the previous menu screen Press the CC button Use the CC button repeatedly to select Caption Off Mute or On Mute shows the selected captions option if available on program when the TV sound is muted 38 EXIT Input Caption Text Captions G G Sleep Timer Key Lock Language MENU Special On Mute Off ...

Страница 39: ...4 you can choose which signal you view CC 1 is usually the signal with the captions while Another mode might show demonstration or programming information Your TV might not receive caption signals normally in the following situations 1 Poor reception conditions are encountered IGNITION Picture may flutter drift suffer from black spots or horizontal streaking Usually caused by interference from aut...

Страница 40: ...utomatically turned off after the setting period of time Setting the key lock Disables the keypad on the TV 40 If you don t press the SLEEP button and wait for a while when the Sleep Timer is displayed on the screen the Sleep Timer display will disappear and the sleep reservation time will be set To check the remaining sleep reservation time after setting the Sleep Timer press the SLEEP button onc...

Страница 41: ... MPAA Select the ratings defined by the Motion Picture Association of America TV Rating Age Block Select the age rating Content Block Select the content rating Aux Block Set locking on the input source of the external devices connected to the TV set Canadian Select the ratings defined by the Canadian rating regulation You can set the locking status for the program audience ratings received from th...

Страница 42: ... restricted NC 17 and Above 18 years and older X adult If you set PG 13 and Above G and PG movies will be available PG 13 R NC 17 and X will be blocked For Television programs including made for TV movies General TV Ratings Unblocked TV G and Above general audience individual categories do not apply TV PG and Above parental guidance suggested TV 14 and Above 14 years and older TV MA mature audienc...

Страница 43: ...adaptor that is easy to configure or the wireless LAN card that runs in 802 11g only Setting method 1 1 Connect the power to the wireless TV Wireless TV DC power adaptor 2 Turn on the wireless TV Switch to the Media Browser by pressing TV MEDIA button SERVER FINDING or SEARCH FAILURE window will appear on the TV screen as shown in the figure Do not click the OK on the screen but take the following...

Страница 44: ...he User s Manual of the wireless LAN card or Access Point AP If you mix 11g and 11b when using the adaptor link speed will drop 3 When using the wireless LAN card Wireless LAN card Not included Computer Install the wireless LAN card driver files after installing it Once the driver is successfully installed go to step Setting the wireless network in the computer Computer When using the Access Point...

Страница 45: ...me Use the existing SSID network name without change or input new SSID nerwork name case sensitive to use e g LGMEDIA Set WEP key as Not in Use Setting Internet protocol TCP IP Set the Access Point AP IP address as 192 168 0 1 and subnet mask as 255 255 255 0 If Access Point AP provides the DHCP Server function activate it recommended Connect the Access Point AP to the computer using the Ethernet ...

Страница 46: ...ly option select Automatic If you select automatic network setting the IP Address Subnet mask and Gateway will not appear in the wireless TV No setting is required uIf you select the Use the following IP address option select Manual and set the fourth column of the IP Address different from the Access Point AP and the computer If you set the same address it will not run e g Wireless TV 192 198 0 1...

Страница 47: ...n the CD manually When installation is ready to proceed click the Next button Windows 98 Windows 98SE Windows ME Windows 2000 Windows XP Wireless LAN card should have the Access Point AP or NIC Network Interface Card that supports 802 11g Wireless LAN card should comply with Wi Fi OS CPU RAM Hard Disk USB Pentium III 600MHz or faster 128Mb or more 1Gb or more USB 2 0 support Wireless LAN card shou...

Страница 48: ...e 53 When the program is successfully installed the initial screen of Home Media will appear on the wireless TV The program icon will appear on the Windows Task Bar If you want to install the program at other folder click the Browse and specify the folder Installation of the Media Library is complete Click the Finish to complete installation Deleting the Media Library program 8 10 9 Select Click 1...

Страница 49: ...CH SERVER LIST window appears on the TV screen When the program is successfully installed as described above the initial screen of Home Media will appear on the wireless TV The IP address of the computer installed with the Media Browser will be displayed on the Select Media Server window If it matches with the computer s IP Address press the button If not find the matching IP Address using the and...

Страница 50: ...he OK using the remote control button The Setting window will appear The setting details are as follows 1 SSID network name LGMEDIA 2 WEP key Not In Use 3 Operation mode ad hoc 4 Internet Protocol TCP IP Obtain an IP address automatically To change the settings take the following steps For your reference the computer should have been turned on and the wireless LAN card or the Access Point AP also ...

Страница 51: ...Move to the Network section using the and button on the remote control Select whether you want to set the IP Address automatically or manually Select Automatic if you select the Obtain an IP address automatically option for IP Address setting in the computer Otherwise manual setting input IP Address Subnet Mask and Gateway using the number buttons on the remote control Set the fourth column of the...

Страница 52: ... button The Home screen of the Media Browser will appear and setting will be completed When Media Library installation is complete run LG Media Library Agent Then the Select Network Interface window will appear Specify the wireless LAN card adaptor you have installed Run LG Media Library Agent Specify the wireless LAN card or Access Point AP and click the Select Share the folder to share when the ...

Страница 53: ... is started the Media Library icon will be activated in the Windows Task Bar Click with the right mouse button to start the Media Library Manager 2 2 5 3 1 4 Menu selection button Picture Manages picture file share folder Music Manages music file share folder Movie Manages movie file share folder Playlist Manages the playlist See page 57 Windows Explorer You can find the folder to add to the Share...

Страница 54: ...g the HOME Home Media button on the remote control 1 2 3 4 5 Home Media screen Viewings the images in the folder The wireless TV supports the following picture file formats Supported format jpeg jpg Select the image to view using the movement buttons on the remote control Selection button Press the STOP button or EXIT button to move back to the picture list Movement buttons Play back the music fil...

Страница 55: ...STOP or EXIT button to return to the View Picture List screen Hide Hides the status bar at the bottom Select the button repetitively to show the status bar again Select the image to view using the MARK button To select consecutive files at a time Click at the beginning of the selected pictures Click at the end of the selected pictures Press the Start Slide Show button If you press this button when...

Страница 56: ...ontrol to move to the upper folder Page Up You can move up down the list by page using the CH PAGE Down button on the remote control Arrange List You can arrange the name of the folder or picture files by ascending descending order using the EZ VIDEO button on the remote control Back to You can move to the home screen using the HOME Home Media button on the remote control 1 2 3 4 Playing back the ...

Страница 57: ...yback of the current music file PAUSE Press the PAUSE button to temporarily stop music playback To resume playback press the PLAY button Repeat Clear Press the AUDIO button to play back several music files in the playlist or selected file repetitively For repeated playback Random Clear Press the button to play back the music files randomly For random playback At the wireless TV At your computer 57...

Страница 58: ...st by default You can add the contents of the selected playlist to the currently edited playlist Select a folder in the Shared folder Then the music file list will be displayed at the bottom section No folder will appear if no folder is shared in the Music menu If the folder is not shared click the File Search button and select the folder to share You can add the music files in the Shared folder o...

Страница 59: ...y the Media Server See page 53 Sharing files in the Media Server Moving up Select the icon using the movement buttons on the remote control to move to the upper folder Page Up Down You can move up down the list by page using the CH PAGE button on the remote control Arrange List You can arrange the name of the folder or movie files by ascending descending order using the EZ VIDEO button on the remo...

Страница 60: ...ton to temporarily stop playback To resume playback press the PLAY button Moves the playback position of the current movie file forward or backward by certain interval FF Moves forward as much as 2 of the entire file playback length based on 1 hour REWIND Moves backward as much as 2 of the entire file playback length based on 1 hour Movement position can differ according to the file size Not avail...

Страница 61: ...etting Not in Use WEP key will not be used 64bit 128bit If you apply 64 bits or 128 bits and press the button the virtual keyboard screen 5 1 will appear and lets you enter the password Sets the IP Address Subnet Mask and Gateway Manual You should manually input IP Address Subnet mask and Gateway value Automatic IP Address Subnet mask and Gateway value will be automatically filled in by the DHCP s...

Страница 62: ...late depending on the network status Check the program of other broadcasting service provider Press the Volume Up button among Volume Up Down button Check whether there is any obstacle between remote control and wireless TV Check whether the battery is inserted with correct polarity The battery can be used up Replace two batteries with new one Page 20 Caused by strong electromagnetic interference ...

Страница 63: ...htness is automatically adjusted for power saving If the DC adaptor is connected the previous set ting will be restored Take the following measures Q A A A A A A A A Screen brightness is adjusted twice at the time of automatic screen adjustment It is not a malfunction A Adjust the volume Check whether the Mute function is set in the Volume setting menu If no sound is heard from the headset check w...

Страница 64: ... is set on in the power saving mode of the computer Check the wireless Access Point AP setting If the SSID network name is in the hiding mode it cannot be used Q A A A A A A A A Check whether the SSID network name in Select Network of the wireless TV setting is identical to that of the computer wireless network If it is different set the SSID network name of the wireless TV as that of the computer...

Страница 65: ...ireless TV and computer is too far away Reception sensitivity differs according to the direction of the wireless TV and wireless transmission unit Turn the front side of the wireless transmission unit towards the wireless TV Reception sensitivity of the wireless TV also depends on the direction Find the optimal direction and location inside the house and install the wireless TV Do not attach the w...

Страница 66: ...Size Width x Length x Height Weight excluding package Wireless TV 4 0 Kg Wireless Transmission Unit 1 6 Kg 15 LCD Panel NTSC VHF 2 13 channels UHF 14 69 channels CATV 01 125 channels S Video Video TV Wireless TV DC 16V 3 0A Wireless Transmission Unit DC 16V 1 0A Wireless TV 40W Wireless Transmission Unit 15W 75Ω 1 5W 1 5W See pages 23 27 Battery 0 4 Kg Wireless TV 4 0 Kg Mounting type stand 1 0 Kg...

Страница 67: ...67 MEMO ...

Страница 68: ......

Отзывы: