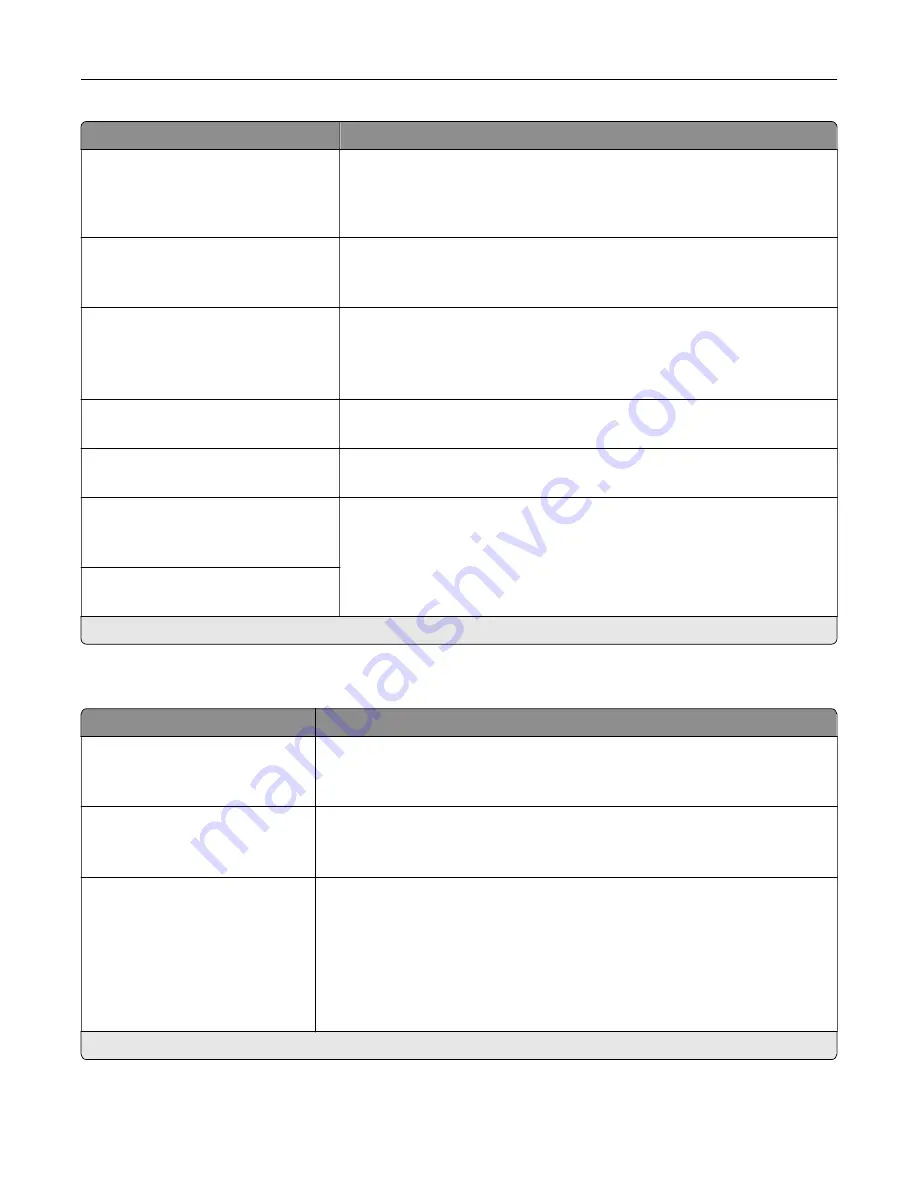
Menu item
Description
Auto CR after LF
On
Off*
Set the printer to perform a carriage return after a line feed control
command.
Note:
Carriage return is a mechanism that commands the printer to move
the position of the cursor to the first position on the same line.
Auto LF after CR
On
Off*
Set the printer to perform a line feed after a carriage return control
command.
Tray Renumber
Assign Tray [x]
Assign Manual Paper
Assign Manual Envelope
Configure the printer to work with a different print driver or custom
application that uses a different set of source assignments to request a
given paper source.
Tray Renumber
View Factory Defaults
Show the factory default value assigned for each paper source.
Tray Renumber
Restore Defaults
Restore the tray renumber values to their factory defaults.
Print Timeout
Disabled
Enabled*
Set the printer to end a print job after it has been idle for the specified
amount of time in seconds.
Note:
Print Timeout Time appears only when Print Timeout is enabled.
Print Timeout Time
1–255 (90*)
Note:
An asterisk (*) next to a value indicates the factory default setting.
Image
Menu item
Description
Auto Fit
On
Off*
Select the best available paper size and orientation setting for an image.
Note:
When set to On, this menu item overrides the scaling and orientation
settings for the image.
Invert
Off*
On
Invert bitonal monochrome images.
Note:
This menu item does not apply to GIF or JPEG image formats.
Scaling
Anchor Top Left
Best Fit*
Anchor Center
Fit Height/Width
Fit Height
Fit Width
Adjust the image to fit the printable area.
Note:
When Auto Fit is set to On, Scaling is automatically set to Best Fit.
Note:
An asterisk (*) next to a value indicates the factory default setting.
Use printer menus
92
Содержание XC2326
Страница 145: ...5 Insert the new print cartridge 6 Insert the print cartridge tray and then close the door Maintain the printer 145 ...
Страница 148: ...4 Insert the new manual feeder 5 Insert the tray Replacing the ADF tray 1 Open the ADF cover Maintain the printer 148 ...
Страница 149: ...2 Remove the used ADF tray 3 Unpack the new ADF tray Maintain the printer 149 ...
Страница 156: ...4 Insert the new separator pad until it clicks into place 5 Close the ADF cover Maintain the printer 156 ...
Страница 205: ...2 Lower the scanner Troubleshoot a problem 205 ...
Страница 208: ... Below the fuser area Duplex unit 3 Close the door Troubleshoot a problem 208 ...
Страница 254: ...Wi Fi Protected Setup wireless network 50 Index 254 ...


