Lexmark X54 Series Скачать руководство пользователя страница 4

Ordering supplies

To order supplies in the U.S., contact Lexmark at 1-800-539-6275 for information about Lexmark authorized supplies

dealers in your area. In other countries or regions, visit the Lexmark Web Site at www.lexmark.com or contact the place

where you purchased the printer.

Note: All life estimates for printer supplies assume printing on letter- or A4-size plain paper.

Ordering toner cartridges

When 

88 Cyan Cartridge Low

88 Magenta Cartridge Low

88 Yellow Cartridge Low

, or 

88

Black Cartridge low

 appears, order a new cartridge.

When 

88 Replace Cyan Cartridge

88 Replace Magenta Cartridge

88 Replace Yellow

Cartridge

, or 

88 Replace Black Cartridge

 appears, you must replace the specified toner cartridge.
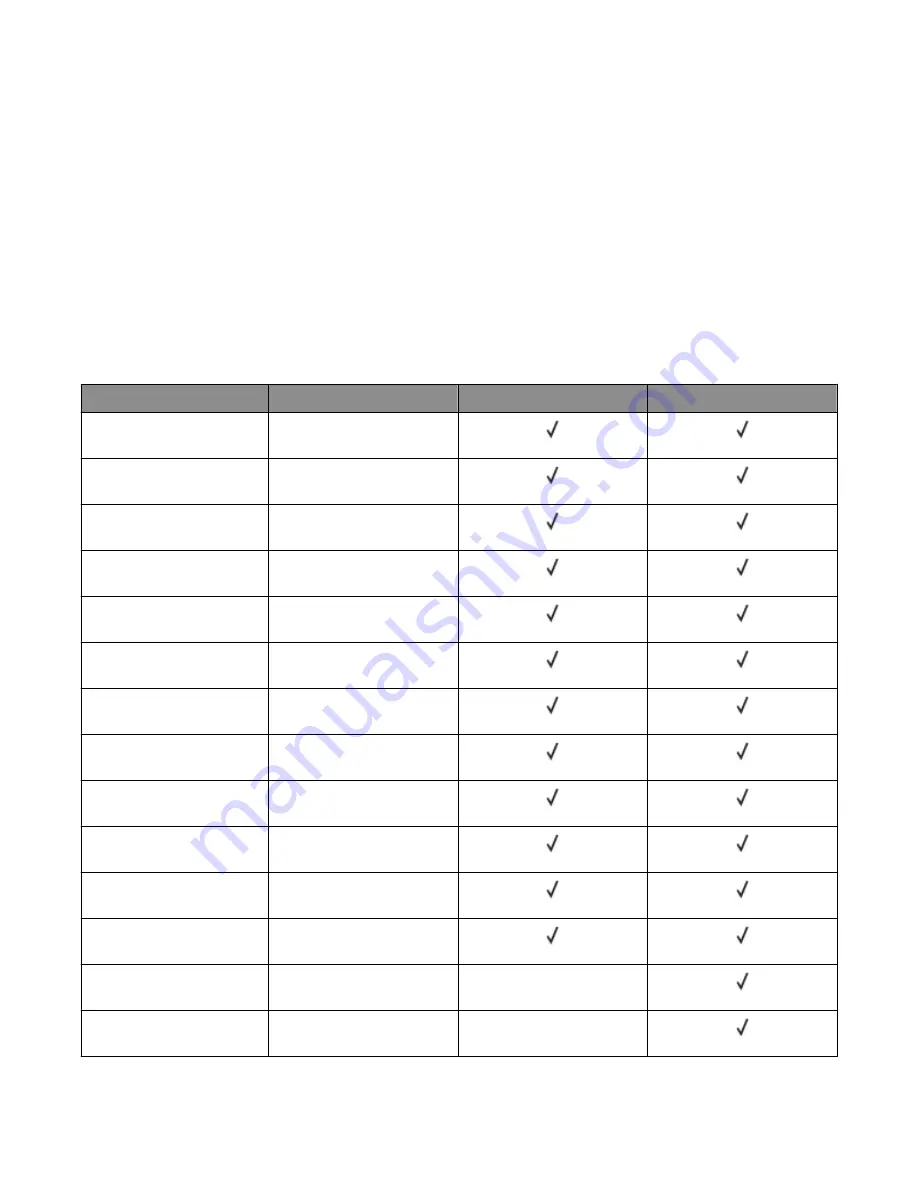
Part name

Part number

C540, C543, and X543 series C544, X544, and X546 series

Black Return Program Toner

Cartridge

C540A1KG

Cyan Return Program Toner

Cartridge

C540A1CG

Magenta Return Program

Toner Cartridge

C540A1MG

Yellow Return Program Toner

Cartridge

C540A1YG

Black High Yield Return

Program Toner Cartridge

C540H1KG

Cyan High Yield Return

Program Toner Cartridge

C540H1CG

Magenta High Yield Return

Program Toner Cartridge

C540H1MG

Yellow High Yield Return

Program Toner Cartridge

C540H1YG

Black High Yield Toner

Cartridge

C540H2KG

Cyan High Yield Toner

Cartridge

C540H2CG

Magenta High Yield Toner

Cartridge

C540H2MG

Yellow High Yield Toner

Cartridge

C540H2YG

Black Extra High Yield Return

Program Toner Cartridge

C544X1KG

Not supported

Cyan Extra High Yield Return

Program Toner Cartridge

C544X1CG

Not supported

Maintaining the printer

4

Содержание X54 Series

Страница 1: ...X54x Series Maintenance Guide August 2009 www lexmark com...

Страница 2: ...dges 4 Ordering imaging kits 5 Ordering a waste toner bottle 5 Replacing supplies 6 Replacing the waste toner bottle 6 Replacing a black imaging kit 9 Replacing a black and color imaging kit 15 Replac...

Страница 3: ...printer control panel You can check the status of printer supplies by printing a menu settings page 1 Make sure the printer is on and Ready appears 2 From the printer control panel press 3 Press the a...

Страница 4: ...lace the specified toner cartridge Part name Part number C540 C543 and X543 series C544 X544 and X546 series Black Return Program Toner Cartridge C540A1KG Cyan Return Program Toner Cartridge C540A1CG...

Страница 5: ...Cartridge C544X2YG Not supported Black Extra High Yield Return Program Toner Cartridge C546U1KG Not supported Black Extra High Yield Toner Cartridge C546U2KG Not supported Ordering imaging kits When...

Страница 6: ...g until the waste toner bottle is replaced 1 Unpack the replacement waste toner bottle 2 Grasp the front door at the side handholds and then pull it toward you CAUTION HOT SURFACE The inside of the pr...

Страница 7: ...ht side cover 5 Press the green levers on each side of the waste toner bottle and then remove it 6 Place the waste toner bottle in the enclosed packaging 7 Insert the new waste toner bottle Maintainin...

Страница 8: ...8 Replace the right side cover 9 Close the top door 10 Close the front door Maintaining the printer 8...

Страница 9: ...ng Kit appears 1 Grasp the front door at the side handholds and then pull it toward you CAUTION HOT SURFACE The inside of the printer might be hot To reduce the risk of injury from a hot component all...

Страница 10: ...rtridges by lifting the handles and then gently pulling away from the imaging kit 4 Remove the right side cover 5 Press the green levers on each side of the waste toner bottle and then remove it Maint...

Страница 11: ...l the imaging kit out Warning Potential Damage Do not touch the underside of the imaging kit This could damage the imaging kit 8 Remove the yellow cyan and magenta developer units 9 Unpack the replace...

Страница 12: ...unit 12 Insert the black developer unit 13 Replace the yellow cyan and magenta developer units Note Make sure each developer unit is inserted into a matching color slot 14 Place the used black imagin...

Страница 13: ...15 Align and insert the imaging kit 16 Rotate the blue levers down until the imaging kit drops into place 17 Replace the waste toner bottle Maintaining the printer 13...

Страница 14: ...18 Replace the right side cover 19 Replace the toner cartridges 20 Close the top door Maintaining the printer 14...

Страница 15: ...t when Replace Color Imaging Kit appears 1 Grasp the front door at the side handholds and then pull it toward you to open it CAUTION HOT SURFACE The inside of the printer might be hot To reduce the ri...

Страница 16: ...2 Open the top door 3 Remove the toner cartridges by lifting the handles and then gently pulling away from the imaging kit 4 Remove the right side cover Maintaining the printer 16...

Страница 17: ...s grasp the green handles on the sides and then pull the imaging kit out Warning Potential Damage Do not touch the underside of the imaging kit This could damage the imaging kit 8 Unpack the replaceme...

Страница 18: ...e yellow cyan magenta and black developer units 11 Insert the yellow cyan magenta and black developer units 12 Place the used black and color imaging kit in the enclosed package 13 Align and insert th...

Страница 19: ...14 Replace the waste toner bottle 15 Replace the right side cover Maintaining the printer 19...

Страница 20: ...16 Replace the toner cartridges 17 Close the top door 18 Close the front door Maintaining the printer 20...

Страница 21: ...amage caused by use of a non Lexmark toner cartridge is not covered under warranty Note Degraded print quality may result from using non Lexmark toner cartridges 1 Make sure the printer is on and Read...

Страница 22: ...developer unit when a print quality defect occurs or when damage occurs to the printer 1 Grasp the front door at the side handholds and then pull it toward you to open it CAUTION HOT SURFACE The insid...

Страница 23: ...2 Open the top door 3 Remove the toner cartridges by lifting the handles and then gently pulling away from the imaging kit Maintaining the printer 23...

Страница 24: ...ove it 6 Lift the blue levers on the imaging kit and then pull it toward you 7 Press down on the blue levers grasp the handles on the sides and then pull the imaging kit out Warning Potential Damage D...

Страница 25: ...developer in the enclosed package 10 Unpack the replacement developer unit Leave the packaging on the developer unit 11 Gently shake the developer unit side to side 12 Remove the red shipping cover f...

Страница 26: ...13 Insert the developer unit 14 Align and insert the imaging kit Maintaining the printer 26...

Страница 27: ...15 Replace the waste toner bottle 16 Replace the right side cover 17 Replace the toner cartridges Maintaining the printer 27...

Страница 28: ...les from the printer before proceeding 2 Remove paper from the standard exit tray 3 Dampen a clean lint free cloth with water Warning Potential Damage Do not use household cleaners or detergents as th...

Страница 29: ...lass until it is clean and dry 4 Wipe the white underside of the scanner cover until it is clean and dry 5 Close the scanner cover Moving the printer Before moving the printer CAUTION POTENTIAL INJURY...

Страница 30: ...o another location The printer and options can be safely moved to another location by following these precautions Any cart used to move the printer must have a surface able to support the full footpri...

Отзывы: