8
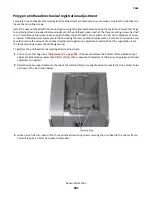
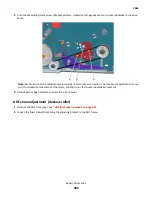
If the printer does not meet the skew specifications, adjust the reference edge as specified in
“Media aligner roller
adjustment” on page 279
.
9
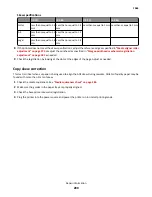
Adjust the scanner registration manually as needed in the Configuration menu. See
“Configuration menu” on
page 247
.
Removal procedures
Keep the following tips in mind as you replace parts:
•
Some removal procedures require removing cable ties. You must replace cable ties during reassembly to avoid
pinching wires, obstructing the paper path, or restricting mechanical movement.
•
Remove the toner cartridges, imaging unit, and media tray before removing other printer parts. The imaging unit
should be carefully set on a clean, smooth, and flat surface. It should also be protected from light while out of the
device.
•
Disconnect all external cables from the printer to prevent possible damage during service.
•
Unless otherwise stated, reinstall the parts in reverse order of removal.
•
When reinstalling a part held with several screws, start all screws before the final tightening.
Base printer - cover removals
•
“Column left front cover removal (MX81x)” on page 291
•
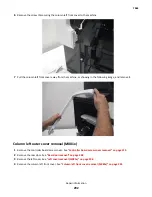
“Column left outer cover removal (MX81x)” on page 292
•
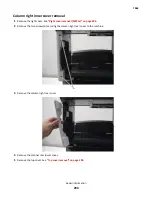
“Column right inner cover removal” on page 294
•
“Column right outer cover removal” on page 295
•
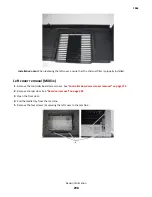
“Left cover removal (MX71x)” on page 296
•
“Left cover removal (MX81x)” on page 298
•
“Left inner cover removal” on page 300
•
“Rear door removal” on page 302
•
“Rear lower cover removal” on page 304
•
“Rear lower door removal (MX81x)” on page 305
•
“Right cover removal (MX71x)” on page 306
•
“Right cover removal (MX81x)” on page 307
•
“Right inner cover removal (MX71x)” on page 308
•
“Top cover removal” on page 309
Column left front cover removal (MX81x)
1
Remove the controller board access cover. See
“Controller board access cover removal” on page 373
.
2
Remove the rear door. See
“Rear door removal” on page 302
.
3
Remove the left cover. See
“Left cover removal (MX81x)” on page 298
.
4
Open the front door.
5
Open the cartridge door.
7463
Repair information
291
Содержание MX71 series
Страница 2: ...October 18 2012 www lexmark com ...
Страница 3: ......
Страница 22: ...7463 Table of contents 20 ...
Страница 30: ...7463 28 ...
Страница 36: ...7463 34 ...
Страница 305: ...3 Remove the support strap 4 Slide the rear door away from the machine and remove it 7463 Repair information 303 ...
Страница 343: ...3 Loosen the two fuser thumbscrews A 4 Gently pull the fuser and remove it from the machine 7463 Repair information 341 ...
Страница 350: ...16 Detach the two springs from the machine 17 Remove the cartridge door 7463 Repair information 348 ...
Страница 370: ...4 Remove the two screws A securing the right frame extension to the machine 7463 Repair information 368 ...
Страница 383: ...6 Remove the five screws A 7 Remove the PCBA housing 7463 Repair information 381 ...
Страница 406: ...10 Remove the seven screws B securing the control panel to the machine 7463 Repair information 404 ...
Страница 407: ...11 Disconnect the three cables C from the controller board 12 Remove the control panel 7463 Repair information 405 ...
Страница 412: ...14 Remove the five screws C 15 Disconnect the five cables D 7463 Repair information 410 ...
Страница 426: ...4 Gently press the hinge inward to release it from the machine 5 Remove the tilting display 7463 Repair information 424 ...
Страница 439: ...11 Remove the scanner CCD 7463 Repair information 437 ...
Страница 450: ...7 Remove the ADF left hinge B ADF left lower cover removal 1 Open the ADF top door 7463 Repair information 448 ...
Страница 457: ...2 Remove the four screws A securing the ADF rear cover 3 Remove the ADF rear cover 7463 Repair information 455 ...
Страница 461: ...3 Remove the ADF separation guide B ADF separator roller removal 1 Open the ADF top cover 7463 Repair information 459 ...
Страница 485: ...Flatbed glass cushion removal 1 Open the ADF 2 Remove the flatbed glass cushion 7463 Repair information 483 ...
Страница 493: ...12 Remove the tension belt E 13 Remove the two c clips F 14 Remove the two gears G 7463 Repair information 491 ...
Страница 495: ...8 Remove the three screws C at the left side 9 Remove the three screws D at the right side 7463 Repair information 493 ...
Страница 525: ...4 Remove the two screws C from the rear side of the cover 5 Remove the left cover 7463 Repair information 523 ...
Страница 530: ...4 Remove the ground screw A 5 Remove the 11 screws B then remove the top cover 7463 Repair information 528 ...
Страница 532: ...4 Remove the other four screws C from the front side of the frame 7463 Repair information 530 ...
Страница 536: ...5 Release the latches A holding the sensor to the media feeder 7463 Repair information 534 ...
Страница 565: ...4 Remove the ground screw A 5 Remove the 11 screws B then remove the top cover 7463 Repair information 563 ...
Страница 567: ...4 Remove the other four screws C from the front side of the frame 7463 Repair information 565 ...
Страница 571: ...5 Release the latches A holding the sensor to the media feeder 7463 Repair information 569 ...
Страница 579: ...2 Remove the two screws C then remove the left cover 7463 Repair information 577 ...
Страница 585: ...6 Ease the media stack flap off the stapler assembly 7463 Repair information 583 ...
Страница 598: ...2 Remove the two screws C then remove the right cover 7463 Repair information 596 ...
Страница 605: ...2 Position the rear door at the angle shown and pull the door off the mailbox 7463 Repair information 603 ...
Страница 617: ...4 Remove the two screws B using a 1 Phillips screwdriver then remove the divert motor 7463 Repair information 615 ...
Страница 627: ...8 Disconnect the two cables D and remove the output bin LED assembly 7463 Repair information 625 ...
Страница 628: ...7463 626 ...
Страница 644: ...7463 642 ...
Страница 654: ...7463 Parts catalog 652 ...
Страница 655: ...Assembly 1 Covers MX71x 7463 Parts catalog 653 ...
Страница 657: ...Assembly 2 Covers MX81x 7463 Parts catalog 655 ...
Страница 660: ...7463 Parts catalog 658 ...
Страница 661: ...Assembly 3 Paper path 7463 Parts catalog 659 ...
Страница 663: ...Assembly 4 Fusers 7463 Parts catalog 661 ...
Страница 665: ...Assembly 5 Electronics 7463 Parts catalog 663 ...
Страница 668: ...7463 Parts catalog 666 ...
Страница 669: ...Assembly 6 Drive motors 7463 Parts catalog 667 ...
Страница 671: ...Assembly 7 Frame 7463 Parts catalog 669 ...
Страница 673: ...Assembly 8 Control panel MX71x 7463 Parts catalog 671 ...
Страница 676: ...7463 Parts catalog 674 ...
Страница 677: ...Assembly 9 Control panel 10 inch display MX81x 7463 Parts catalog 675 ...
Страница 679: ...Assembly 10 Paper tray 7463 Parts catalog 677 ...
Страница 681: ...Assembly 11 ADF assembly 7463 Parts catalog 679 ...
Страница 683: ...Assembly 12 ADF covers 7463 Parts catalog 681 ...
Страница 686: ...7463 Parts catalog 684 ...
Страница 687: ...Assembly 13 ADF mechanical 7463 Parts catalog 685 ...
Страница 689: ...Assembly 14 ADF electronics 7463 Parts catalog 687 ...
Страница 692: ...7463 Parts catalog 690 ...
Страница 693: ...Assembly 15 Flatbed scanner MX710 and MX711 7463 Parts catalog 691 ...
Страница 696: ...7463 Parts catalog 694 ...
Страница 697: ...Assembly 16 Flatbed scanner MX810 MX811 and MX812 7463 Parts catalog 695 ...
Страница 699: ...Assembly 17 Input options MX710 and MX711 7463 Parts catalog 697 ...
Страница 701: ...Assembly 18 Input options MX810 MX811 and MX812 7463 Parts catalog 699 ...
Страница 703: ...Assembly 19 250 sheet tray option MX710 and MX711 7463 Parts catalog 701 ...
Страница 705: ...Assembly 20 550 sheet tray option MX710 and MX711 7463 Parts catalog 703 ...
Страница 707: ...Assembly 21 550 sheet tray option MX810 MX811 MX812 7463 Parts catalog 705 ...
Страница 709: ...Assembly 22 High capacity input tray option 1 MX710 and MX711 7463 Parts catalog 707 ...
Страница 711: ...Assembly 23 High capacity input tray option 2 MX710 and MX711 7463 Parts catalog 709 ...
Страница 713: ...Assembly 24 High capacity input tray option 3 MX810 MX811 MX812 7463 Parts catalog 711 ...
Страница 715: ...Assembly 25 High capacity input tray option 4 MX810 MX811 MX812 7463 Parts catalog 713 ...
Страница 717: ...Assembly 26 Output options MX810 MX811 and MX812 7463 Parts catalog 715 ...
Страница 719: ...Assembly 27 Staple finisher option 1 7463 Parts catalog 717 ...
Страница 721: ...Assembly 28 Staple finisher option 2 7463 Parts catalog 719 ...
Страница 723: ...Assembly 29 Mailbox option 1 7463 Parts catalog 721 ...
Страница 725: ...Assembly 30 Mailbox option 2 7463 Parts catalog 723 ...
Страница 727: ...Assembly 31 Offset stacker option 1 7463 Parts catalog 725 ...
Страница 729: ...Assembly 32 Offset stacker option 2 7463 Parts catalog 727 ...
Страница 734: ...7463 732 ...
Страница 740: ...7463 738 ...
Страница 744: ...Models MX81x and MX71x paper path rollers and sensors 7463 Appendix C Theory of operation 742 ...
Страница 754: ...Sensors 7463 Appendix C Theory of operation 752 ...
Страница 763: ...ADF components ADF electronic components 7463 Appendix C Theory of operation 761 ...
Страница 772: ...7463 770 ...


